Git 版本控制管理(二)
Git 分支管理
1. 概念
我们来抽象的理解,分支就是科幻电影里面的平行宇宙,当你正在电脑前努力学习Git的时候,另一个你正在另一个平行宇宙里努力学习SVN。如果两个平行宇宙互不干扰,那对现在的你也没啥影响。不过,在某个时间点,两个平行宇宙合并了,结果,你既学会了git又学会了SVN!
那么分支在实际中有什么用呢?假设你准备开发一个新功能,但是需要两周才能完成,第一周你写了50%的代码,如果立刻提交,由于代码还没写完,不完整的代码库会导致别人不能干活了。如果等代码全部写完再一次提交,又存在丢失每天进度的巨大风险。
现在有了分支,就不用怕了。你创建了一个属于你自己的分支,别人看不到,还继续在原来的分支上正常工作,而你在自己的分支上干活,想提交就提交,直到开发完毕后,再一次性合并到原来的分支上,这样,既安全,又不影响别人工作。
2.创建与合并分支
git把我们之前每次提交的版本串成一条时间线,这条时间线就是一个分支。截止到目前只有一条时间线,在git里,这个分支叫主分支,即master分支。HEAD严格来说不是指向提交,而是指向master,master才是指向提交的,所以,HEAD指向的就是当前分支。
1) 一开始的时候,master分支是一条线,git用master指向最新的提交,再用HEAD指向master,就能确定当前分支,以及当前分支的提交点:

每次提交,master分支都会向前移动一步,这样,随着你不断提交,master分支的线也越来越长。
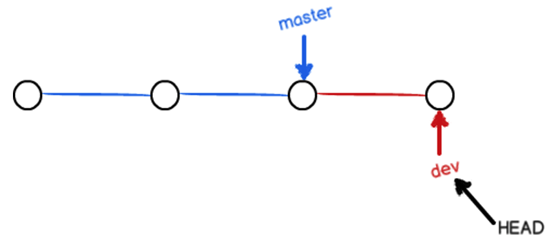
2)当我们创建新的分支,例如dev时,git新建了一个指针叫dev,指向master相同的提交,再把HEAD指向dev,就表示当前分支在dev上:

git创建一个分支很快,因为除了增加一个dev指针,改变HEAD的指向,工作区的文件都没有任何变化。
3)不过,从现在开始,对工作区的修改和提交就是针对dev分支了,比如新提交一次后,dev指针往前移动一步,而master指针不变:
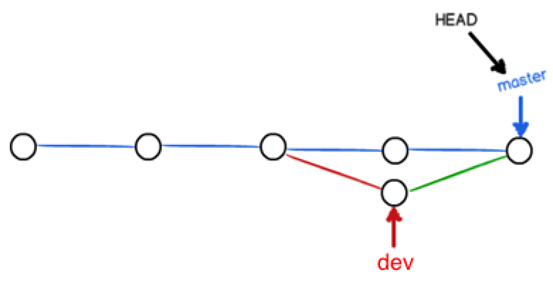
4)假如我们在dev上的工作完成了,就可以把dev合并到master上。git怎么合并呢?最简单的方法,就是直接把master指向dev的当前提交,就完成了合并:
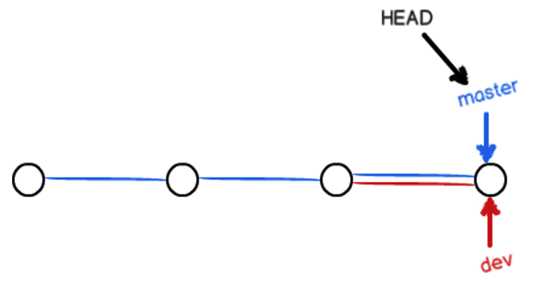
git合并分支也很快,就改改指针,工作区内容也不变。
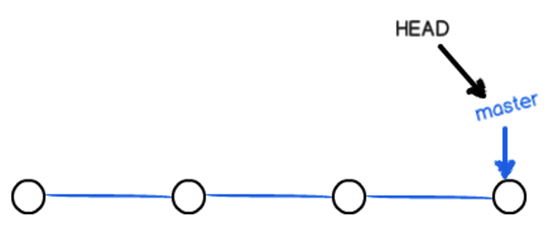
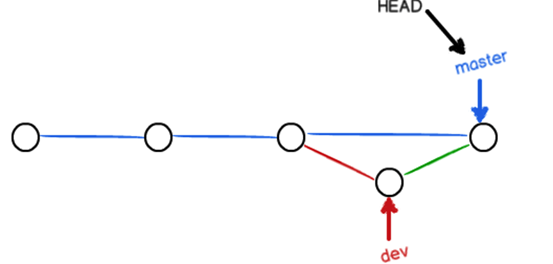
5)合并完分支后,甚至可以删除dev分支。删除dev分支就是把dev指针给删掉,删掉后,我们就剩下了一条master分支:
实战案例演示:
执行如下命令可以查看当前有几个分支,并且看到在哪个分支下工作
[root@kai git_test]# git branch

* master

[root@kai git_test]#
下面创建一个分支dev并切换到其上进行工作。
[root@kai git_test]# git branch

* master

[root@kai git_test]# git checkout -b dev

Switched to a new branch 'dev'

[root@kai git_test]# git branch

* dev

  master

[root@kai git_test]#

下面我们修改code.txt内容,在里面添加一行,并进行提交。
[root@kai git_test]# echo "add one line" >> code.txt

[root@kai git_test]# cat code.txt

this is the first line

this is the second line

this is the third line

this is the forth line

add one line

[root@kai git_test]# git add code.txt

[root@kai git_test]# git commit -m "dev_branch_submit"

[dev b63902b] dev_branch_submit

 1 file changed, 1 insertion(+)

[root@kai git_test]#

dev分支的工作完成,我们就可以切换回master分支:
[root@kai git_test]# git commit -m "dev_branch_submit"

[dev b63902b] dev_branch_submit

 1 file changed, 1 insertion(+)

[root@kai git_test]# git checkout master

Switched to branch 'master'

[root@kai git_test]# git branch

  dev

* master

[root@kai git_test]#

master分支查看code.txt,发现添加的内容没有了。因为那个提交是在dev分支上,而master分支此刻的提交点并没有变:
[root@kai git_test]# cat code.txt

this is the first line

this is the second line

this is the third line

this is the forth line

[root@kai git_test]#
现在,我们把dev分支的工作成果合并到master分支上:
[root@kai git_test]# git merge dev

Updating f25e944..b63902b

Fast-forward

 code.txt | 1 +

 1 file changed, 1 insertion(+)

[root@kai git_test]# cat code.txt

this is the first line

this is the second line

this is the third line

this is the forth line

add one line

[root@kai git_test]#

注意到上面的Fast-forward信息,Git告诉我们,这次合并是“快进模式”,也就是直接把master指向dev的当前提交,所以合并速度非常快。
合并完成后,就可以放心地删除dev分支了,删除后,查看branch,就只剩下master分支了。
[root@kai git_test]# git branch -d dev

Deleted branch dev (was b63902b).

[root@kai git_test]# git branch

* master

[root@kai git_test]#

小结:
查看分支:git branch
创建分支:git branch <name>
切换分支:git checkout <name>
创建+切换分支:git checkout -b <name>
合并某分支到当前分支:git merge <name>
删除分支:git branch -d <name>
3. 解决冲突
合并分支往往也不是一帆风顺的。
再创建并切换一个新分支dev,修改code.txt内容,并进行提交。
[root@kai git_test]# git checkout -b dev

Switched to a new branch 'dev'

[root@kai git_test]# git branch

* dev

  master

[root@kai git_test]# echo "add two line" >> code.txt

[root@kai git_test]# cat code.txt

this is the first line

this is the second line

this is the third line

this is the forth line

add one line

add two line

[root@kai git_test]# git add code.txt

[root@kai git_test]# git commit -m "dev_branch_submit"

[dev 7da47b4] dev_branch_submit

 1 file changed, 1 insertion(+)

[root@kai git_test]#
切换回master分支,在master的code.txt添加一行内容并进行提交。
[root@kai git_test]# git checkout master

Switched to branch 'master'

[root@kai git_test]# echo "add two line in master" >> code.txt

[root@kai git_test]# cat code.txt

this is the first line

this is the second line

this is the third line

this is the forth line

add one line

add two line in master

[root@kai git_test]# git add code.txt

[root@kai git_test]# git commit -m "matser_branch_submit"

[master e57c158] matser_branch_submit

 1 file changed, 1 insertion(+)

[root@kai git_test]#
现在,master分支和dev分支各自都分别有新的提交,变成了这个样子:
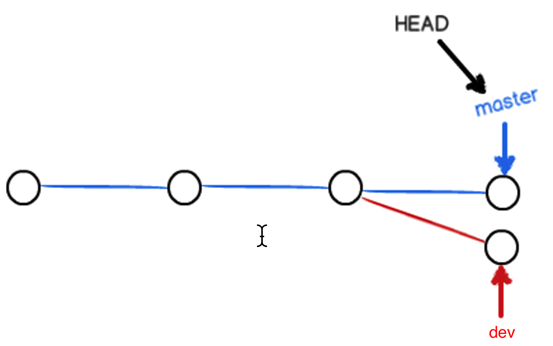
这种情况下,git无法执行“快速合并”,只能试图把各自的修改合并起来,但这种合并就可能会有冲突。
执行如下命令尝试将dev分支合并到master分支上来。
[root@kai git_test]# git merge dev

Auto-merging code.txt

CONFLICT (content): Merge conflict in code.txt

Automatic merge failed; fix conflicts and then commit the result.

[root@kai git_test]#
git告诉我们,code.txt文件存在冲突,必须手动解决冲突后再提交。
git status也可以告诉我们冲突的文件:
[root@kai git_test]# git status

# On branch master

# You have unmerged paths.

#   (fix conflicts and run "git commit")

#

# Unmerged paths:

#   (use "git add <file>..." to mark resolution)

#

#	both modified:      code.txt

#

no changes added to commit (use "git add" and/or "git commit -a")

[root@kai git_test]#
查看code.txt的内容。
[root@kai git_test]# cat code.txt

this is the first line

this is the second line

this is the third line

this is the forth line

add one line

<<<<<<< HEAD

add two line in master

=======

add two line

>>>>>>> dev

[root@kai git_test]#
git用<<<<<<<,=======,>>>>>>>标记出不同分支的内容,我们修改如下后保存,再次提交:
[root@kai git_test]# cat code.txt

this is the first line

this is the second line

this is the third line

this is the forth line

add one line

add two line in master

add two line

[root@kai git_test]# git add code.txt

[root@kai git_test]# git commit -m "resolve_the_conflict"

[master b46a32f] resolve_the_conflict

[root@kai git_test]#
现在,master分支和dev分支变成了下图所示:
用带参数的git log也可以看到分支的合并情况:
[root@kai git_test]# git commit -m "resolve_the_conflict"

[master b46a32f] resolve_the_conflict

[root@kai git_test]# git log --graph --pretty=oneline

*   b46a32ff94fb7cf4b61ce9af466c5433b0469fb2 resolve_the_conflict

|\

| * 7da47b4af8476b1c42b03bf04b7d3f103b16da0d dev_branch_submit

* | e57c158c60697955a4179ab87244957967419f70 matser_branch_submit

|/

* b63902b3874dd3e0a3e0b1ae3e0eb0f30cd616d4 dev_branch_submit

* f25e944f3e23532ecc3d2837c32057826920474b delete_code2.txt

* 66a9c996749285bdb5e2010b992483e8a1a1771c version4

* f18f0ccadc62b83fa4c6e2222956ba2f2a0e5230 version3

* 6280fa584403809ac2078a81120acf33e6bec836 version2

* 020bf021ec6d1b77836db4e96541d3659251714e version1

[root@kai git_test]#
最后工作完成,可以删除dev分支。
[root@kai git_test]# git branch -d dev

Deleted branch dev (was 7da47b4).

[root@kai git_test]# git branch

* master

[root@kai git_test]#
4. 分支管理策略
通常,合并分支时,如果可能,git会用fast forward模式,但是有些快速合并不能成功而且合并时没有冲突,这个时候会合并之后并做一次新的提交。但这种模式下,删除分支后,会丢掉分支信息。
创建切换到dev分支下,新建一个文件code3.txt编辑内容如下,并提交一个commit。
[root@kai git_test]# git checkout -b dev

Switched to a new branch 'dev'

[root@kai git_test]# echo "this is the first line" >> code3.txt

[root@kai git_test]# cat code3.txt

this is the first line

[root@kai git_test]# git add code3.txt

[root@kai git_test]# git commit -m "create_new_code3"

[dev a1f6ad6] create_new_code3

 1 file changed, 1 insertion(+)

 create mode 100644 code3.txt

[root@kai git_test]#
切换回master分支,编辑code.txt并进行一个提交。
[root@kai git_test]# git checkout master

Switched to branch 'master'

[root@kai git_test]# ls

code.txt

[root@kai git_test]# echo "add three line" >> code.txt

[root@kai git_test]# git add code.txt

[root@kai git_test]# git commit -m "add_new_line"

[master f4f5dd0] add_new_line

 1 file changed, 1 insertion(+)

[root@kai git_test]#
合并dev分支的内容到master分支。出现如下提示,这是因为这次不能进行快速合并,所以git提示输入合并说明信息,输入之后合并内容之后git会自动创建一次新的提交。
[root@kai git_test]# git merge dev

Merge branch 'dev'

# Please enter a commit message to explain why this merge is necessary,

# especially if it merges an updated upstream into a topic branch.

#

# Lines starting with '#' will be ignored, and an empty message aborts

# the commit.

~

~

~

".git/MERGE_MSG" 7L, 246C

# 保存退出即可!

Merge made by the 'recursive' strategy.

 code3.txt | 1 +

 1 file changed, 1 insertion(+)

 create mode 100644 code3.txt

[root@kai git_test]#
使用分支命令查看分支信息。
[root@kai git_test]# git log --graph --pretty=oneline

*   f6807c155cbb5aa59a04a6eb354d1df14d641c3c Merge branch 'dev'

|\

| * a1f6ad699c62782ddf3cd2c6fc36773f7e55a365 create_new_code3

* | f4f5dd02154451492b799d9ce8346361e3898b00 add_new_line

|/

*   b46a32ff94fb7cf4b61ce9af466c5433b0469fb2 resolve_the_conflict

|\

| * 7da47b4af8476b1c42b03bf04b7d3f103b16da0d dev_branch_submit

* | e57c158c60697955a4179ab87244957967419f70 matser_branch_submit

|/

* b63902b3874dd3e0a3e0b1ae3e0eb0f30cd616d4 dev_branch_submit

* f25e944f3e23532ecc3d2837c32057826920474b delete_code2.txt

* 66a9c996749285bdb5e2010b992483e8a1a1771c version4

* f18f0ccadc62b83fa4c6e2222956ba2f2a0e5230 version3

* 6280fa584403809ac2078a81120acf33e6bec836 version2

* 020bf021ec6d1b77836db4e96541d3659251714e version1

[root@kai git_test]#
删除dev分支。
[root@kai git_test]# git branch -d dev

Deleted branch dev (was a1f6ad6).

[root@kai git_test]#
如果要强制禁用fast forward模式,git就会在merge时生成一个新的commit,这样,从分支历史上就可以看出分支信息。
禁用fast forward模式:
创建并切换到dev分支,修改code.txt内容,并提交一个commit。
[root@kai git_test]# git checkout -b dev

Switched to a new branch 'dev'

[root@kai git_test]# echo "add new line" >> code.txt

[root@kai git_test]# git add code.txt

[root@kai git_test]# git commit -m "add_nwe_line"

[dev 5952b2f] add_nwe_line

 1 file changed, 1 insertion(+)

[root@kai git_test]#
切换回master分支,准备合并dev分支,请注意--no-ff参数,表示禁用Fast forward:
[root@kai git_test]# git merge --no-ff -m 'forbid_fastforward_merge' dev

Merge made by the 'recursive' strategy.

 code.txt | 1 +

 1 file changed, 1 insertion(+)

[root@kai git_test]#
因为本次合并要创建一个新的commit,所以加上-m参数,把commit描述写进去。
合并后,我们用git log看看分支历史:
可以看到,不使用Fast forward模式,merge后就像这样:
[root@kai git_test]# git log --graph --pretty=oneline

*   aa22465083e104bf61d7a5c1b8190fe48557adf7 forbid_fastforward_merge

|\

| * 5952b2f6b216ca88484ab92aafc636077c30c9a3 add_nwe_line

|/

*   f6807c155cbb5aa59a04a6eb354d1df14d641c3c Merge branch 'dev'

|\

| * a1f6ad699c62782ddf3cd2c6fc36773f7e55a365 create_new_code3

* | f4f5dd02154451492b799d9ce8346361e3898b00 add_new_line

|/

*   b46a32ff94fb7cf4b61ce9af466c5433b0469fb2 resolve_the_conflict

|\

| * 7da47b4af8476b1c42b03bf04b7d3f103b16da0d dev_branch_submit

* | e57c158c60697955a4179ab87244957967419f70 matser_branch_submit

|/

* b63902b3874dd3e0a3e0b1ae3e0eb0f30cd616d4 dev_branch_submit

* f25e944f3e23532ecc3d2837c32057826920474b delete_code2.txt

* 66a9c996749285bdb5e2010b992483e8a1a1771c version4

* f18f0ccadc62b83fa4c6e2222956ba2f2a0e5230 version3

* 6280fa584403809ac2078a81120acf33e6bec836 version2

* 020bf021ec6d1b77836db4e96541d3659251714e version1

[root@kai git_test]#
5. Bug分支
软件开发中,bug就像家常便饭一样。有了bug就需要修复,在git中,由于分支是如此的强大,所以,每个bug都可以通过一个新的临时分支来修复,修复后,合并分支,然后将临时分支删除。
当你接到一个修复一个代号001的bug的任务时,很自然地,你想创建一个分支bug-001来修复它,但是,等等,当前正在dev上进行的工作还没有提交:
[root@kai git_test]# echo "this line is writing...." >> code.txt

[root@kai git_test]# git status

# On branch dev

# Changes not staged for commit:

#   (use "git add <file>..." to update what will be committed)

#   (use "git checkout -- <file>..." to discard changes in working directory)

#

#	modified:   code.txt

#

no changes added to commit (use "git add" and/or "git commit -a")

[root@kai git_test]#
并不是你不想提交,而是工作只进行到一半,还没法提交,预计完成还需1天时间。但是,必须在两个小时内修复该bug,怎么办?
git还提供了一个stash功能,可以把当前工作现场“储藏”起来,等以后恢复现场后继续工作:
[root@kai git_test]# git stash

Saved working directory and index state WIP on dev: 5952b2f add_nwe_line

HEAD is now at 5952b2f add_nwe_line

[root@kai git_test]#
首先确定要在哪个分支上修复bug,假定需要在master分支上修复,就从master创建临时分支:
[root@kai git_test]# git checkout master

Switched to branch 'master'

[root@kai git_test]# git checkout -b bug-001

Switched to a new branch 'bug-001'

[root@kai git_test]#
现在模拟修复bug,把 add new line删掉,然后提交。
[root@kai git_test]# vim code.txt

[root@kai git_test]# cat code.txt

this is the first line

this is the second line

this is the third line

this is the forth line

add one line

add two line in master

add two line

add three line

[root@kai git_test]# git add code.txt

[root@kai git_test]# git commit -m "repair_bug"

[bug-001 f52de9b] repair_bug

 1 file changed, 1 deletion(-)
修复完成后,切换到master分支,并完成合并,最后删除bug-001分支。
[root@kai git_test]# git checkout master

Switched to branch 'master'

[root@kai git_test]# git merge --no-ff -m "repair_bug" bug-001

Merge made by the 'recursive' strategy.

 code.txt | 1 -

 1 file changed, 1 deletion(-)

[root@kai git_test]# git branch -d bug-001

Deleted branch bug-001 (was f52de9b).

[root@kai git_test]#
现在bug-001修复完成,是时候接着回到dev分支干活了!
[root@kai git_test]# git checkout dev

Switched to branch 'dev'

[root@kai git_test]# git status

# On branch dev

nothing to commit, working directory clean

[root@kai git_test]#
工作区是干净的,刚才的工作现场存到哪去了?用git stash list命令看看:
[root@kai git_test]# git stash list

stash@{0}: WIP on dev: 5952b2f add_nwe_line

[root@kai git_test]#
工作现场还在,git把stash内容存在某个地方了,但是需要恢复一下
[root@kai git_test]# git stash pop

# On branch dev

# Changes not staged for commit:

#   (use "git add <file>..." to update what will be committed)

#   (use "git checkout -- <file>..." to discard changes in working directory)

#

#	modified:   code.txt

#

no changes added to commit (use "git add" and/or "git commit -a")

Dropped refs/stash@{0} (ff39e6e47ea948b97d2587f2205c465fa789c5e9)

[root@kai git_test]# git status

# On branch dev

# Changes not staged for commit:

#   (use "git add <file>..." to update what will be committed)

#   (use "git checkout -- <file>..." to discard changes in working directory)

#

#	modified:   code.txt

#

no changes added to commit (use "git add" and/or "git commit -a")

[root@kai git_test]#
小结:
修复bug时,我们会通过创建新的bug分支进行修复,然后合并,最后删除;
当手头工作没有完成时,先把工作现场git stash一下,然后去修复bug,修复后,再git stash pop,恢复工作现场。
Git 版本控制管理(二)的更多相关文章
- git版本控制管理实践-4
vcs: version control system 版本控制系统 local vcs, 集中式版本控制系统: centralized vcs; 分布式vcs: distributed vcs Lo ...
- 利用Git版本控制管理你的项目
准备工作 项目创建完成后,将项目版本控制起来,今后每个版本的迭代会非常清楚,同时也有助于项目进行协同开发. 还有一个十分重要的问题是:项目上线后,线上的运行的程序的配置与线下进行测试的配置文件是不一样 ...
- [Git]自译《Git版本控制管理》——1.介绍(二)_Git诞生
译者前言: 本系列译文为作者利用业余时间翻译,有些疏漏与翻译不到位的地方敬请谅解. 不过也很希望各位读者能给出中肯的建议. 方括号的注释,如[1][2]为译者注. ...
- Git版本控制管理学习笔记4-文件管理和索引
可以认为使用Git时,我们会遇到3个空间:工作目录.索引.版本库.我们关心的,就是在新建.修改等操作时,这三者之间发生了怎样的变化. 笼统的讲,就是在工作目录下编辑,在索引中积累修改, ...
- Git版本控制管理学习笔记3-基本的Git概念
为了更近一步的学习和理解Git的理念,这一节介绍一下Git中的一些基本概念. 基本概念 对象库图示 Git在工作时的概念 一.基本概念: 1.版本库: Git的版本库就是一个简单的数据库,其中 ...
- Git版本控制管理学习笔记2--起步
首先确保系统中已经安装了git,这里使用的linux系统. 一.命令行初步使用: 1.git命令: 列出它的选项和最常用的子命令.标准命令格式中,COMMAND代表的就是下面列出的子命令. [root ...
- Git版本控制管理学习笔记1-介绍
几乎所有的版本控制工具都是出于同样的目的:开发以及维护开发出来的代码,方便读取代码的历史,记录所有的修改.这里,介绍的是当前在开源社区内非常流行的版本控制工具Git.它是由Linus Torvalds ...
- Git版本控制管理教程(一):介绍
我的个人博客地址:damienzhong.com 原文链接:点击打开链接 1.1 背景 数据是短暂的,且容易丢失的,特别是作为开发人员的我们每天频繁的对项目代码进行更新,容易产生错误代码的变更或者项目 ...
- Git 版本控制管理(一)
Git 是一个分布式版本控制工具,它的作者 Linus Torvalds 是这样给我们介绍 Git —— The stupid content tracker(傻瓜式的内容跟踪器) 关于 Git 的 ...
随机推荐
- Mac安装mysql8.0.12
···shell 下载 wget https://dev.mysql.com/get/Downloads/MySQL-8.0/mysql-8.0.12-macos10.13-x86_64.tar.gz ...
- bug5 Debug:This kind of launch is configured to openthe debug perspective when it解决办法
启动tomcat时,myeclipse报错: This kind of launch is configured to openthe debug perspective when itsuspend ...
- Linux上java程序的jar包启动通用脚本(稳定用过)
Linux上java程序的jar包启动通用脚本如下: #! /bin/sh export LANG="zh_CN.GBK" SERVICE_NAME=` .sh` SCRIPT_N ...
- linux shell重定向
http://note.youdao.com/noteshare?id=e944e6315d1566b3417e6f59305ddedc
- python的类的 静态属性 类方法 静态方法
一.静态属性 静态属性说的就是数据属性 1.定义一个房间的类,求下这个房间的面积 class Room: def __init__(self,name,ower,width,length,heigh) ...
- Tomcat get 中文乱码
乱码问题 原因: tomcat默认的在url传输时是用iso8859-1编码. 解决方案一: 在使用get传输参数时,将参数中的中文转换成url格式,也就是使用urlEncode和urlDecode来 ...
- bzoj千题计划185:bzoj1260: [CQOI2007]涂色paint
http://www.lydsy.com/JudgeOnline/problem.php?id=1260 区间DP模型 dp[l][r] 表示涂完区间[l,r]所需的最少次数 从小到大们枚举区间[l, ...
- info replication
主Redis设置值:redis-cli -h 192.168.18.121 -p 63800 -a tinywan123456 登陆从1:redis-cli -h 192.168.18.121 -p ...
- Logistic Regression – Geometric Intuition
Logistic Regression – Geometric Intuition Everybody who has taken a machine learning course probably ...
- Linux - Port 端口检测方式
ss 和 netstat 区别 netstat是遍历/proc下面每个PID目录: ss直接读/proc/net下面的统计信息. 所以ss执行的时候消耗资源以及消耗的时间都比netstat少很多 ne ...