Unity 环境区域网格化
区域网格化
在使用A星算法和物体布局的过程中,常常会使用的网格的概念,即建立在网格的基础上,会使得游戏的相关编程变得简单的多。
格子的代码:
using System.Collections;

using System.Collections.Generic;

using UnityEngine;

[System.Serializable]

public class Node

{

    public Vector3 _worldPos;//格子中心点的位置

    public int _gridX, _gridY;//在网格列表的下标

    public Node(Vector3 Position, int x, int y)

    {

        _worldPos = Position;

        _gridX = x;

        _gridY = y;

    }

}
网格代码:
using System.Collections;

using System.Collections.Generic;

using UnityEngine;

//网格,网格的起点是在左下角,终点是右上角

public class Grid : MonoBehaviour

{

    public static Grid instance;

    private Node[,] grid;//网格

    public Vector2 gridSize;//网格横纵大小

    public float nodeRadius;//格子的半径

    private float nodeDiameter;//格子的直径

    public int gridCntX, gridCntY;//两个方向上的网格数量

    //Test

    public Transform tarTrans;//目标

    public Node tar;

    public float dir;//射程

    //目标区域

    public Node zoneLeftDown;//网格的左下角

    public Node zoneRightUp;//网格的右上角

    Vector3 pos = new Vector3();

    // Start is called before the first frame update

    void Awake()

    {

        instance = this;

        nodeDiameter = nodeRadius * ;

        gridCntX = Mathf.RoundToInt(gridSize.x / nodeDiameter);

        gridCntY = Mathf.RoundToInt(gridSize.y / nodeDiameter);

        grid = new Node[gridCntX, gridCntY];

        CreateGrid();

    }//创建网格,起始点在左下角

    private void CreateGrid()

    {

        //获得网格的左下角的坐标

        Vector3 startPoint = transform.position - gridSize.x /  * Vector3.right - gridSize.y / * Vector3.up;

        for (int i = ; i < gridCntX; i++)

        {

            for (int j = ; j < gridCntY; j++)

            {

                Vector3 worldPoint = startPoint + Vector3.right * (i * nodeDiameter + nodeRadius) + Vector3.up * (j * nodeDiameter + nodeRadius);

                grid[i, j] = new Node(worldPoint, i, j);

            }

        }

    }

    //获取某个坐标处的格子

    public Node GetFromPosition(Vector3 position)

    {

        //首先获得该坐标相对于网格的宽高的百分比

        float percentX = (position.x + gridSize.x / ) / gridSize.x;

        float percentY = (position.y + gridSize.y / ) / gridSize.y;

        //保证百分比值在0到1之间

        percentX = Mathf.Clamp01(percentX);

        percentY = Mathf.Clamp01(percentY);

        int x = Mathf.RoundToInt((gridCntX - ) * percentX);

        int y = Mathf.RoundToInt((gridCntY - ) * percentY);

        return grid[x, y];

    }

    //获取一个正方形区域中随机点,length为区域的边长

    public Vector3 GetZoneRandomPos(Vector3 center,float length)

    {

        //射程一定要大于等于0

        //float len = Mathf.Abs(length) / 2;

        //获取射程网格区域

        zoneLeftDown = GetFromPosition(center - new Vector3(length, length));

        zoneRightUp = GetFromPosition(center + new Vector3(length, length));

        //获取并返回射程网格区域中的一个随机点

        int i = Random.Range(zoneLeftDown._gridX, zoneRightUp._gridX);

        int j = Random.Range(zoneLeftDown._gridY, zoneRightUp._gridY);

        return grid[i, j]._worldPos;

    }

    //获取整个区域中的一个随机点

    public Vector3 GetZoneRandomPos()

    {

        int i = Random.Range(, gridCntX);

        int j = Random.Range(, gridCntY);

        return grid[i, j]._worldPos;

    }

    private void OnDrawGizmos()

    {

        //绘制网格边界线

        Gizmos.DrawWireCube(transform.position, new Vector3(gridSize.x, gridSize.y, ));

        if (grid == null) return;

        Gizmos.color = new Color(, , , 0.2f);

        //绘制网格

        foreach (var node in grid)

        {

            Gizmos.DrawCube(node._worldPos+Vector3.forward, Vector3.one * (nodeDiameter - .1f*nodeDiameter));

        }

    }

}
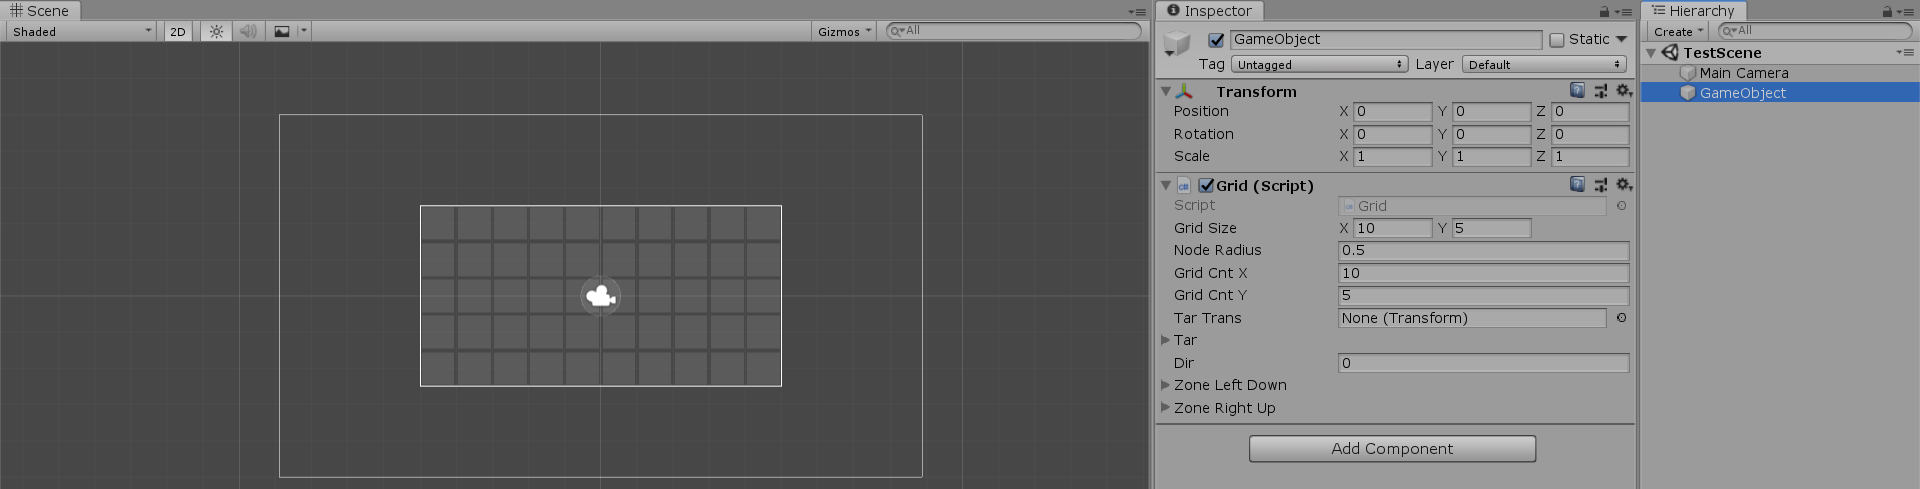
运行结果:
一般A星算法实例一,具体算法原理略
这里修改原来的网格代码,从而符合A星算法的需求
using System.Collections;

using System.Collections.Generic;

using UnityEngine;

[System.Serializable]

public class Node

{

    public bool _walkable;//是否可走

    public Vector3 _worldPos;//格子中心点的位置

    public int _gridX, _gridY;//在网格列表的下标

    public int gCost;//到起始点的曼哈顿距离

    public int hCost;//到目标点的曼哈顿距离

    public Node parent;//父亲网格点

    public int fCost {//曼哈顿距离综合

        get { return gCost +hCost; }

    }

    public Node(bool walkable,Vector3 Position, int x, int y)

    {

        _walkable = walkable;

        _worldPos = Position;

        _gridX = x;

        _gridY = y;

    }

}

public class Grid : MonoBehaviour

{

    public static Grid instance;

    private Node[,] grid;//网格

    public Vector2 gridSize;//网格横纵大小

    public float nodeRadius;//格子的半径

    private float nodeDiameter;//格子的直径

    public int gridCntX, gridCntY;//两个方向上的网格数量

    public Vector3 startPoint;//网格的最右下角的坐标

    public LayerMask layer;

    //Test

    public Transform tarTrans;//目标

    public Node tar;

    public float dir;//射程

    public List<Node> path = new List<Node>();

    //目标区域

    public Node zoneLeftDown;//网格的左下角

    public Node zoneRightUp;//网格的右上角

    Vector3 pos = new Vector3();

    // Start is called before the first frame update

    void Awake()

    {

        instance = this;

        nodeDiameter = nodeRadius * ;

        gridCntX = Mathf.RoundToInt(gridSize.x / nodeDiameter);

        gridCntY = Mathf.RoundToInt(gridSize.y / nodeDiameter);

        grid = new Node[gridCntX, gridCntY];

        CreateGrid();

    }

    //创建网格,起始点在左下角

    private void CreateGrid()

    {

        //获得网格的左下角的坐标

        startPoint = transform.position - gridSize.x /  * Vector3.right - gridSize.y /  * Vector3.up;

        for (int i = ; i < gridCntX; i++)

        {

            for (int j = ; j < gridCntY; j++)

            {

                Vector3 worldPoint = startPoint + Vector3.right * (i * nodeDiameter + nodeRadius) + Vector3.up * (j * nodeDiameter + nodeRadius);

                bool walkable = !Physics2D.OverlapCircle(worldPoint, nodeRadius, layer);

                grid[i, j] = new Node(walkable,worldPoint, i, j);

            }

        }

    }

    //获取某个坐标处的格子,利用百分比,那么在网格区域外的一个点的网格点就是离它最近的那个网格点

    public Node GetFromPosition(Vector3 position)

    {

        //首先获得该坐标相对于网格的宽高的百分比

        float percentX = (position.x + gridSize.x / ) / gridSize.x;

        float percentY = (position.y + gridSize.y / ) / gridSize.y;

        //保证百分比值在0到1之间

        percentX = Mathf.Clamp01(percentX);

        percentY = Mathf.Clamp01(percentY);

        int x = Mathf.RoundToInt((gridCntX - ) * percentX);

        int y = Mathf.RoundToInt((gridCntY - ) * percentY);

        return grid[x, y];

    }

    //获取网格范围内一个正方形区域中随机点,length为区域的边长

    public Vector3 GetZoneRandomPos(Vector3 center, float length)

    {

        //射程一定要大于等于0

        //float len = Mathf.Abs(length) / 2;

        //获取射程网格区域

        zoneLeftDown = GetFromPosition(center - new Vector3(length, length));

        zoneRightUp = GetFromPosition(center + new Vector3(length, length));

        //获取并返回射程网格区域中的一个随机点

        int i = Random.Range(zoneLeftDown._gridX, zoneRightUp._gridX);

        int j = Random.Range(zoneLeftDown._gridY, zoneRightUp._gridY);

        return grid[i, j]._worldPos;

    }

    //获取整个区域中的一个随机点

    public Vector3 GetZoneRandomPos()

    {

        int i = Random.Range(, gridCntX);

        int j = Random.Range(, gridCntY);

        return grid[i, j]._worldPos;

    }

    //获取某格子周围除了自身外的另外所有可走格子

    public List<Node> GetNeibourhood(Node node)

    {

        List<Node> neibourhood = new List<Node>();

        for(int i = -; i <= ; i++)

        {

            for(int j = -; j<= ; j++)

            {

                if (i ==  && j == ) continue;

                int tempX = node._gridX + i;

                int tempY = node._gridY + j;

                if (tempX >  && tempX < gridCntX && tempY >  && tempY < gridCntY)

                {

                    neibourhood.Add(grid[tempX,tempY]);

                }

            }

        }

        return neibourhood;

    }

    private void OnDrawGizmos()

    {

        //绘制网格边界线

        Gizmos.DrawWireCube(transform.position, new Vector3(gridSize.x, gridSize.y, ));

        if (grid == null) return;

        //Gizmos.color = new Color(1, 1, 1, 0.2f);

        //绘制网格

        foreach (var node in grid)

        {

            Gizmos.color = node._walkable ? Color.white : Color.red;

            Gizmos.DrawCube(node._worldPos + Vector3.forward, Vector3.one * (nodeDiameter - .1f * nodeDiameter));

        }

        if (path != null)

        {

            foreach(var node in path)

            {

                Gizmos.color = Color.black;

                Gizmos.DrawCube(node._worldPos + Vector3.forward, Vector3.one * (nodeDiameter - .1f * nodeDiameter));

            }

        }

        Node tarNode = GetFromPosition(tarTrans.position);

        if (tarNode != null && tarNode._walkable)

        {

            Gizmos.color = Color.cyan;

            Gizmos.DrawCube(tarNode._worldPos, Vector3.one * (nodeDiameter - .1f * nodeDiameter));

        }

    }

}
下面是A星寻路算法,这里使用了两种不能的路径处理结果
using System.Collections;

using System.Collections.Generic;

using UnityEngine;

//FindingPath为经典的A星寻路算法,获得网格路径。

//FindingPathForFlay是在寻路结束之后,将网格路径中不需要的网格删除调,从而使得运动方向更加平滑,剪除的过程在GeneratePathForFly中进行,

//后期优化可以放在寻路过程中进行

public class FindPath : MonoBehaviour

{

    public Transform hunter, tar;

    Grid _grid;

    // Start is called before the first frame update

    void Start()

    {

        _grid = GetComponent<Grid>();

    }

    // Update is called once per frame

    void Update()

    {

        //FindingPath(hunter.position, tar.position);

        FindingPathForFly(hunter.position, tar.position);

    }

    //经典A*算法到目标点的精确路径查找

    void FindingPath(Vector3 startPos,Vector3 endPos)

    {

        Node startNode = _grid.GetFromPosition(startPos);

        Node endNode = _grid.GetFromPosition(endPos);

        List<Node> openSet = new List<Node>();

        HashSet<Node> closeSet = new HashSet<Node>();

        openSet.Add(startNode);

        while (openSet.Count > )

        {

            //根据曼哈顿距离寻找新结点

            Node currentNode = openSet[];

            for (int i = ; i < openSet.Count; i++)

            {

                if (openSet[i].fCost < currentNode.fCost || openSet[i].fCost == currentNode.fCost && openSet[i].hCost < currentNode.hCost)

                {

                    currentNode = openSet[i];

                }

            }

            openSet.Remove(currentNode);

            closeSet.Add(currentNode);

            //如果当前结点是最后一个结点,那么寻找结束

            if (currentNode == endNode) {

                GeneratePath(startNode,endNode);

                return;

            }

            //添加周围的可用结点到openSet

            foreach (var node in _grid.GetNeibourhood(currentNode))

            {

                if (!node._walkable || closeSet.Contains(node)) continue;

                int newCost = currentNode.gCost + GetDistanceNodes(currentNode, node);

                if (newCost < node.gCost || !openSet.Contains(node))

                {

                    node.gCost = newCost;

                    node.hCost = GetDistanceNodes(node, endNode);

                    node.parent = currentNode;

                    if (!openSet.Contains(node))

                    {

                        openSet.Add(node);

                    }

                }

            }

        }

    }

    //经典A*算法下的飞行游戏路径查找

    void FindingPathForFly(Vector3 startPos, Vector3 endPos)

    {

        Node startNode = _grid.GetFromPosition(startPos);

        Node endNode = _grid.GetFromPosition(endPos);

        List<Node> openSet = new List<Node>();

        HashSet<Node> closeSet = new HashSet<Node>();

        openSet.Add(startNode);

        while (openSet.Count > )

        {

            //根据曼哈顿距离寻找新结点

            Node currentNode = openSet[];

            for (int i = ; i < openSet.Count; i++)

            {

                if (openSet[i].fCost < currentNode.fCost || openSet[i].fCost == currentNode.fCost && openSet[i].hCost < currentNode.hCost)

                {

                    currentNode = openSet[i];

                }

            }

            openSet.Remove(currentNode);

            closeSet.Add(currentNode);

            //如果当前结点是最后一个结点,那么寻找结束

            if (currentNode == endNode)

            {

                GeneratePathForFly(startNode, endNode);

                return;

            }

            //添加周围的可用结点到openSet

            foreach (var node in _grid.GetNeibourhood(currentNode))

            {

                if (!node._walkable || closeSet.Contains(node)) continue;

                int newCost = currentNode.gCost + GetDistanceNodes(currentNode, node);

                if (newCost < node.gCost || !openSet.Contains(node))

                {

                    node.gCost = newCost;

                    node.hCost = GetDistanceNodes(node, endNode);

                    node.parent = currentNode;

                    if (!openSet.Contains(node))

                    {

                        openSet.Add(node);

                    }

                }

            }

        }

    }

    //经典A*算法下根据父子关系回溯获得路径

    void GeneratePath(Node startNode,Node endNode)

    {

        List<Node> path = new List<Node>();

        Node temp = endNode;

        while (temp != startNode)//回溯,将所有路径结点结合成路径列表

        {

            path.Add(temp);

            temp = temp.parent;

        }

        path.Reverse();//将列表反转

        _grid.path = path;//将列表交予Grid;

    }

    //经典A*算法下根据父子关系回溯获得路径,并且回溯。如果两个网格点之间没有障碍,可以直达,那么剪除两个网格点之间剪除不要的网格点

    void GeneratePathForFly(Node startNode, Node endNode)

    {

        List<Node> path = new List<Node>();

        Node temp = endNode;

        while (temp != startNode)//回溯,将所有路径网格结合成路径列表

        {

            if(path.Count==)

                path.Add(temp);

            RaycastHit2D hit;

            //如果前一个网格点与当前网格点的父亲网格之间有障碍,那么表明需要当前网格点,将其添加到路径表中

            if(hit=Physics2D.Raycast(path[path.Count-]._worldPos, temp.parent._worldPos - path[path.Count - ]._worldPos,Vector3.Distance(temp.parent._worldPos, path[path.Count - ]._worldPos)))

            {

                path.Add(temp);

            }

            temp = temp.parent;

        }

        path.Reverse();//将列表反转

        _grid.path = path;//将列表交予Grid;

    }

    //获取两个点之间的曼哈顿距离

    int GetDistanceNodes(Node a,Node b)

    {

        int cntX = Mathf.Abs(a._gridX - b._gridX);

        int cntY = Mathf.Abs(a._gridY - b._gridY);

        if (cntX > cntY)

        {

            return  * cntY +  * (cntX - cntY);

        }

        else

        {

            return  * cntX +  * (cntY - cntX);

        }

    }

}
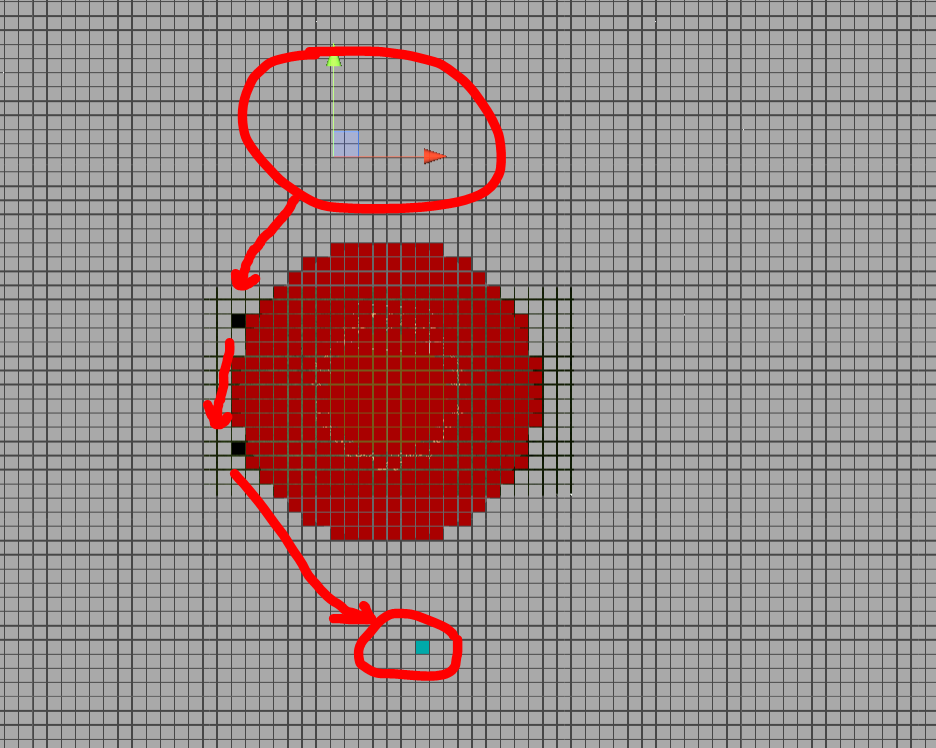
结果
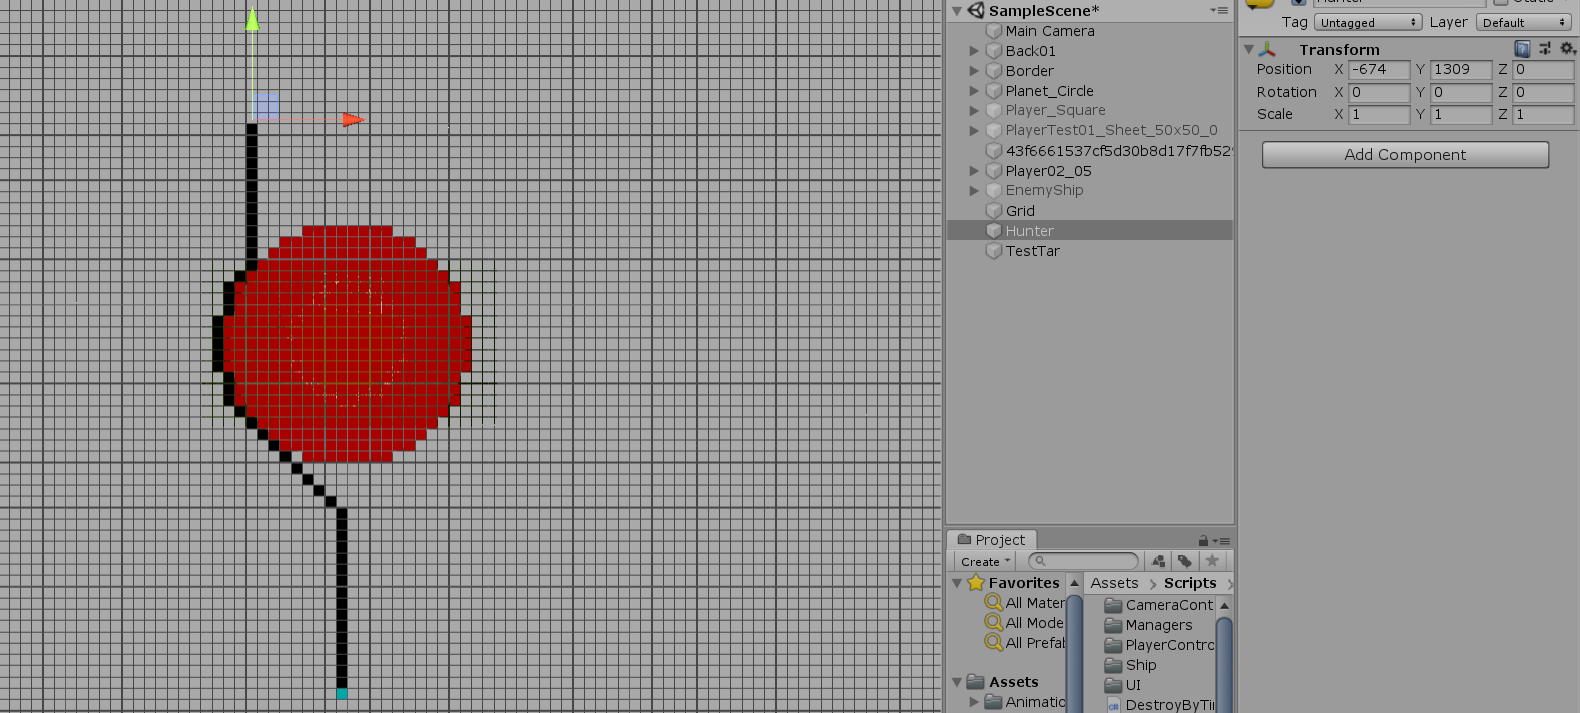
剪除多余的网格点之后
对于不同体积的角色,避免碰撞的处理方案有两种:
第一种:将网格分为不同的层,每层的格子的大小不同。
第二种:寻路时,网格可以走的条件为,walkable为真,且在设定半径范围内没有其他碰撞体存在。
2D飞行游戏最简单AI设计:
1.如果自己与目标之间没有障碍,那么直接飞向目标
2.飞向目标的方式:转向目标方向,如果当前的方向与到目标方向的角度小于设定的某个角度,那么开启喷射引擎。
3.逃离目标:这里以圆形的障碍目标为例,如果检测到障碍,那么设定障碍到自身的方向为目标方向,转向该目标方向,从而逃离目标。由于这个过程中自身的位置 不断变化,目标方向也是变化的,但是获得的结果也更加真实。
Unity 环境区域网格化的更多相关文章
- ARToolKit for Unity环境搭建(初步搭建成功)
最近一段时间才开始学习使用Unity3d,AR的学习使用中,先后使用了metaio SDK.vuforia SDK,但由于这两个都属于收费的,今天开始尝试使用ARToolKit.先将ARToolKit ...
- 在Unity环境下使用抽象和接口
http://gamasutra.com/blogs/VictorBarcelo/20131217/207204/Using_abstractions_and_interfaces_with_Unit ...
- unity 环境增强
早上过来解决两个问题: (1)VS2012 配置下 VA_X 插件,现在VS在字体颜色方面已经提高很多,但是在类成员实时显示方面还是不方便,或者我没找到吧 (2)安装unityVs插件,微软把 ...
- Unity 指定区域随机实例化预制体Prefab 代码
using UnityEngine; public class NewBehaviourScript : MonoBehaviour { public GameObject prefab; void ...
- 转:Oculus Unity Development Guide开发指南(2015-7-21更新)
http://forum.exceedu.com/forum/forum.php?mod=viewthread&tid=34175 Oculus Unity Development Guide ...
- C#区域截图——调用API截图
原文:C#区域截图——调用API截图 前言:截图对于一个C++开发者来说无非是小菜一碟,也有朋友使用C#的 Graphics.CopyFromScreen 方法屏幕操作,作为一名整天想着用 C++ 开 ...
- Unity 发布到IOS,Android的各种坑
Unity 发布到IOS的注意事项1.开发环境MAC环境:Xcode环境 7.2.1Unity环境:Unity5.32.基本说明首先,我说一下,这是我在对Unity发布到IOS的实际使用中,总结出来的 ...
- 【Holograms 101D】一步步用Unity 开发 Hologram
转载请注明出处: copperface:[Holograms 101D]一步步用Unity 开发 Hologram Holograms 101 该教程将带领你走完 Hologram 创建 的全过程.整 ...
- 【原】Unity Shader VS UDK Material Editor
UDK 的材质编辑器十分好用,毕竟是所见即所得的.虽然unity也有类似第三方插件,但易用性还是差很多,下面主要是,把一些常见表达式概念对应起来. 1. UDK CameraVector (相机位向量 ...
随机推荐
- Delegate,Action,Func,匿名方法,匿名委托,事件 (转载)
Delegate,Action,Func,匿名方法,匿名委托,事件 (转载) 一.委托Delegate 一般的方法(Method)中,我们的参数总是string,int,DateTime...这些基本 ...
- UVA 10405 Longest Common Subsequence
题目链接:https://uva.onlinejudge.org/index.php?option=com_onlinejudge&Itemid=8&category=16&p ...
- Jvm(jdk8)源码分析1-java命令启动流程详解
JDK8加载源码分析 1.概述 现在大多数互联网公司都是使用java技术体系搭建自己的系统,所以对java开发工程师以及java系统架构师的需求非常的多,虽然普遍的要求都是需要熟悉各种java开发框架 ...
- Java基础-时间类
关于java中六个时间类的使用和区别 java.util.Date java.sql.Date ,java.sql.Time , java.sql.Timestamp java.text.Simple ...
- mount 移动硬盘出现的各种小问题
1.fdisk -l 查看硬盘是否存在 2.新建要挂载硬盘的文件夹 mkdir /disk (如果想要挂载到已存在的目录就不要新建了) 3.挂载硬盘:mount /dev/sdc /disk 4 ...
- 解决普通用户sudo时出现/usr/bin/sudo must be owned by uid 0 and have the setuid bit set
一:因为之前误操作使用sudo chmod -R 777 /usr命令修改了usr文件的所有者导致了此问题: 二:网上说需要进入recovery mode,经过自己的测试是不需要的: 三:步骤(只需登 ...
- urb的处理流程
USB分析 2013年11月11日 16:06:24 阅读数:1807 转载自:http://blog.csdn.net/aaa6695798/article/details/4776202 很久 ...
- Day1-python基础
python是一门动态解释性的强类型定义语言 python 3.0 ALL IS UNICODE NOW 认识python,了解python的发展史. 1.变量 变量命名规则:变量名只能是字母.数字 ...
- .net 打开Excel文档并转为DataTable
/// <summary> /// 打开Excel文档并转为DataTable /// </summary> /// <returns></returns&g ...
- Linux服务器密钥安全登录
使用密钥登录的好处:1.省事,不用每次去敲用户名和密码:2.安全,密钥长度一般是1024位,比我们设的密码要长得多: 以下是为新用户jackson添加密钥登录的步骤. 1.添加用户,并添加到sudoe ...