FreeRTOS-05任务相关API函数
根据正点原子FreeRTOS视频整理
单片机:STM32F207VC
FreeRTOS源码版本:v10.0.1
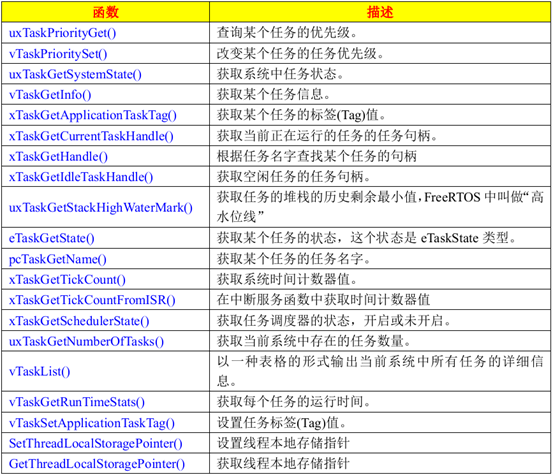
任务相关API函数:
1. main.c
/*
*
*/
#include "main.h"
#include "delay.h"
#include "sys.h"
#include "usart.h" #include "stm32f2xx_gpio.h" #include "FreeRTOS.h"
#include "task.h" #define START_TASK_PRIO 1 /*任务优先级*/
#define START_STK_SIZE 128 /*任务堆栈大小*/
TaskHandle_t StartTask_Handle; /*任务句柄*/
void StartTask(void *pvParameters); /*任务函数*/ #define LED_TASK_PRIO 2
#define LED_STK_SIZE 128
TaskHandle_t LedTask_Handle;
void LedTask(void *pvParameters); #define QUERY_TASK_PRIO 3
#define QUERY_STK_SIZE 256
TaskHandle_t QueryTask_Handle;
void QueryTask(void *pvParameters); char InfoBuffer[]; /*保存信息的数组*/ /***** 声明 *****/
static void SystemInitial(void);
static void GPIO_LED_Configuration(void); static void GPIO_LED_Configuration(void)
{
GPIO_InitTypeDef GPIO_InitStructure; RCC_AHB1PeriphClockCmd(RCC_AHB1Periph_GPIOE, ENABLE); GPIO_InitStructure.GPIO_Pin = LED_POWER | LED_RUN;
GPIO_InitStructure.GPIO_Mode = GPIO_Mode_OUT;
GPIO_InitStructure.GPIO_Speed = GPIO_Speed_100MHz;
GPIO_InitStructure.GPIO_OType = GPIO_OType_PP;
GPIO_InitStructure.GPIO_PuPd = GPIO_PuPd_NOPULL;
GPIO_Init(GPIOE, &GPIO_InitStructure); LED_Power_On();
GPIO_SetBits(GPIOE, LED_RUN);
} void StartTask(void *pvParameters)
{
taskENTER_CRITICAL(); /*进入临界区*/ xTaskCreate((TaskFunction_t )LedTask, /*任务函数*/
(const char * )"LedTask", /*任务名称*/
(uint16_t )LED_STK_SIZE, /*任务堆栈大小*/
(void * )NULL, /*传递给任务函数的参数*/
(UBaseType_t )LED_TASK_PRIO, /*任务优先级*/
(TaskHandle_t )&LedTask_Handle); /*任务句柄*/ xTaskCreate((TaskFunction_t )QueryTask, /*任务函数*/
(const char * )"QueryTask", /*任务名称*/
(uint16_t )QUERY_STK_SIZE, /*任务堆栈大小*/
(void * )NULL, /*传递给任务函数的参数*/
(UBaseType_t )QUERY_TASK_PRIO, /*任务优先级*/
(TaskHandle_t )&QueryTask_Handle); /*任务句柄*/ vTaskDelete(StartTask_Handle); /*删除开始任务*/
taskEXIT_CRITICAL(); /*退出临界区*/
} void LedTask(void *pvParameters)
{
while ()
{
GPIOE->ODR ^= LED_RUN;
vTaskDelay();
}
} void QueryTask(void * pvParameters)
{
UBaseType_t x;
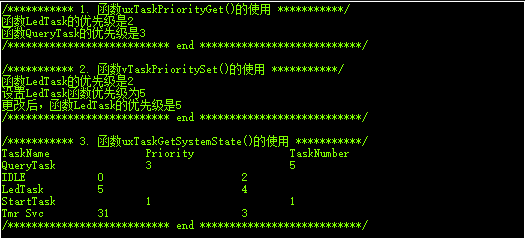
/*1. 函数uxTaskPriorityGet()的使用*/
printf("/*********** 1. 函数uxTaskPriorityGet()的使用 ***********/\r\n");
x = uxTaskPriorityGet(LedTask_Handle);
printf("函数LedTask的优先级是%ld\r\n", x);
x = uxTaskPriorityGet(QueryTask_Handle);
printf("函数QueryTask的优先级是%ld\r\n", x);
printf("/*************************** end ***************************/\r\n");
printf("\r\n"); /*2. 函数vTaskPrioritySet()的使用*/
printf("/*********** 2. 函数vTaskPrioritySet()的使用 ***********/\r\n");
x = uxTaskPriorityGet(LedTask_Handle);
printf("函数LedTask的优先级是%ld\r\n", x);
printf("设置LedTask函数优先级为5\r\n");
vTaskPrioritySet(LedTask_Handle, (UBaseType_t));
x = uxTaskPriorityGet(LedTask_Handle);
printf("更改后,函数LedTask的优先级是%ld\r\n", x);
printf("/*************************** end ***************************/\r\n");
printf("\r\n"); /*3. 函数uxTaskGetSystemState()的使用*/
uint32_t TotalRunTime;
UBaseType_t ArraySize;
TaskStatus_t *StatusArray; printf("/*********** 3. 函数uxTaskGetSystemState()的使用 ***********/\r\n");
ArraySize = uxTaskGetNumberOfTasks(); /*获取系统任务数量*/
StatusArray = pvPortMalloc(ArraySize * sizeof(TaskStatus_t)); /*申请内存*/
if (StatusArray != NULL)
{
ArraySize = uxTaskGetSystemState( (TaskStatus_t * )StatusArray,
(UBaseType_t )ArraySize,
(uint32_t * )&TotalRunTime );
printf("TaskName\t\tPriority\t\tTaskNumber\t\t\r\n");
for (x=;x<ArraySize;++x)
{
printf("%s\t\t%d\t\t\t%d\t\t\t\r\n",
StatusArray[x].pcTaskName,
(int)StatusArray[x].uxCurrentPriority,
(int)StatusArray[x].xTaskNumber );
}
}
vPortFree(StatusArray); /*释放内存*/
printf("/*************************** end ***************************/\r\n");
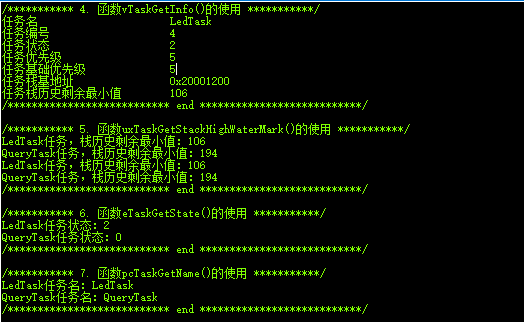
printf("\r\n"); /*4. 函数vTaskGetInfo()的使用*/
TaskHandle_t LedTaskHandle;
TaskStatus_t LedTaskStatus; printf("/*********** 4. 函数vTaskGetInfo()的使用 ***********/\r\n");
LedTaskHandle = xTaskGetHandle("LedTask"); /*函数xTaskGetHandle()的使用*/
vTaskGetInfo(LedTaskHandle,
(TaskStatus_t *)&LedTaskStatus,
pdTRUE,
eInvalid);
printf("任务名 %s\r\n", LedTaskStatus.pcTaskName);
printf("任务编号 %ld\r\n", LedTaskStatus.xTaskNumber);
printf("任务状态 %d\r\n", LedTaskStatus.eCurrentState);
printf("任务优先级 %ld\r\n", LedTaskStatus.uxCurrentPriority);
printf("任务基础优先级 %ld\r\n", LedTaskStatus.uxBasePriority);
printf("任务栈基地址 %#x\r\n", (int)LedTaskStatus.pxStackBase);
printf("任务栈历史剩余最小值 %d\r\n", LedTaskStatus.usStackHighWaterMark);
printf("/*************************** end ***************************/\r\n");
printf("\r\n"); /*
* 栈历史剩余最小值是针对定义的“QUERY_STK_SIZE 256”来说的,
* 假如QueryTask函数用了62字节,那么查询到的最小值就应该是256-62=194了。
*/
/*5. 函数uxTaskGetStackHighWaterMark()的使用*/
printf("/*********** 5. 函数uxTaskGetStackHighWaterMark()的使用 ***********/\r\n");
x = uxTaskGetStackHighWaterMark(LedTask_Handle);
printf("LedTask任务,栈历史剩余最小值:%ld\r\n", x);
x = uxTaskGetStackHighWaterMark(QueryTask_Handle);
printf("QueryTask任务,栈历史剩余最小值:%ld\r\n", x);
x = uxTaskGetStackHighWaterMark(LedTask_Handle);
printf("LedTask任务,栈历史剩余最小值:%ld\r\n", x);
x = uxTaskGetStackHighWaterMark(QueryTask_Handle);
printf("QueryTask任务,栈历史剩余最小值:%ld\r\n", x);
printf("/*************************** end ***************************/\r\n");
printf("\r\n"); /*6. 函数eTaskGetState()的使用*/
eTaskState LedTaskState;
eTaskState QueryTaskState; printf("/*********** 6. 函数eTaskGetState()的使用 ***********/\r\n");
LedTaskState = eTaskGetState(LedTask_Handle);
printf("LedTask任务状态:%d\r\n", LedTaskState);
QueryTaskState = eTaskGetState(QueryTask_Handle);
printf("QueryTask任务状态:%d\r\n", QueryTaskState);
printf("/*************************** end ***************************/\r\n");
printf("\r\n"); /*7. 函数pcTaskGetName()的使用,根据任务句柄查询任务名*/
char *TaskName; printf("/*********** 7. 函数pcTaskGetName()的使用 ***********/\r\n");
TaskName = pcTaskGetName(LedTask_Handle);
printf("LedTask任务名:%s\r\n", TaskName);
TaskName = pcTaskGetName(QueryTask_Handle);
printf("QueryTask任务名:%s\r\n", TaskName);
printf("/*************************** end ***************************/\r\n");
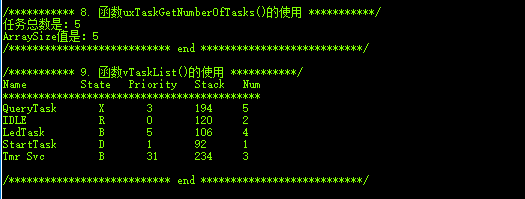
printf("\r\n"); /*8. 函数uxTaskGetNumberOfTasks()的使用,查询系统当前存在的任务数量*/
printf("/*********** 8. 函数uxTaskGetNumberOfTasks()的使用 ***********/\r\n");
x = uxTaskGetNumberOfTasks();
printf("任务总数是:%ld\r\n", x);
printf("ArraySize值是:%ld\r\n", ArraySize);
printf("/*************************** end ***************************/\r\n");
printf("\r\n"); /*
* Name: 创建任务的时候给任务分配的名字
* State: 任务的状态信息。B阻塞态,R就绪态,S挂起态,D删除态
* Priority: 任务优先级
* Stack: 栈历史最小剩余大小
* Num: 任务编号
*/
/*9. 函数vTaskList()的使用*/
printf("/*********** 9. 函数vTaskList()的使用 ***********/\r\n");
vTaskList(InfoBuffer);
printf("Name State Priority\tStack\tNum\t\r\n");
printf("*******************************************\r\n");
printf("%s\r\n", InfoBuffer);
printf("/*************************** end ***************************/\r\n");
printf("\r\n"); while ()
{
vTaskDelay();
}
} static void SystemInitial(void)
{
/*组4,16级抢占优先级,无响应优先级*/
NVIC_PriorityGroupConfig(NVIC_PriorityGroup_4); DelayInitial();
USART1_Initialization();
GPIO_LED_Configuration();
} int main(void)
{
SystemInitial(); /*创建开始任务*/
xTaskCreate((TaskFunction_t )StartTask, /*任务函数*/
(const char * )"StartTask", /*任务名称*/
(uint16_t )START_STK_SIZE, /*任务堆栈大小*/
(void * )NULL, /*传递给任务函数的参数*/
(UBaseType_t )START_TASK_PRIO, /*任务优先级*/
(TaskHandle_t * )&StartTask_Handle); /*任务句柄*/ /*开启任务调度*/
vTaskStartScheduler();
} /***************************END OF FILE***************************/
2. main.h
 /**/

 #ifndef __MAIN_H__

 #define __MAIN_H__

 #define LED_POWER         GPIO_Pin_2    /*PE2*/

 #define LED_RUN           GPIO_Pin_3    /*PE3*/

 #define LED_Power_On()    GPIO_ResetBits(GPIOE, LED_POWER)

 #endif    /*__MAIN_H__*/

 /***************************END OF FILE***************************/
3. sys.c
 /**/

 #include "sys.h"

 #include "stdio.h"

 #pragma import(__use_no_semihosting)

 //标准库需要的支持函数

 struct __FILE

 {

     int handle;

 };

 FILE __stdout;

 //定义_sys_exit()以避免使用半主机模式

 void _sys_exit(int x)

 {

     x = x;

 }

 /* //重定义fputc函数

 int fputc(int ch, FILE *f)

 {

      while((USART1->SR&0X40)==0)  //循环发送,直到发送完毕

     USART1->DR = (u8) ch;

     return ch;

 } */

 /***************************END OF FILE***************************/
4. sys.h
 /**/

 #ifndef __SYS_H__

 #define __SYS_H__

 /*0不支持OS,1支持OS*/

 #define SYSTEM_SUPPORT_OS        1        /*定义系统文件夹是否支持OS*/

 #endif    /*__SYS_H__*/

 /***************************END OF FILE***************************/
5. delay.c
 /**/

 #include "delay.h"

 #include "sys.h"

 /*如果需要使用OS,则包括下面的头文件即可*/

 #if SYSTEM_SUPPORT_OS

 #include "FreeRTOS.h"

 #include "task.h"

 #endif

 __IO uint32_t TimingDelay;

 //////////////////////////

 //static uint8_t  fac_us = 0;

 //////////////////////////

 /***** 声明 *****/

 extern void xPortSysTickHandler(void);

 /*systick中断服务函数,使用FreeRTOS时用到*/

 void SysTick_Handler(void)

 {

     TimingDelayDecrement();

     if(xTaskGetSchedulerState()!=taskSCHEDULER_NOT_STARTED)   /*系统已运行*/

     {

       xPortSysTickHandler();

     }

 }

 void DelayInitial(void)

 {

   /*

      * SystemCoreClock / 1000      1ms中断一次

      * SystemCoreClock / 100000    10us中断一次

      * SystemCoreClock / 1000000   1us中断一次

      */

   if (SysTick_Config(SystemCoreClock / ))

   {

     while ();

   }

   /*关闭systick timer定时器*/

   /*    SysTick->CTRL &= ~SysTick_CTRL_ENABLE_Msk;*/

   /*使能滴答定时器*/

   SysTick->CTRL |=   SysTick_CTRL_ENABLE_Msk;

 }

 //void DelayNus(uint32_t nus)

 //{

 //  uint32_t ticks;

 //  uint32_t told, tnow, tcnt = 0;

 //  uint32_t reload = SysTick->LOAD;

 //

 //  fac_us = SystemCoreClock / 1000000;

 //  ticks = nus * fac_us;

 //  told  = SysTick->VAL;

 //

 //  while (1)

 //  {

 //    tnow = SysTick->VAL;

 //    if (tnow != told)

 //    {

 //      if (tnow < told)

 //      {

 //        tcnt += told - tnow;

 //      }

 //      else

 //      {

 //        tcnt += reload - tnow + told;

 //      }

 //      told = tnow;

 //      if (tcnt >= ticks)  break;

 //    }

 //  }

 //}

 ///*不会引起调度*/

 //void DelayXms(uint32_t nms)

 //{

 //  uint32_t i;

 //

 //  for (i=0;i<nms;++i)

 //  {

 //    DelayNus(1000);

 //  }

 //}

 /*

  * 本函数在中断函数中调用,滴答定时器中断一次调用一次。

  */

 void TimingDelayDecrement(void)

 {

     if (TimingDelay != 0x00)

     {

         TimingDelay--;

     }

 }

 /*

  * TimingDelay值在TimingDelayDecrement函数中递减

  */

 void DelayNms(uint32_t nTimes)

 {

     TimingDelay = nTimes;

     while (TimingDelay!=);   //等待计数停止

 }

 /***************************END OF FILE***************************/
6. delay.h
 /**/

 #ifndef __DELAY_H__

 #define __DELAY_H__

 #include "stm32f2xx.h"

 #include <stdint.h>

 extern void DelayInitial(void);

 extern void TimingDelayDecrement(void);

 extern void DelayNms(uint32_t nTimes);

 /////////////////////////

 extern void DelayXms(uint32_t nms);

 /////////////////////////

 #endif    /*__DELAY_H__*/

 /***************************END OF FILE***************************/
7. usart.c
 /*

  * USART1: 中断优先级选择第4组, 3级抢占优先级  无响应优先级

  */

 #include "usart.h"

 #include "stdio.h"      /*printf*/

 #include "stm32f2xx.h"

 #include "stm32f2xx_gpio.h"

 #include "stm32f2xx_rcc.h"

 #include "stm32f2xx_usart.h"

 uint8_t  USART1_RxBuffer[USART1_RECEIVE_SIZE];

 uint8_t  Flag_USART1Receive = ;

 uint8_t  USART1_ReceiveCount = ;

 uint8_t  USART1_ReceiveIndex = ;

 void USART1_Initialization(void)

 {

     USART1_GPIO_Configuration();

     USART1_NVIC_Configuration();

     /*USART1使能接收中断*/

 //    USART_ITConfig(USART1, USART_IT_RXNE, ENABLE);

     /*USART1使能发送中断*/

 /*    USART_ITConfig(USART1, USART_IT_TXE, ENABLE);      */

 }

 /*

  */

 void USART1_GPIO_Configuration(void)

 {

     GPIO_InitTypeDef   GPIO_InitStructure;

     USART_InitTypeDef  USART_InitStructure;

     RCC_APB2PeriphClockCmd(RCC_APB2Periph_USART1, ENABLE);

   RCC_AHB1PeriphClockCmd(RCC_AHB1Periph_GPIOA,  ENABLE);

   GPIO_PinAFConfig(GPIOA, , GPIO_AF_USART1);     /*GPIO连接到串口1上,PA9-TXD*/

     GPIO_PinAFConfig(GPIOA, , GPIO_AF_USART1);        /*GPIO连接到串口1上,PA10-RXD*/

     /*tx, PA9*/

   GPIO_InitStructure.GPIO_Pin   = GPIO_Pin_9;

     GPIO_InitStructure.GPIO_Mode  = GPIO_Mode_AF;

     GPIO_InitStructure.GPIO_Speed = GPIO_Speed_50MHz;

   GPIO_InitStructure.GPIO_OType = GPIO_OType_PP;

   GPIO_InitStructure.GPIO_PuPd  = GPIO_PuPd_NOPULL;

     GPIO_Init(GPIOA, &GPIO_InitStructure);

     /*rx, PA10*/

     GPIO_InitStructure.GPIO_Mode  = GPIO_Mode_AF;

     GPIO_InitStructure.GPIO_Pin   = GPIO_Pin_10;

   GPIO_InitStructure.GPIO_OType = GPIO_OType_PP;

   GPIO_InitStructure.GPIO_PuPd  = GPIO_PuPd_NOPULL;

     GPIO_Init(GPIOA, &GPIO_InitStructure);

     /*配置波特率9600*/

     USART_InitStructure.USART_BaudRate   = ;

     /*配置串口的模式。为了配置双线全双工通讯,需要把Rx和Tx模式都开启. Tx发送使能和Rx接收使能*/

     USART_InitStructure.USART_Mode       = USART_Mode_Rx | USART_Mode_Tx;

     /*无奇偶校验*/

     USART_InitStructure.USART_Parity     = USART_Parity_No;

     /*1停止位*/

     USART_InitStructure.USART_StopBits   = USART_StopBits_1;

     /*配置串口传输字长8位*/

     USART_InitStructure.USART_WordLength = USART_WordLength_8b;

     /*不采用硬件流控制*/

     USART_InitStructure.USART_HardwareFlowControl = USART_HardwareFlowControl_None;

     /*向寄存器写入配置参数*/

     USART_Init(USART1, &USART_InitStructure);

     /*使能USART1外设。在使用外设时,不仅要使能其时钟,还要调用此函数使能外设才可以正常使用*/

     USART_Cmd(USART1, ENABLE);

 }

 //void USART1_SendNChar(uint8_t *str, uint8_t n)

 //{

 //    /*发送区是否为空*/

 //    while (USART_GetFlagStatus(USART1, USART_FLAG_TXE) == RESET);

 //

 //    while (n--)

 //    {

 //        USART_SendData(USART1, (uint8_t)(*str++));

 //        /*是否发送完成*/

 //        while (USART_GetFlagStatus(USART1, USART_FLAG_TC) == RESET);

 //    }

 //}

 /*

  * 如果一次发送多个字节数据,可能会多次进入此函数

  * 调用时,应先延时几十毫秒,确保把数据都接收完

  */

 //void USART1_ReceiveIRQ(void)

 //{

 //    /*如果寄存器中有数据*/

 //    while (USART_GetFlagStatus(USART1, USART_FLAG_RXNE) == SET)

 //    {

 //        USART1_RxBuffer[USART1_ReceiveIndex++] = USART_ReceiveData(USART1);

 //        USART1_ReceiveCount++;

 //    }

 //

 //    Flag_USART1Receive = 1;

 //}

 void USART1_NVIC_Configuration(void)

 {

     NVIC_InitTypeDef NVIC_InitStructure;

     /*中断优先级选择第1组*/

 //    NVIC_PriorityGroupConfig(NVIC_PriorityGroup_4);

     /*3级抢占优先级  0级响应优先级*/

     NVIC_InitStructure.NVIC_IRQChannel                    = USART1_IRQn;

     NVIC_InitStructure.NVIC_IRQChannelPreemptionPriority  = ;

     NVIC_InitStructure.NVIC_IRQChannelSubPriority         = ;

     NVIC_InitStructure.NVIC_IRQChannelCmd                 = ENABLE;

     NVIC_Init(&NVIC_InitStructure);

 }

 /*重定义fputc函数 2种方法都可以*/

 /*

 int fputc(int ch,FILE *f)

 {

  while(USART_GetFlagStatus(USART1,USART_FLAG_TC) != SET);

  USART_SendData(USART1,(uint8_t)ch);

  while(USART_GetFlagStatus(USART1,USART_FLAG_TC) != SET);

  return (ch);

 }

 */

 int fputc(int ch, FILE *f)

 {

   while((USART1->SR&0X40)==)   /*循环发送,直到发送完毕*/

   {}

   USART1->DR = (uint8_t)ch;

   return ch;

 }

 /***************************END OF FILE***************************/
8. usart.h
 /*

  *

  */

 #ifndef __USART_H__

 #define __USART_H__

 #include <stdint.h>        /* uint8_t */

 #define USART1_RECEIVE_SIZE            20

 void USART1_Initialization(void);

 void USART1_GPIO_Configuration(void);

 void USART1_SendNChar(uint8_t *str, uint8_t n);

 void USART1_ReceiveIRQ(void);

 void USART1_NVIC_Configuration(void);

 #endif  /*__USART_H__*/

 /***************************END OF FILE***************************/
打印结果:
FreeRTOS-05任务相关API函数的更多相关文章
- 2、FreeRTOS任务相关API函数
1.任务相关的API函数 函数存在于task.c中,主要的函数有: xTaskCreate():使用动态的方法创建一个任务: xTaskCreatStatic():使用静态的方法创建一个任务(用的非常 ...
- 串口编程的相关API函数
用户使用函数CreateFile()创建与指定串口相关联的文件,然后可以使用该函数返回的文件句柄进行串口参数设置.• 01 HANDLE hModem; //定义串口句柄02 hModem=Creat ...
- FreeRTOS系列第20篇---FreeRTOS信号量API函数
FreeRTOS的信号量包括二进制信号量.计数信号量.相互排斥信号量(以后简称相互排斥量)和递归相互排斥信号量(以后简称递归相互排斥量).我们能够把相互排斥量和递归相互排斥量看成特殊的信号量. 信号量 ...
- [转]SQLITE3 C语言接口 API 函数简介
SQLITE3 C语言接口 API 函数简介 说明:本说明文档属作者从接触 SQLite 开始认识的 API 函数的使用方法, 由本人翻译, 不断更新. /* 2012-05-25 */ int sq ...
- Windows API 函数列表 附帮助手册
所有Windows API函数列表,为了方便查询,也为了大家查找,所以整理一下贡献出来了. 帮助手册:700多个Windows API的函数手册 免费下载 API之网络函数 API之消息函数 API之 ...
- C#中可直接调用WIN32的API函数--USER32.DLL
Win32的API函数可以直接在C#中直接调用,在做WinForm时还是很有帮助的.有时候直接调用Win32的API,可以很高效的实现想要的效果. using System; using System ...
- Appium常用的API函数
在学习应用一个框架之前,应该了解一下这个框架的整体结构或是相应的API函数.这篇文章还不错:http://blog.sina.com.cn/s/blog_68f262210102vzf9.html,就 ...
- mfc 调用Windows的API函数实现同步异步串口通信(源码)
在工业控制中,工控机(一般都基于Windows平台)经常需要与智能仪表通过串口进行通信.串口通信方便易行,应用广泛. 一般情况下,工控机和各智能仪表通过RS485总线进行通信.RS485的通信方式是半 ...
- QQ音乐的各种相关API
QQ音乐的各种相关API 分类: oc2014-01-29 15:34 2676人阅读 评论(2) 收藏 举报 基本上论坛里做在线音乐的都在用百度的API,进来发现百度的API不仅歌曲的质量不可以保证 ...
随机推荐
- RedisHelper in C#
自己写了一个RedisHelper,现贴出来,希望各位大神能够指正和优化. using System; using StackExchange.Redis; using System.Configur ...
- C#读取EXCEL到内存
public class ExcelUtils { private static string strcon = "Server=48.12.1.28;initial catalog=NBS ...
- hdu 折线分割平面(递推)
题解: 首先我们考虑直线的情况: 当n=1时原来的1个平面被分割成了2个: 当n=2时原来的2个平面被分割成了4个: 当n=3时原来的4个平面被分割成了7个: 也就是说F(n)=F(n-1)+n且n= ...
- PHP Windows系统下调用OpenOffice
项目需要把用户上传的word文档转换为pdf文件,方便用户浏览.经过谷歌百度找到PHP可以使用COM组件调用微软的openoffice来实现文档转换 1,安装OpenOffice 安装OpenOffi ...
- MySQL 存储过程和存储函数 的定义条件和处理程序
#三.定义条件和处理程序 #mysql 存储函数和过程可以将错误 变成我们想要的处理结果分2步骤 #1.定义错误条件 语法:DECLARE 条件名字 CONDITION for 错误编码 #2. 定义 ...
- 36 有n个整数,使其前面各数顺序向后移n个位置,最后m个数变成最前面的m个数
题目:有n个整数,使其前面各数顺序向后移n个位置,最后m个数变成最前面的m个数 public class _036ExchangeSite { public static void main(Stri ...
- python列表技巧
1.访问列表元素 test1 = ["chengqian","and","what"] print(test1[0])#第一个元素 prin ...
- Canvas vs. SVG[转]
Canvas 和 SVG 都允许您在浏览器中创建图形,但是它们在根本上是不同的. SVG SVG 是一种使用 XML 描述 2D 图形的语言. SVG 基于 XML,这意味着 SVG DOM 中的每个 ...
- FPGA的时钟质量对设计的影响
小梅哥编写,未经许可严禁用于任何商业用途 近期,一直在调试使用Verilog编写的以太网发送摄像头数据到电脑的工程(以下简称以太网图传).该工程基于今年设计的一款FPGA教学板AC620.AC620上 ...
- 使用shell脚本build并创建ipa文件(转)
前言 由于项目引入了敏捷开发,需要每天build出一个ipa供QA测试.此前是使用Xcode先achive出一个文件,再在 organizer->achives里发布ipa,一直感觉也没啥不方便 ...