一文读懂Apollo客户端配置加载流程
SpringBoot集成Apollo源码分析
本文基于 apollo-client 2.1.0 版本源码进行分析
Apollo 是携程开源的配置中心,能够集中化管理应用不同环境、不同集群的配置,配置修改后能够实时推送到应用端,并且具备规范的权限、流程治理等特性。
Apollo支持4个维度管理Key-Value格式的配置:
- application (应用)
- environment (环境)
- cluster (集群)
- namespace (命名空间)
同时,Apollo基于开源模式开发,开源地址:https://github.com/ctripcorp/apollo
一. SpringBoot集成Apollo
1.1 引入Apollo客户端依赖
<dependency>

    <groupId>com.ctrip.framework.apollo</groupId>

    <artifactId>apollo-client</artifactId>

    <version>2.1.0</version>

</dependency>
1.2 配置apollo
#Apollo 配置

app:

  id: apollo-test                            #应用ID

apollo:

  meta: http://10.10.10.12:8080            #DEV环境配置中心地址

  autoUpdateInjectedSpringProperties: true   #是否开启 Spring 参数自动更新

  bootstrap:

    enabled: true                            #是否开启 Apollo

    namespaces: application.yaml                 #设置 Namespace

    eagerLoad:

      enabled: true                         #将 Apollo 加载提到初始化日志系统之前
app.id:AppId是应用的身份信息,是配置中心获取配置的一个重要信息。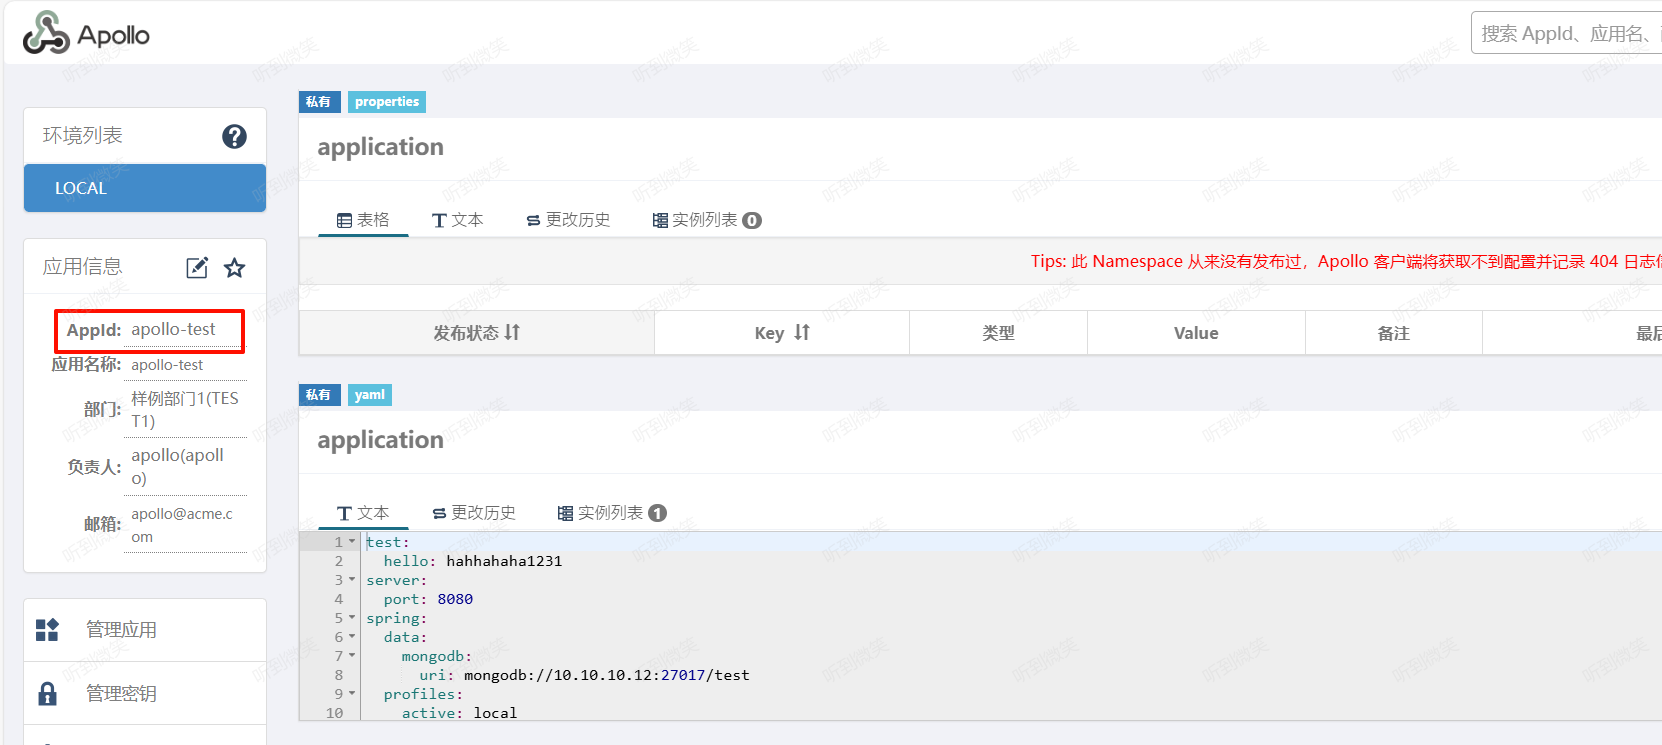
apollo.bootstrap.enabled:在应用启动阶段,向Spring容器注入被托管的application.properties文件的配置信息。apollo.bootstrap.eagerLoad.enabled:将 Apollo 配置加载提到初始化日志系统之前。将Apollo配置加载提到初始化日志系统之前从1.2.0版本开始,如果希望把日志相关的配置(如1ogging.level.root=info或1ogback-spring.xml中的参数)也放在Apollo管理,来使Apollo的加载顺序放到日志系统加载之前,不过这会导致Apollo的启动过程无法通过日志的方式输出(因为执行Apollo加载的时的日志输出便没有任何内容)。
1.3 启动项目
启动项目后,我们更改 apollo 中的配置,SpringBoot中的配置会自动更新:
[Apollo-Config-1] c.f.a.s.p.AutoUpdateConfigChangeListener : Auto update apollo changed value successfully, new value: hahhahaha12311, key: test.hello, beanName: mongoController, field: cn.bigcoder.mongo.mongodemo.web.MongoController.hello
二. SpringBoot如何在启动时加载Apollo配置
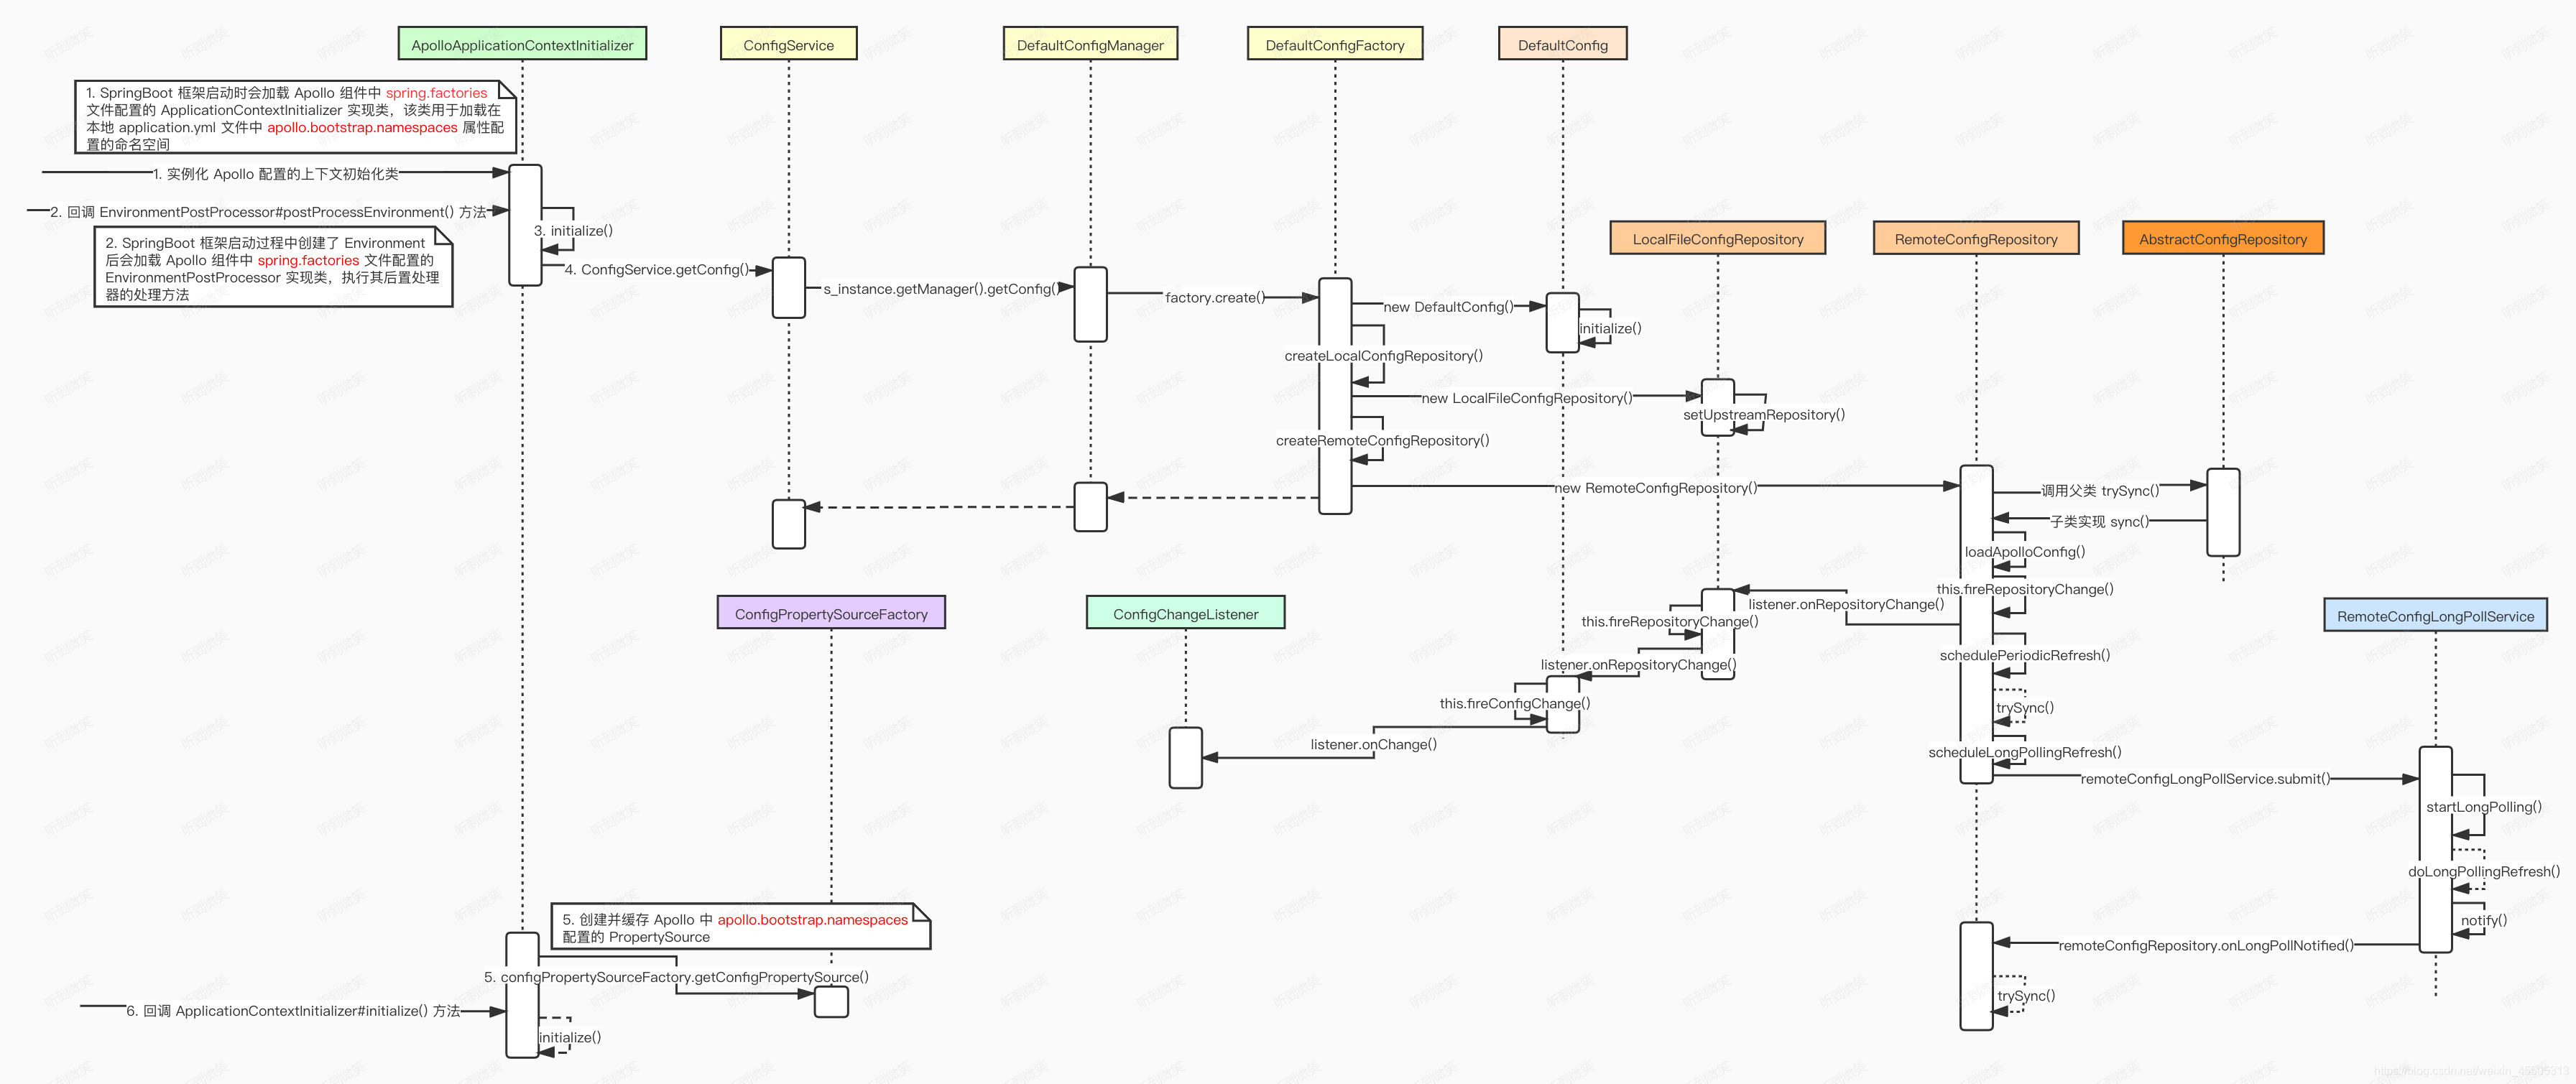
2.1 ApolloApplicationContextInitializer
spring.factories 文件 是 SpringBoot 中实现 SPI 机制的重要组成,在这个文件中可以定义SpringBoot各种扩展点的实现类。Apollo 客户端 与 SpringBoot 的集成就借助了这个机制,apollo-client 包中的 META-INF/spring.factories 文件配置如下:
org.springframework.boot.autoconfigure.EnableAutoConfiguration=\

com.ctrip.framework.apollo.spring.boot.ApolloAutoConfiguration

org.springframework.context.ApplicationContextInitializer=\

com.ctrip.framework.apollo.spring.boot.ApolloApplicationContextInitializer

org.springframework.boot.env.EnvironmentPostProcessor=\

com.ctrip.framework.apollo.spring.boot.ApolloApplicationContextInitializer
ApolloApplicationContextInitializer 实现了 ApplicationContextInitializer 和 EnvironmentPostProcessor 两个扩展点,使得 apollo-client 能在Spring容器启动前从Apollo Server中加载配置。
EnvironmentPostProcessor:当我们想在Bean中使用配置属性时,那么我们的配置属性必须在Bean实例化之前就放入到Spring到Environment中。即我们的接口需要在 application context refreshed 之前进行调用,而EnvironmentPostProcessor正好可以实现这个功能。ApplicationContextInitializer:是Spring框架原有的概念,这个类的主要目的就是在ConfigurableApplicationContext类型(或者子类型)的ApplicationContext做refresh之前,允许我们对ConfigurableApplicationContext的实例做进一步的设置或者处理。
两者虽都实现在 Application Context 做 refresh 之前加载配置,但是 EnvironmentPostProcessor 的扩展点相比 ApplicationContextInitializer 更加靠前,使得 Apollo 配置加载能够提到初始化日志系统之前。
ApolloApplicationContextInitializer.postProcessEnvironment 扩展点:
// com.ctrip.framework.apollo.spring.boot.ApolloApplicationContextInitializer#postProcessEnvironment

/**

   *

   * 为了早在Spring加载日志系统阶段之前就加载Apollo配置,这个EnvironmentPostProcessor可以在ConfigFileApplicationListener成功之后调用。

   * 处理顺序是这样的: 加载Bootstrap属性和应用程序属性----->加载Apollo配置属性---->初始化日志系

   *

   * @param configurableEnvironment

   * @param springApplication

   */

  @Override

  public void postProcessEnvironment(ConfigurableEnvironment configurableEnvironment, SpringApplication springApplication) {

    // should always initialize system properties like app.id in the first place

    initializeSystemProperty(configurableEnvironment);

    // 获取 apollo.bootstrap.eagerLoad.enabled 配置

    Boolean eagerLoadEnabled = configurableEnvironment.getProperty(PropertySourcesConstants.APOLLO_BOOTSTRAP_EAGER_LOAD_ENABLED, Boolean.class, false);

    // 如果你不想在日志系统初始化之前进行阿波罗加载,就不应该触发EnvironmentPostProcessor

    if (!eagerLoadEnabled) {

      // 如果未开启提前加载,则 postProcessEnvironment 扩展点直接返回,不加载配置

      return;

    }

    // 是否开启了 apollo.bootstrap.enabled 参数,只有开启了才会在Spring启动阶段加载配置

    Boolean bootstrapEnabled = configurableEnvironment.getProperty(PropertySourcesConstants.APOLLO_BOOTSTRAP_ENABLED, Boolean.class, false);

    if (bootstrapEnabled) {

      DeferredLogger.enable();

      // 初始化Apollo配置,内部会加载Apollo Server配置

      initialize(configurableEnvironment);

    }

  }
ApolloApplicationContextInitializer.initialize 扩展点:
//com.ctrip.framework.apollo.spring.boot.ApolloApplicationContextInitializer#initialize(org.springframework.context.ConfigurableApplicationContext)

  @Override

  public void initialize(ConfigurableApplicationContext context) {

    ConfigurableEnvironment environment = context.getEnvironment();

    // 判断是否配置了 apollo.bootstrap.enabled=true

    if (!environment.getProperty(PropertySourcesConstants.APOLLO_BOOTSTRAP_ENABLED, Boolean.class, false)) {

      logger.debug("Apollo bootstrap config is not enabled for context {}, see property: ${{}}", context, PropertySourcesConstants.APOLLO_BOOTSTRAP_ENABLED);

      return;

    }

    logger.debug("Apollo bootstrap config is enabled for context {}", context);

    // 初始化Apollo配置,内部会加载Apollo Server配置

    initialize(environment);

  }
两个扩展点最终都会调用 ApolloApplicationContextInitializer#initialize(ConfigurableEnvironment environment) 方法初始化 apollo client,并加载远端配置:
//com.ctrip.framework.apollo.spring.boot.ApolloApplicationContextInitializer#initialize(org.springframework.core.env.ConfigurableEnvironment)

 /**

   * 初始化Apollo配置

   *

   * @param environment

   */

  protected void initialize(ConfigurableEnvironment environment) {

    final ConfigUtil configUtil = ApolloInjector.getInstance(ConfigUtil.class);

    if (environment.getPropertySources().contains(PropertySourcesConstants.APOLLO_BOOTSTRAP_PROPERTY_SOURCE_NAME)) {

      // 已经初始化,重播日志系统初始化之前打印的日志

      DeferredLogger.replayTo();

      if (configUtil.isOverrideSystemProperties()) {

        // 确保ApolloBootstrapPropertySources仍然是第一个,如果不是会将其调整为第一个,这样从Apollo加载出来的配置拥有更高优先级

        PropertySourcesUtil.ensureBootstrapPropertyPrecedence(environment);

      }

      // 因为有两个不同的触发点,所以该方法首先检查 Spring 的 Environment 环境中是否已经有了 key 为 ApolloBootstrapPropertySources 的目标属性,有的话就不必往下处理,直接 return

      return;

    }

    // 获取配置的命名空间参数

    String namespaces = environment.getProperty(PropertySourcesConstants.APOLLO_BOOTSTRAP_NAMESPACES, ConfigConsts.NAMESPACE_APPLICATION);

    logger.debug("Apollo bootstrap namespaces: {}", namespaces);

    // 使用","切分命名参数

    List<String> namespaceList = NAMESPACE_SPLITTER.splitToList(namespaces);

    CompositePropertySource composite;

    if (configUtil.isPropertyNamesCacheEnabled()) {

      composite = new CachedCompositePropertySource(PropertySourcesConstants.APOLLO_BOOTSTRAP_PROPERTY_SOURCE_NAME);

    } else {

      composite = new CompositePropertySource(PropertySourcesConstants.APOLLO_BOOTSTRAP_PROPERTY_SOURCE_NAME);

    }

    for (String namespace : namespaceList) {

      // 从远端拉去命名空间对应的配置

      Config config = ConfigService.getConfig(namespace);

      // 调用ConfigPropertySourceFactory#getConfigPropertySource() 缓存从远端拉取的配置,并将其包装为 PropertySource,

      // 最终将所有拉取到的远端配置聚合到一个以 ApolloBootstrapPropertySources 为 key 的属性源包装类 CompositePropertySource 的内部

      composite.addPropertySource(configPropertySourceFactory.getConfigPropertySource(namespace, config));

    }

    if (!configUtil.isOverrideSystemProperties()) {

      if (environment.getPropertySources().contains(StandardEnvironment.SYSTEM_ENVIRONMENT_PROPERTY_SOURCE_NAME)) {

        environment.getPropertySources().addAfter(StandardEnvironment.SYSTEM_ENVIRONMENT_PROPERTY_SOURCE_NAME, composite);

        return;

      }

    }

    // 将 CompositePropertySource 属性源包装类添加到 Spring 的 Environment 环境中,注意是插入在属性源列表的头部,

    // 因为取属性的时候其实是遍历这个属性源列表来查找,找到即返回,所以出现同名属性时,前面的优先级更高

    environment.getPropertySources().addFirst(composite);

  }
流程如下:
因为有两个不同的触发点,所以该方法首先检查 Spring 的 Environment 环境中是否已经有了 key 为
ApolloBootstrapPropertySources的目标属性,有的话就不必往下处理,直接 return。从 Environment 环境中获取
apollo.bootstrap.namespaces属性配置的启动命名空间字符串,如果没有的话就取默认的 application 命名空间。按逗号分割处理配置的启动命名空间字符串,然后调用
ConfigService#getConfig()依次拉取各个命名空间的远端配置,下节详细分析这部分创建
CompositePropertySource复合属性源,因为 apollo-client 启动时可以加载多个命名空间的配置,每个命名空间对应一个PropertySource,而多个PropertySource就会被封装在CompositePropertySource对象中,若需要获取apollo中配置的属性时,就会遍历多个命名空间所对应的PropertySource,找到对应属性后就会直接返回,这也意味着,先加载的namespace中的配置具有更高优先级:public class CompositePropertySource extends EnumerablePropertySource<Object> { private final Set<PropertySource<?>> propertySources = new LinkedHashSet<>(); @Override
@Nullable
public Object getProperty(String name) {
for (PropertySource<?> propertySource : this.propertySources) {
Object candidate = propertySource.getProperty(name);
if (candidate != null) {
return candidate;
}
}
return null;
}
}
调用
ConfigPropertySourceFactory#getConfigPropertySource()缓存从远端拉取的配置,并将其包装为PropertySource,最终将所有拉取到的远端配置聚合到一个以ApolloBootstrapPropertySources为 key 的属性源包装类CompositePropertySource的内部。public ConfigPropertySource getConfigPropertySource(String name, Config source) {
// 将 Apollo 的 Config 配置封装为继承自 Spring 内置的 EnumerablePropertySource 类的 ConfigPropertySource 对象
ConfigPropertySource configPropertySource = new ConfigPropertySource(name, source); // 将新生成的 ConfigPropertySource 对象缓存到内部列表,以备后续为每个配置实例添加配置变化监听器使用
configPropertySources.add(configPropertySource); return configPropertySource;
}
将
CompositePropertySource属性源包装类添加到 Spring 的 Environment 环境中,注意是插入在属性源列表的头部,因为取属性的时候其实是遍历这个属性源列表来查找,找到即返回,所以出现同名属性时,前面的优先级更高。这样在当本地配置文件和Apollo中配置了同名参数时会使得Apollo中的优先级更高。
2.2 从远端加载配置
在 ApolloApplicationContextInitializer.initialize 中会调用 ConfigService.getConfig() 加载远端命名空间配置。getConfig方法处理流程如下:
// com.ctrip.framework.apollo.ConfigService#getConfig

 /**

   * 获取名称空间的配置实例

   *

   * @param namespace the namespace of the config

   * @return config instance

   */

  public static Config getConfig(String namespace) {

    // s_instance.getManager() 实际通过 ApolloInjector 去获取 ConfigManager实例, ApolloInjector 其实采用了 Java 中的 ServiceLoader 机制,此处不作讨论,读者有兴趣可自行搜索

    return s_instance.getManager().getConfig(namespace);

  }

  private ConfigManager getManager() {

    if (m_configManager == null) {

      synchronized (this) {

        if (m_configManager == null) {

          m_configManager = ApolloInjector.getInstance(ConfigManager.class);

        }

      }

    }

    return m_configManager;

  }
s_instance.getManager()实际通过ApolloInjector去获取ConfigManager实例,ApolloInjector其实采用了 Java 中的ServiceLoader机制,此处不作讨论,读者有兴趣可自行搜索ConfigManager其实只有一个实现类,此处最终将调用到DefaultConfigManager#getConfig()方法。
DefaultConfigManager#getConfig() 方法处理逻辑较为清晰,重点如下:
  @Override

  public Config getConfig(String namespace) {

    // 首先从缓存中获取配置,缓存中没有则从远程拉取,注意此处在 synchronized 代码块内部也判了一次空,采用了双重检查锁机制

    Config config = m_configs.get(namespace);

    if (config == null) {

      synchronized (this) {

        config = m_configs.get(namespace);

        // 加锁后再次判断

        if (config == null) {

          // 远程拉取配置首先需要通过 ConfigFactoryManager#getFactory() 方法获取 ConfigFactory 实例

          ConfigFactory factory = m_factoryManager.getFactory(namespace);

          // 再通过 ConfigFactory#create() 去实际地进行拉取操作。此处 Factory 的创建也使用了 ServiceLoader 机制,暂不讨论,可知最后实际调用到 DefaultConfigFactory#create()

          config = factory.create(namespace);

          // 将从远端拉取到的配置缓存

          m_configs.put(namespace, config);

        }

      }

    }
- 首先从缓存中获取配置,缓存中没有则从远程拉取,注意此处在 synchronized 代码块内部也判了一次空,采用了双重检查锁机制。
- 远程拉取配置首先需要通过
ConfigFactoryManager#getFactory()方法获取ConfigFactory实例,这里实际上获取的是DefaultConfigFactory,再通过DefaultConfigFactory#create()去获取 Apollo Server 中的配置。
在 DefaultConfigFactory#create() 中会根据加载namespace类型,创建对应的 ConfigRepository:
 //com.ctrip.framework.apollo.spi.DefaultConfigFactory#create

 @Override

  public Config create(String namespace) {

    // 确定本地配置缓存文件的格式。对于格式不是属性的命名空间,必须提供文件扩展名,例如application.yaml

    ConfigFileFormat format = determineFileFormat(namespace);

    ConfigRepository configRepository = null;

    if (ConfigFileFormat.isPropertiesCompatible(format) &&

        format != ConfigFileFormat.Properties) {

      // 如果是YML类型的配置

      configRepository = createPropertiesCompatibleFileConfigRepository(namespace, format);

    } else {

      // 如果是 Properties 类型的配置

      configRepository = createConfigRepository(namespace);

    }

    logger.debug("Created a configuration repository of type [{}] for namespace [{}]",

        configRepository.getClass().getName(), namespace);

    // 创建 DefaultConfig对象,并将当前 DefaultConfig 对象 对象注册进 configRepository 更新通知列表,这样configRepository中的配置发生变更时,就会通知 DefaultConfig

    return this.createRepositoryConfig(namespace, configRepository);

  }
我们就以 properties 配置类型为例,会调用 DefaultConfigFactory.createConfigRepository 创建 ConfigRepository:
  // com.ctrip.framework.apollo.spi.DefaultConfigFactory#createConfigRepository

  ConfigRepository createConfigRepository(String namespace) {

    if (m_configUtil.isPropertyFileCacheEnabled()) {

      // 默认是开启缓存机制的

      return createLocalConfigRepository(namespace);

    }

    return createRemoteConfigRepository(namespace);

  }
2.3 Apollo ConfigRepository 分层设计
Apollo ConfigRepository 适用于加载配置的接口,默认有两种实现:
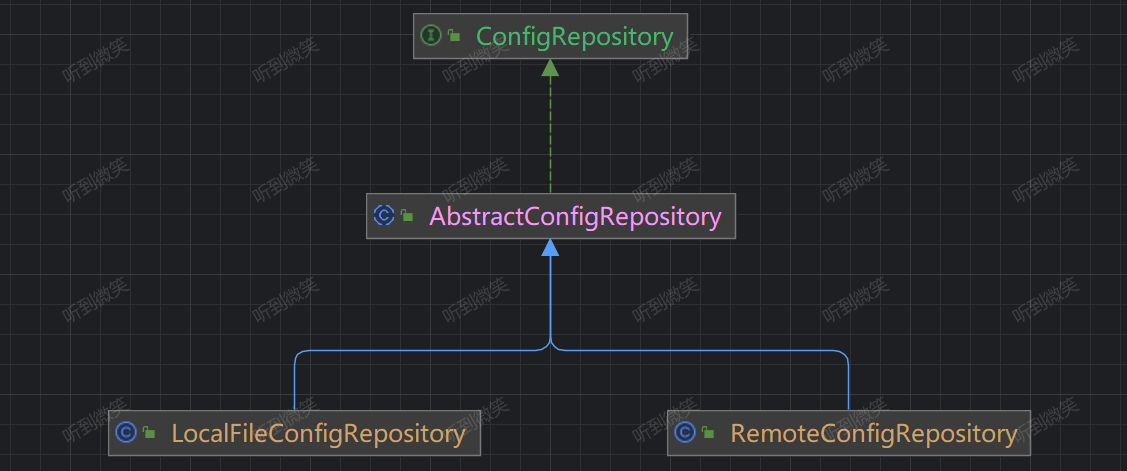
- LocalFileConfigRepository:从本地文件中加载配置。
- RemoteConfigRepository:从远端Apollo Server加载配置。
在调用 DefaultConfigFactory#createConfigRepository 创建 ConfigRepository 时默认会创建多级对象,创建时的顺序为:RemoteConfigRepository --> LocalFileConfigRepository --> DefaultConfig
其中 DefaultConfig 持有 LocalFileConfigRepository,LocalFileConfigRepository 持有 RemoteConfigRepository。
DefaultConfig 监听 LocalFileConfigRepository 变化,LocalFileConfigRepository 监听 RemoteConfigRepository 变化。
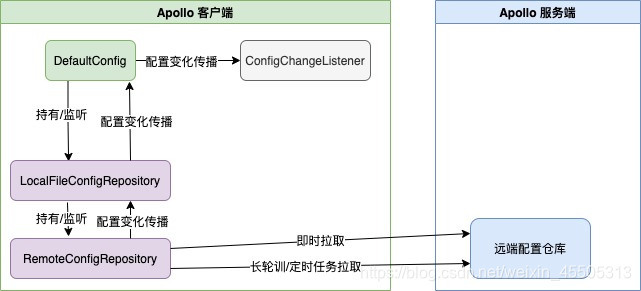
创建流程如下:
  ConfigRepository createConfigRepository(String namespace) {

    if (m_configUtil.isPropertyFileCacheEnabled()) {

      // 默认是开启缓存机制的

      return createLocalConfigRepository(namespace);

    }

    return createRemoteConfigRepository(namespace);

  }

  LocalFileConfigRepository createLocalConfigRepository(String namespace) {

    if (m_configUtil.isInLocalMode()) {

      logger.warn(

          "==== Apollo is in local mode! Won't pull configs from remote server for namespace {} ! ====",

          namespace);

      return new LocalFileConfigRepository(namespace);

    }

    // 创建 RemoteConfigRepository 和 LocalFileConfigRepository,并将 LocalFileConfigRepository 注册进 RemoteConfigRepository的变更通知列表中

    return new LocalFileConfigRepository(namespace, createRemoteConfigRepository(namespace));

  }

  RemoteConfigRepository createRemoteConfigRepository(String namespace) {

    return new RemoteConfigRepository(namespace);

  }
Apollo 通过多层 ConfigRepository 设计实现如下配置加载机制,既保证了配置的实时性,又保证了Apollo Server出现故障时对接入的服务影响最小:
客户端和服务端保持了一个长连接(通过Http Long Polling实现),从而能第一时间获得配置更新的推送(RemoteConfigRepository)
客户端还会定时从Apollo配置中心服务端拉取应用的最新配置。
- 这是一个fallback机制,为了防止推送机制失效导致配置不更新。客户端定时拉取会上报本地版本,所以一般情况下,对于定时拉取的操作,服务端都会返回304 - Not Modified
- 定时频率默认为每5分钟拉取一次,客户端也可以通过在运行时指定System Property:apollo.refreshInterval来覆盖,单位为分钟
客户端会把从服务端获取到的配置在本地文件系统缓存一份在遇到服务不可用,或网络不通的时候,依然能从本地恢复配置(LocalFileConfigRepository)
客户端从Apollo配置中心服务端获取到应用的最新配置后,会保存在内存中(DefaultConfig)
2.4.1 RemoteConfigRepository
RemoteConfigRepository 实现 AbstractConfigRepository 抽象类,远程配置Repository。实现从Apollo Server拉取配置,并缓存在内存中。定时 + 实时刷新缓存:
构造方法:
public class RemoteConfigRepository extends AbstractConfigRepository {

  private static final Logger logger = DeferredLoggerFactory.getLogger(RemoteConfigRepository.class);

  private static final Joiner STRING_JOINER = Joiner.on(ConfigConsts.CLUSTER_NAMESPACE_SEPARATOR);

  private static final Joiner.MapJoiner MAP_JOINER = Joiner.on("&").withKeyValueSeparator("=");

  private static final Escaper pathEscaper = UrlEscapers.urlPathSegmentEscaper();

  private static final Escaper queryParamEscaper = UrlEscapers.urlFormParameterEscaper();

  private final ConfigServiceLocator m_serviceLocator;

  private final HttpClient m_httpClient;

  private final ConfigUtil m_configUtil;

  /**

   * 远程配置长轮询服务

   */

  private final RemoteConfigLongPollService remoteConfigLongPollService;

  /**

   * 指向ApolloConfig的AtomicReference,拉取的远端配置缓存

   */

  private volatile AtomicReference<ApolloConfig> m_configCache;

  private final String m_namespace;

  private final static ScheduledExecutorService m_executorService;

  private final AtomicReference<ServiceDTO> m_longPollServiceDto;

  private final AtomicReference<ApolloNotificationMessages> m_remoteMessages;

  /**

   * 加载配置的RateLimiter

   */

  private final RateLimiter m_loadConfigRateLimiter;

  /**

   * 是否强制拉取缓存的标记

   * 若为true,则多一轮从Config Service拉取配置

   * 为true的原因:RemoteConfigRepository知道Config Service有配置刷新

   */

  private final AtomicBoolean m_configNeedForceRefresh;

  /**

   * 失败定时重试策略

   */

  private final SchedulePolicy m_loadConfigFailSchedulePolicy;

  private static final Gson GSON = new Gson();

  static {

    m_executorService = Executors.newScheduledThreadPool(1,

        ApolloThreadFactory.create("RemoteConfigRepository", true));

  }

  /**

   * Constructor.

   *

   * @param namespace the namespace

   */

  public RemoteConfigRepository(String namespace) {

    m_namespace = namespace;

    m_configCache = new AtomicReference<>();

    m_configUtil = ApolloInjector.getInstance(ConfigUtil.class);

    m_httpClient = ApolloInjector.getInstance(HttpClient.class);

    m_serviceLocator = ApolloInjector.getInstance(ConfigServiceLocator.class);

    remoteConfigLongPollService = ApolloInjector.getInstance(RemoteConfigLongPollService.class);

    m_longPollServiceDto = new AtomicReference<>();

    m_remoteMessages = new AtomicReference<>();

    m_loadConfigRateLimiter = RateLimiter.create(m_configUtil.getLoadConfigQPS());

    m_configNeedForceRefresh = new AtomicBoolean(true);

    m_loadConfigFailSchedulePolicy = new ExponentialSchedulePolicy(m_configUtil.getOnErrorRetryInterval(),

        m_configUtil.getOnErrorRetryInterval() * 8);

    // 尝试同步配置

    this.trySync();

    // 初始化定时刷新配置的任务

    this.schedulePeriodicRefresh();

    // 注册自己到RemoteConfigLongPollService中,实现配置更新的实时通知

    this.scheduleLongPollingRefresh();

  }

}
RemoteConfigRepository 构造方法中分别调用了 trySync() 尝试同步配置,schedulePeriodicRefresh() 初始化定时刷新配置的任务,scheduleLongPollingRefresh() 注册自己到 RemoteConfigLongPollService 中实现配置更新的实时通知。
trySync():
public abstract class AbstractConfigRepository implements ConfigRepository {

  protected boolean trySync() {

    try {

      // 调用实现类的sync方法

      sync();

      return true;

    } catch (Throwable ex) {

      Tracer.logEvent("ApolloConfigException", ExceptionUtil.getDetailMessage(ex));

      logger

          .warn("Sync config failed, will retry. Repository {}, reason: {}", this.getClass(), ExceptionUtil

              .getDetailMessage(ex));

    }

    return false;

  }

}
RemoteConfigRepository 构造方法中调用的 trySync 方法,最终会调用实现类的自己的 sync 方法:
  // com.ctrip.framework.apollo.internals.RemoteConfigRepository#sync

  @Override

  protected synchronized void sync() {

    Transaction transaction = Tracer.newTransaction("Apollo.ConfigService", "syncRemoteConfig");

    try {

      // 缓存的 Apollo服务端配置

      ApolloConfig previous = m_configCache.get();

      // 从Apollo Server加载配置

      ApolloConfig current = loadApolloConfig();

      //reference equals means HTTP 304

      if (previous != current) {

        logger.debug("Remote Config refreshed!");

        // 若不相等,说明更新了,设置到缓存中

        m_configCache.set(current);

        // 发布配置变更事件,实际上是回调 LocalFileConfigRepository.onRepositoryChange

        this.fireRepositoryChange(m_namespace, this.getConfig());

      }

      if (current != null) {

        Tracer.logEvent(String.format("Apollo.Client.Configs.%s", current.getNamespaceName()),

            current.getReleaseKey());

      }

      transaction.setStatus(Transaction.SUCCESS);

    } catch (Throwable ex) {

      transaction.setStatus(ex);

      throw ex;

    } finally {

      transaction.complete();

    }

  }
调用
loadApolloConfig()方法加载远端配置信息。// com.ctrip.framework.apollo.internals.RemoteConfigRepository#loadApolloConfig
private ApolloConfig loadApolloConfig() {
// 限流
if (!m_loadConfigRateLimiter.tryAcquire(5, TimeUnit.SECONDS)) {
try {
// 如果被限流则sleep 5s
TimeUnit.SECONDS.sleep(5);
} catch (InterruptedException e) {
}
}
String appId = m_configUtil.getAppId();
String cluster = m_configUtil.getCluster();
String dataCenter = m_configUtil.getDataCenter();
String secret = m_configUtil.getAccessKeySecret();
Tracer.logEvent("Apollo.Client.ConfigMeta", STRING_JOINER.join(appId, cluster, m_namespace));
//计算重试次数
int maxRetries = m_configNeedForceRefresh.get() ? 2 : 1;
long onErrorSleepTime = 0; // 0 means no sleep
Throwable exception = null; //获得所有的Apollo Server的地址
List<ServiceDTO> configServices = getConfigServices();
String url = null;
//循环读取配置重试次数直到成功 每一次都会循环所有的ServiceDTO数组
retryLoopLabel:
for (int i = 0; i < maxRetries; i++) {
List<ServiceDTO> randomConfigServices = Lists.newLinkedList(configServices);
// 随机所有的Config Service 的地址
Collections.shuffle(randomConfigServices);
// 优先访问通知配置变更的Config Service的地址 并且获取到时,需要置空,避免重复优先访问
if (m_longPollServiceDto.get() != null) {
randomConfigServices.add(0, m_longPollServiceDto.getAndSet(null));
} //循环所有的Apollo Server的地址
for (ServiceDTO configService : randomConfigServices) {
if (onErrorSleepTime > 0) {
logger.warn(
"Load config failed, will retry in {} {}. appId: {}, cluster: {}, namespaces: {}",
onErrorSleepTime, m_configUtil.getOnErrorRetryIntervalTimeUnit(), appId, cluster, m_namespace); try {
m_configUtil.getOnErrorRetryIntervalTimeUnit().sleep(onErrorSleepTime);
} catch (InterruptedException e) {
//ignore
}
} // 组装查询配置的地址
url = assembleQueryConfigUrl(configService.getHomepageUrl(), appId, cluster, m_namespace,
dataCenter, m_remoteMessages.get(), m_configCache.get()); logger.debug("Loading config from {}", url); //创建HttpRequest对象
HttpRequest request = new HttpRequest(url);
if (!StringUtils.isBlank(secret)) {
Map<String, String> headers = Signature.buildHttpHeaders(url, appId, secret);
request.setHeaders(headers);
} Transaction transaction = Tracer.newTransaction("Apollo.ConfigService", "queryConfig");
transaction.addData("Url", url);
try {
// 发起请求,返回HttpResponse对象
HttpResponse<ApolloConfig> response = m_httpClient.doGet(request, ApolloConfig.class);
// 设置是否强制拉取缓存的标记为false
m_configNeedForceRefresh.set(false);
// 标记成功
m_loadConfigFailSchedulePolicy.success(); transaction.addData("StatusCode", response.getStatusCode());
transaction.setStatus(Transaction.SUCCESS); if (response.getStatusCode() == 304) {
logger.debug("Config server responds with 304 HTTP status code.");
// 无新的配置, 直接返回缓存的 ApolloConfig 对象
return m_configCache.get();
} // 有新的配置,进行返回新的ApolloConfig对象
ApolloConfig result = response.getBody(); logger.debug("Loaded config for {}: {}", m_namespace, result); return result;
} catch (ApolloConfigStatusCodeException ex) {
ApolloConfigStatusCodeException statusCodeException = ex;
//config not found
if (ex.getStatusCode() == 404) {
String message = String.format(
"Could not find config for namespace - appId: %s, cluster: %s, namespace: %s, " +
"please check whether the configs are released in Apollo!",
appId, cluster, m_namespace);
statusCodeException = new ApolloConfigStatusCodeException(ex.getStatusCode(),
message);
}
Tracer.logEvent("ApolloConfigException", ExceptionUtil.getDetailMessage(statusCodeException));
transaction.setStatus(statusCodeException);
exception = statusCodeException;
if(ex.getStatusCode() == 404) {
break retryLoopLabel;
}
} catch (Throwable ex) {
Tracer.logEvent("ApolloConfigException", ExceptionUtil.getDetailMessage(ex));
transaction.setStatus(ex);
exception = ex;
} finally {
transaction.complete();
} // if force refresh, do normal sleep, if normal config load, do exponential sleep
onErrorSleepTime = m_configNeedForceRefresh.get() ? m_configUtil.getOnErrorRetryInterval() :
m_loadConfigFailSchedulePolicy.fail();
} }
String message = String.format(
"Load Apollo Config failed - appId: %s, cluster: %s, namespace: %s, url: %s",
appId, cluster, m_namespace, url);
throw new ApolloConfigException(message, exception);
}
如果配置发生变更,回调
LocalFileConfigRepository.onRepositoryChange方法,从而将最新配置同步到LocalFileConfigRepository。而LocalFileConfigRepository在更新完本地文件缓存配置后,同样会回调DefaultConfig.onRepositoryChange同步内存缓存,具体源码我们在后文分析。
schedulePeriodicRefresh:
  // com.ctrip.framework.apollo.internals.RemoteConfigRepository#schedulePeriodicRefresh

  private void schedulePeriodicRefresh() {

    logger.debug("Schedule periodic refresh with interval: {} {}",

        m_configUtil.getRefreshInterval(), m_configUtil.getRefreshIntervalTimeUnit());

    m_executorService.scheduleAtFixedRate(

        new Runnable() {

          @Override

          public void run() {

            Tracer.logEvent("Apollo.ConfigService", String.format("periodicRefresh: %s", m_namespace));

            logger.debug("refresh config for namespace: {}", m_namespace);

            // 同步配置

            trySync();

            Tracer.logEvent("Apollo.Client.Version", Apollo.VERSION);

          }

          // 默认每5分钟同步一次配置

        }, m_configUtil.getRefreshInterval(), m_configUtil.getRefreshInterval(),

        m_configUtil.getRefreshIntervalTimeUnit());

  }
scheduleLongPollingRefresh():
  // com.ctrip.framework.apollo.internals.RemoteConfigRepository#scheduleLongPollingRefresh

  private void scheduleLongPollingRefresh() {

    //将自己注册到RemoteConfigLongPollService中,实现配置更新的实时通知

    //当RemoteConfigLongPollService长轮询到该RemoteConfigRepository的Namespace下的配置更新时,会回调onLongPollNotified()方法

    remoteConfigLongPollService.submit(m_namespace, this);

  }

  // com.ctrip.framework.apollo.internals.RemoteConfigRepository#onLongPollNotified

  public void onLongPollNotified(ServiceDTO longPollNotifiedServiceDto, ApolloNotificationMessages remoteMessages) {

    //设置长轮询到配置更新的Config Service 下次同步配置时,优先读取该服务

    m_longPollServiceDto.set(longPollNotifiedServiceDto);

    m_remoteMessages.set(remoteMessages);

    // 提交同步任务

    m_executorService.submit(new Runnable() {

      @Override

      public void run() {

        // 设置是否强制拉取缓存的标记为true

        m_configNeedForceRefresh.set(true);

        //尝试同步配置

        trySync();

      }

    });

  }
2.4.2 RemoteConfigLongPollService
RemoteConfigLongPollService 远程配置长轮询服务。负责长轮询 Apollo Server 的配置变更通知 /notifications/v2 接口。当有新的通知时,触发 RemoteConfigRepository.onLongPollNotified,立即轮询 Apollo Server 的配置读取/configs/{appId}/{clusterName}/{namespace:.+}接口。
构造方法:
public class RemoteConfigLongPollService {

  private static final Logger logger = LoggerFactory.getLogger(RemoteConfigLongPollService.class);

  private static final Joiner STRING_JOINER = Joiner.on(ConfigConsts.CLUSTER_NAMESPACE_SEPARATOR);

  private static final Joiner.MapJoiner MAP_JOINER = Joiner.on("&").withKeyValueSeparator("=");

  private static final Escaper queryParamEscaper = UrlEscapers.urlFormParameterEscaper();

  private static final long INIT_NOTIFICATION_ID = ConfigConsts.NOTIFICATION_ID_PLACEHOLDER;

  //90 seconds, should be longer than server side's long polling timeout, which is now 60 seconds

  private static final int LONG_POLLING_READ_TIMEOUT = 90 * 1000;

  /**

   * 长轮询ExecutorService

   */

  private final ExecutorService m_longPollingService;

  /**

   * 是否停止长轮询的标识

   */

  private final AtomicBoolean m_longPollingStopped;

  /**

   * 失败定时重试策略

   */

  private SchedulePolicy m_longPollFailSchedulePolicyInSecond;

  /**

   * 长轮询的RateLimiter

   */

  private RateLimiter m_longPollRateLimiter;

  /**

   * 是否长轮询已经开始的标识

   */

  private final AtomicBoolean m_longPollStarted;

  /**

   * 长轮询的Namespace Multimap缓存

   * key:namespace的名字

   * value:RemoteConfigRepository集合

   */

  private final Multimap<String, RemoteConfigRepository> m_longPollNamespaces;

  /**

   * 通知编号Map缓存

   * key:namespace的名字

   * value:最新的通知编号

   */

  private final ConcurrentMap<String, Long> m_notifications;

  /**

   * 通知消息Map缓存

   * key:namespace的名字

   * value:ApolloNotificationMessages 对象

   */

  private final Map<String, ApolloNotificationMessages> m_remoteNotificationMessages;//namespaceName -> watchedKey -> notificationId

  private Type m_responseType;

  private static final Gson GSON = new Gson();

  private ConfigUtil m_configUtil;

  private HttpClient m_httpClient;

  private ConfigServiceLocator m_serviceLocator;

  private final ConfigServiceLoadBalancerClient configServiceLoadBalancerClient = ServiceBootstrap.loadPrimary(

      ConfigServiceLoadBalancerClient.class);

  /**

   * Constructor.

   */

  public RemoteConfigLongPollService() {

    m_longPollFailSchedulePolicyInSecond = new ExponentialSchedulePolicy(1, 120); //in second

    m_longPollingStopped = new AtomicBoolean(false);

    m_longPollingService = Executors.newSingleThreadExecutor(

        ApolloThreadFactory.create("RemoteConfigLongPollService", true));

    m_longPollStarted = new AtomicBoolean(false);

    m_longPollNamespaces =

        Multimaps.synchronizedSetMultimap(HashMultimap.<String, RemoteConfigRepository>create());

    m_notifications = Maps.newConcurrentMap();

    m_remoteNotificationMessages = Maps.newConcurrentMap();

    m_responseType = new TypeToken<List<ApolloConfigNotification>>() {

    }.getType();

    m_configUtil = ApolloInjector.getInstance(ConfigUtil.class);

    m_httpClient = ApolloInjector.getInstance(HttpClient.class);

    m_serviceLocator = ApolloInjector.getInstance(ConfigServiceLocator.class);

    m_longPollRateLimiter = RateLimiter.create(m_configUtil.getLongPollQPS());

  }

}
submit:
  // com.ctrip.framework.apollo.internals.RemoteConfigLongPollService#submit

  public boolean submit(String namespace, RemoteConfigRepository remoteConfigRepository) {

    // 将远程仓库缓存下来

    boolean added = m_longPollNamespaces.put(namespace, remoteConfigRepository);

    m_notifications.putIfAbsent(namespace, INIT_NOTIFICATION_ID);

    if (!m_longPollStarted.get()) {

      // 若未启动长轮询定时任务,进行启动

      startLongPolling();

    }

    return added;

  }
startLongPolling:
  // com.ctrip.framework.apollo.internals.RemoteConfigLongPollService#startLongPolling

  private void startLongPolling() {

    // CAS设置 m_longPollStarted 为 true,代表长轮询已启动

    if (!m_longPollStarted.compareAndSet(false, true)) {

      //already started

      return;

    }

    try {

      final String appId = m_configUtil.getAppId();

      final String cluster = m_configUtil.getCluster();

      final String dataCenter = m_configUtil.getDataCenter();

      final String secret = m_configUtil.getAccessKeySecret();

      // 获得长轮询任务的初始化延迟时间,单位毫秒

      final long longPollingInitialDelayInMills = m_configUtil.getLongPollingInitialDelayInMills();

      // 提交长轮询任务 该任务会持续且循环执行

      m_longPollingService.submit(new Runnable() {

        @Override

        public void run() {

          if (longPollingInitialDelayInMills > 0) {

            try {

              logger.debug("Long polling will start in {} ms.", longPollingInitialDelayInMills);

              TimeUnit.MILLISECONDS.sleep(longPollingInitialDelayInMills);

            } catch (InterruptedException e) {

              //ignore

            }

          }

          // 执行长轮询

          doLongPollingRefresh(appId, cluster, dataCenter, secret);

        }

      });

    } catch (Throwable ex) {

      m_longPollStarted.set(false);

      ApolloConfigException exception =

          new ApolloConfigException("Schedule long polling refresh failed", ex);

      Tracer.logError(exception);

      logger.warn(ExceptionUtil.getDetailMessage(exception));

    }

  }
doLongPollingRefresh:
  // com.ctrip.framework.apollo.internals.RemoteConfigLongPollService#doLongPollingRefresh

  private void doLongPollingRefresh(String appId, String cluster, String dataCenter, String secret) {

    ServiceDTO lastServiceDto = null;

    // 循环执行,直到停止或线程中断

    while (!m_longPollingStopped.get() && !Thread.currentThread().isInterrupted()) {

      if (!m_longPollRateLimiter.tryAcquire(5, TimeUnit.SECONDS)) {

        //wait at most 5 seconds

        try {

          // 若被限流,则等待5s

          TimeUnit.SECONDS.sleep(5);

        } catch (InterruptedException e) {

        }

      }

      Transaction transaction = Tracer.newTransaction("Apollo.ConfigService", "pollNotification");

      String url = null;

      try {

        // 获得Apollo Server的地址

        if (lastServiceDto == null) {

          lastServiceDto = this.resolveConfigService();

        }

        // 组装长轮询通知变更的地址

        url =

            assembleLongPollRefreshUrl(lastServiceDto.getHomepageUrl(), appId, cluster, dataCenter,

                m_notifications);

        logger.debug("Long polling from {}", url);

        // 创建HttpRequest对象,并设置超时时间

        HttpRequest request = new HttpRequest(url);

        request.setReadTimeout(LONG_POLLING_READ_TIMEOUT);

        if (!StringUtils.isBlank(secret)) {

          Map<String, String> headers = Signature.buildHttpHeaders(url, appId, secret);

          request.setHeaders(headers);

        }

        transaction.addData("Url", url);

        // 发起请求,返回HttpResponse对象

        final HttpResponse<List<ApolloConfigNotification>> response =

            m_httpClient.doGet(request, m_responseType);

        logger.debug("Long polling response: {}, url: {}", response.getStatusCode(), url);

        // 有新的通知,刷新本地的缓存

        if (response.getStatusCode() == 200 && response.getBody() != null) {

          updateNotifications(response.getBody());

          updateRemoteNotifications(response.getBody());

          transaction.addData("Result", response.getBody().toString());

          // 通知对应的RemoteConfigRepository们

          notify(lastServiceDto, response.getBody());

        }

        //try to load balance

        // 无新的通知,重置连接的Config Service的地址,下次请求不同的Config Service,实现负载均衡

        if (response.getStatusCode() == 304 && ThreadLocalRandom.current().nextBoolean()) {

          lastServiceDto = null;

        }

        // 标记成功

        m_longPollFailSchedulePolicyInSecond.success();

        transaction.addData("StatusCode", response.getStatusCode());

        transaction.setStatus(Transaction.SUCCESS);

      } catch (Throwable ex) {

        lastServiceDto = null;

        Tracer.logEvent("ApolloConfigException", ExceptionUtil.getDetailMessage(ex));

        transaction.setStatus(ex);

        long sleepTimeInSecond = m_longPollFailSchedulePolicyInSecond.fail();

        logger.warn(

            "Long polling failed, will retry in {} seconds. appId: {}, cluster: {}, namespaces: {}, long polling url: {}, reason: {}",

            sleepTimeInSecond, appId, cluster, assembleNamespaces(), url, ExceptionUtil.getDetailMessage(ex));

        try {

          TimeUnit.SECONDS.sleep(sleepTimeInSecond);

        } catch (InterruptedException ie) {

          //ignore

        }

      } finally {

        transaction.complete();

      }

    }

  }
notify:
  private void notify(ServiceDTO lastServiceDto, List<ApolloConfigNotification> notifications) {

    if (notifications == null || notifications.isEmpty()) {

      return;

    }

    for (ApolloConfigNotification notification : notifications) {

      String namespaceName = notification.getNamespaceName();

      // 创建新的RemoteConfigRepository数组,避免并发问题

      List<RemoteConfigRepository> toBeNotified =

          Lists.newArrayList(m_longPollNamespaces.get(namespaceName));

      // 获得远程的ApolloNotificationMessages对象并克隆

      ApolloNotificationMessages originalMessages = m_remoteNotificationMessages.get(namespaceName);

      ApolloNotificationMessages remoteMessages = originalMessages == null ? null : originalMessages.clone();

      //since .properties are filtered out by default, so we need to check if there is any listener for it

      toBeNotified.addAll(m_longPollNamespaces

          .get(String.format("%s.%s", namespaceName, ConfigFileFormat.Properties.getValue())));

      // 循环RemoteConfigRepository进行通知

      for (RemoteConfigRepository remoteConfigRepository : toBeNotified) {

        try {

          // 回调 RemoteConfigRepository.onLongPollNotified 方法,让其重新拉取最新的配置

          remoteConfigRepository.onLongPollNotified(lastServiceDto, remoteMessages);

        } catch (Throwable ex) {

          Tracer.logError(ex);

        }

      }

    }

  }
至此 RemoteConfigRepository 从远端拉取配置的整个流程就已经分析完毕,Spring启动流程创建 RemoteConfigRepository 对象时会尝试第一次拉取namespace对应的配置,拉取完后会创建定时拉取任务和长轮询任务,长轮询任务调用 RemoteConfigLongPollService#startLongPolling 来实现,若服务端配置发生变更,则会回调 RemoteConfigRepository#onLongPollNotified 方法,在这个方法中会调用 RemoteConfigRepository#sync 方法重新拉取对应 namespace 的远端配置。
2.4.3 LocalFileConfigRepository
前文我们提到当服务端配置发生变更后,RemoteConfigRepository 会收到配置变更通知并调用 sync 方法同步配置,若配置发生变更,则会继续回调 LocalFileConfigRepository#onRepositoryChange:
// LocalFileConfigRepository.onRepositoryChange

  @Override

  public void onRepositoryChange(String namespace, Properties newProperties) {

    if (newProperties.equals(m_fileProperties)) {

      return;

    }

    Properties newFileProperties = propertiesFactory.getPropertiesInstance();

    newFileProperties.putAll(newProperties);

    // 将最新配置写入本地文件

    updateFileProperties(newFileProperties, m_upstream.getSourceType());

    // 回调 DefaultConfig.onRepositoryChange 方法

    this.fireRepositoryChange(namespace, newProperties);

  }
2.4.4 DefaultConfig
当 LocalFileConfigRepository 收到 RemoteConfigRepository 的配置变更通知并更新本地配置文件后,会继续回调 DefaultConfig#onRepositoryChange:
 // com.ctrip.framework.apollo.internals.DefaultConfig#onRepositoryChange

  @Override

  public synchronized void onRepositoryChange(String namespace, Properties newProperties) {

    // 如果属性配置未发生变更,则直接退出

    if (newProperties.equals(m_configProperties.get())) {

      return;

    }

    // 获取配置源类型,默认情况下 这里是 LocalFileConfigRepository

    ConfigSourceType sourceType = m_configRepository.getSourceType();

    Properties newConfigProperties = propertiesFactory.getPropertiesInstance();

    newConfigProperties.putAll(newProperties);

    // 更新配置缓存,并计算实际发生变更的key, key为发生变更的配置key,value是发生变更的配置信息

    Map<String, ConfigChange> actualChanges = updateAndCalcConfigChanges(newConfigProperties,

        sourceType);

    //check double checked result

    if (actualChanges.isEmpty()) {

      // 如果未发生属性变更,则直接退出

      return;

    }

    // 发送 属性变更给注册的 ConfigChangeListener

    this.fireConfigChange(m_namespace, actualChanges);

    Tracer.logEvent("Apollo.Client.ConfigChanges", m_namespace);

  }
整体流程:
更新配置缓存,并计算实际发生变更的key,key为发生变更的配置key,value是发生变更的配置信息:
例如我们变更
test.hello配置以及新增一个test.hello3配置: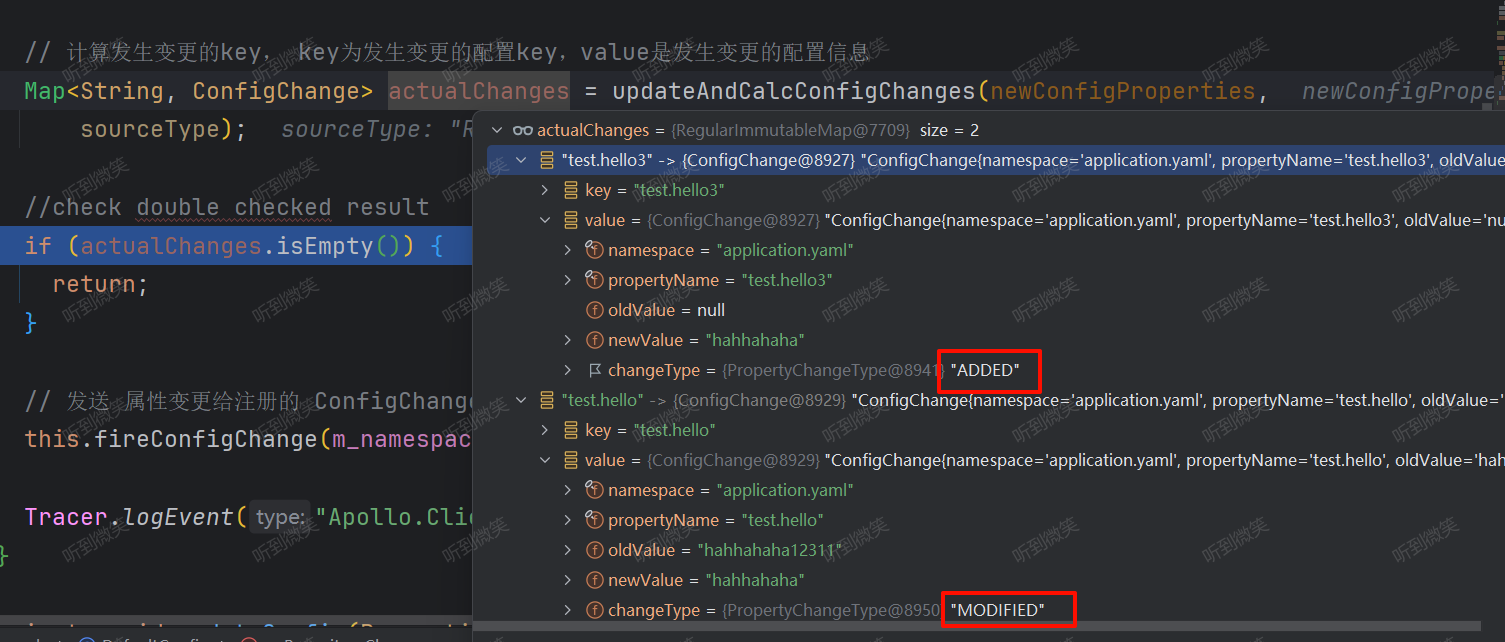
发送属性变更通知,注意在这里就不像
Resporsitory层发送的是整个仓库的变更事件,而发送的是某一个属性变更的事件。Repository配置变更事件监听是实现RepositoryChangeListener,属性变更事件监听是实现ConfigChangeListener
三. Apollo如何实现Spring Bean配置属性的实时更新
在 SpringBoot 中使用 Apollo 客户端一般都需要启用 @EnableApolloConfig 注解:
@Retention(RetentionPolicy.RUNTIME)

@Target(ElementType.TYPE)

@Documented

@Import(ApolloConfigRegistrar.class)

public @interface EnableApolloConfig {

  /**

   * Apollo namespaces to inject configuration into Spring Property Sources.

   */

  String[] value() default {ConfigConsts.NAMESPACE_APPLICATION};

  /**

   * The order of the apollo config, default is {@link Ordered#LOWEST_PRECEDENCE}, which is Integer.MAX_VALUE.

   * If there are properties with the same name in different apollo configs, the apollo config with smaller order wins.

   * @return

   */

  int order() default Ordered.LOWEST_PRECEDENCE;

}
@EnableApolloConfig 通过 @Import 注解注入了 ApolloConfigRegistrar 类,该类是Apollo组件注入的入口:
public class ApolloConfigRegistrar implements ImportBeanDefinitionRegistrar, EnvironmentAware {

  private final ApolloConfigRegistrarHelper helper = ServiceBootstrap.loadPrimary(ApolloConfigRegistrarHelper.class);

  @Override

  public void registerBeanDefinitions(AnnotationMetadata importingClassMetadata, BeanDefinitionRegistry registry) {

    helper.registerBeanDefinitions(importingClassMetadata, registry);

  }

  @Override

  public void setEnvironment(Environment environment) {

    this.helper.setEnvironment(environment);

  }

}
该类实现了两个扩展点:
- EnvironmentAware:凡注册到Spring容器内的bean,实现了EnvironmentAware接口重写setEnvironment方法后,在工程启动时可以获得application.properties的配置文件配置的属性值。
- ImportBeanDefinitionRegistrar:该扩展点作用是通过自定义的方式直接向容器中注册bean。实现ImportBeanDefinitionRegistrar接口,在重写的registerBeanDefinitions方法中定义的Bean,就和使用xml中定义Bean效果是一样的。ImportBeanDefinitionRegistrar是Spring框架提供的一种机制,允许通过api代码向容器批量注册BeanDefinition。它实现了BeanFactoryPostProcessor接口,可以在所有bean定义加载到容器之后,bean实例化之前,对bean定义进行修改。使用ImportBeanDefinitionRegistrar,我们可以向容器中批量导入bean,而不需要在配置文件中逐个配置。
ApolloConfigRegistrar#setEnvironment 将 Environment 暂存下来;ApolloConfigRegistrar#registerBeanDefinitions 中调用 ApolloConfigRegistrarHelper.registerBeanDefinitions 注册了一系列Spring扩展点实例至Ioc容器:
  // com.ctrip.framework.apollo.spring.spi.DefaultApolloConfigRegistrarHelper#registerBeanDefinitions

  @Override

  public void registerBeanDefinitions(AnnotationMetadata importingClassMetadata, BeanDefinitionRegistry registry) {

    AnnotationAttributes attributes = AnnotationAttributes

        .fromMap(importingClassMetadata.getAnnotationAttributes(EnableApolloConfig.class.getName()));

    final String[] namespaces = attributes.getStringArray("value");

    final int order = attributes.getNumber("order");

    final String[] resolvedNamespaces = this.resolveNamespaces(namespaces);

    PropertySourcesProcessor.addNamespaces(Lists.newArrayList(resolvedNamespaces), order);

    Map<String, Object> propertySourcesPlaceholderPropertyValues = new HashMap<>();

    // to make sure the default PropertySourcesPlaceholderConfigurer's priority is higher than PropertyPlaceholderConfigurer

    propertySourcesPlaceholderPropertyValues.put("order", 0);

    // PropertySourcesPlaceholderConfigurer是 SpringBoot 框架自身的占位符处理配置,占位符的处理主要是将 ${apollo.value} 这样的字符串解析出 关键字 apollo.value,再使用这个 key 通过 PropertySourcesPropertyResolver 从 PropertySource 中找到对应的属性值替换掉占位符

    BeanRegistrationUtil.registerBeanDefinitionIfNotExists(registry, PropertySourcesPlaceholderConfigurer.class,

            propertySourcesPlaceholderPropertyValues);

    BeanRegistrationUtil.registerBeanDefinitionIfNotExists(registry, AutoUpdateConfigChangeListener.class);

    // 用于拉取 @EnableApolloConfig 配置的 namespace 的远程配置

    BeanRegistrationUtil.registerBeanDefinitionIfNotExists(registry, PropertySourcesProcessor.class);

    // 用于处理 Apollo 的专用注解

    BeanRegistrationUtil.registerBeanDefinitionIfNotExists(registry, ApolloAnnotationProcessor.class);

    // 用于处理 @Value 注解标注的类成员变量和对象方法

    BeanRegistrationUtil.registerBeanDefinitionIfNotExists(registry, SpringValueProcessor.class);

    // 用于处理 XML 文件中的占位符

    BeanRegistrationUtil.registerBeanDefinitionIfNotExists(registry, SpringValueDefinitionProcessor.class);

  }
PropertySourcesProcessor 是 Apollo 最关键的组件之一,并且其实例化优先级也是最高的,PropertySourcesProcessor#postProcessBeanFactory() 会在该类实例化的时候被回调,该方法的处理如下:
  // com.ctrip.framework.apollo.spring.config.PropertySourcesProcessor#postProcessBeanFactory

  @Override

  public void postProcessBeanFactory(ConfigurableListableBeanFactory beanFactory) throws BeansException {

    this.configUtil = ApolloInjector.getInstance(ConfigUtil.class);

    // 调用 PropertySourcesProcessor#initializePropertySources() 拉取远程 namespace 配置

    initializePropertySources();

    // 调用 PropertySourcesProcessor#initializeAutoUpdatePropertiesFeature() 给所有缓存在本地的 Config 配置添加监听器

    initializeAutoUpdatePropertiesFeature(beanFactory);

  }
调用
PropertySourcesProcessor#initializePropertySources()拉取远程 namespace 配置:调用
PropertySourcesProcessor#initializeAutoUpdatePropertiesFeature()给所有缓存在本地的 Config 配置添加监听器// com.ctrip.framework.apollo.spring.config.PropertySourcesProcessor#initializeAutoUpdatePropertiesFeature
private void initializeAutoUpdatePropertiesFeature(ConfigurableListableBeanFactory beanFactory) {
if (!AUTO_UPDATE_INITIALIZED_BEAN_FACTORIES.add(beanFactory)) {
return;
} // 当收到配置变更回调后,会发送 ApolloConfigChangeEvent 事件
ConfigChangeListener configChangeEventPublisher = changeEvent ->

applicationEventPublisher.publishEvent(new ApolloConfigChangeEvent(changeEvent)); List<ConfigPropertySource> configPropertySources = configPropertySourceFactory.getAllConfigPropertySources();
for (ConfigPropertySource configPropertySource : configPropertySources) {
// 将配置变更监听器注册进 DefaultConfig中
configPropertySource.addChangeListener(configChangeEventPublisher);
}
}
ConfigPropertySource#addChangeListener()方法如下,在上文中分析过ConfigPropertySource包装类,我们知道这里的this.source.addChangeListener(listener)实际调用的是DefaultConfig#addChangeListener()方法。在上文中我们了解DefaultConfig收到来自LocalFileConfigRepository配置变更后,会计算出具体的属性变更信息,并回调ConfigChangeListener#onChange方法,而在这里的定义中,onChange方法会发送一个ApolloConfigChangeEvent类型的Spring事件:ConfigChangeListener configChangeEventPublisher = changeEvent ->
applicationEventPublisher.publishEvent(new ApolloConfigChangeEvent(changeEvent));
在 DefaultApolloConfigRegistrarHelper#registerBeanDefinitions 会注册 AutoUpdateConfigChangeListener Bean进入Ioc容器,而该监听器就是用于监听 ApolloConfigChangeEvent 事件,当属性发生变更调用 AutoUpdateConfigChangeListener#onChange 方法:
 // com.ctrip.framework.apollo.spring.property.AutoUpdateConfigChangeListener#onChange

 @Override

  public void onChange(ConfigChangeEvent changeEvent) {

    Set<String> keys = changeEvent.changedKeys();

    if (CollectionUtils.isEmpty(keys)) {

      return;

    }

    for (String key : keys) {

      // 1. check whether the changed key is relevant

      Collection<SpringValue> targetValues = springValueRegistry.get(beanFactory, key);

      if (targetValues == null || targetValues.isEmpty()) {

        continue;

      }

      // 2. update the value

      for (SpringValue val : targetValues) {

        updateSpringValue(val);

      }

    }

  }
onChange 方法会调用 updateSpringValue 更新对应Bean的属性值:
  // com.ctrip.framework.apollo.spring.property.AutoUpdateConfigChangeListener#updateSpringValue

  private void updateSpringValue(SpringValue springValue) {

    try {

      Object value = resolvePropertyValue(springValue);

      springValue.update(value);

      logger.info("Auto update apollo changed value successfully, new value: {}, {}", value,

          springValue);

    } catch (Throwable ex) {

      logger.error("Auto update apollo changed value failed, {}", springValue.toString(), ex);

    }

  }
- 首先调用
AutoUpdateConfigChangeListener#resolvePropertyValue()方法借助 SpringBoot 的组件将 @Value 中配置的占位符替换为 PropertySource 中的对应 key 的属性值,此处涉及到 Spring 创建 Bean 对象时的属性注入机制,比较复杂,暂不作深入分析。 - 调用
SpringValue#update()方法实际完成属性值的更新。
SpringValue#update()方法其实就是使用反射机制运行时修改 Bean 对象中的成员变量,至此自动更新完成:
 // com.ctrip.framework.apollo.spring.property.SpringValue#update

 public void update(Object newVal) throws IllegalAccessException, InvocationTargetException {

    if (isField()) {

      injectField(newVal);

    } else {

      injectMethod(newVal);

    }

  }

  private void injectField(Object newVal) throws IllegalAccessException {

    Object bean = beanRef.get();

    if (bean == null) {

      return;

    }

    boolean accessible = field.isAccessible();

    field.setAccessible(true);

    field.set(bean, newVal);

    field.setAccessible(accessible);

  }
四. 总结
Apollo 启动时会在 ApolloApplicationContextInitializer 扩展点开始加载远端配置,而Apollo客户端获取配置采用多层设计 DefaultConfig->LocalFileConfigRepository->RemoteConfigRepository,最终由 RemoteConfigRepository 完成远端配置拉取
每一层的作用各不一样:
RemoteConfigRepository负责拉取远端配置并通知LocalFileConfigRepository更新配置。LocalFileConfigRepository负责将远端配置缓存至本地文件,设计这一层主要是为了在Apollo Server 不可用时保证业务服务的可用性。当LocalFileConfigRepository配置发生变更时负责通知DefaultConfig更新配置。DefaultConfig负责缓存Apollo配置信息在内存中,当DefaultConfig配置发生变更时,会回调AutoUpdateConfigChangeListener#onChange方法更新Java Bean 中的属性。
Apollo 客户端为了能够实时更新 Apollo Server 中的配置,使用下列手段来实现服务端配置变更的感知:
客户端和服务端保持了一个长连接(通过Http Long Polling实现),从而能第一时间获得配置更新的推送(
RemoteConfigRepository)客户端还会定时从Apollo配置中心服务端拉取应用的最新配置。
这是一个fallback机制,为了防止推送机制失效导致配置不更新。客户端定时拉取会上报本地版本,所以一般情况下,对于定时拉取的操作,服务端都会返回304 - Not Modified
定时频率默认为每5分钟拉取一次,客户端也可以通过在运行时指定
System Property:apollo.refreshInterval来覆盖,单位为分钟
参考文章:
Apollo 客户端集成 SpringBoot 的源码分析(1)-启动时配置获取_spring 无法实例化apolloapplicationcontextinitializer的解决-CSDN博客
Apollo 客户端集成 SpringBoot 的源码分析(2)-配置属性的注入更新-CSDN博客
Spring Boot 启动生命周期分析,每个组件的执行时序,扩展点分析等【建议收藏】(持续更新,见到一个分析一个) - 掘金 (juejin.cn)
apollo client 自动更新深入解析 - 掘金 (juejin.cn)
SpringBoot快速入门-ImportBeanDefinitionRegistrar详解 – 编程技术之美-IT之美 (itzhimei.com)
一文读懂Apollo客户端配置加载流程的更多相关文章
- 一文读懂Spring动态配置多数据源---源码详细分析
Spring动态多数据源源码分析及解读 一.为什么要研究Spring动态多数据源 期初,最开始的原因是:想将答题服务中发送主观题答题数据给批改中间件这块抽象出来, 但这块主要使用的是mq消息的方式 ...
- 读懂CommonJS的模块加载
叨叨一会CommonJS Common这个英文单词的意思,相信大家都认识,我记得有一个词组common knowledge是常识的意思,那么CommonJS是不是也是类似于常识性的,大家都理解的意思呢 ...
- Dubbo 配置的加载流程
配置加载流程 在SpringBoot应用启动阶段,Dubbo的读取配置遵循以下原则 Dubbo支持了多层级的配置,按照预先定义的优先级自动实现配置之间的覆盖,最终所有的配置汇总到数据总线URL后,驱动 ...
- 即时通讯新手入门:一文读懂什么是Nginx?它能否实现IM的负载均衡?
本文引用了“蔷薇Nina”的“Nginx 相关介绍(Nginx是什么?能干嘛?)”一文部分内容,感谢作者的无私分享. 1.引言 Nginx(及其衍生产品)是目前被大量使用的服务端反向代理和负载均衡 ...
- 从HTTP/0.9到HTTP/2:一文读懂HTTP协议的历史演变和设计思路
本文原作者阮一峰,作者博客:ruanyifeng.com. 1.引言 HTTP 协议是最重要的互联网基础协议之一,它从最初的仅为浏览网页的目的进化到现在,已经是短连接通信的事实工业标准,最新版本 HT ...
- [转帖]一文读懂 HTTP/2
一文读懂 HTTP/2 http://support.upyun.com/hc/kb/article/1048799/ 又小拍 • 发表于:2017年05月18日 15:34:45 • 更新于:201 ...
- [转帖]从HTTP/0.9到HTTP/2:一文读懂HTTP协议的历史演变和设计思路
从HTTP/0.9到HTTP/2:一文读懂HTTP协议的历史演变和设计思路 http://www.52im.net/thread-1709-1-2.html 本文原作者阮一峰,作者博客:r ...
- 一文读懂HDMI和VGA接口针脚定义
一文读懂HDMI和VGA接口针脚定义 摘自:http://www.elecfans.com/yuanqijian/jiekou/20180423666604.html HDMI概述 HDMI是高清 ...
- kubernetes基础——一文读懂k8s
容器 容器与虚拟机对比图(左边为容器.右边为虚拟机) 容器技术是虚拟化技术的一种,以Docker为例,Docker利用Linux的LXC(LinuX Containers)技术.CGroup(Co ...
- 一文读懂HTTP/2及HTTP/3特性
摘要: 学习 HTTP/2 与 HTTP/3. 前言 HTTP/2 相比于 HTTP/1,可以说是大幅度提高了网页的性能,只需要升级到该协议就可以减少很多之前需要做的性能优化工作,当然兼容问题以及如何 ...
随机推荐
- mybatis 查询一对多子表只能查出一条数据
mybatis 插叙一对多子表只能查出一条数据 环境 ssm 持久层 mybatis 关联查询一对多<collection> 原因 主表id 和子表id 一样 处理方式: select ...
- OpenGauss数据库对象属主变更后会自动调整对象权限吗?
OpenGauss 数据库对象属主变更后会自动调整对象权限吗? OpenGauss 数据库创建了数据库对象之后,可以使用 alter 命令修改对象的属主. 以表为例,修改属主的命令如下: ALTER ...
- 元启发式算法库 MEALPY 初体验-遗传算法为例
简介 官网: MealPY官网 开源许可: (GPL) V3 MEALPY简介 官网简介翻译 MEALPY (MEta-heuristic ALgorithms in PYthon) 是一个提供最新自 ...
- 浅析eTS的起源和演进
原文:https://mp.weixin.qq.com/s/N2RPeboN8Fj0-8wBMZJ-7w,点击链接查看更多技术内容. 引言 Mozilla创造了JS,Microsoft创建了TS,Hu ...
- k8s之存储卷local PV
一.简介 local能够作为PV使用的本地存储卷. local卷插件用于将本地存储设备(如磁盘.分区或目录) 配置为卷. hostPath卷在Pod被重建后可能被调试至其它节点而无法再次使用此前的数据 ...
- Linux-搭建内网yum源
部署要求: 服务器:CentOS7 YUM源:阿里云 空间要求:CentOS6+CentOS7 50G,考虑后期更新预留,LVS空间100G 1.在服务器配置CentOS7的yum源和CentOS6的 ...
- 第十六篇:jQuery基础
一.jQuery和Dom的关系 http://jquery.cuishifeng.cn/ 模块,类库 DOM/BOM/JavaScript的类库: 二.jQuery选择器 1.查找元素 DOM: 10 ...
- nginx重新整理——————热部署和日志切割[三]
前言 简单演示热部署和日志切割. 正文 什么是热部署了,我们前文也说过了一个编译后的nginx 二进制. 热部署就是无需停止现有的nginx,替换正在运行的nginx. 步骤: 复制nginx 二进制 ...
- 论文记载: Deep Reinforcement Learning for Traffic LightControl in Vehicular Networks
强化学习论文记载 论文名: Deep Reinforcement Learning for Traffic LightControl in Vehicular Networks ( 车辆网络交通信号灯 ...
- HBuilderX 连接网易mumu手机模拟器进行App开发
1.下载安装手机模拟器 常见的安卓手机模拟器: 手机模拟器名称 对应端口号 夜神模拟器 62001 天天模拟器 6555 海马玩模拟器 26944 逍遥模拟器 21503 网易mumu模拟器 7555 ...
