keras实现简单性别识别(二分类问题)
keras实现简单性别识别(二分类问题)
第一步:准备好需要的库
- tensorflow 1.4.0
- h5py 2.7.0
- hdf5 1.8.15.1
- Keras 2.0.8
- opencv-python 3.3.0
- numpy 1.13.3+mkl
- 所需要的人脸检测模块
- mtcnn和opencv
- https://pan.baidu.com/s/1rhP7mcnAtiojhk8eiLroEw
第二步:准备数据集:
将性别不同的图片按照不同的分类放到不同的文件夹内。

数据集
https://pan.baidu.com/s/1_f36Gw4PWztUXZWH_jLWcw
 import shutil

 # 读取文件中图片信息根据性别分类图片到对应目录中

 dirroot = "D:\\Users\\a\\Pictures\\adience"

 f = open(dirroot+"\\fold_frontal_3_data.txt","r")

 i = 0

 for line in f.readlines():

     line = line.split()

     dir = line[0]

     imgName = "landmark_aligned_face."+ line[2] +'.'+ line[1]

     if i > 0:

         if line[5]== "f":

             print("female")

             shutil.copy(dirroot+'\\faces\\'+dir+'\\'+imgName, "D:\\pycode\\learn\\data\\validation\\"+imgName)

         #     移动图片到female目录

         elif line[5]=="m":

             print("male")

             shutil.copy(dirroot+'\\faces\\'+dir+'\\'+imgName, "D:\\pycode\\learn\\data\\validation\\"+imgName)

         #     移动图片到male目录

         else:

             print("N")

             # 未识别男女

     i += 1

 f.close()
使用ImageDataGenerator,来对图片进行归一化和随机旋转。使用flow_from_directory,来自动产生图片标签生成器。
 class Dataset(object):

     def __init__(self):

         self.train = None

         self.valid = None

     def read(self, img_rows=IMAGE_SIZE, img_cols=IMAGE_SIZE):

         train_datagen = ImageDataGenerator(

             rescale=1. / 255,

             horizontal_flip=True)

         test_datagen = ImageDataGenerator(rescale=1. / 255)

         train_generator = train_datagen.flow_from_directory(

             train_data_dir,

             target_size=(img_rows, img_cols),

             batch_size=batch_size,

             class_mode='binary')

         validation_generator = test_datagen.flow_from_directory(

             validation_data_dir,

             target_size=(img_rows, img_cols),

             batch_size=batch_size,

             class_mode='binary')

         self.train = train_generator

         self.valid = validation_generator
第三部:网络
 class Model(object):

     def __init__(self):

         self.model = Sequential()

         self.model.add(Conv2D(32, (3, 3), input_shape=(IMAGE_SIZE,IMAGE_SIZE,3)))

         self.model.add(Activation('relu'))

         self.model.add(MaxPooling2D(pool_size=(2, 2)))

         self.model.add(Conv2D(32, (3, 3)))

         self.model.add(Activation('relu'))

         self.model.add(MaxPooling2D(pool_size=(2, 2)))

         self.model.add(Conv2D(64, (3, 3)))

         self.model.add(Activation('relu'))

         self.model.add(MaxPooling2D(pool_size=(2, 2)))

         self.model.add(Conv2D(64, (3, 3)))

         self.model.add(Activation('relu'))

         self.model.add(MaxPooling2D(pool_size=(2, 2)))

         self.model.add(Flatten())

         self.model.add(Dense(64))

         self.model.add(Activation('relu'))

         self.model.add(Dropout(0.85))

         self.model.add(Dense(1))

         self.model.add(Activation('sigmoid'))

     def train(self, dataset, batch_size=batch_size, nb_epoch=epochs):

         self.model.compile(loss='binary_crossentropy',

                       optimizer='adam',

                       metrics=['accuracy'])

         self.model.fit_generator(dataset.train,

                                  steps_per_epoch=nb_train_samples // batch_size,

                                  epochs=epochs,

                                  validation_data=dataset.valid,

                                  validation_steps=nb_validation_samples//batch_size)

     def save(self, file_path=FILE_PATH):

         print('Model Saved.')

         self.model.save_weights(file_path)

     def load(self, file_path=FILE_PATH):

         print('Model Loaded.')

         self.model.load_weights(file_path)

     def predict(self, image):

         # 预测样本分类

         img = image.resize((1, IMAGE_SIZE, IMAGE_SIZE, 3))

         img = image.astype('float32')

         img /= 255

         #归一化

         result = self.model.predict(img)

         print(result)

         # 概率

         result = self.model.predict_classes(img)

         print(result)

         # 0/1

         return result[0]

     def evaluate(self, dataset):

         # 测试样本准确率

         score = self.model.evaluate_generator(dataset.valid,steps=2)

         print("样本准确率%s: %.2f%%" % (self.model.metrics_names[1], score[1] * 100))
第四部:主程序
 if __name__ == '__main__':

     dataset = Dataset()

     dataset.read()

     model = Model()

     model.load()

     model.train(dataset)

     model.evaluate(dataset)

     model.save()
第五步:识别程序
opencv检测模块版
#!/usr/bin/env python
"""
从摄像头中获取图像实时监测
"""
import numpy as np
import cv2
from GenderTrain import Model def detect(img, cascade):
"""
检测图像是否含有人脸部分
:param img: 待检测帧图像
:param cascade: 面部对象检测器
:return: 面部图像标记
"""
rects = cascade.detectMultiScale(img, scaleFactor=1.3, minNeighbors=4, minSize=(30, 30),
flags=cv2.CASCADE_SCALE_IMAGE)
if len(rects) == 0:
return []
rects[:,2:] += rects[:,:2]
return rects def draw_rects(img, rects, color):
"""
根据图像标记人脸区域与性别
:param img:
:param rects:
:param color:
:return:
"""
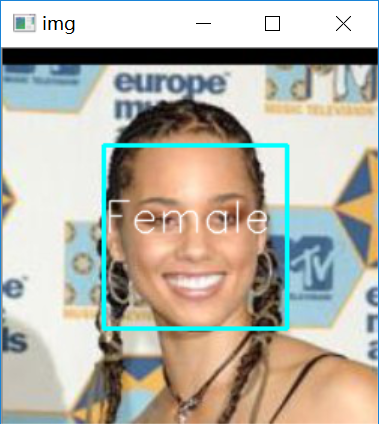
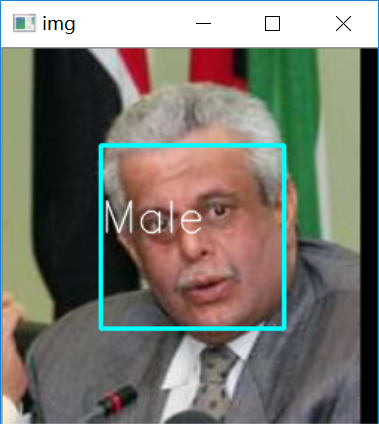
for x, y, w, h in rects:
face = img[x:x+w,y:y+h]
face = cv2.resize(face,(224,224))
if gender.predict(face)==1:
text = "Male"
else:
text = "Female"
cv2.rectangle(img, (x, y), (w, h), color, 2)
cv2.putText(img, text, (x, h), cv2.FONT_HERSHEY_SIMPLEX, 2.0, (255, 255, 255), lineType=cv2.LINE_AA) if __name__ == '__main__':
haar__cascade_path = "D:\\opencv\\sources\\data\\haarcascades\\haarcascade_frontalface_default.xml" cascade = cv2.CascadeClassifier( haar__cascade_path)
cam = cv2.VideoCapture(0)
# 获取摄像头视频
gender = Model()
gender.load()
# 加载性别模型
while True:
ret, img = cam.read()
# 读取帧图像
rects = detect(img, cascade)
print(rects)
vis = img.copy()
draw_rects(vis, rects, (0, 255, 0))
cv2.imshow('Gender', vis)
if cv2.waitKey(5) == 27:
break
cv2.destroyAllWindows()
MTCNN检测版
"""

从摄像头中获取图像实时监测

"""

import PIL

import numpy as np

import detect_face

import tensorflow as tf

import cv2

from GenderTrain import Model

with tf.Graph().as_default():

    gpu_options = tf.GPUOptions(per_process_gpu_memory_fraction=0.5)

    sess = tf.Session(config=tf.ConfigProto(gpu_options=gpu_options, log_device_placement=False))

    with sess.as_default():

        pnet, rnet, onet = detect_face.create_mtcnn(sess,

                                                    'E:\\pycode\\real-time-deep-face-recognition-master\\20170512-110547')

minsize = 20  # minimum size of face

threshold = [0.6, 0.7, 0.7]  # three steps's threshold

factor = 0.709  # scale factor

margin = 44

frame_interval = 3

batch_size = 1000

image_size = 182

input_image_size = 160

def draw_rects(img, rects, color):

    """

    根据图像标记人脸区域与性别

    :param img:

    :param rects:

    :param color:

    :return:

    """

    for x, y, w, h in rects:

        face = img[x:x+w,y:y+h]

        face = cv2.resize(face,(224,224))

        if gender.predict(face)==1:

            text = "Male"

        else:

            text = "Female"

        cv2.rectangle(img, (x, y), (w, h), color, 2)

        cv2.putText(img, text, (x, h), cv2.FONT_HERSHEY_SIMPLEX, 2.0, (255, 255, 255), lineType=cv2.LINE_AA)

if __name__ == '__main__':

    cam = cv2.VideoCapture(0)

    # 获取摄像头视频

    gender = Model()

    gender.load()

    # 加载性别模型

    while True:

        ret, img = cam.read()

        # 读取帧图像

        bounding_boxes, _ = detect_face.detect_face(img, minsize, pnet, rnet, onet, threshold, factor)

        # 读取帧图像

        for face_position in bounding_boxes:

            face_position = face_position.astype(int)

            print(face_position[0:4])

            rects = [[face_position[0], face_position[1], face_position[2], face_position[3]]]

            vis = img.copy()

            draw_rects(vis, rects, (255, 255, 255))

            cv2.imshow('Gender', vis)

        if cv2.waitKey(5) == 27:

            break

    cv2.destroyAllWindows()
完全版
import os

import random

import cv2

import numpy as np

from tensorflow.contrib.keras.api.keras.preprocessing.image import ImageDataGenerator,img_to_array

from tensorflow.contrib.keras.api.keras.models import Sequential

from tensorflow.contrib.keras.api.keras.layers import Dense, Dropout, Activation, Flatten

from tensorflow.contrib.keras.api.keras.layers import Conv2D, MaxPooling2D

from tensorflow.contrib.keras.api.keras.optimizers import SGD

IMAGE_SIZE = 182

# 训练图片大小

epochs = 150#原来是50

# 遍历次数

batch_size = 32

# 批量大小

nb_train_samples = 512*2

# 训练样本总数

nb_validation_samples = 128*2

# 测试样本总数

train_data_dir = 'D:\\code\\learn\\data_sex\\train_data\\'

validation_data_dir = 'D:\\data_sex\\test_data\\'

# 样本图片所在路径

FILE_PATH = 'Gender_new.h5'

# 模型存放路径

class Dataset(object):

    def __init__(self):

        self.train = None

        self.valid = None

    def read(self, img_rows=IMAGE_SIZE, img_cols=IMAGE_SIZE):

        train_datagen = ImageDataGenerator(

            rescale=1. / 255,

            horizontal_flip=True)

        test_datagen = ImageDataGenerator(rescale=1. / 255)

        train_generator = train_datagen.flow_from_directory(

            train_data_dir,

            target_size=(img_rows, img_cols),

            batch_size=batch_size,

            class_mode='binary')

        validation_generator = test_datagen.flow_from_directory(

            validation_data_dir,

            target_size=(img_rows, img_cols),

            batch_size=batch_size,

            class_mode='binary')

        self.train = train_generator

        self.valid = validation_generator

class Model(object):

    def __init__(self):

        self.model = Sequential()

        self.model.add(Conv2D(32, (3, 3), input_shape=(IMAGE_SIZE,IMAGE_SIZE,3)))

        self.model.add(Activation('relu'))

        self.model.add(MaxPooling2D(pool_size=(2, 2)))

        self.model.add(Conv2D(32, (3, 3)))

        self.model.add(Activation('relu'))

        self.model.add(MaxPooling2D(pool_size=(2, 2)))

        self.model.add(Conv2D(64, (3, 3)))

        self.model.add(Activation('relu'))

        self.model.add(MaxPooling2D(pool_size=(2, 2)))

        self.model.add(Flatten())

        self.model.add(Dense(64))

        self.model.add(Activation('relu'))

        self.model.add(Dropout(0.5))

        self.model.add(Dense(1))

        self.model.add(Activation('sigmoid'))

    def train(self, dataset, batch_size=batch_size, nb_epoch=epochs):

        self.model.compile(loss='binary_crossentropy',

                      optimizer='adam',

                      metrics=['accuracy'])

        self.model.fit_generator(dataset.train,

                                 steps_per_epoch=nb_train_samples // batch_size,

                                 epochs=epochs,

                                 validation_data=dataset.valid,

                                 validation_steps=nb_validation_samples//batch_size)

    def save(self, file_path=FILE_PATH):

        print('Model Saved.')

        self.model.save_weights(file_path)

    def load(self, file_path=FILE_PATH):

        print('Model Loaded.')

        self.model.load_weights(file_path)

    def predict(self, image):

        # 预测样本分类

        img = image.resize((1, IMAGE_SIZE, IMAGE_SIZE, 3))

        img = image.astype('float32')

        img /= 255

        #归一化

        result = self.model.predict(img)

        print(result)

        # 概率

        result = self.model.predict_classes(img)

        print(result)

        # 0/1

        return result[0]

    def evaluate(self, dataset):

        # 测试样本准确率

        score = self.model.evaluate_generator(dataset.valid,steps=2)

        print("样本准确率%s: %.2f%%" % (self.model.metrics_names[1], score[1] * 100))

if __name__ == '__main__':

    dataset = Dataset()

    dataset.read()

    model = Model()

    model.load()

    model.train(dataset)

    model.evaluate(dataset)

    model.save()
keras实现简单性别识别(二分类问题)的更多相关文章
- keras框架下的深度学习(二)二分类和多分类问题
本文第一部分是对数据处理中one-hot编码的讲解,第二部分是对二分类模型的代码讲解,其模型的建立以及训练过程与上篇文章一样:在最后我们将训练好的模型保存下来,再用自己的数据放入保存下来的模型中进行分 ...
- 1.keras实现-->自己训练卷积模型实现猫狗二分类(CNN)
原数据集:包含 25000张猫狗图像,两个类别各有12500 新数据集:猫.狗 (照片大小不一样) 训练集:各1000个样本 验证集:各500个样本 测试集:各500个样本 1= 狗,0= 猫 # 将 ...
- 基于Keras的imdb数据集电影评论情感二分类
IMDB数据集下载速度慢,可以在我的repo库中找到下载,下载后放到~/.keras/datasets/目录下,即可正常运行.)中找到下载,下载后放到~/.keras/datasets/目录下,即可正 ...
- [DeeplearningAI笔记]卷积神经网络4.1-4.5 人脸识别/one-shot learning/Siamase网络/Triplet损失/将面部识别转化为二分类问题
4.4特殊应用:人脸识别和神经网络风格转换 觉得有用的话,欢迎一起讨论相互学习~Follow Me 4.1什么是人脸识别 Face verification人脸验证 VS face recogniti ...
- xgb, lgb, Keras, LR(二分类、多分类代码)
preprocess # 通用的预处理框架 import pandas as pd import numpy as np import scipy as sp # 文件读取 def read_csv_ ...
- C++开发人脸性别识别教程(16)——视频人脸性别识别
在之前的博文中我们已经可以顺利驱动摄像头来採集源图像.在这篇博文中将正式为其加入性别识别的代码,实现摄像头视频的人脸性别识别. 一.人脸检測 在得到摄像头採集的源图像之后,首先要做的就是对其进行人脸检 ...
- C++开发人脸性别识别教程(5)——通过FaceRecognizer类实现性别识别
在之前的博客中已经攻克了人脸检測的问题,我们计划在这篇博客中介绍人脸识别.性别识别方面的相关实现方法. 事实上性别识别和人脸识别本质上是相似的,由于这里仅仅是一个简单的MFC开发,主要工作并不在算法研 ...
- 基于深度学习的人脸性别识别系统(含UI界面,Python代码)
摘要:人脸性别识别是人脸识别领域的一个热门方向,本文详细介绍基于深度学习的人脸性别识别系统,在介绍算法原理的同时,给出Python的实现代码以及PyQt的UI界面.在界面中可以选择人脸图片.视频进行检 ...
- 基于OpenCV性别识别
叙述性说明 所谓的性别识别推断检测到的面部是男性还是女性.它是一个二值分类问题. 识别算法可以用于SVM,BP神经网络.LDA,PCA,PCA+LDA等等.OpenCV官网给出的文档是基于Fisher ...
随机推荐
- java -- 对Map按键排序、按值排序
java -- 对Map按键.按值排序 1.按键排序(sort by key) 直接上代码 ↓ public Map<String, Str ...
- 在VirtualBox中的Ubuntu中添加新硬盘
步骤如下: 1. 关闭Ubuntu系统,打开VistualBox,"设置"->"存储"->"添加虚拟硬盘" 2. 启动Ubunt ...
- MariaDB/MySQL备份和恢复(一):mysqldump工具用法详述
本文目录:1.备份分类2.备份内容和备份工具3.mysqldump用法详述 3.1 语法选项 3.1.1 连接选项 3.1.2 筛选选项 3.1.3 DDL选项 3.1.4 字符集选项 3.1.5 复 ...
- kaggle入门项目:Titanic存亡预测(二)数据处理
原kaggle比赛地址:https://www.kaggle.com/c/titanic 原kernel地址:A Data Science Framework: To Achieve 99% Accu ...
- Python撸支付宝红包教程,行走在灰色产业边缘的程序员!
2018年刚到就作死撸羊毛(支付宝).2017年用分享给支付宝好友链接的官方通道"撸"了400大洋. 如许天天早上7:30便起床开愉快心的分享红包链接.200多个老友分享完一次 ...
- Python_字符串连接
#join() 与split()相反,join()方法用来将列表中多个字符串进行连接,并在相邻两个字符串之间插入指定字符 li=['apple','peach','banana','pear'] se ...
- webpack4:连奏中的进化
webpack4在2月底的时候发布,这次webpack4有了一个名字"Legato",也就是"连奏"的意思,寓意webpack在不断进化,而且是无缝(no-ga ...
- python装饰器小计
1.装饰器:本质是函数,是用来给其他函数添加附加扩展功能的函数,其返回值是一个函数(函数指针) 2.装饰器作用:不改变函数源代码和函数调用方式的前提下添加函数的附加功能. 3.装饰器储备知识点: A. ...
- javascript中!=、!==、==、===操作符总结
JavaScript 有两种比较方式:严格比较运算符和转换类型比较运算符. 在相等运算符中对应 === .!==和 ==.!=. 先举个栗子 var str = '1' var num0 = 0 va ...
- Linux Vim配置
用过很多vim配置的版本,怎么说,想轻量级就不要胡加乱七八糟的功能:如果不在乎反应是不是快速,侧重功能是否强大,可以参考vim大神的配置策略(spf13-vim)https://github.com/ ...