分布式消息中间件(二)ActiveMQ
一、概述
Apache出品,最流行的,能力强劲的开源消息总线。

1.JMS规范
Java消息服务(Java Message Service,即JMS)应用程序接口是一个Java平台中关于面向消息中间件(MOM)的API,用于应用程序之间,或分布式系统中发送消息,进行异步通信。Java消息服务是一个与具体平台无关的API。
JMS的对象模型
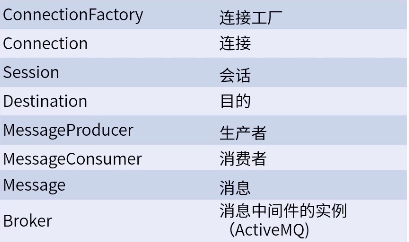
JMS的消息模型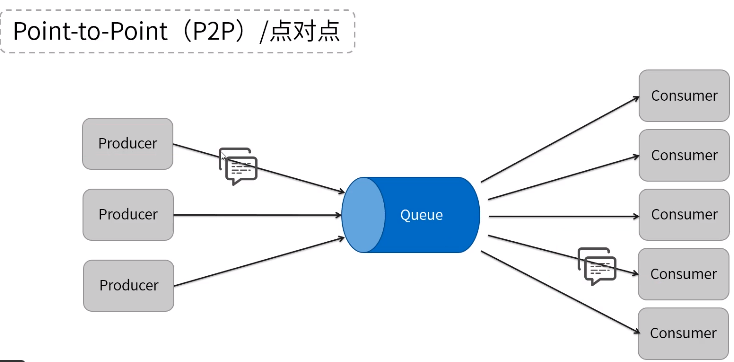
指定的数据给指定的消费者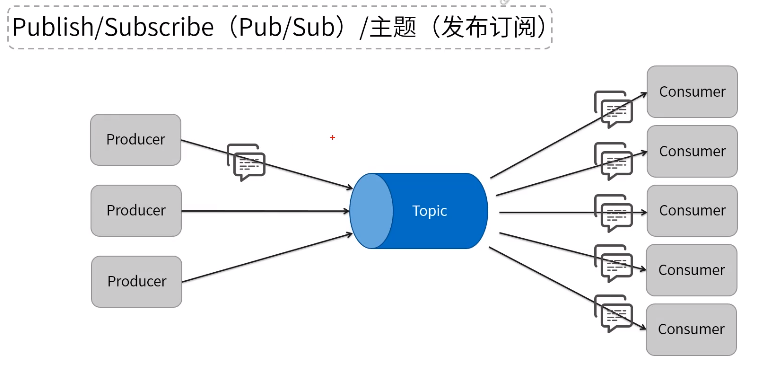
生产者发布消息,消息会传送给所有同一主题的消费者
JMS消息结构

消息头,关于一些消息的描述信息
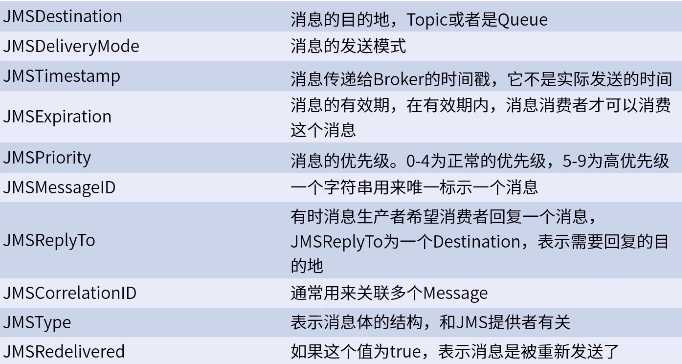
消息属性可以理解为消息的附加消息头,属性名可以自定义
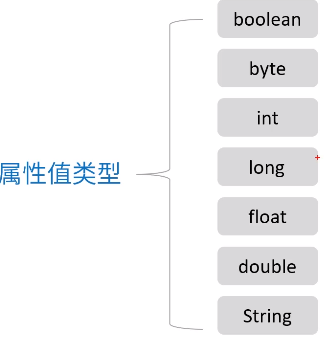
消息体类型

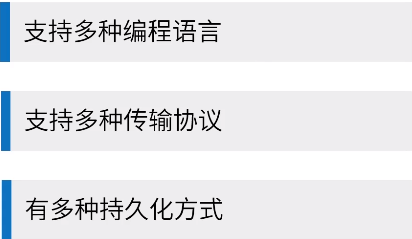
2.ActiveMQ的特性
3.安装和启动
centos7
下载 解压 文件夹改名activemq
放在了/var下面
启动
作为后台进程启动
[root@node01 activemq]# ./bin/activemq start

INFO: Loading '/bigdata/activemq//bin/env'

INFO: Using java '/usr/local/jdk/bin/java'

INFO: Starting - inspect logfiles specified in logging.properties and log4j.properties to get details

INFO: pidfile created : '/bigdata/activemq//data/activemq.pid' (pid '')
停止 则用stop
最好的方式是将ActiveMQ作为服务启动,使用system服务将可以确保ActiveMQ能在系统启动时自动启动。
使用vim创建已给systemd服务文件
vi /usr/lib/systemd/system/activemq.service
填写内容
    [Unit]

       Description=ActiveMQ service

       After=network.target

       [Service]

       Type=forking

       ExecStart=/var/activemq/bin/activemq start

       ExecStop=/var/activemq/bin/activemq stop

       User=root

      Group=root

      Restart=always

      RestartSec=

      StandardOutput=syslog

      StandardError=syslog

      SyslogIdentifier=activemq

      [Install]

      WantedBy=multi-user.target
3.修改/var/activemq/bin/env配置,最下面;将JAVA_HOME的注释取消,填入jdk安装路径
# Location of the java installation

# Specify the location of your java installation using JAVA_HOME, or specify the

# path to the "java" binary using JAVACMD

# (set JAVACMD to "auto" for automatic detection)

JAVA_HOME="/bigdata/jdk1.8.0_151"

JAVACMD="auto"
启动ActiveMQ服务
systemtcl start activemq
查看服务状态
systemctl status activemq
设置开机启动
ln -s /usr/lib/systemd/system/activemq.service/etc/systemd/system/multi-user.target.wants/activemq.service systemctl enable activemq
防火墙添加ActiveMQ的端口
ActiveMQ启动后,外部还无法访问,还需要在防火墙配置中增加ActiveMQ的Web管理端口和通讯端口。

使用ActiveMQ的Web管理平台
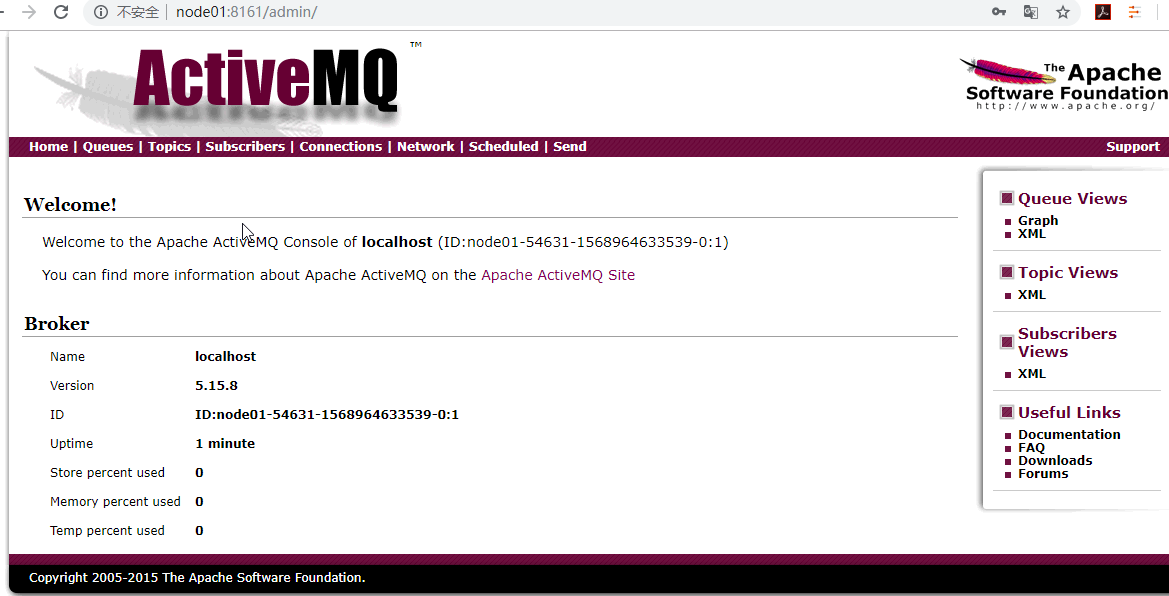
ActiveMQ自带有管理平台,在浏览器访问http://服务IP:8161/admin即可进入
默认开启了身份校验
账户:admin
密码:admin
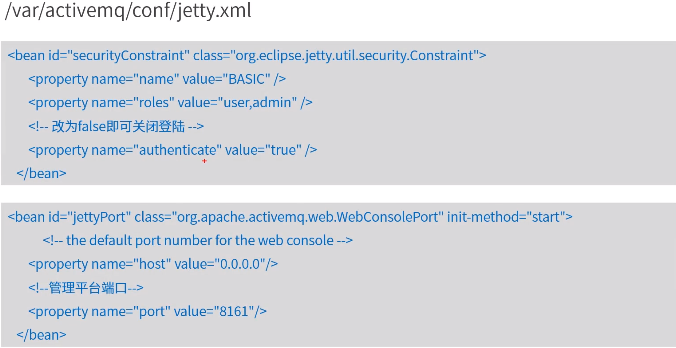
ActiveMQ的Web管理平台是基于jetty运行,因此在/var/activemq/conf目录可以看到jetty的配置文件
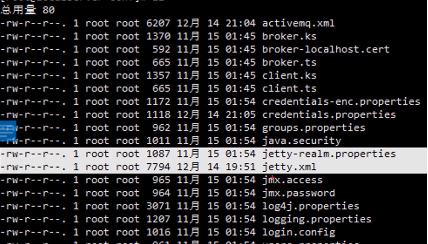
修改web管理平台的默认端口,在/var/activemq/conf/jetty.xml中

密码等

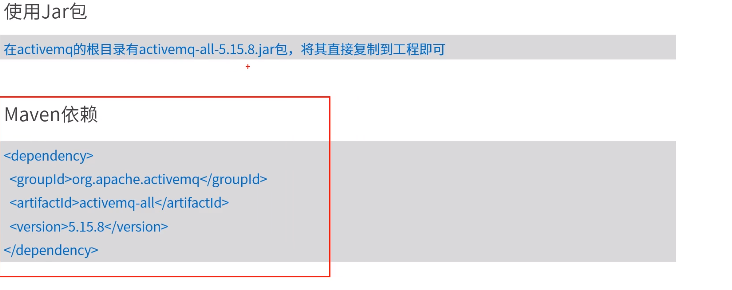
在Java中使用
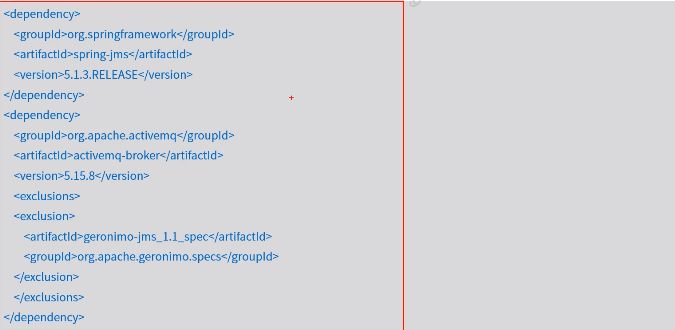
在Spring中使用
/**

 * 生产者事务

 *

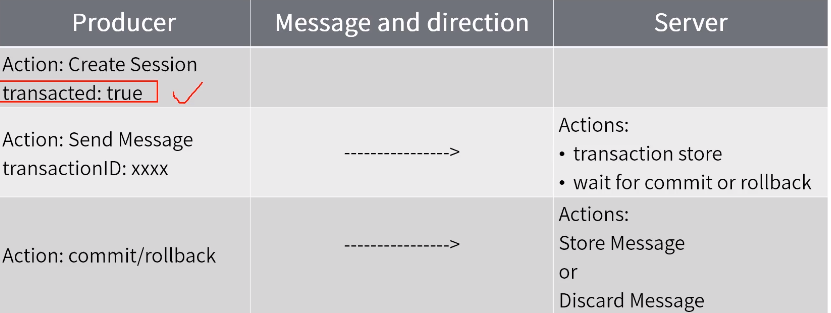
 * 生产者开启事务后,消息发送后,提交事务后,broker上的消息才能发到消费者

 */

public class Producer {

    public static void main(String[] args) {

        ActiveMQConnectionFactory connectionFactory;

        Connection conn = null;

        Session session = null;

        try {

            // 1、创建连接工厂

//            connectionFactory = new ActiveMQConnectionFactory("admin", "admin", "udp://vm1.tony.com:61616");

            connectionFactory = new ActiveMQConnectionFactory("admin", "admin", "tcp://192.168.99.151:61616");

            // 2、创建连接对象

            conn = connectionFactory.createConnection();

            conn.start();

            // 3、创建会话

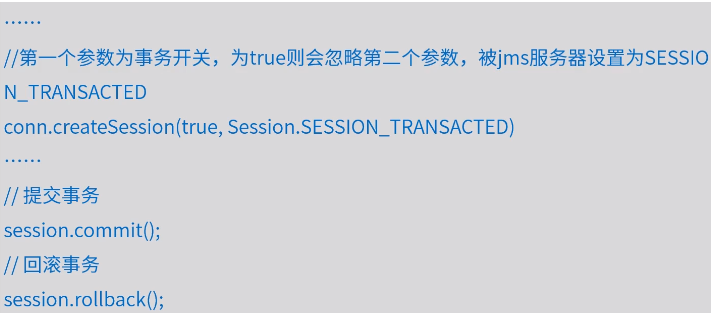
            // 第一个参数:是否支持事务,如果为true,则会忽略第二个参数,被jms服务器设置为SESSION_TRANSACTED

            // 第一个参数为false时,第二个参数的值可为Session.AUTO_ACKNOWLEDGE,Session.CLIENT_ACKNOWLEDGE,DUPS_OK_ACKNOWLEDGE其中一个。

            // Session.AUTO_ACKNOWLEDGE为自动确认,客户端发送和接收消息不需要做额外的工作。哪怕是接收端发生异常,也会被当作正常发送成功。

            // Session.CLIENT_ACKNOWLEDGE为客户端确认。客户端接收到消息后,必须调用javax.jms.Message的acknowledge方法。jms服务器才会当作发送成功,并删除消息。

            // DUPS_OK_ACKNOWLEDGE允许副本的确认模式。一旦接收方应用程序的方法调用从处理消息处返回,会话对象就会确认消息的接收;而且允许重复确认。

            session = conn.createSession(true, Session.AUTO_ACKNOWLEDGE);

            // 4、创建点对点发送的目标

            Destination destination = session.createQueue("queue2");

            // 创建发布的目标

//            Destination b4_destination = session.createTopic("topic1");

            // 5、创建生产者消息

            MessageProducer producer = session.createProducer(destination);

            // 设置生产者的模式,有两种可选

            // DeliveryMode.PERSISTENT 当activemq关闭的时候,队列数据将会被保存

            // DeliveryMode.NON_PERSISTENT 当activemq关闭的时候,队列里面的数据将会被清空

            producer.setDeliveryMode(DeliveryMode.NON_PERSISTENT);

            for (int i = 0; i < 10; i++) {

                // 6、创建一条消息

                // 有6中消息类型:

                // BytesMessage  用来传递字节

                // MapMessage    用来传递字节

                // ObjectMessage 用来传递序列化对象

                // StreamMessage 用来传递文件等

                // TextMessage   用来传递字符串

                String text = "Hello world! " + i;

                TextMessage message = session.createTextMessage(text);

                // 7、发送消息

                producer.send(message);

                if (i % 3 == 0) { // 3的倍数,发送,但回滚

                    session.rollback();

                } else {

                    // 在开启持久化模式时,commit后,会同步到磁盘

                    // 所以当一个原子步骤中发送大批量消息,不建议每条消息发送后提交,而是批量发送完后一次性提交,以最大限度地减少磁盘同步产生的延迟.

                    session.commit();

                }

            }

        } catch (JMSException e) {

            e.printStackTrace();

        } finally {

            if (conn != null) {

                try {

                    conn.close();

                } catch (JMSException e1) {

                    e1.printStackTrace();

                }

            }

            if (session != null) {

                try {

                    session.close();

                } catch (JMSException e1) {

                    e1.printStackTrace();

                }

            }

        }

    }

}
启动
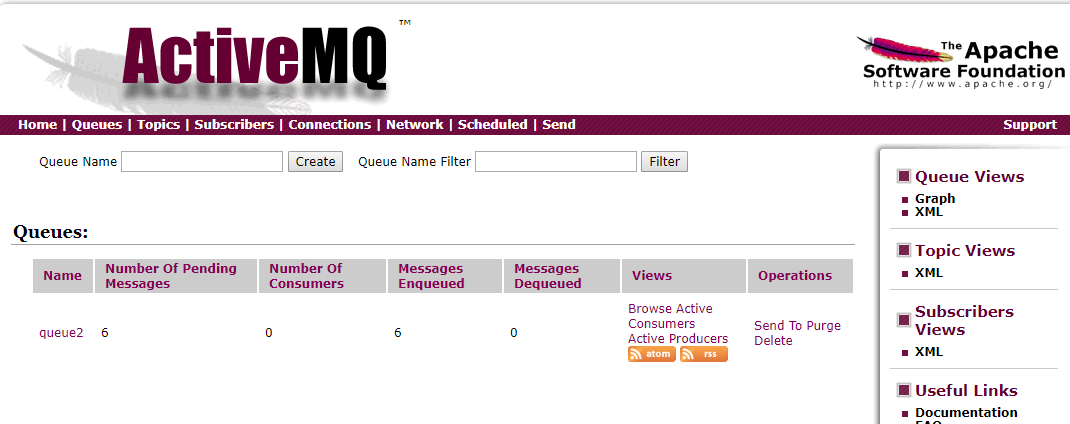
消费者
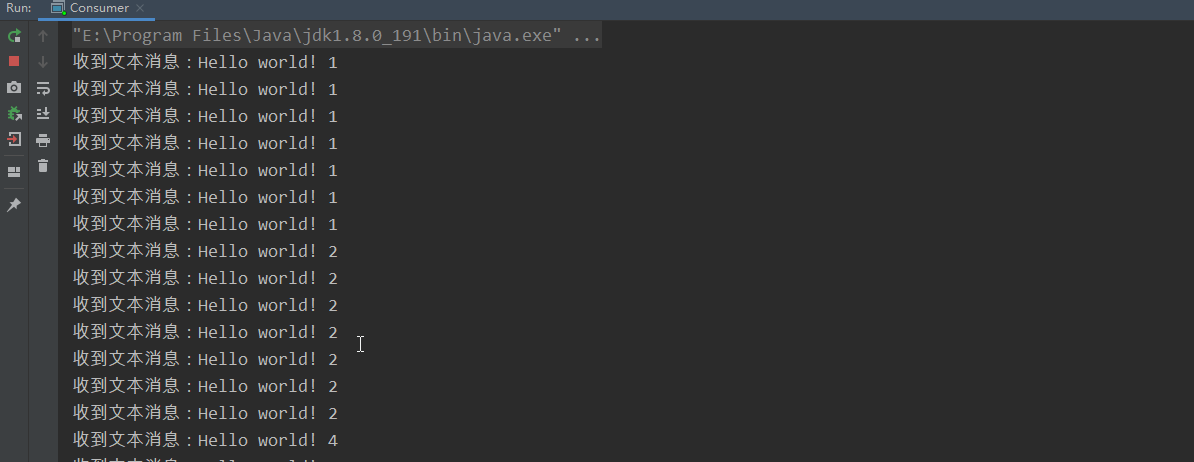
/**

 * 消费者事务

 *

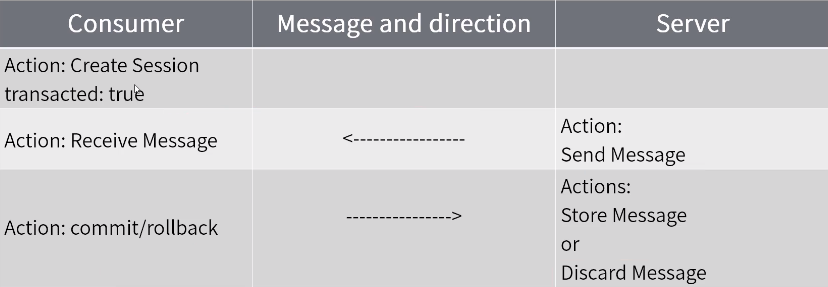
 * 消费者开启事务后,接收到消息后,需要手动提交事务,否则broker上的消息不会真正被消费

 */

// http://activemq.apache.org/destination-options.html

public class Consumer {

    public static void main(String[] args) {

        ActiveMQConnectionFactory connectionFactory = null;

        Connection conn = null;

        Session session = null;

        MessageConsumer consumer = null;

        try {

            // brokerURL http://activemq.apache.org/connection-configuration-uri.html

            // 1、创建连接工厂

            connectionFactory = new ActiveMQConnectionFactory("tcp://192.168.99.151:61616");

            // 2、创建连接对象

            conn = connectionFactory.createConnection("admin", "admin");

            conn.start();

            // 3、创建会话

            // 第一个参数:是否支持事务,如果为true,则会忽略第二个参数,被jms服务器设置为SESSION_TRANSACTED

            // 第一个参数为false时,第二个参数的值可为Session.AUTO_ACKNOWLEDGE,Session.CLIENT_ACKNOWLEDGE,DUPS_OK_ACKNOWLEDGE其中一个。

            // Session.AUTO_ACKNOWLEDGE为自动确认,客户端发送和接收消息不需要做额外的工作。哪怕是接收端发生异常,也会被当作正常发送成功。

            // Session.CLIENT_ACKNOWLEDGE为客户端确认。客户端接收到消息后,必须调用javax.jms.Message的acknowledge方法。jms服务器才会当作发送成功,并删除消息。

            // DUPS_OK_ACKNOWLEDGE允许副本的确认模式。一旦接收方应用程序的方法调用从处理消息处返回,会话对象就会确认消息的接收;而且允许重复确认。

            session = conn.createSession(true, Session.AUTO_ACKNOWLEDGE);

            // 4、创建点对点接收的目标

            Destination destination = session.createQueue("queue2");

            // 创建订阅的目标

//            Destination b4_destination = session.createTopic("topic1");

            // 5、创建消费者消息 http://activemq.apache.org/destination-options.html

            consumer = session.createConsumer(destination);

            // 6、接收消息

            Session finalSession = session;

            consumer.setMessageListener(new MessageListener() {

                @Override

                public void onMessage(Message message) {

                    if (message instanceof TextMessage) {

                        try {

                            System.out.println("收到文本消息:" + ((TextMessage) message).getText());

                        } catch (JMSException e) {

                            e.printStackTrace();

                        }

                    } else {

                        System.out.println(message);

                    }

                    try {

                        finalSession.rollback();

                    } catch (JMSException e) {

                        e.printStackTrace();

                    }

                }

            });

            System.in.read();

        } catch (JMSException e) {

            e.printStackTrace();

        } catch (IOException e) {

            e.printStackTrace();

        } finally {

            if (consumer != null) {

                try {

                    consumer.close();

                } catch (JMSException e) {

                    e.printStackTrace();

                }

            }

            if (session != null) {

                try {

                    session.close();

                } catch (JMSException e1) {

                    e1.printStackTrace();

                }

            }

            if (conn != null) {

                try {

                    conn.close();

                } catch (JMSException e1) {

                    e1.printStackTrace();

                }

            }

        }

    }

}
使用spring
pom
<?xml version="1.0" encoding="UTF-8"?>

<project xmlns="http://maven.apache.org/POM/4.0.0"

         xmlns:xsi="http://www.w3.org/2001/XMLSchema-instance"

         xsi:schemaLocation="http://maven.apache.org/POM/4.0.0 http://maven.apache.org/xsd/maven-4.0.0.xsd">

    <modelVersion>4.0.0</modelVersion>

    <groupId>com.study.mq</groupId>

    <artifactId>activemq-spring</artifactId>

    <version>1.0.0</version>

    <parent>

        <groupId>org.springframework.boot</groupId>

        <artifactId>spring-boot-starter-parent</artifactId>

        <version>2.1.1.RELEASE</version>

    </parent>

    <properties>

        <java.version>1.8</java.version>

    </properties>

    <dependencies>

        <!--直接使用spring-boot-starter-activemq-->

        <dependency>

            <groupId>org.springframework.boot</groupId>

            <artifactId>spring-boot-starter-activemq</artifactId>

        </dependency>

        <!-- MQTT -->

        <dependency>

            <groupId>org.springframework.integration</groupId>

            <artifactId>spring-integration-mqtt</artifactId>

        </dependency>

    </dependencies>

    <build>

        <plugins>

            <plugin>

                <groupId>org.springframework.boot</groupId>

                <artifactId>spring-boot-maven-plugin</artifactId>

            </plugin>

        </plugins>

    </build>

</project>
resources文件夹下创建application.properties
spring.activemq.broker-url=tcp://192.168.99.151:61616

spring.activemq.user=admin

spring.activemq.password=admin
package hello;

import org.springframework.beans.factory.annotation.Autowired;

import org.springframework.boot.SpringApplication;

import org.springframework.boot.autoconfigure.SpringBootApplication;

import org.springframework.jms.core.JmsTemplate;

import javax.annotation.PostConstruct;

@SpringBootApplication

public class Producer {

    @Autowired

    private JmsTemplate jmsTemplate;

    @PostConstruct

    public void init() {

        jmsTemplate.convertAndSend("queue1", "Hello Spring 4");

    }

    public static void main(String[] args) {

        SpringApplication.run(Producer.class, args);

    }

}
package hello;

import org.springframework.boot.SpringApplication;

import org.springframework.boot.autoconfigure.SpringBootApplication;

import org.springframework.jms.annotation.EnableJms;

import org.springframework.jms.annotation.JmsListener;

@SpringBootApplication

@EnableJms

public class Consumer {

    @JmsListener(destination = "queue1")

    public void receive(String message) {

        System.out.println("收到消息:" + message);

    }

    public static void main(String[] args) {

        SpringApplication.run(Consumer.class, args);

    }

}
手工的配置
@Configuration

@EnableJms

public class JmsConfiguration {

    /**

     * 连接工厂

     *

     * @param brokerUrl

     * @param userName

     * @param password

     * @return

     */

    @Bean

    public ConnectionFactory connectionFactory(@Value("${spring.activemq.broker-url}") String brokerUrl, @Value("${spring.activemq.user}") String userName, @Value("${spring.activemq.password}") String password) {

        return new ActiveMQConnectionFactory(userName, password, brokerUrl);

    }

    /**

     * 队列模式的监听容器

     *

     * @param connectionFactory

     * @return

     */

    @Bean

    public JmsListenerContainerFactory<?> jmsListenerContainerFactoryQueue(ConnectionFactory connectionFactory) {

        DefaultJmsListenerContainerFactory bean = new DefaultJmsListenerContainerFactory();

        bean.setConnectionFactory(connectionFactory);

        return bean;

    }

    /**

     * topic 监听

     * @param connectionFactory

     * @return

     */

    @Bean

    public JmsListenerContainerFactory<?> jmsListenerContainerFactoryTopic(ConnectionFactory connectionFactory) {

        DefaultJmsListenerContainerFactory bean = new DefaultJmsListenerContainerFactory();

        bean.setConnectionFactory(connectionFactory);

        bean.setPubSubDomain(true);

        return bean;

    }

    /**

     * 队列模板

     *

     * @param connectionFactory

     * @return

     */

    @Bean

    public JmsTemplate jmsTemplateQueue(ConnectionFactory connectionFactory) {

        return new JmsTemplate(connectionFactory);

    }

    /**

     * 发布订阅模板

     *

     * @param connectionFactory

     * @return

     */

    @Bean

    public JmsTemplate jmsTemplatePublish(ConnectionFactory connectionFactory) {

        JmsTemplate jmsTemplate = new JmsTemplate(connectionFactory);

        jmsTemplate.setPubSubDomain(true);

        return jmsTemplate;

    }

}
二、支持的协议

ActiveMQ的协议连接配置
在${ACTIVE_HOME}/conf/activemq.xml中,通过配置<transportConnectors>就可以使用多种传输方式

2.传输方式配置
TCP
由于TCP具有可靠传输的特性,它在ActiveMQ中也是最常用的一种协议。在默认的配置中,TCP连接的端口为61616
TCP配置格式
tcp://hostname:port?key=value
TCP参数配置
在服务端配置时,参数要以"transfport."开头
在客户端连接时,参数省略“transport.”前缀
服务器端配置示例:

客户端配置示例:

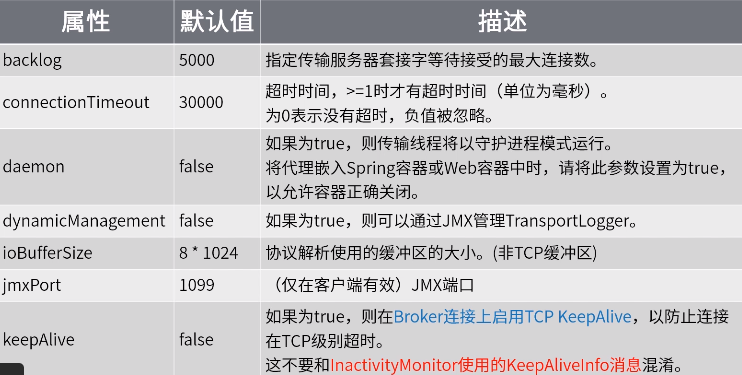
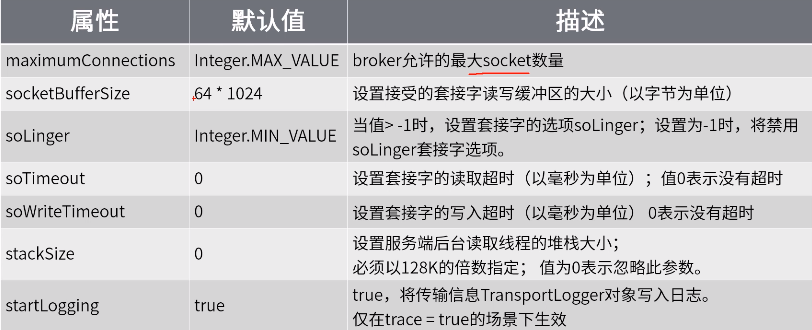
TCP配置参数说明
SSL
对外开放
需要一个安全连接的时候可以考虑使用SSL,适用于client和broke在公网的情况,如使用aws云平台等
http://activemq.apache.org/ssl-transport-reference.html
SSL配置格式,可配置参数和TCP相同
ssl://localhost:61616
SSL客户端配置
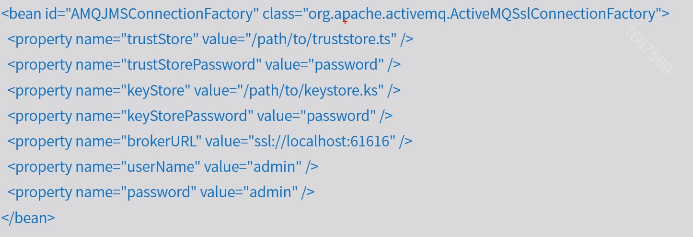
JMS客户端需要使用ActiveMQSslConnectionFactory类创建连接,brokeUrl以ssl://开头,以下是Spring配置示例
NIO
使用Java的NIO方式对连接进行改进,因为NIO使用线程池,可以复用线程,所以可以用更少的线程维持更多的连接。如果有大量的客户端,或者性能瓶颈在网络传输上,可以考虑使用NIO的连接方式。
NIO配置格式,可配置参数和TCP相同
nio://hostname:port?key=value
Nio是OpenWrite协议的传输方式,其他协议,像AMQP、MQTT、Stomp,也有NIO的实现,通常在协议前缀中加“+nio”来区分。示例:

NIO传输线程使用情况配置
从5.15.0开始,ActiveMQ支持调整NIO的传输线程,可以设置以下属性
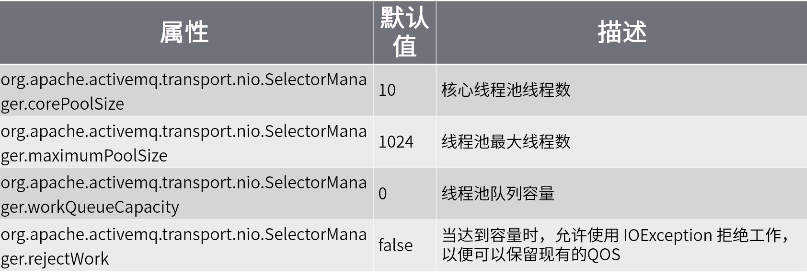
NIO传输线程使用情况配置
属性可以在${ACTIVEMQ_HOME}/bin/env中配置,示例:

NIO SSL
从5.6版开始,NIO可以支持和SSL搭配使用的传输连接。
NIO+SSL配置格式,可配置参数和TCP相同

UDP
与面向连接,可靠的字节流服务的TCP不同,UDP是一个面向数据的简单传输连接,没有TCP的三次握手,所以性能大大强于TCP,但是是以牺牲可靠性为前提。适用于丢失也无所谓的消息。
UDP配置格式

UDP配置参数说明

HTTP(S)
需要穿越防火墙,可以考虑使用HTTP(S),但由于HTTP(S)是短连接,每次创建连接的成本较高,所以性能最差。通过XML传输数据。
HTTP配置格式

HTTPS配置格式

VM
虚拟机协议(方法直调),使用场景是client和broker在同一个Java虚拟机内嵌的情况,无需网络通信的开销。
VM配置格式

VM配置参数说明

3.OpenWire协议
OpenWire是Apache的一种跨语言的协议,允许从不同的语言和平台访问ActiveMQ,是ActiveMQ 4.x以后的版本默认的传输协议。

OpenWire支持TCP、SSL、NIO、UDP、VM等传输方式,直接配置这些连接,就是使用的OpenWire协议,OpenWire有自己的配置参数,客户端和服务器端配置的参数名都通过前缀“wireFormat.”表示。

示例:

配置参数


配置activemq
[root@node01 activemq]# cd /var/activemq/conf

[root@node01 conf]# ls

activemq.xml           client.ts                   jetty-realm.properties  logging.properties

broker.ks              credentials-enc.properties  jetty.xml               login.config

broker-localhost.cert  credentials.properties      jmx.access              users.properties

broker.ts              groups.properties           jmx.password

client.ks              java.security               log4j.properties

[root@node01 conf]# vi activemq.xml
比如,加个日志输出
<transportConnectors>
<!-- DOS protection, limit concurrent connections to and frame size to 100MB -->
<transportConnector name="openwire" uri="tcp://0.0.0.0:61616?maximumConnections=1000&wireFormat.maxFrameSi ze=104857600"/>
<transportConnector name="amqp" uri="amqp://0.0.0.0:5672?maximumConnections=1000&wireFormat.maxFrameSize=1 04857600"/>
<transportConnector name="stomp" uri="stomp://0.0.0.0:61613?maximumConnections=1000&wireFormat.maxFrameSiz e=104857600"/>
<transportConnector name="mqtt" uri="mqtt://0.0.0.0:1883?maximumConnections=1000&wireFormat.maxFrameSize=1 04857600"/>
<transportConnector name="ws" uri="ws://0.0.0.0:61614?maximumConnections=1000&wireFormat.maxFrameSize=1048 57600"/>
</transportConnectors>
默认启动的端口,支持不同的协议,需要什么就开什么
在tcp加参数
<transportConnector name="openwire" uri="tcp://0.0.0.0:61616?transport.trace=true&maximumConnections=1000&wireFormat.maxFrameSi ze=104857600"/>
修改日志文件的格式
vi log4j.properties
加一行日志输出的日志级别
 # Or for more fine grained debug logging uncomment one of these

      #log4j.logger.org.apache.activemq=DEBUG

      #log4j.logger.org.apache.camel=DEBUG

      log4j.logger.org.apache.activemq.transport.TransportLogger=DEBUG
启动activemq
日志在data目录,进入该目录,查看日志文件内容
tail -f activemq.log
运行producer
UDP
// UDP示例 http://activemq.apache.org/udp-transport-reference.html

public class ConsumerAndProducerUDP {

    public static void main(String[] args) {

        ActiveMQConnectionFactory connectionFactory = null;

        Connection conn = null;

        Session session = null;

        MessageConsumer consumer = null;

        try {

            // 1、创建连接工厂

            connectionFactory = new ActiveMQConnectionFactory("udp://activemq.tony.com:61616");

            // 2、创建连接对象

            conn = connectionFactory.createConnection("admin", "admin");

            conn.start();

            session = conn.createSession(false, Session.AUTO_ACKNOWLEDGE);

            // 4、创建点对点接收的目标

            Destination destination = session.createQueue("queue1");

            // 5、创建生产者消息

            MessageProducer producer = session.createProducer(destination);

            // 设置生产者的模式,有两种可选

            // DeliveryMode.PERSISTENT 当activemq关闭的时候,队列数据将会被保存

            // DeliveryMode.NON_PERSISTENT 当activemq关闭的时候,队列里面的数据将会被清空

            producer.setDeliveryMode(DeliveryMode.NON_PERSISTENT);

            // 6、创建一条消息

            String text = "Hello world!";

            TextMessage message = session.createTextMessage(text);

            // 7、发送消息

            producer.send(message);

            // 8、创建消费者消息

            consumer = session.createConsumer(destination);

            // 9、接收消息

            Message consumerMessage = consumer.receive();

            if (consumerMessage instanceof TextMessage) {

                System.out.println("收到文本消息:" + ((TextMessage) consumerMessage).getText());

            } else {

                System.out.println(consumerMessage);

            }

        } catch (JMSException e) {

            e.printStackTrace();

        } finally {

            if (consumer != null) {

                try {

                    consumer.close();

                } catch (JMSException e) {

                    e.printStackTrace();

                }

            }

            if (session != null) {

                try {

                    session.close();

                } catch (JMSException e1) {

                    e1.printStackTrace();

                }

            }

            if (conn != null) {

                try {

                    conn.close();

                } catch (JMSException e1) {

                    e1.printStackTrace();

                }

            }

        }

    }

}
SSL
// ssl客户端: http://activemq.apache.org/ssl-transport-reference.html

// http://activemq.apache.org/how-do-i-use-ssl.html

public class ConsumerAndProducerSSL {

    public static void main(String[] args) {

        //  ssl

        ActiveMQSslConnectionFactory connectionFactory = null;

        Connection conn = null;

        Session session = null;

        MessageConsumer consumer = null;

        try {

            // 1、创建连接工厂

            connectionFactory = new ActiveMQSslConnectionFactory("ssl://activemq.tony.com:61617?socket.verifyHostName=false");

            connectionFactory.setTrustStore("activemq-client.ts");

            connectionFactory.setTrustStorePassword("netease");

            // 2、创建连接对象

            conn = connectionFactory.createConnection();

            conn.start();

            // 3、 创建session

            session = conn.createSession(false, Session.AUTO_ACKNOWLEDGE);

            // 4、创建点对点接收的目标

            Destination destination = session.createQueue("queue1");

            // 5、创建生产者消息

            MessageProducer producer = session.createProducer(destination);

            // 设置生产者的模式,有两种可选

            producer.setDeliveryMode(DeliveryMode.NON_PERSISTENT);

            // 6、创建一条消息

            String text = "Hello world!";

            TextMessage message = session.createTextMessage(text);

            // 7、发送消息

            producer.send(message);

            // 8、创建消费者消息

            consumer = session.createConsumer(destination);

            // 9、接收消息

            Message consumerMessage = consumer.receive();

            if (consumerMessage instanceof TextMessage) {

                System.out.println("收到文本消息:" + ((TextMessage) consumerMessage).getText());

            } else {

                System.out.println(consumerMessage);

            }

            consumer.close();

            session.close();

            conn.close();

        } catch (Exception e) {

            e.printStackTrace();

        }

    }

}
4.MQTT协议


发布订阅模型
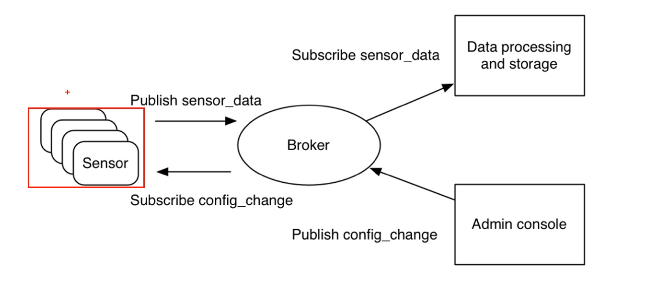
服务质量


怎样工作--QoS level 0

QoS level 1


QoS level 2
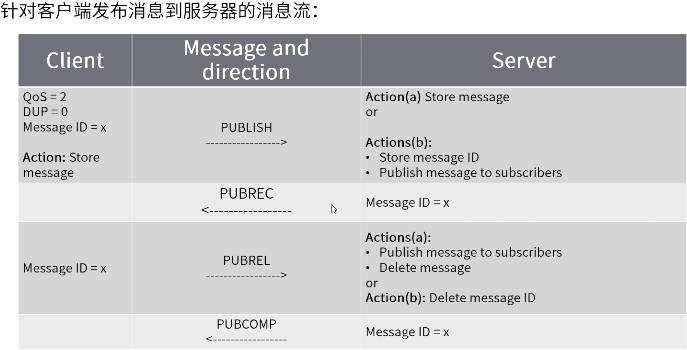
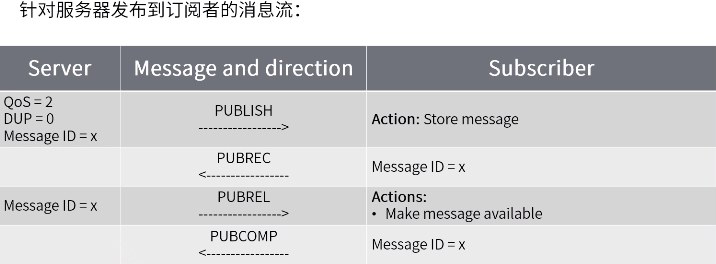
ActiveMQ中使用MQTT协议

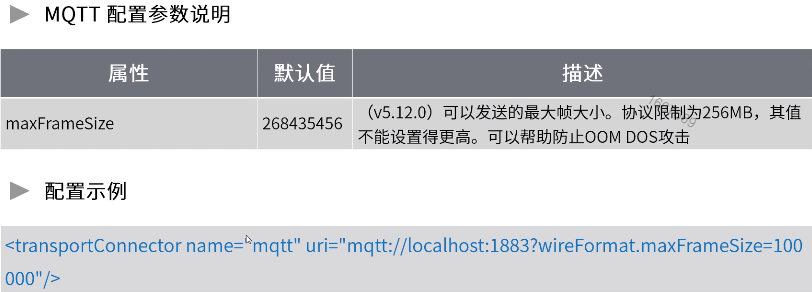

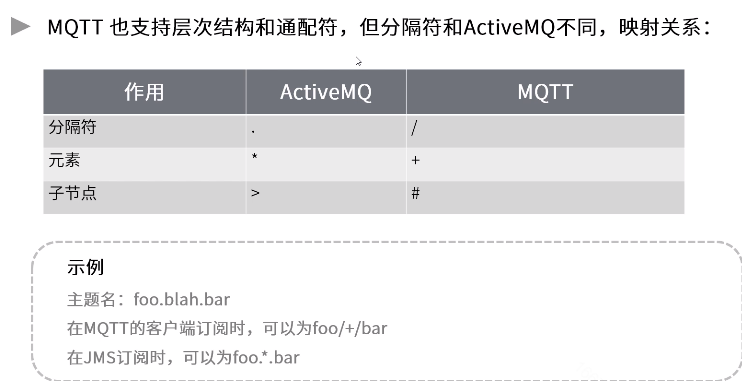
Spring使用MQTT
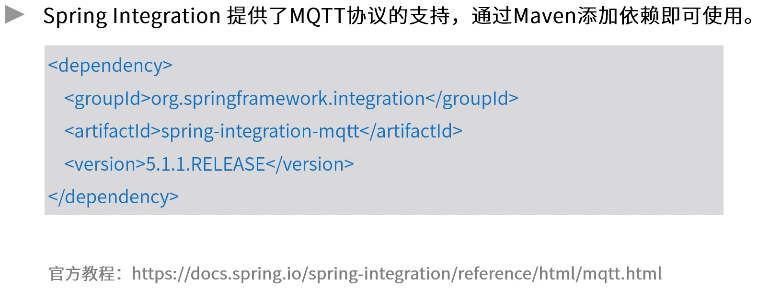
public class MqttConsumer {

    private static int qos = 2;

    private static String broker = "tcp://192.168.99.151:1883";

    private static String userName = "admin";

    private static String passWord = "admin";

    private static MqttClient connect(String clientId) throws MqttException {

        MemoryPersistence persistence = new MemoryPersistence();

        MqttConnectOptions connOpts = new MqttConnectOptions();

        connOpts.setCleanSession(false);

        connOpts.setUserName(userName);

        connOpts.setPassword(passWord.toCharArray());

        connOpts.setConnectionTimeout(10);

        connOpts.setKeepAliveInterval(20);

        MqttClient mqttClient = new MqttClient(broker, clientId, persistence);

        mqttClient.connect(connOpts);

        return mqttClient;

    }

    public static void sub(MqttClient mqttClient, String topic) throws MqttException {

        int[] Qos = {qos};

        String[] topics = {topic};

        mqttClient.subscribe(topics, Qos, new IMqttMessageListener[]{(s, mqttMessage) -> {

            System.out.println("收到新消息" + s + " > " + mqttMessage.toString());

        }});

    }

    private static void runsub(String clientId, String topic) throws MqttException {

        MqttClient mqttClient = connect(clientId);

        if (mqttClient != null) {

            sub(mqttClient, topic);

        }

    }

    public static void main(String[] args) throws MqttException {

        runsub("consumer-client-id-1", "x/y/z");

    }

}
public class MqttProducer {

    private static int qos = 1;

    private static String broker = "tcp://192.168.99.151:1883";

    private static String userName = "admin";

    private static String passWord = "admin";

    private static MqttClient connect(String clientId, String userName,

                                      String password) throws MqttException {

        MemoryPersistence persistence = new MemoryPersistence();

        MqttConnectOptions connOpts = new MqttConnectOptions();

        connOpts.setCleanSession(true);

        connOpts.setUserName(userName);

        connOpts.setPassword(password.toCharArray());

        connOpts.setConnectionTimeout(10);

        connOpts.setKeepAliveInterval(20);

        // String[] uris = {"tcp://10.100.124.206:1883","tcp://10.100.124.207:1883"};

        // connOpts.setServerURIs(uris);  //这个是mqtt客户端实现的负载均衡和容错

        MqttClient mqttClient = new MqttClient(broker, clientId, persistence);

        mqttClient.setCallback(new PushCallback("test"));

        mqttClient.connect(connOpts);

        return mqttClient;

    }

    private static void pub(MqttClient sampleClient, String msg, String topic)

            throws Exception {

        MqttMessage message = new MqttMessage(msg.getBytes());

        message.setQos(qos);

        message.setRetained(false);

        sampleClient.publish(topic, message);

    }

    private static void publish(String str, String clientId, String topic) throws Exception {

        MqttClient mqttClient = connect(clientId, userName, passWord);

        if (mqttClient != null) {

            pub(mqttClient, str, topic);

            System.out.println("pub-->" + str);

        }

        if (mqttClient != null) {

            mqttClient.disconnect();

        }

    }

    public static void main(String[] args) throws Exception {

        publish("message content", "producer-client-id-0", "x/y/z");

    }

}

class PushCallback implements MqttCallback {

    private String threadId;

    public PushCallback(String threadId) {

        this.threadId = threadId;

    }

    public void connectionLost(Throwable cause) {

        cause.printStackTrace();

    }

    public void deliveryComplete(IMqttDeliveryToken token) {

        System.out.println("服务器是否正确接收---------" + token.isComplete());

    }

    public void messageArrived(String topic, MqttMessage message) throws Exception {

        String msg = new String(message.getPayload());

        System.out.println(threadId + " " + msg);

    }

}
spring
@SpringBootApplication

public class MqttApplication {

    private static final Log LOGGER = LogFactory.getLog(MqttApplication.class);

    public static void main(final String... args) {

        // https://spring.io/projects/spring-integration

        // https://github.com/spring-projects/spring-integration-samples/

        SpringApplication.run(MqttApplication.class, args);

    }

    @Bean

    public MqttPahoClientFactory mqttClientFactory() {

        DefaultMqttPahoClientFactory factory = new DefaultMqttPahoClientFactory();

        MqttConnectOptions options = new MqttConnectOptions();

        options.setServerURIs(new String[]{"tcp://192.168.99.151:1883"});

        options.setUserName("admin");

        options.setPassword("admin".toCharArray());

        factory.setConnectionOptions(options);

        return factory;

    }

    // publisher

    @Bean

    public IntegrationFlow mqttOutFlow() {

        // IntegrationFlows.from 数据来源,可以设定为每秒去取数据

        return IntegrationFlows.from(() -> "hello mqtt", new Consumer<SourcePollingChannelAdapterSpec>() {

            @Override

            public void accept(SourcePollingChannelAdapterSpec sourcePollingChannelAdapterSpec) {

                sourcePollingChannelAdapterSpec.poller(Pollers.fixedDelay(1000));

            }

        })

                .transform(p -> p + " sent to MQTT")

                .handle(mqttOutbound())

                .get();

    }

    @Bean

    public MessageHandler mqttOutbound() {

        // 创建handller

        MqttPahoMessageHandler messageHandler = new MqttPahoMessageHandler("client-si-producer-0", mqttClientFactory());

        messageHandler.setAsync(true);

        messageHandler.setDefaultTopic("x/y/z");

        return messageHandler;

    }

    // consumer

    @Bean

    public IntegrationFlow mqttInFlow() {

        return IntegrationFlows.from(mqttInbound())

                .transform(p -> p + ", received from MQTT")

                .handle(printHandler())

                .get();

    }

    private MessageHandler printHandler() {

        return new MessageHandler() {

            @Override

            public void handleMessage(Message<?> message) throws MessagingException {

                System.out.println(message.getPayload().toString());

            }

        };

    }

    @Bean

    public MessageProducerSupport mqttInbound() {

        MqttPahoMessageDrivenChannelAdapter adapter = new MqttPahoMessageDrivenChannelAdapter("client-si-consumer-1",

                mqttClientFactory(), "x/y/z");

        adapter.setCompletionTimeout(5000);

        adapter.setConverter(new DefaultPahoMessageConverter());

        adapter.setQos(1);

        return adapter;

    }

}
TCP等是数据传输的方式,基于这种连接方式可以传递什么数据内容,消息协议
5.AUTO协议

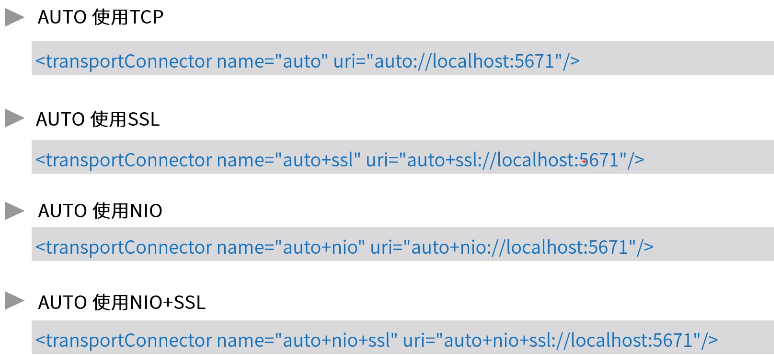
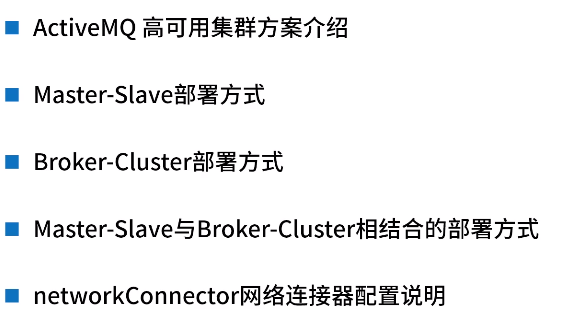
三、高可用集群方案
需求:延时调用
配置
          <!--

              The <broker> element is used to configure the ActiveMQ broker.

          -->

          <broker xmlns="http://activemq.apache.org/schema/core" brokerName="localhost" dataDirectory="${activemq.data}" schedul        erSupport="true">
// 延时、调度消息 http://activemq.apache.org/delay-and-schedule-message-delivery.html

// 定时发送邮件通知,或者触发代码执行

public class DelayScheduleMessageDemo {

    public static void main(String[] args) {

        new ProducerThread("tcp://192.168.99.151:61616", "queue1").start();

    }

    static class ProducerThread extends Thread {

        String brokerUrl;

        String destinationUrl;

        public ProducerThread(String brokerUrl, String destinationUrl) {

            this.brokerUrl = brokerUrl;

            this.destinationUrl = destinationUrl;

        }

        @Override

        public void run() {

            ActiveMQConnectionFactory connectionFactory;

            Connection conn;

            Session session;

            try {

                // 1、创建连接工厂

                connectionFactory = new ActiveMQConnectionFactory(brokerUrl);

                // 2、创建连接对象md

                conn = connectionFactory.createConnection();

                conn.start();

                // 3、创建会话

                session = conn.createSession(false, Session.AUTO_ACKNOWLEDGE);

                // 4、创建点对点发送的目标

                Destination destination = session.createQueue(destinationUrl);

                // 5、创建生产者消息

                MessageProducer producer = session.createProducer(destination);

                // 设置生产者的模式,有两种可选 持久化 / 不持久化

                producer.setDeliveryMode(DeliveryMode.PERSISTENT);

                // 6、示例消息

                //  延时 5秒

                TextMessage message = session.createTextMessage("Hello world - 1!");

                message.setLongProperty(ScheduledMessage.AMQ_SCHEDULED_DELAY, 5 * 1000L);

                //  延时 5秒,投递3次,间隔10秒 (投递次数=重复次数+默认的一次)

                TextMessage message2 = session.createTextMessage("Hello world - 2!");

                message2.setLongProperty(ScheduledMessage.AMQ_SCHEDULED_DELAY, 5 * 1000L); // 延时

                message2.setLongProperty(ScheduledMessage.AMQ_SCHEDULED_PERIOD, 2 * 1000L); // 投递间隔

                message2.setIntProperty(ScheduledMessage.AMQ_SCHEDULED_REPEAT, 2); // 重复次数

                //  CRON 表达式的方式 以及 和上面参数的组合

                TextMessage message3 = session.createTextMessage("Hello world - 3!");

                message3.setStringProperty(ScheduledMessage.AMQ_SCHEDULED_CRON, "0 * * * *");

                // 7、发送消息

                producer.send(message);

                producer.send(message2);

                producer.send(message3);

                // 8、 关闭连接

                session.close();

                conn.close();

            } catch (JMSException e) {

                e.printStackTrace();

            }

        }

    }

}
延时调用需要高可用,否则崩了,就无法接收到消息
1.方案介绍

2.Master-Slave部属方式
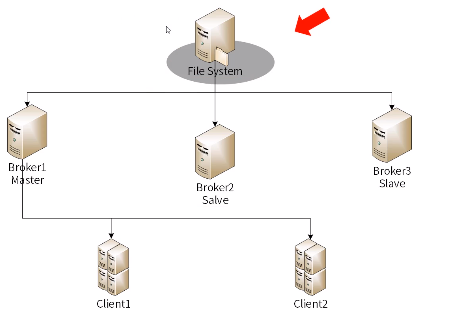
shared database Master-Slave方式
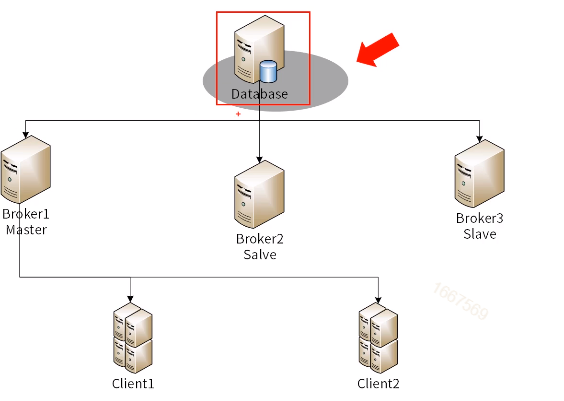
默认不支持数据库,需要在lib/extra目录下放驱动包
修改配置conf/activemq.xml
      <!--

          The <broker> element is used to configure the ActiveMQ broker.

      -->

      <broker xmlns="http://activemq.apache.org/schema/core" brokerName="localhost" persistent="true" dataDirectory="${activemq.data}" sched    ulerSupport="true">
         <!--

              Configure message persistence for the broker. The default persistence

              mechanism is the KahaDB store (identified by the kahaDB tag).

              For more information, see:

              http://activemq.apache.org/persistence.html

          -->

          <persistenceAdapter>

              <kahaDB directory="${activemq.data}/kahadb"/>

          </persistenceAdapter>

          <persistenceAdapter>

               <jdbcPersistenceAdapter dataSource="#mysql-ds" useDatabaseLock="false" transactionIsolation=""/>

          </persistenceAdapter>
数据源
<!-- MySql DataSource Sample Setup -->

<bean id="mysql-ds" class="org.apache.commons.dbcp2.BasicDataSource" destroy-method="close">

    <property name="driverClassName" value="com.mysql.jdbc.Driver"/>

    <property name="url" value="jdbc:mysql://node03:3306/test_activemq?relaxAutoCommit=true"/>

    <property name="username" value="root"/>

    <property name="password" value="mysql_abc123"/>

    <property name="poolPreparedStatements" value="true"/>

</bean>
node03上的mysql要创建text_activemq数据库
重启activemq
集群中的服务器共用mysql服务器,使用同一个mysql实例
只有一个broker抢到
mysql实例中有Lock表
集群配置
只要把activemq目录复制到其他节点,并启动即可
[root@node01 var]# scp -r activemq/ root@node02:/var
启动activemq
Java代码 支持故障切换
// http://activemq.apache.org/failover-transport-reference.html

public class ConsumerFailover {

    public static void main(String[] args) throws InterruptedException {

        // 非failover的公共参数配置通过nested.*,例如 failover:(...)?nested.wireFormat.maxInactivityDuration=1000

        // ?randomize=false 随机选择,默认是顺序

        // 指定优先切换 failover:(tcp://host1:61616,tcp://host2:61616,tcp://host3:61616)?priorityBackup=true&priorityURIs=tcp://local1:61616,tcp://local2:61616

        // maxReconnectDelay重连的最大间隔时间(毫秒)

        String brokerUrl = "failover:(tcp://node01:61616,tcp://node02:61616)?initialReconnectDelay=100";

        ConsumerThread queue1 = new ConsumerThread(brokerUrl, "queue1");

        queue1.start();

        queue1.join();

    }

}

class ConsumerThread extends Thread {

    String brokerUrl;

    String destinationUrl;

    public ConsumerThread(String brokerUrl, String destinationUrl) {

        this.brokerUrl = brokerUrl;

        this.destinationUrl = destinationUrl;

    }

    @Override

    public void run() {

        ActiveMQConnectionFactory connectionFactory;

        Connection conn;

        Session session;

        MessageConsumer consumer;

        try {

            // brokerURL http://activemq.apache.org/connection-configuration-uri.html

            // 1、创建连接工厂

            connectionFactory = new ActiveMQConnectionFactory(this.brokerUrl);

            // 2、创建连接对象

            conn = connectionFactory.createConnection();

            conn.start(); // 一定要启动

            // 3、创建会话(可以创建一个或者多个session)

            session = conn.createSession(false, Session.AUTO_ACKNOWLEDGE);

            // 4、创建点对点接收的目标,queue - 点对点

            Destination destination = session.createQueue(destinationUrl);

            // 5、创建消费者消息 http://activemq.apache.org/destination-options.html

            consumer = session.createConsumer(destination);

            // 6、接收消息

            consumer.setMessageListener(message -> {

                try {

                    if (message instanceof TextMessage) {

                        System.out.println("收到文本消息:" + ((TextMessage) message).getText());

                    } else {

                        System.out.println(message);

                    }

                } catch (JMSException e) {

                    e.printStackTrace();

                }

            });

        } catch (JMSException e) {

            e.printStackTrace();

        }

    }

}
/**

 * 简单生产者

 */

public class Producer {

    public static void main(String[] args) {

        String brokerUrl = "failover:(tcp://node01:61616,tcp://node02:61616)?initialReconnectDelay=100";

        new ProducerThread(brokerUrl, "queue1").start();

    }

    static class ProducerThread extends Thread {

        String brokerUrl;

        String destinationUrl;

        public ProducerThread(String brokerUrl, String destinationUrl) {

            this.brokerUrl = brokerUrl;

            this.destinationUrl = destinationUrl;

        }

        @Override

        public void run() {

            ActiveMQConnectionFactory connectionFactory;

            Connection conn;

            Session session;

            try {

                // 1、创建连接工厂

                connectionFactory = new ActiveMQConnectionFactory(brokerUrl);

                // 2、创建连接对象md

                conn = connectionFactory.createConnection();

                conn.start();

                // 3、创建会话

                session = conn.createSession(false, Session.AUTO_ACKNOWLEDGE);

                // 4、创建点对点发送的目标

                 Destination destination = session.createQueue(destinationUrl);

                // 5、创建生产者消息

                MessageProducer producer = session.createProducer(destination);

                // 设置生产者的模式,有两种可选 持久化 / 不持久化

                producer.setDeliveryMode(DeliveryMode.PERSISTENT);

                // 6、创建一条文本消息

                String text = "Hello world!";

                TextMessage message = session.createTextMessage(text);

                for (int i = 0; i < 1; i++) {

                    // 7、发送消息

                    producer.send(message);

                }

                // 8、 关闭连接

                session.close();

                conn.close();

            } catch (JMSException e) {

                e.printStackTrace();

            }

        }

    }

}
关闭master主机node01
自动重连了node02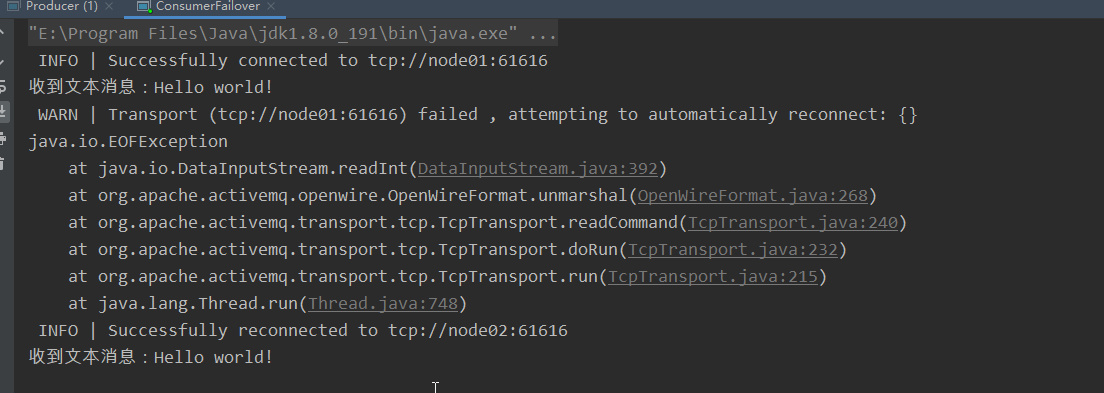
进化版不成功
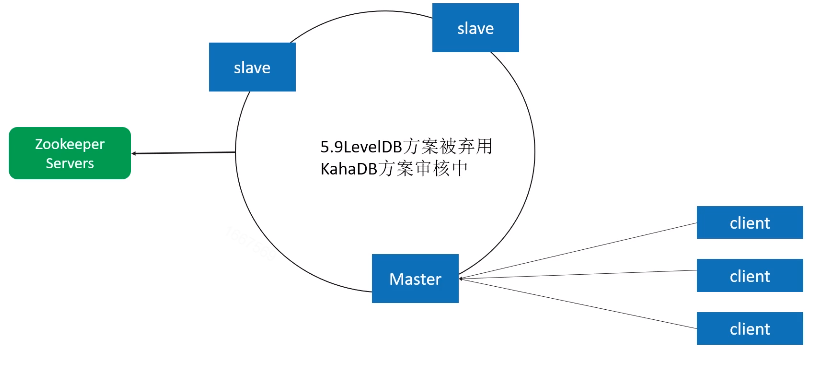
Replicated LevelDB Store方式 弃用
3.Broker-Cluster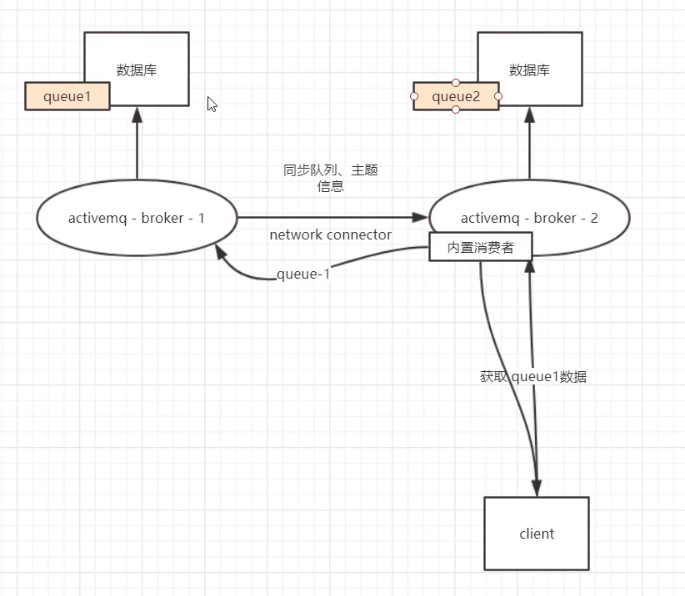
高性能的一种方式,客户端连接任何一台服务器都可以接收信息
比如连broker2,想消费订阅queue1,broker1和borker2之间有network connector,通过内置消费者去borker1里找queue1的数据
内置消费者专门负责消费其他系统的消息,再转发给客户端
还可以加负载均衡机制

去activemq.xml里配置networkConnectors
在node01里
         <networkConnectors>

             <networkConnector uri="static:(tcp://node02:61616)"/>

         </networkConnectors>
在node02里
         <networkConnectors>

             <networkConnector uri="static:(tcp://node01:61616)"/>

         </networkConnectors>
查看web控制台
node01连通node02

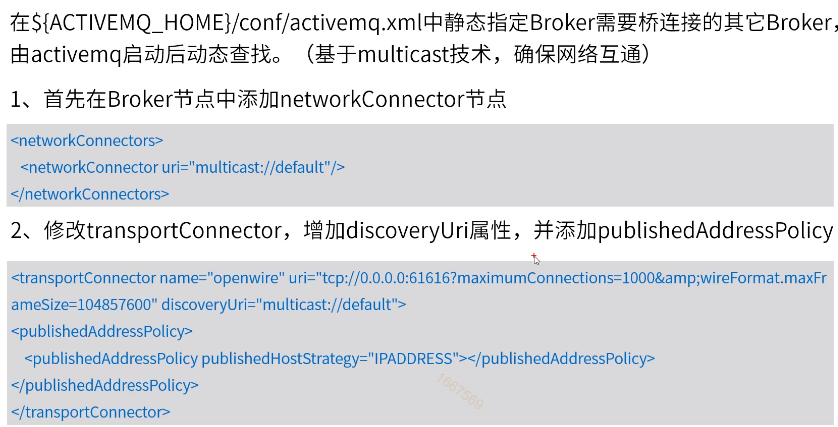
还有动态的方式
Broker-Cluster部属方式

Static Broker-Cluster部属配置

Dynamic Broker-Cluster部属配置
4.Master-Slave与Broker-Cluster相结合的部属方式

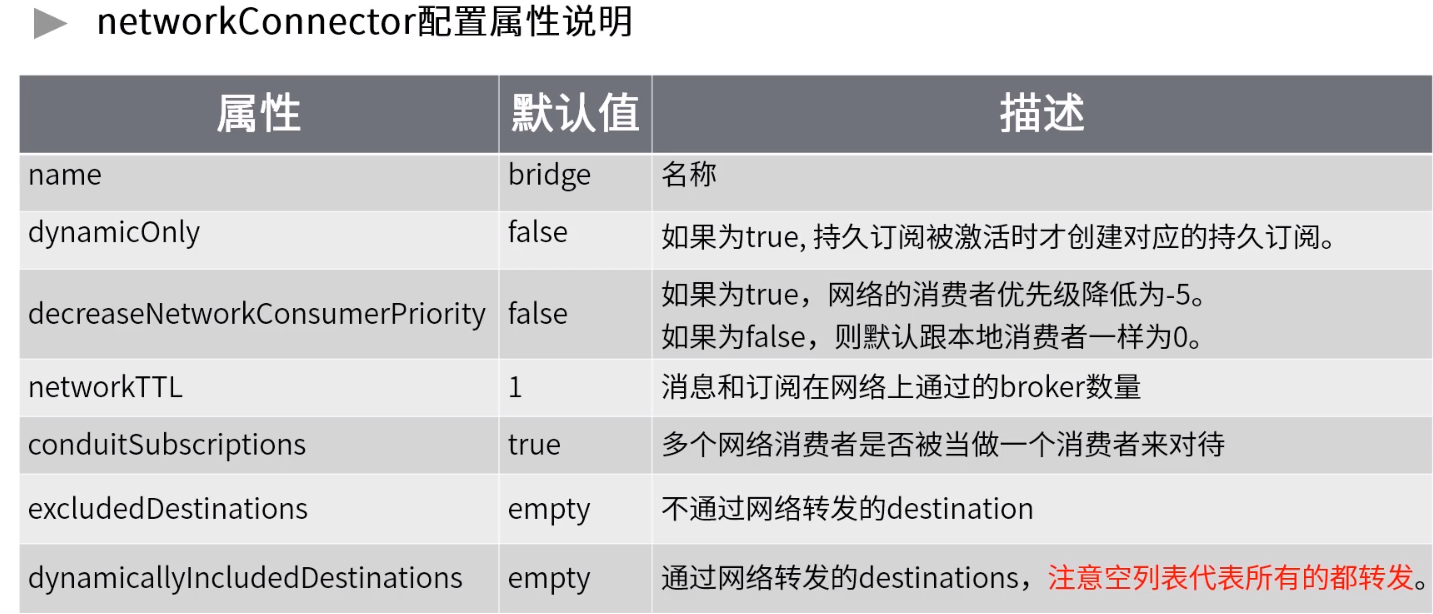
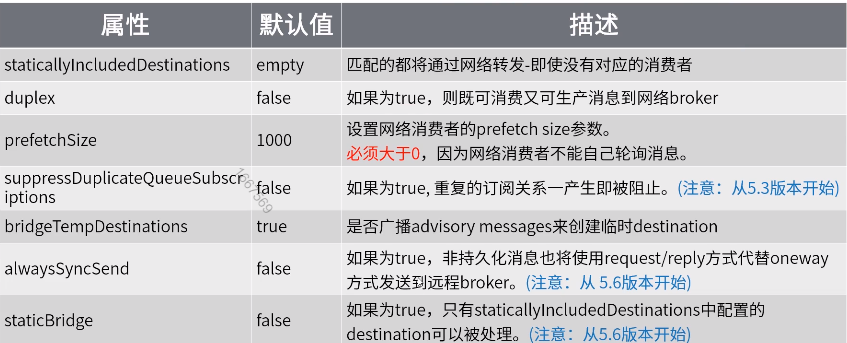
5.网络连接器配置说明
四、持久化原理及事务机制
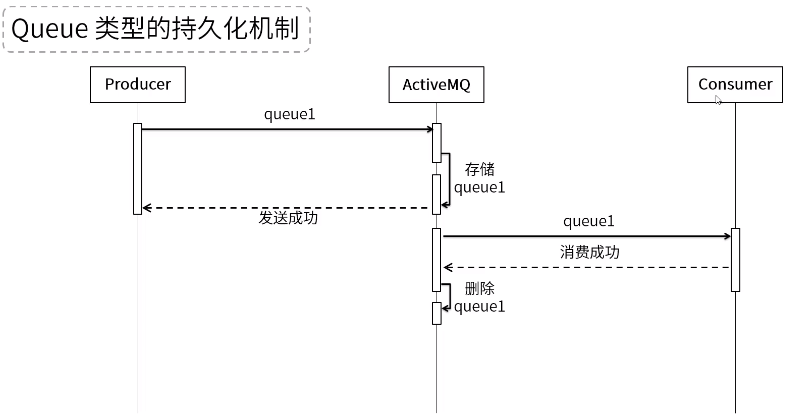
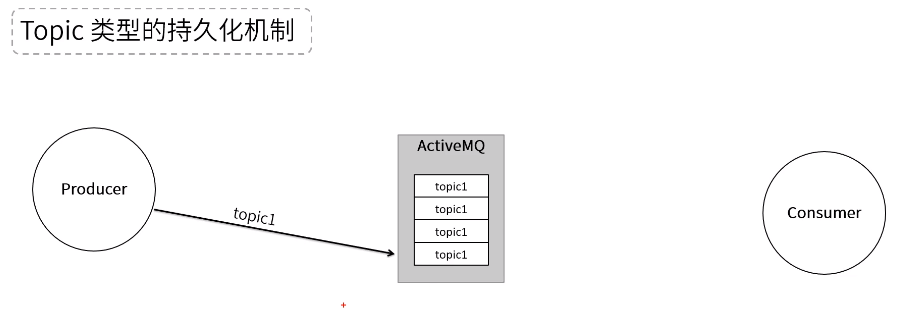
1.持久化方案

2.JDBC方式

3.AMQ方式

4.KahaDB方式

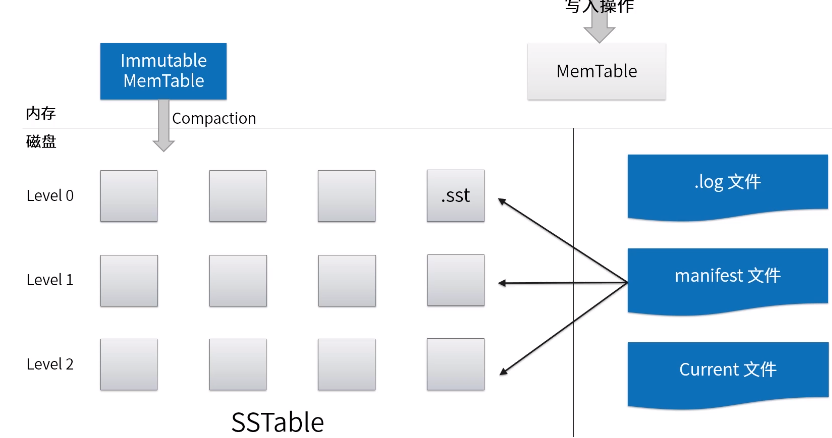
5.LevelDB

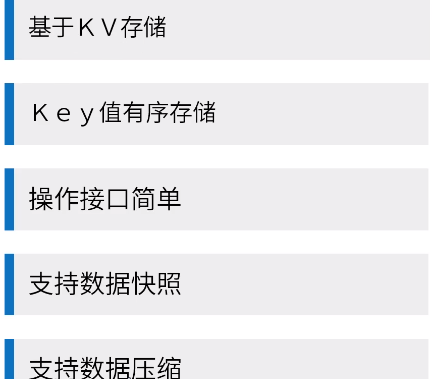
结构
配置

4.事务机制
开启事务
分布式消息中间件(二)ActiveMQ的更多相关文章
- 手把手教你如何玩转消息中间件(ActiveMQ)
手把手教你如何玩转消息中间件(ActiveMQ) 2018年07月15日 18:07:39 Cs_hnu_scw 阅读数 12270 标签: 中间件消息中间件ActiveMQ分布式集群 更多 个人分类 ...
- [转]分布式消息中间件 MetaQ 作者庄晓丹专访
MetaQ(全称Metamorphosis)是一个高性能.高可用.可扩展的分布式消息中间件,思路起源于LinkedIn的Kafka,但并不是Kafka的一个Copy.MetaQ具有消息存储顺序写.吞吐 ...
- 深入浅出 JMS(二) - ActiveMQ 入门指南
深入浅出 JMS(二) - ActiveMQ 入门指南 上篇博文深入浅出 JMS(一) – JMS 基本概念,我们介绍了消息通信的规范JMS,这篇博文介绍一款开源的 JMS 具体实现-- Active ...
- 分布式消息通信ActiveMQ
消息中间件 消息中间件是指利用高效可靠的消息传递机制进行平台无关的数据交流,并且基于数据通信来进行分布式系统的集成.通过提供消息传递和消息排队模型,可以在分布式架构下扩展进程之间的通信. 消息中间件能 ...
- 分布式进阶(二)Ubuntu 14.04下安装Dockr图文教程(一)
当前,完全硬件虚拟化技术(KVM.Xen.Hyper-V 等)能在一个物理主机上很好地运行多个互相独立的操作系统,但这也带来一些问题:性能不佳,资源浪费,系统反应迟缓等.有时候对用户来说,完全的硬件虚 ...
- 腾讯万亿级分布式消息中间件TubeMQ正式开源
TubeMQ是腾讯在2013年自研的分布式消息中间件系统,专注服务大数据场景下海量数据的高性能存储和传输,经过近7年上万亿的海量数据沉淀,目前日均接入量超过25万亿条.较之于众多明星的开源MQ组件,T ...
- 手把手教你如何玩转消息中间件(ActiveMQ) https://blog.csdn.net/cs_hnu_scw/article/details/81040834
#情景引入小白:起床起床起床起床....快起床~我:怎么了又,大惊小怪,吓到我了.小白:我有事有事想找你,十万火急呢~~我:你能有什么事?反正我不信..那你说说看~~小白:就是我有两个小表弟,叫大白和 ...
- 消息中间件之ActiveMQ
一.什么是消息中间件(MQ) 1.1 为什么会需要消息队列(MQ)? 主要原因是由于在高并发环境下,由于来不及同步处理,请求往往会发生堵塞,比如说,大量的insert,update之类的请求同时到达M ...
- 分布式消息中间件rocketmq的原理与实践
RocketMQ作为阿里开源的一款高性能.高吞吐量的消息中间件,它是怎样来解决这两个问题的?RocketMQ 有哪些关键特性?其实现原理是怎样的? 关键特性以及其实现原理 一.顺序消息 消息有序指的是 ...
随机推荐
- 微信浏览器 video - android适配
阶段一: 直接裸用 video 标签, 安卓 - 会重新弹一个播放层, 和之前video的父盒子错位, 要多丑有多丑, 体验要多烂有多烂. 阶段二: video添加以下属性, 安卓可实现内联播放, 但 ...
- 关键字group by 、 Having的 用法
概述 GROUP BY我们可以先从字面上来理解,GROUP表示分组,BY后面写字段名,就表示根据哪个字段进行分组,如果有用Excel比较多的话,GROUP BY比较类似Excel里面的透视表. GRO ...
- 【Zookeekper】分布锁Curator
有序节点:假如当前有一个父节点为/lock,我们可以在这个父节点下面创建子节点:zookeeper提供了一个可选的有序特性,例如我们可以创建子节点“/lock/node-”并且指明有序,那么zooke ...
- Nacos 常见问题及解决方法
Nacos 开源至今已有一年,在这一年里,得到了很多用户的支持和反馈.在与社区的交流中,我们发现有一些问题出现的频率比较高,为了能够让用户更快的解决问题,我们总结了这篇常见问题及解决方法,这篇文章后续 ...
- 微信jssdk安卓机分享QQ好友和QQ空间出现{"errMsg":"shareQQ:fail"}
使用ajax请求appid之类的配置,然后进行wx.config和wx.ready,苹果机上是完全OK的,但是安卓机上十次有九次是失败,只有一次能成功,百度了一下,有人说是参数有空格,有人说是微信bu ...
- Python每日一题 006
题目 你有一个目录,装了很多照片,把它们的尺寸变成都不大于 iPhone5 分辨率的大小. 如果只是单纯的通过将图片缩放到iPhone5分辨率大小,显然最后呈现出来的效果会很糟糕.所以等比例缩放到长( ...
- PHP浮点计算结果返回异常问题
php中如果直接小数点进行计算的话.比如16.8*3var_dump是50.4.但是return就变成了50.400000000000006.至于是什么原因本人尚不得而知.解决方法是用把计算放入下面的 ...
- Android 架构师技能图谱
# Android 架构师技能图谱 ## 架构与设计 - 设计模式 - 重构 - 技术选型 - 特性 - 可用性 - 性能 - 包大小 - 方法数 - 文档 - 技术支持 - UI架构模式 - MVC ...
- js事件冒泡、事件捕获
事件冒泡 var box = document.querySelector('.box'); var content = document.querySelector('.content'); doc ...
- HTML-参考手册: 颜色混搭
ylbtech-HTML-参考手册: 颜色混搭 1.返回顶部 1. HTML 颜色混搭 混搭两种颜色,并查看效果: 选择颜色: #FF0000 #0000FF 顶部颜色: ...
