ASP.NET CORE RAZOR :将文件上传至 ASP.NET Core 中的 Razor 页面
本部分演示使用 Razor 页面上传文件。
本教程中的 Razor 页面 Movie 示例应用使用简单的模型绑定上传文件,非常适合上传小型文件。 有关流式传输大文件的信息,请参阅通过流式传输上传大文件。
在下列步骤中,向示例应用添加电影计划文件上传功能。 每个电影计划由一个 Schedule 类表示。 该类包括两个版本的计划。 其中一个版本 (PublicSchedule) 提供给客户。 另一个版本 (PrivateSchedule) 用于公司员工。 每个版本作为单独的文件进行上传。 本教程演示如何通过单个 POST 将两个文件上传至服务器。
添加 FileUpload 类
创建 Razor 页以处理一对文件上传。 添加 FileUpload 类(此类与页面绑定以获取计划数据)。 右键单击“Models”文件夹。 选择“添加” > “类”。 将类命名为“FileUpload”,并添加以下属性:
using Microsoft.AspNetCore.Http;

using System.ComponentModel.DataAnnotations;

namespace RazorPagesMovie.Models

{

    public class FileUpload

    {

        [Required]

        [Display(Name="Title")]

        [StringLength(, MinimumLength = )]

        public string Title { get; set; }

        [Required]

        [Display(Name="Public Schedule")]

        public IFormFile UploadPublicSchedule { get; set; }

        [Required]

        [Display(Name="Private Schedule")]

        public IFormFile UploadPrivateSchedule { get; set; }

    }

}
此类有一个属性对应计划标题,另各有一个属性对应计划的两个版本。 3 个属性皆为必需属性,标题长度必须为 3-60 个字符。
添加用于上传文件的 helper 方法
为避免处理未上传计划文件时出现代码重复,请首先上传一个静态 helper 方法。 在此应用中创建一个“Utilities”文件夹,然后在“FileHelpers.cs”文件中添加以下内容。 helper 方法 ProcessFormFile 接受 IFormFile 和 ModelStateDictionary,并返回包含文件大小和内容的字符串。 检查内容类型和长度。 如果文件未通过验证检查,将向 ModelState 添加一个错误。
using System;

using System.ComponentModel.DataAnnotations;

using System.IO;

using System.Net;

using System.Reflection;

using System.Text;

using System.Threading.Tasks;

using Microsoft.AspNetCore.Http;

using Microsoft.AspNetCore.Mvc.ModelBinding;

using RazorPagesMovie.Models;

namespace RazorPagesMovie.Utilities

{

    public class FileHelpers

    {

        public static async Task<string> ProcessFormFile(IFormFile formFile, ModelStateDictionary modelState)

        {

            var fieldDisplayName = string.Empty;

            // Use reflection to obtain the display name for the model

            // property associated with this IFormFile. If a display

            // name isn't found, error messages simply won't show

            // a display name.

            MemberInfo property =

                typeof(FileUpload).GetProperty(formFile.Name.Substring(formFile.Name.IndexOf(".") + ));

            if (property != null)

            {

                var displayAttribute =

                    property.GetCustomAttribute(typeof(DisplayAttribute)) as DisplayAttribute;

                if (displayAttribute != null)

                {

                    fieldDisplayName = $"{displayAttribute.Name} ";

                }

            }

            // Use Path.GetFileName to obtain the file name, which will

            // strip any path information passed as part of the

            // FileName property. HtmlEncode the result in case it must

            // be returned in an error message.

            var fileName = WebUtility.HtmlEncode(Path.GetFileName(formFile.FileName));

            if (formFile.ContentType.ToLower() != "text/plain")

            {

                modelState.AddModelError(formFile.Name,

                                         $"The {fieldDisplayName}file ({fileName}) must be a text file.");

            }

            // Check the file length and don't bother attempting to

            // read it if the file contains no content. This check

            // doesn't catch files that only have a BOM as their

            // content, so a content length check is made later after

            // reading the file's content to catch a file that only

            // contains a BOM.

            if (formFile.Length == )

            {

                modelState.AddModelError(formFile.Name, $"The {fieldDisplayName}file ({fileName}) is empty.");

            }

            else if (formFile.Length > )

            {

                modelState.AddModelError(formFile.Name, $"The {fieldDisplayName}file ({fileName}) exceeds 1 MB.");

            }

            else

            {

                try

                {

                    string fileContents;

                    // The StreamReader is created to read files that are UTF-8 encoded.

                    // If uploads require some other encoding, provide the encoding in the

                    // using statement. To change to 32-bit encoding, change

                    // new UTF8Encoding(...) to new UTF32Encoding().

                    using (

                        var reader =

                            new StreamReader(

                                formFile.OpenReadStream(),

                                new UTF8Encoding(encoderShouldEmitUTF8Identifier: false, throwOnInvalidBytes: true),

                                detectEncodingFromByteOrderMarks: true))

                    {

                        fileContents = await reader.ReadToEndAsync();

                        // Check the content length in case the file's only

                        // content was a BOM and the content is actually

                        // empty after removing the BOM.

                        if (fileContents.Length > )

                        {

                            return fileContents;

                        }

                        else

                        {

                            modelState.AddModelError(formFile.Name,

                                                     $"The {fieldDisplayName}file ({fileName}) is empty.");

                        }

                    }

                }

                catch (Exception ex)

                {

                    modelState.AddModelError(formFile.Name,

                                             $"The {fieldDisplayName}file ({fileName}) upload failed. " +

                                             $"Please contact the Help Desk for support. Error: {ex.Message}");

                    // Log the exception

                }

            }

            return string.Empty;

        }

    }

}
以上内容如果看不懂就不用看了,核心思想就是检查上传文件是否合乎要求。
将文件保存到磁盘(拓展内容,本案例未用到)
示例应用将文件内容保存到数据库字段。 若要将文件内容保存到磁盘,请使用文件流:
using (var fileStream = new FileStream(filePath, FileMode.Create))

{

    await formFile.CopyToAsync(fileStream);

}
将文件保存到 Azure Blob 存储(拓展内容,本案例未用到)
若要将文件内容上传到 Azure Blob 存储,请参阅使用 .NET 的 Azure Blob 存储入门。 本主题演示如何使用UploadFromStream 将文件流保存到 blob 存储。
添加 Schedule 类
右键单击“Models”文件夹。 选择“添加” > “类”。 将类命名为“Schedule”,并添加以下属性:
using System;

using System.Collections.Generic;

using System.ComponentModel.DataAnnotations;

using System.ComponentModel.DataAnnotations.Schema;

namespace RazorPagesMovie.Models

{

    public class Schedule

    {

        public int ID { get; set; }

        public string Title { get; set; }

        public string PublicSchedule { get; set; }

        [Display(Name = "Public Schedule Size (bytes)")]

        [DisplayFormat(DataFormatString = "{0:N1}")]

        public long PublicScheduleSize { get; set; }

        public string PrivateSchedule { get; set; }

        [Display(Name = "Private Schedule Size (bytes)")]

        [DisplayFormat(DataFormatString = "{0:N1}")]

        public long PrivateScheduleSize { get; set; }

        [Display(Name = "Uploaded (UTC)")]

        [DisplayFormat(DataFormatString = "{0:F}")]

        public DateTime UploadDT { get; set; }

    }

}
此类使用 Display 和 DisplayFormat 特性,呈现计划数据时,这些特性会生成友好型的标题和格式。
更新 MovieContext
在 MovieContext (Models/MovieContext.cs) 中为计划指定 DbSet:
using Microsoft.EntityFrameworkCore;

namespace RazorPagesMovie.Models

{

    public class MovieContext:DbContext

    {

        public MovieContext(DbContextOptions<MovieContext> options)

            : base(options)

        {

        }

        public DbSet<Movie> Movie { get; set; }

        public DbSet<Class> Class { get; set; }

        public DbSet<Schedule> Schedule { get; set; }

    }

}
将 Schedule 表添加到数据库
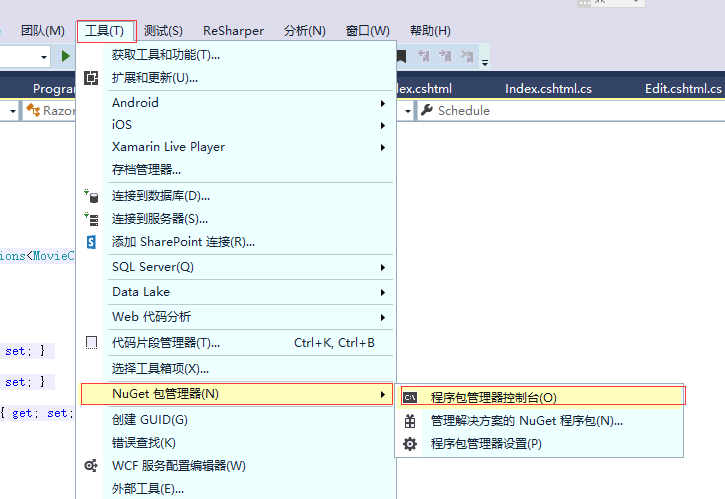
打开包管理器控制台 (PMC):“工具” > “NuGet 包管理器” > “包管理器控制台”。
在 PMC 中执行以下命令。 这些命令将向数据库添加 Schedule 表:
Add-Migration AddScheduleTable

Update-Database
添加文件上传 Razor 页面
在“Pages”文件夹中创建“Schedules”文件夹。 在“Schedules”文件夹中,创建名为“Index.cshtml”的页面,用于上传具有如下内容的计划:
@page

@model RazorPagesMovie.Pages.Schedule.IndexModel

@{

    ViewData["Title"] = "Schedules";

}

<h2>Schedules</h2>

<hr />

<h3>Upload Schedules</h3>

<div class="row">

    <div class="col-md-4">

        <form method="post" enctype="multipart/form-data">

            <div class="form-group">

                <label asp-for="FileUpload.Title" class="control-label"></label>

                <input asp-for="FileUpload.Title" type="text" class="form-control" />

                <span asp-validation-for="FileUpload.Title" class="text-danger"></span>

            </div>

            <div class="form-group">

                <label asp-for="FileUpload.UploadPublicSchedule" class="control-label"></label>

                <input asp-for="FileUpload.UploadPublicSchedule" type="file" class="form-control" style="height:auto" />

                <span asp-validation-for="FileUpload.UploadPublicSchedule" class="text-danger"></span>

            </div>

            <div class="form-group">

                <label asp-for="FileUpload.UploadPrivateSchedule" class="control-label"></label>

                <input asp-for="FileUpload.UploadPrivateSchedule" type="file" class="form-control" style="height:auto" />

                <span asp-validation-for="FileUpload.UploadPrivateSchedule" class="text-danger"></span>

            </div>

            <input type="submit" value="Upload" class="btn btn-default" />

        </form>

    </div>

</div>

<h3>Loaded Schedules</h3>

<table class="table">

    <thead>

        <tr>

            <th></th>

            <th>

                @Html.DisplayNameFor(model => model.Schedule[].Title)

            </th>

            <th>

                @Html.DisplayNameFor(model => model.Schedule[].UploadDT)

            </th>

            <th class="text-center">

                @Html.DisplayNameFor(model => model.Schedule[].PublicScheduleSize)

            </th>

            <th class="text-center">

                @Html.DisplayNameFor(model => model.Schedule[].PrivateScheduleSize)

            </th>

        </tr>

    </thead>

    <tbody>

        @foreach (var item in Model.Schedule)

        {

            <tr>

                <td>

                    <a asp-page="./Delete" asp-route-id="@item.ID">Delete</a>

                </td>

                <td>

                    @Html.DisplayFor(modelItem => item.Title)

                </td>

                <td>

                    @Html.DisplayFor(modelItem => item.UploadDT)

                </td>

                <td class="text-center">

                    @Html.DisplayFor(modelItem => item.PublicScheduleSize)

                </td>

                <td class="text-center">

                    @Html.DisplayFor(modelItem => item.PrivateScheduleSize)

                </td>

            </tr>

        }

    </tbody>

</table>

@section Scripts {

    @{await Html.RenderPartialAsync("_ValidationScriptsPartial");}

}
每个窗体组包含一个 <label>,它显示每个类属性的名称。 FileUpload 模型中的 Display 特性提供这些标签的显示值。例如,UploadPublicSchedule 特性的显示名称通过 [Display(Name="Public Schedule")] 进行设置,因此呈现窗体时会在此标签中显示“Public Schedule”。
每个窗体组包含一个验证 <span>。 如果用户输入未能满足 FileUpload 类中设置的属性特性,或者任何 ProcessFormFile方法文件检查失败,则模型验证会失败。 模型验证失败时,会向用户呈现有用的验证消息。 例如,Title 属性带有 [Required] 和 [StringLength(60, MinimumLength = 3)] 注释。 用户若未提供标题,会接收到一条指示需要提供值的消息。如果用户输入的值少于 3 个字符或多于 60 个字符,则会接收到一条指示值长度不正确的消息。 如果提供不含内容的文件,则会显示一条指示文件为空的消息。
添加页面模型
将页面模型 (Index.cshtml.cs) 添加到“Schedules”文件夹中:
using System;

using System.Collections.Generic;

using System.Threading.Tasks;

using Microsoft.AspNetCore.Mvc;

using Microsoft.AspNetCore.Mvc.RazorPages;

using Microsoft.EntityFrameworkCore;

using RazorPagesMovie.Models;

using RazorPagesMovie.Utilities;

namespace RazorPagesMovie.Pages.Schedule

{

    public class IndexModel : PageModel

    {

        private readonly RazorPagesMovie.Models.MovieContext _context;

        public IndexModel(RazorPagesMovie.Models.MovieContext context)

        {

            _context = context;

        }

        [BindProperty]

        public FileUpload FileUpload { get; set; }

        public IList<Models.Schedule> Schedule { get; private set; }

        public async Task OnGetAsync()

        {

            Schedule = await _context.Schedule.AsNoTracking().ToListAsync();

        }

        public async Task<IActionResult> OnPostAsync()

        {

            // Perform an initial check to catch FileUpload class

            // attribute violations.

            if (!ModelState.IsValid)

            {

                Schedule = await _context.Schedule.AsNoTracking().ToListAsync();

                return Page();

            }

            var publicScheduleData =

                await FileHelpers.ProcessFormFile(FileUpload.UploadPublicSchedule, ModelState);

            var privateScheduleData =

                await FileHelpers.ProcessFormFile(FileUpload.UploadPrivateSchedule, ModelState);

            // Perform a second check to catch ProcessFormFile method

            // violations.

            if (!ModelState.IsValid)

            {

                Schedule = await _context.Schedule.AsNoTracking().ToListAsync();

                return Page();

            }

            var schedule = new Models.Schedule()

            {

                PublicSchedule = publicScheduleData,

                PublicScheduleSize = FileUpload.UploadPublicSchedule.Length,

                PrivateSchedule = privateScheduleData,

                PrivateScheduleSize = FileUpload.UploadPrivateSchedule.Length,

                Title = FileUpload.Title,

                UploadDT = DateTime.UtcNow

            };

            _context.Schedule.Add(schedule);

            await _context.SaveChangesAsync();

            return RedirectToPage("./Index");

        }

    }

}
页面模型(Index.cshtml.cs 中的 IndexModel)绑定 FileUpload 类:
[BindProperty]

public FileUpload FileUpload { get; set; }
此模型还使用计划列表 (IList<Schedule>) 在页面上显示数据库中存储的计划:
public IList<Models.Schedule> Schedule { get; private set; }
页面加载 OnGetAsync 时,会从数据库填充 Schedules,用于生成已加载计划的 HTML 表:
public async Task OnGetAsync()

{

    Schedule = await _context.Schedule.AsNoTracking().ToListAsync();

}
将窗体发布到服务器时,会检查 ModelState。 如果无效,会重新生成 Schedule,且页面会呈现一个或多个验证消息,陈述页面验证失败的原因。 如果有效,FileUpload 属性将用于“OnPostAsync”中,以完成两个计划版本的文件上传,并创建一个用于存储数据的新 Schedule 对象。 然后会将此计划保存到数据库:
        public async Task<IActionResult> OnPostAsync()

        {

            // Perform an initial check to catch FileUpload class

            // attribute violations.

            if (!ModelState.IsValid)

            {

                Schedule = await _context.Schedule.AsNoTracking().ToListAsync();

                return Page();

            }

            var publicScheduleData =

                await FileHelpers.ProcessFormFile(FileUpload.UploadPublicSchedule, ModelState);

            var privateScheduleData =

                await FileHelpers.ProcessFormFile(FileUpload.UploadPrivateSchedule, ModelState);

            // Perform a second check to catch ProcessFormFile method

            // violations.

            if (!ModelState.IsValid)

            {

                Schedule = await _context.Schedule.AsNoTracking().ToListAsync();

                return Page();

            }

            var schedule = new Models.Schedule()

            {

                PublicSchedule = publicScheduleData,

                PublicScheduleSize = FileUpload.UploadPublicSchedule.Length,

                PrivateSchedule = privateScheduleData,

                PrivateScheduleSize = FileUpload.UploadPrivateSchedule.Length,

                Title = FileUpload.Title,

                UploadDT = DateTime.UtcNow

            };

            _context.Schedule.Add(schedule);

            await _context.SaveChangesAsync();

            return RedirectToPage("./Index");

        }
链接文件上传 Razor 页面
打开“_Layout.cshtml”,然后向导航栏添加一个链接以访问文件上传页面:
            <div class="navbar-collapse collapse">

                <ul class="nav navbar-nav">

                    <li><a asp-page="/Index">Home</a></li>

                    <li><a asp-page="/About">About</a></li>

                    <li><a asp-page="/Contact">Contact</a></li>

                    <li><a asp-page="/Product">产品展示</a></li>

                    <li><a asp-page="/Movies/Index">RpMovie</a></li>

                    <li><a asp-page="/Schedule/Index">文件上传</a></li>

                </ul>

            </div>
现在可以运行看一下效果了
这里只能上传文本文件,还要注意.txt文件必须为Unicode文件类型,否则文件中带有汉字的话,上传后会提示错误消息
Error: Unable to translate bytes [D7] at index 0 from specified code page to Unicode.
解决方法:FileHelpers.cs文件中修改读取字符编码的格式为
                    using (

                        var reader =

                            new StreamReader(

                                formFile.OpenReadStream(),
                   new UTF32Encoding(false, false),//使用此字符编码

                                //new UTF8Encoding(encoderShouldEmitUTF8Identifier: false, throwOnInvalidBytes: true),//原字符编码

                                detectEncodingFromByteOrderMarks: true))

修改后上传文件中包含中文字符就没问题了。
添加计划删除确认页面
用户单击删除计划时,为其提供取消此操作的机会。 向“Schedules”文件夹添加删除确认页面 (Delete.cshtml):
@page "{id:int}"

@model RazorPagesMovie.Pages.Schedule.DeleteModel

@{

    ViewData["Title"] = "Delete Schedule";

}

<h2>Delete Schedule</h2>

<h3>Are you sure you want to delete this?</h3>

<div>

    <h4>Schedule</h4>

    <hr />

    <dl class="dl-horizontal">

        <dt>

            @Html.DisplayNameFor(model => model.Schedule.Title)

        </dt>

        <dd>

            @Html.DisplayFor(model => model.Schedule.Title)

        </dd>

        <dt>

            @Html.DisplayNameFor(model => model.Schedule.PublicScheduleSize)

        </dt>

        <dd>

            @Html.DisplayFor(model => model.Schedule.PublicScheduleSize)

        </dd>

        <dt>

            @Html.DisplayNameFor(model => model.Schedule.PrivateScheduleSize)

        </dt>

        <dd>

            @Html.DisplayFor(model => model.Schedule.PrivateScheduleSize)

        </dd>

        <dt>

            @Html.DisplayNameFor(model => model.Schedule.UploadDT)

        </dt>

        <dd>

            @Html.DisplayFor(model => model.Schedule.UploadDT)

        </dd>

    </dl>

    <form method="post">

        <input type="hidden" asp-for="Schedule.ID" />

        <input type="submit" value="Delete" class="btn btn-default" /> |

        <a asp-page="./Index">Back to List</a>

    </form>

</div>
页面模型 (Delete.cshtml.cs) 在请求的路由数据中加载由 id 标识的单个计划。 将“Delete.cshtml.cs”文件添加到“Schedules”文件夹:
using System;

using System.Collections.Generic;

using System.Linq;

using System.Threading.Tasks;

using Microsoft.AspNetCore.Mvc;

using Microsoft.AspNetCore.Mvc.RazorPages;

using Microsoft.EntityFrameworkCore;

namespace RazorPagesMovie.Pages.Schedule

{

    public class DeleteModel : PageModel

    {

        private readonly RazorPagesMovie.Models.MovieContext _context;

        public DeleteModel(RazorPagesMovie.Models.MovieContext context)

        {

            _context = context;

        }

        [BindProperty]

        public Models.Schedule Schedule { get; set; }

        public async Task<IActionResult> OnGetAsync(int? id)

        {

            if (id == null)

            {

                return NotFound();

            }

            Schedule = await _context.Schedule.SingleOrDefaultAsync(m => m.ID == id);

            if (Schedule == null)

            {

                return NotFound();

            }

            return Page();

        }

        public async Task<IActionResult> OnPostAsync(int? id)

        {

            if (id == null)

            {

                return NotFound();

            }

            Schedule = await _context.Schedule.FindAsync(id);

            if (Schedule != null)

            {

                _context.Schedule.Remove(Schedule);

                await _context.SaveChangesAsync();

            }

            return RedirectToPage("./Index");

        }

    }

}
OnPostAsync 方法按 id 处理计划删除:
public async Task<IActionResult> OnPostAsync(int? id)

{

    if (id == null)

    {

        return NotFound();

    }

    Schedule = await _context.Schedule.FindAsync(id);

    if (Schedule != null)

    {

        _context.Schedule.Remove(Schedule);

        await _context.SaveChangesAsync();

    }

    return RedirectToPage("./Index");

}
成功删除计划后,RedirectToPage 将返回到计划的“Index.cshtml”页面。
有效的 Schedules Razor 页面
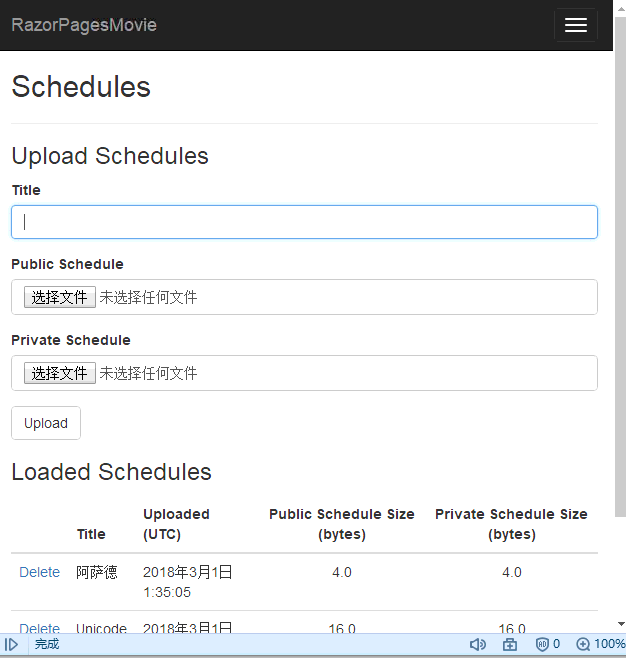
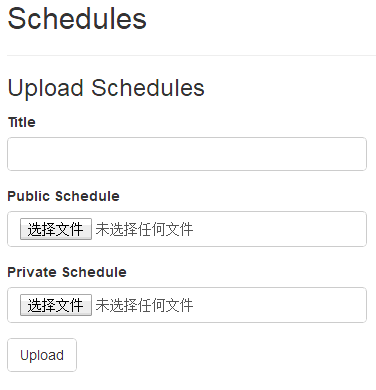
页面加载时,计划标题、公用计划和专用计划的标签和输入将呈现提交按钮:
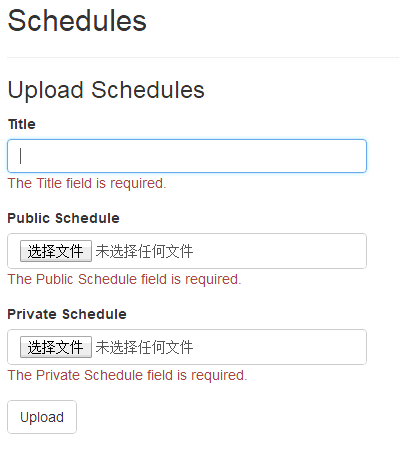
在不填充任何字段的情况下选择“上传”按钮会违反此模型上的 [Required] 特性。 ModelState 无效。 会向用户显示验证错误消息:
上传一个或多个计划时,“已加载计划”部分会显示已加载计划:

用户可单击该表中的“删除”链接以访问删除确认视图,并在其中选择确认或取消删除操作。
ASP.NET CORE RAZOR 到此结束
源代码
 https://pan.baidu.com/s/1c4k5au8
密码:rtr7
ASP.NET CORE RAZOR :将文件上传至 ASP.NET Core 中的 Razor 页面的更多相关文章
- Asp.Net实现无刷新文件上传并显示进度条(非服务器控件实现)(转)
Asp.Net实现无刷新文件上传并显示进度条(非服务器控件实现) 相信通过Asp.Net的服务器控件上传文件在简单不过了,通过AjaxToolkit控件实现上传进度也不是什么难事,为什么还要自己辛辛苦 ...
- [代码示例]用Fine Uploader+ASP.NET MVC实现ajax文件上传
原文 [代码示例]用Fine Uploader+ASP.NET MVC实现ajax文件上传 Fine Uploader(http://fineuploader.com/)是一个实现 ajax 上传文件 ...
- ASP.NET MVC下使用文件上传
这里我通过使用uploadify组件来实现异步无刷新多文件上传功能. 1.首先下载组件包uploadify,我这里使用的版本是3.1 2.下载后解压,将组件包拷贝到MVC项目中 3. 根目录下添加新 ...
- .net core webapi 文件上传在 Swagger 文档中的有好提示处理
前提: 需要nuget Swashbuckle.AspNetCore 我暂时用的是 4.01 最新版本: 描述:解决 .net core webapi 上传文件使用的是 IFormFile,在S ...
- [转]ExtJs入门之filefield:文件上传的配置+结合Ajax完美实现文件上传的asp.net示例
原文地址:http://www.stepday.com/topic/?459 作文一个ExtJs的入门汉子,学习起来的确是比较费劲的事情,不过如今在这样一个网络资源如此丰富的时代,依然不是那么难了的. ...
- [Asp.net]通过uploadify将文件上传到B服务器的共享文件夹中
写在前面 客户有这样的一个需求,针对项目中文档共享的模块,客户提出如果用户上传特别的大,或者时间久了硬盘空间就会吃满,能不能将这些文件上传到其他的服务器?然后就稍微研究了下这方面的东西,上传到网络中的 ...
- asp.net.mvc 的单文件上传和多文件上传的简单例子
首先打开vs2012,创建空的mvc4项目,名称为MVCStudy,选择基本模板
- .Net Core实现将文件上传到七牛云存储
功能:将图片上传到七牛云存储 准备工作 注册七牛账号,提交实名认证(基本上1天内内审核通过) 登录七牛后台->对象存储->新建空间 (基本概念:https://developer.qini ...
- JQuery文件上传插件uploadify在MVC中Session丢失的解决方案
<script type="text/javascript"> var auth = "@(Request.Cookies[FormsAuthenticati ...
随机推荐
- 使用log4j2分离系统日志与业务日志
前一篇文章介绍了log4j2 扩展日志级别,支持将系统日志与业务处理日志拆分,现在介绍一下通过日志级别将系统日志与业务日志分类,要达到这个目的很容易,只需要配置一下log4j的xml文件: <? ...
- 【linux高级程序设计】(第十三章)Linux Socket网络编程基础 4
网络调试工具 tcpdump 功能:打印指定网络接口中与布尔表达式匹配的报头信息 关键字: ①类型:host(默认).net.port host 210.27.48.2 //指明是一台主机 net 2 ...
- JAVA线程池调优
在JAVA中,线程可以使用定制的代码来管理,应用也可以利用线程池.在使用线程池时,有一个因素非常关键:调节线程池的大小对获得最好的性能至关重要.线程池的性能会随线程池大小这一基本选择而有所不同 ...
- 使用 ElasticSearch Aggregations 进行统计分析
https://blog.csdn.net/zxjiayou1314/article/details/53837719/
- 在16aspx.com上下了一个.net程序,怎么修改它的默认登录名和密码?
正常应该有个login.aspx文件,找到登入按钮事件,查看验证用户名密码事件,这个验证就有去搜索用户表,然后在这个用户表修改用户名密码就行了.不排除其他表有用用户名关联
- 使用webView的时候,出现Error loading page Domain:WebKitErrorDomain Error Code:101 Description: The URL can't be shown
onShouldStartLoadWithRequest = (e) => {// Implement any custom loading logic here, don't forget t ...
- (4)PHP基本语法、变量、数据类型、运算符、流程控制
一.基本语法 1.PHP在网页里的结构 <?php ..... ?> 2.php的另一种格式(不推荐使用) <script language="php"> ...
- codevs——1553 互斥的数
时间限制: 1 s 空间限制: 128000 KB 题目等级 : 黄金 Gold 题解 题目描述 Description 有这样的一个集合,集合中的元素个数由给定的N决定,集合的元素为N个不同 ...
- Ubuntu 16.04/CentOS 6.9安装Apache压力(并发)测试工具ab
说明: ab工具已经在Apache中包含,如果不想安装Apache,那么可以使用下面方法单独安装. 安装: Ubuntu: sudo apt-get install apache2-utils Cen ...
- CENTOS设置MYSQL字符集
CENTOS设置MYSQL字符集 show variables like 'character_set%'; vim etc/my.cnf 修改成如下: [client] port=3306 sock ...