【JavaWeb】Spring+SpringMVC+MyBatis+SpringSecurity+EhCache+JCaptcha 完整Web基础框架(五)
SpringSecurity(2)
好久没有写了,之前只写了一半,我是一边开发一边写Blog一边上班,所以真心没有那么多时间来维护Blog,项目已经开发到编写逻辑及页面部分了,框架基本上已经搭建好不会再修改了,数据库也扩充了好多了。目前前端的技术框架使用的是BootStrap,集成了几个不错的插件这边列举一下,给大家做一个参考:
- select2:一个下拉框的优化组件,支持多级,支持模糊匹配等等,而且也非常美观,与Bootstrap其他控件可完美兼容;
- iCheck:一个checkBox和radios的优化组件,支持各种事件回调多种配色方案,与Bootstrap其他控件完美兼容;
- artTemplate:这个是腾讯的模板渲染框架,好用,语法简单,类似JSTL,我表示非常推荐;
- krpano:这是一个付费的插件,用于制作并可在web上显示720全景照片以及VR模式;【付费插件,价格不菲,不是打广告,我也是找不到更好的才用它,我自己也没有去买正版,不是做上线网站,所以也没打算买。】
好了,现在还要继续讲解Security的集成工作。
SpringSecurity配置文件
目录:resource/config/spring,文件名:applicationContext-security.xml
- <sec:logout invalidate-session="true" logout-url="/logout.do" logout-success-url="/"/>
继续上一篇文章,接下来要讲的就是这个登出的配置了。
- invalidate-session:这个配置的意思是,当用户登出后,是否将session失效;
- logout-url:这个自然是登出的url地址了。
- logout-success-url:当顺利登出后,浏览器跳转的地址,我这样设置是跳转到首页。
- <!--session管理及单点登录-->
- <sec:session-management session-authentication-strategy-ref="concurrentSessionControlStrategy"/>
- <!--session管理器 start-->
- <bean id="concurrencyFilter" class="org.springframework.security.web.session.ConcurrentSessionFilter">
- <constructor-arg name="sessionRegistry" ref="sessionRegistry"/>
- <constructor-arg name="expiredUrl" value="/user/timeout"/>
- </bean>
- <bean id="concurrentSessionControlStrategy"
- class="org.springframework.security.web.authentication.session.ConcurrentSessionControlAuthenticationStrategy">
- <constructor-arg name="sessionRegistry" ref="sessionRegistry"/>
- <property name="maximumSessions" value="1"/>
- </bean>
- <bean id="sessionRegistry" class="org.springframework.security.core.session.SessionRegistryImpl"/>
- <!--session管理器 end-->
这个是单点登录的管理配置,这个简单说一下吧,expiredUrl这个参数呢,是当session失效之后,页面的跳转地址。maximunSessions指的是最大的session数,如果是限制账号只能单点登录的话,自然要配置为“1”。而sessionRegistry这个是Spring自带实现,我就不多解释了,大家可以自己去看SessionRegistryImpl这个实现类。
- <!--资源拦截器配置-->
- <sec:custom-filter ref="filterSecurityInterceptor" before="FILTER_SECURITY_INTERCEPTOR"/>
- <sec:custom-filter ref="concurrencyFilter" position="CONCURRENT_SESSION_FILTER"/>
- <!--资源拦截器 start-->
- <bean id="filterSecurityInterceptor"
- class="org.springframework.security.web.access.intercept.FilterSecurityInterceptor">
- <property name="accessDecisionManager" ref="accessDecisionManager"/>
- <property name="authenticationManager" ref="myAuthenticationManager"/>
- <property name="securityMetadataSource" ref="resourceSecurityMetadataSource"/>
- </bean>
第一个是资源拦截器,可以看得见,这是一个Filter。第二个是刚才设置的单点登录Filter。顺带讲一下,我不知道是为什么,配置的第一个Filter点击ref名字的时候,可以自动链接跳转,但是后面添加的Filter都统统会提示找不到,但实际上是生效的就是了。
然后来讲讲资源拦截器中的三个属性:
- accessDecisionManager:决策管理器,这个上节有讲过,此处略过;
- authenticationManager:认证管理器,主要用于验证用户密码的。这个有专门的配置,一会儿说。
- securityMetadataSource:权限验证资源,主要是从数据库中读取资源和权限的对应关系。咱们这个类主要是用于记录“资源访问权限”,还有关于方法的访问权限,就是后面的methodSecurityMetadataSource.方法的访问权限主要是以Spring的AOP模式去做的。
然后来说说,认证管理器的配置:
- <!--认证管理器-->
- <sec:authentication-manager alias="myAuthenticationManager">
- <sec:authentication-provider ref="daoAuthenticationProvider"/>
- </sec:authentication-manager>
- <bean id="daoAuthenticationProvider"
- class="org.springframework.security.authentication.dao.DaoAuthenticationProvider">
- <property name="messageSource" ref="messageSource"/>
- <property name="passwordEncoder" ref="messageDigestPasswordEncoder"/>
- <property name="userDetailsService" ref="cachingUserDetailsService"/>
- <property name="saltSource" ref="saltSource"/>
- <property name="hideUserNotFoundExceptions" value="false"/>
- </bean>
- <!--认证处理服务-->
- <bean id="cachingUserDetailsService"
- class="org.springframework.security.config.authentication.CachingUserDetailsService">
- <constructor-arg name="delegate" ref="webUserDetailsService"/>
- <property name="userCache">
- <bean class="org.springframework.security.core.userdetails.cache.EhCacheBasedUserCache">
- <property name="cache" ref="userEhCacheFactory"/>
- </bean>
- </property>
- </bean>
这个是认证管理器的配置,其中daoAuthenticationProvider主要用作与认证时查询数据库获取数据库存储的认证信息,比如用户名对应的密码。
messageSource是用于国际化的,这个你们看着配,非必要功能。
passwordEncoder,主要是用于密码加密的,
userDetailsService,这个是用于查找用户信息的类,
saltSource,这个是加密盐值,这个情况是这样子,我们存在数据库中的密码,向来不是明文,都是密文存储,所以在访问密码的时候,都是将用户的密码进一步的加密后再跟系统数据库中的值进行比较,盐值的概念,我不知道怎么解释,给我的理解就是有它进行加密的话会更安全。
hideUserNotFoundException,这个就跟字面意思一样,因此找不到用户的异常,实际上这个异常不应该被隐藏,而是需要抛出,然后错误信息直接反馈到前端页面上,提示用户找不到用户名。
接下来我们来讲解一下这几个属性对应的类,然而要涉及到另一个配置文件,因为这些东西,不仅仅属于SpringSecurity,而更广泛的适用于整个框架中,作为一种Service的角色来使用。
SpringService配置文件
目录:resource/config/spring,文件名:applicationContext-service.xml
- <?xml version="1.0" encoding="UTF-8"?>
- <beans xmlns="http://www.springframework.org/schema/beans"
- xmlns:xsi="http://www.w3.org/2001/XMLSchema-instance"
- xmlns:context="http://www.springframework.org/schema/context"
- xsi:schemaLocation="http://www.springframework.org/schema/beans http://www.springframework.org/schema/beans/spring-beans.xsd http://www.springframework.org/schema/context http://www.springframework.org/schema/context/spring-context.xsd">
- <!--扫描service-->
- <context:component-scan base-package="com.magic.rent.service"/>
- <!--注册统一异常控制-->
- <bean id="exception" class="com.magic.rent.exception.exhandler.CustomExceptionHandler"/>
- <!--MD5加密-->
- <bean id="messageDigestPasswordEncoder"
- class="org.springframework.security.authentication.encoding.MessageDigestPasswordEncoder">
- <constructor-arg name="algorithm" value="MD5"/>
- </bean>
- <!--国际化配置-->
- <bean id="messageSource"
- class="org.springframework.context.support.ResourceBundleMessageSource">
- <property name="basename" value="messages"/>
- </bean>
- <bean id="messageSourceAccessor" class="org.springframework.context.support.MessageSourceAccessor">
- <constructor-arg ref="messageSource"/>
- </bean>
- </beans>
- 第一行配置自然是扫描Service组件,这个我就不说了,Spring的基本配置常识。
- 统一异常控制,这个呢就是前面第三篇文章中所提到的统一异常控制的类,可以用注解去注册,也可以像我这样用配置文件的方式,这个到没有什么区别,我之所以没有用注解,而是单独写一行配置,是因为我把Exception跟Service包区分开了,看我之前的目录结构就知道,这样比较方便我维护自定义异常种类而已。
- MD5加密,这就是我们SpringSecurity的密码加密类,用于加密密码的,其中可以看到我们在属性algorithm中,使用MD5加密。
- messageSource这个就是我说的国际化配置,其中basename指向的就是国际化配置的资源文件,如下图:

所有的中文,都要转换成UTF-8的编码,这个文件,在SpringSecurity中又自带的,可以直接拿来用,地址是:
- org/springframework/security/spring-security-core/4.1.3.RELEASE/spring-security-core-4.1.3.RELEASE.jar!/org/springframework/security/messages_zh_CN.properties
然后这边我写了一个转换的工具类:
- package com.magic.rent.util;
- import java.io.BufferedReader;
- import java.io.IOException;
- import java.io.InputStreamReader;
- /**
- * 创建者: wuxinzhe 创建时间: 16/10/6
- * 类说明: UTF-8的中文转换类
- */
- public class UTF8Util {
- /**
- * "/"分隔符
- *
- * @param str
- * @return
- */
- public static String GBK2Unicode(String str) {
- StringBuffer result = new StringBuffer();
- for (int i = 0; i < str.length(); i++) {
- char chr = str.charAt(i);
- if (!isNeedConvert(chr)) {
- result.append(chr);
- continue;
- }
- result.append("\\u" + Integer.toHexString((int) chr));
- }
- return result.toString();
- }
- public static boolean isNeedConvert(char para) {
- return ((para & (0x00FF)) != para);
- }
- /**
- * &#分隔符
- *
- * @param str
- * @return
- */
- public static String GBK2Unicode2(String str) {
- StringBuffer result = new StringBuffer();
- for (int i = 0; i < str.length(); i++) {
- char chr = str.charAt(i);
- result.append("&#" + Integer.toString((int) chr) + ";");
- }
- return result.toString();
- }
- public static void main(String[] args) throws IOException {
- BufferedReader br = new BufferedReader(new InputStreamReader(System.in));
- String str = br.readLine();
- System.out.println("UTF-8:" + GBK2Unicode(str));
- System.out.println("UTF-82:" + GBK2Unicode2(str));
- }
- }
运行后在控制台输入你要转换的中文或英文或标点,然后回车后会自动转换成两种不同格式的UTF-8编码。还算挺方便的。
然后大家还能看到我配置了一个MessageSourceAccess,这个是做什么的呢?这是一个国际化的工具类,非常好用,我随便拿我项目中的一个例子给大家演示:

可以看到,这个对象有两个参数(这个对象我是写在BaseController当中,通过继承获取,因为这个算是通用的属性。),第一个参数就是像message的配置文件中查找,看是否有配置这个对应的文字,如果没有的话,就采用第二个参数中的值,即默认值,进行返回。到此,我们再回到SpringSecurity的配置文件中,继续讲解:
- <!--MD5加密盐值-->
- <bean id="saltSource" class="org.springframework.security.authentication.dao.ReflectionSaltSource">
- <property name="userPropertyToUse" value="username"/>
- </bean>
这就是盐值的配置了,这个配置的意思,就是说,将用户的用户名,作为加密时的混入MD5的加密中,增强密码的加密强度。当然你也可以不一定用用户名而是其他的什么值。
然后贴出这个securityMetadataSource的类代码,这个没有什么特殊的,就从数据库中获取数据而已,我留了一个手动刷新的方法,主要是用于后续如果有更新权限的情况下,不需要重启服务器,就可以刷新权限列表,因为我们再启动项目的时候,将数据库中的权限数据一次性加载到内存中,而后续对比权限的时候,实际上只跟内存中的数据对比相当于一个缓存的作用。
- package com.magic.rent.service.security;
- import com.magic.rent.mapper.SysResourcesMapper;
- import org.slf4j.Logger;
- import org.slf4j.LoggerFactory;
- import org.springframework.beans.factory.InitializingBean;
- import org.springframework.beans.factory.annotation.Autowired;
- import org.springframework.security.access.ConfigAttribute;
- import org.springframework.security.access.SecurityConfig;
- import org.springframework.security.web.FilterInvocation;
- import org.springframework.security.web.access.intercept.FilterInvocationSecurityMetadataSource;
- import org.springframework.security.web.util.matcher.AntPathRequestMatcher;
- import org.springframework.security.web.util.matcher.RequestMatcher;
- import org.springframework.stereotype.Service;
- import javax.servlet.http.HttpServletRequest;
- import java.util.*;
- @Service
- public class ResourceSecurityMetadataSource implements FilterInvocationSecurityMetadataSource, InitializingBean {
- private final static List<ConfigAttribute> NULL_CONFIG_ATTRIBUTE = Collections.emptyList();
- //权限集合
- private Map<RequestMatcher, Collection<ConfigAttribute>> requestMap;
- private static Logger logger = LoggerFactory.getLogger(ResourceSecurityMetadataSource.class);
- @Autowired
- private SysResourcesMapper sysResourcesMapper;
- public Collection<ConfigAttribute> getAttributes(Object object)
- throws IllegalArgumentException {
- final HttpServletRequest request = ((FilterInvocation) object).getRequest();
- Collection<ConfigAttribute> attrs = NULL_CONFIG_ATTRIBUTE;
- for (Map.Entry<RequestMatcher, Collection<ConfigAttribute>> entry : requestMap.entrySet()) {
- if (entry.getKey().matches(request)) {
- attrs = entry.getValue();
- break;
- }
- }
- logger.info("请求资源->资源:[{}]->[{}]", request.getRequestURI(), attrs);
- return attrs;
- }
- public Collection<ConfigAttribute> getAllConfigAttributes() {
- Set<ConfigAttribute> allAttributes = new HashSet<ConfigAttribute>();
- for (Map.Entry<RequestMatcher, Collection<ConfigAttribute>> entry : requestMap.entrySet()) {
- allAttributes.addAll(entry.getValue());
- }
- return allAttributes;
- }
- public boolean supports(Class<?> clazz) {
- return FilterInvocation.class.isAssignableFrom(clazz);
- }
- private Map<String, String> loadResource() {
- Map<String, String> resourceLinkMap = new LinkedHashMap<String, String>();
- List<Map<String, String>> resourceList = sysResourcesMapper.getURLResourceMapping();
- for (Map<String, String> resourceMap : resourceList) {
- String resourcePath = resourceMap.get("resourcePath");
- String authorityMark = resourceMap.get("authorityMark");
- if (resourceLinkMap.containsKey(resourcePath)) {
- String mark = resourceLinkMap.get("resourcePath");
- resourceLinkMap.put(resourcePath, mark + "," + authorityMark);
- } else {
- resourceLinkMap.put(resourcePath, authorityMark);
- }
- }
- return resourceLinkMap;
- }
- protected Map<RequestMatcher, Collection<ConfigAttribute>> bindRequestMap() {
- Map<RequestMatcher, Collection<ConfigAttribute>> map =
- new LinkedHashMap<RequestMatcher, Collection<ConfigAttribute>>();
- Map<String, String> resMap = this.loadResource();
- for (Map.Entry<String, String> entry : resMap.entrySet()) {
- String key = entry.getKey();
- map.put(new AntPathRequestMatcher(key), SecurityConfig.createListFromCommaDelimitedString(entry.getValue()));
- }
- return map;
- }
- public void afterPropertiesSet() throws Exception {
- this.requestMap = this.bindRequestMap();
- logger.info("资源文件权限参数初始化:资源列表[{}]", requestMap);
- }
- /**
- * 手动刷新资源
- */
- public void refreshResuorceMap() {
- this.requestMap = this.bindRequestMap();
- }
- }
接着来讲一讲cachingUserDetailsService:认证处理服务,这个服务看它的名字就知道,它涉及到了缓存,所以我们加入了缓存的功能,因为登录这种操作,一般情况下肯定不会只登录一次就在不登录了,甚至一天可能会登录好几次,那用缓存的方式,减少数据库的访问,能提高每次验证速度。
我们可以看到有一个userCache的属性,这个属性就直接连接着userEhCacheFactory这个对象,我们的缓存,用的是EhCache。缓存的配置部分,我还没讲到,下一篇将会作出说明,简单地说,就是通过这个userEhCacheFactory工厂对象,来获取缓存对象。
另外可以看到构造器中还有一个参数是:delegate,指向的是一个WebUserDetailService,这个类是要自己自定义的:
- package com.magic.rent.service.security;
- /**
- *
- * 创建者: wu 创建时间: 16/9/23
- * 类说明: 用于获取用户角色下的所有权限
- */
- import com.magic.rent.mapper.SysAuthoritiesMapper;
- import com.magic.rent.mapper.SysRolesMapper;
- import com.magic.rent.mapper.SysUsersMapper;
- import com.magic.rent.pojo.SysAuthorities;
- import com.magic.rent.pojo.SysRoles;
- import com.magic.rent.pojo.SysUsers;
- import org.slf4j.Logger;
- import org.slf4j.LoggerFactory;
- import org.springframework.beans.factory.annotation.Autowired;
- import org.springframework.context.MessageSource;
- import org.springframework.context.support.MessageSourceAccessor;
- import org.springframework.security.core.GrantedAuthority;
- import org.springframework.security.core.authority.SimpleGrantedAuthority;
- import org.springframework.security.core.userdetails.*;
- import org.springframework.stereotype.Service;
- import java.util.*;
- @Service
- public class WebUserDetailsService implements UserDetailsService {
- @Autowired
- private SysUsersMapper sysUsersMapper;
- @Autowired
- private SysRolesMapper sysRolesMapper;
- @Autowired
- private SysAuthoritiesMapper sysAuthoritiesMapper;
- @Autowired
- private MessageSourceAccessor messageSourceAccessor;
- private static Logger logger = LoggerFactory.getLogger(WebUserDetailsService.class);
- public UserDetails loadUserByUsername(String s) throws UsernameNotFoundException {
- SysUsers sysUsers = null;
- try {
- //从数据中查找数据
- sysUsers = sysUsersMapper.selectByUserName(s);
- } catch (Exception e) {
- e.printStackTrace();
- }
- //如果查找不到用户信息,则抛出异常
- if (sysUsers == null) {
- throw new UsernameNotFoundException(
- messageSourceAccessor.getMessage("UserDetailsService.userNotFount", "用户未找到!"));
- }
- //查询用户角色
- sysUsers.setSysRoles(sysRolesMapper.selectRolesByUserId(sysUsers.getUserId()));
- //查询并封装该用户具有什么权限
- Set<GrantedAuthority> authorities = new HashSet<GrantedAuthority>();
- //用于过滤重复的权限
- List<String> preAuthorityMarks = new ArrayList<String>();
- if (sysUsers.getSysRoles() != null && !sysUsers.getSysRoles().isEmpty()) {
- //遍历用户所具有的所有角色
- for (SysRoles role : sysUsers.getSysRoles()) {
- //根据角色查询单独角色所具有的权限
- List<SysAuthorities> sysAuthoritiesList = sysAuthoritiesMapper.selectByRole(role);
- //将权限封装用于后续做判断
- for (SysAuthorities sysAuthority : sysAuthoritiesList) {
- //过滤已经存在的权限
- if (preAuthorityMarks.contains(sysAuthority.getAuthorityMark())) {
- //过滤
- continue;
- } else {
- //加入用于过滤的集合中
- preAuthorityMarks.add(sysAuthority.getAuthorityMark());
- //封装如权限集合中
- GrantedAuthority ga = new CustomGrantedAuthority(sysAuthority.getAuthorityMark());
- authorities.add(ga);
- }
- }
- }
- }
- //装载权限列表
- sysUsers.setAuthorities(authorities);
- logger.info("读取用户角色:账户名[{}]-权限[{}]", s, sysUsers.getAuthorities().toString());
- //拼装SysUserLoginDetails对象
- return sysUsers;
- }
- }
其中,我们有涉及到另一个类,就是CustomGrantedAuthority,而这个类也是自定义的,可以这样写的:
- package com.magic.rent.service.security;
- import org.springframework.security.core.GrantedAuthority;
- import org.springframework.stereotype.Service;
- import org.springframework.util.Assert;
- import java.io.Serializable;
- /**
- *
- * 创建者: wuxinzhe 创建时间: 16/10/6
- * 类说明:用于封装权限对象
- */
- public class CustomGrantedAuthority implements GrantedAuthority, Serializable {
- private static final long serialVersionUID = 9188347583387457302L;
- private final String authority;
- public CustomGrantedAuthority(String role) {
- Assert.hasText(role, "A granted authority textual representation is required");
- this.authority = role;
- }
- public String getAuthority() {
- return authority;
- }
- public boolean equals(Object obj) {
- if (this == obj) {
- return true;
- }
- if (obj instanceof CustomGrantedAuthority) {
- return authority.equals(((CustomGrantedAuthority) obj).authority);
- }
- return false;
- }
- public int hashCode() {
- return this.authority.hashCode();
- }
- public String toString() {
- return this.authority;
- }
- }
接着我们讲最后一部分,就是方法拦截器的配置了。
- <!--方法拦截器 start-->
- <bean id="methodSecurityInterceptor"
- class="org.springframework.security.access.intercept.aopalliance.MethodSecurityInterceptor">
- <property name="accessDecisionManager" ref="accessDecisionManager"/>
- <property name="authenticationManager" ref="myAuthenticationManager"/>
- <property name="securityMetadataSource" ref="methodSecurityMetadataSource"/>
- </bean>
- <aop:config>
- <aop:advisor advice-ref="methodSecurityInterceptor" pointcut="execution(* com.magic.rent.service.*.*(..))"
- order="1"/>
- </aop:config>
- <!--方法拦截器 end-->
基本属性我就不再阐述了。
正如前面所说,方法层级的权限验证,主要是通过AOP的方式来实现的,所以有了关于AOP的配置。
主要不同在于methodSecurityMetadataSource这个类:
- package com.magic.rent.service.security;
- import com.magic.rent.mapper.SysResourcesMapper;
- import com.magic.rent.pojo.MethodKey;
- import org.slf4j.Logger;
- import org.slf4j.LoggerFactory;
- import org.springframework.beans.factory.InitializingBean;
- import org.springframework.beans.factory.annotation.Autowired;
- import org.springframework.security.access.ConfigAttribute;
- import org.springframework.security.access.SecurityConfig;
- import org.springframework.security.access.method.AbstractMethodSecurityMetadataSource;
- import org.springframework.stereotype.Service;
- import java.lang.reflect.Method;
- import java.util.*;
- /**
- * Created by wuxinzhe on 16/9/25.
- */
- @Service
- public class MethodSecurityMetadataSource extends AbstractMethodSecurityMetadataSource implements InitializingBean {
- private final static List<ConfigAttribute> NULL_CONFIG_ATTRIBUTE = Collections.emptyList();
- private final static String RES_KEY = "resourcePath";
- private final static String AUTH_KEY = "authorityMark";
- private Map<MethodKey, Collection<ConfigAttribute>> requestMap;
- private static Logger logger = LoggerFactory.getLogger(MethodSecurityMetadataSource.class);
- @Autowired
- private SysResourcesMapper sysResourcesMapper;
- /**
- * 根据方法获取到访问方法所需要的权限
- *
- * @param method 访问的方法
- * @param targetClass 方法所属的类
- */
- public Collection<ConfigAttribute> getAttributes(Method method,
- Class<?> targetClass) {
- MethodKey key = new MethodKey(method);
- Collection<ConfigAttribute> attrs = NULL_CONFIG_ATTRIBUTE;
- for (Map.Entry<MethodKey, Collection<ConfigAttribute>> entry : requestMap.entrySet()) {
- if (entry.getKey().equals(key)) {
- attrs = entry.getValue();
- break;
- }
- }
- logger.info("获取Method-资源:[{}]->[{}]", key.getFullMethodName(), attrs);
- return attrs;
- }
- /**
- * 获取到所有方法对应的权限集合
- */
- public Collection<ConfigAttribute> getAllConfigAttributes() {
- Set<ConfigAttribute> allAttributes = new HashSet<ConfigAttribute>();
- for (Map.Entry<MethodKey, Collection<ConfigAttribute>> entry : requestMap.entrySet()) {
- allAttributes.addAll(entry.getValue());
- }
- return allAttributes;
- }
- /**
- * 初始化方法权限对应集合,绑定方法权限集合
- */
- public void afterPropertiesSet() throws Exception {
- this.requestMap = this.bindRequestMap();
- }
- /**
- * 从数据库中获取方法及权限对应信息
- *
- * @return
- */
- private Map<String, String> loadMethod() {
- Map<String, String> resMap = new LinkedHashMap<String, String>();
- List<Map<String, String>> list = this.sysResourcesMapper.getMethodResourceMapping();
- for (Map<String, String> map : list) {
- String resourcePath = map.get(RES_KEY);
- String authorityMark = map.get(AUTH_KEY);
- if (resMap.containsKey(resourcePath)) {
- String mark = resMap.get(resourcePath);
- resMap.put(resourcePath, mark + "," + authorityMark);
- } else {
- resMap.put(resourcePath, authorityMark);
- }
- }
- return resMap;
- }
- /**
- * 封装从数据库中获取的方法权限集合
- *
- * @return
- */
- public Map<MethodKey, Collection<ConfigAttribute>> bindRequestMap() {
- Map<MethodKey, Collection<ConfigAttribute>> resMap =
- new LinkedHashMap<MethodKey, Collection<ConfigAttribute>>();
- Map<String, String> map = this.loadMethod();
- for (Map.Entry<String, String> entry : map.entrySet()) {
- MethodKey key = new MethodKey(entry.getKey());
- resMap.put(key, SecurityConfig.createListFromCommaDelimitedString(entry.getValue()));
- }
- return resMap;
- }
- }
这个类暂时忘记了增加手动刷新内存中权限列表的方法,以后再弄吧,反正现在还没有开发管理页面,写法跟上面资源权限列表的那个类是一样的。
好啦,到此,万恶的SpringSecurity就配置完了。
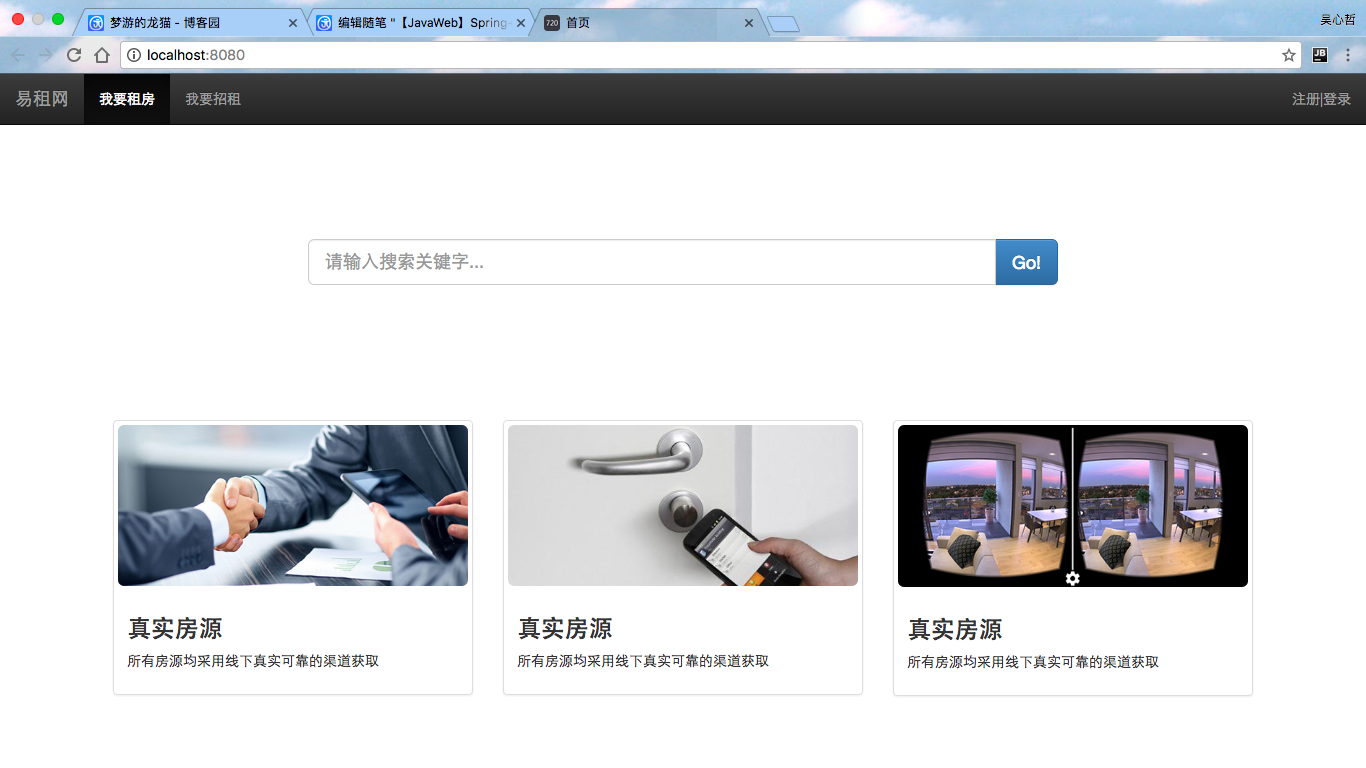
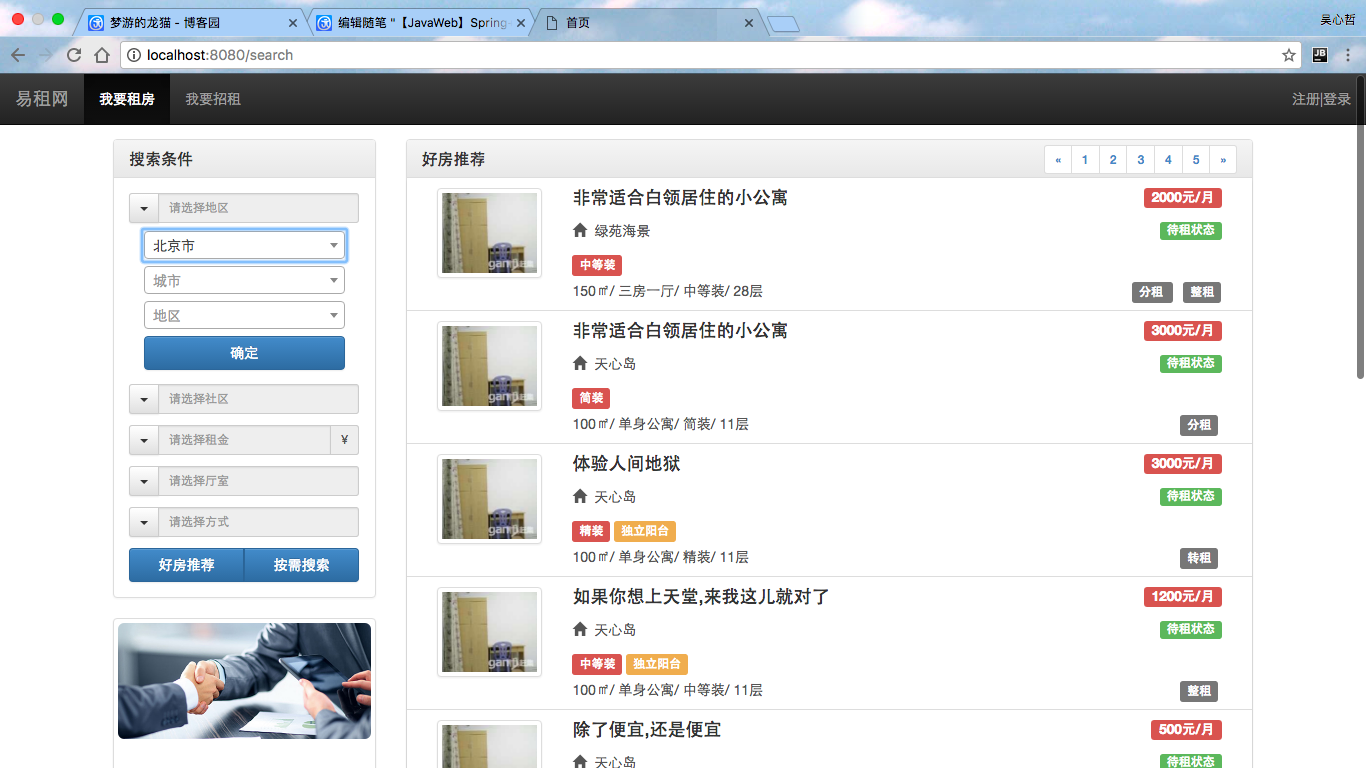
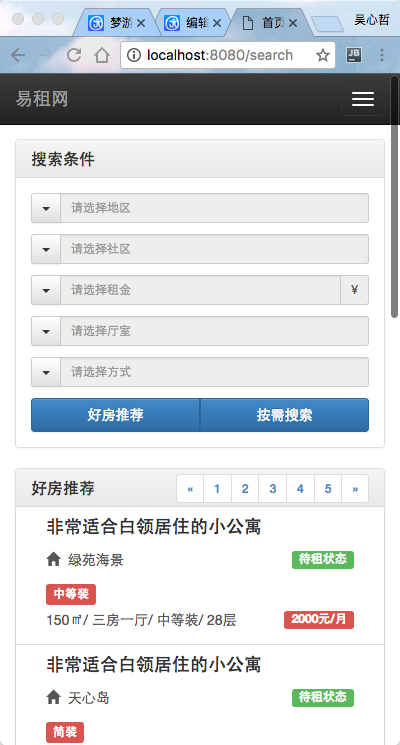
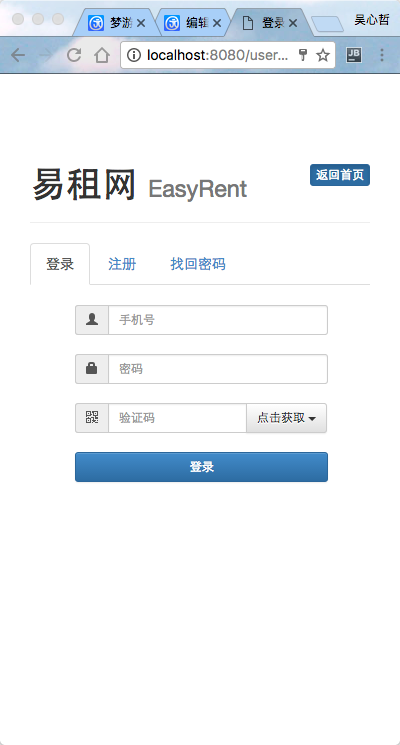
顺带的,贴几张,前端截图,嘻嘻嘻,做网站吗,忙活了半天,肯定要看到一个直观的结果撒~


【JavaWeb】Spring+SpringMVC+MyBatis+SpringSecurity+EhCache+JCaptcha 完整Web基础框架(五)的更多相关文章
- 【JavaWeb】Spring+SpringMVC+MyBatis+SpringSecurity+EhCache+JCaptcha 完整Web基础框架(三)
Spring+SpringMVC MVC呢,现在似乎越来越流行使用SpringMVC框架,我自己用的感觉,是非常好,确实很舒服,配置一开始是麻烦了一点点,但是后续的开发真的是很清爽! SpringMV ...
- 【JavaWeb】Spring+SpringMVC+MyBatis+SpringSecurity+EhCache+JCaptcha 完整Web基础框架(前言)
一直希望能够搭建一个完整的,基础Web框架,方便日后接一些外快的时候,能够省时省力,终于花了一周的时间,把这个东西搞定了.特此写下此博客,一来是纪念,二来是希望能够为别人提供方便.顺带说一下,恩,组合 ...
- Spring+SpringMVC+MyBatis+SpringSecurity+EhCache+JCaptcha 完整Web基础框架(前言)
简单介绍一下,本框架的基本功能点: Spring:整个框架的主体部分,这个自不用说. SpringMVC:MVC部分我还是比较喜欢Spring的. MyBatis:选型的时候选择这个ORM主要也是考虑 ...
- 【JavaWeb】Spring+SpringMVC+MyBatis+SpringSecurity+EhCache+JCaptcha 完整Web基础框架(四)
SpringSecurity(1) 其实啊,这部分我是最不想写的,因为最麻烦的也是这部分,真的是非常非常的麻烦.关于SpringSecurity的配置,让我折腾了好半天,网上的配置方式一大把,但总有一 ...
- 【JavaWeb】Spring+SpringMVC+MyBatis+SpringSecurity+EhCache+JCaptcha 完整Web基础框架(一)
Spring+MyBatis 首先要搭建的是Spring+MyBatis的整合框架,毕竟Spring是整个Web框架的核心部位,而数据库操作是一切测试的基础嘛. 目录结构 ━java ┣ contro ...
- 【JavaWeb】Spring+SpringMVC+MyBatis+SpringSecurity+EhCache+JCaptcha 完整Web基础框架(二)
Log4j 这个东西,大家都熟悉,就简单的介绍一下,算是一个抛砖引玉,因为我自己在Log日志的搭建方面,没有什么经验,但这东西确实是非常重要的,日后调Bug没有它基本不可能,如果有朋友有什么比较好的L ...
- 【JavaWeb】SSM+SpringSecurity+EhCache+JCaptcha 完整Web基础框架(六)
Showings 我个人的项目,当前不断地在更新. 我希望做成一个好项目,同时,也是在锻炼自己的技术. 在项目中发现问题,学习知识,是比较可取的一条路子. 这样学习到的知识,虽然分散,但是都很实用,而 ...
- Spring+SpringMVC+Mybatis+MAVEN+Eclipse+项目完整环境搭建
1.新建一个Maven项目,创建父项目. 2.创建子项目模块 3.创建javaWeb项目 4.创建后的项目目录结构 5.Maven文件配置 parent父项目pom.xml文件配置 <?xml ...
- javaweb项目-医者天下 (Spring+SpringMVC+MyBatis)
项目下载地址:http://download.csdn.net/detail/qq_33599520/9826683 项目完整结构图: 项目简介: 医者天下项目是一个基于Spring+SpringMV ...
随机推荐
- 5.2 Array类型介绍
Array类型是数组类型,Array(数组)类型也是引用类型中的一种. js 数组中的每一项可以保存任何类型的数据. js数组的大小/长度是可以动态调整的.如果你往数组中添加数据,数组长度会自动增加. ...
- Using View and Data API with Meteor
By Daniel Du I have been studying Meteor these days, and find that Meteor is really a mind-blowing f ...
- 菜单(Menu)的三中创建方式——Android开发之路2
菜单的三种创建方式 一.OptionsMenu---选项菜单 Android应用中的菜单默认是隐藏的,只有当用户点击手机上的MENU键,系统才会显示菜单.这种菜单叫做选项菜单(Options Menu ...
- 自动将指定目录下面的文件转换为UTF-8
using System; using System.Collections; using System.Collections.Generic; using System.IO; using Sys ...
- Html --用简单的<hr>实现多样化分割效果
最基本的:<hr width=300 size=1 color=#5151A2 align=center noshade>. <!--其中 width 规定线条的长度,还可以是百分比 ...
- ASP.NET MVC 5 01 - ASP.NET概述
本篇目录: ASP.NET 概述 .NET Framework 与 ASP.NET ASP.NET MVC简介 ASP.NET的特色和优势 典型案例 ▁▃▅ ASP.NET概述 ▅▃▁ 目前开发B/S ...
- 基于Spring+SpringMVC+Mybatis的Web系统搭建
系统搭建的配置大同小异,本文在前人的基础上做了些许的改动,重写数据库,增加依据权限的动态菜单的实现,也增加了后台返回json格式数据的配置,详细参见完整源码. 主要的后端架构:Spring+Sprin ...
- 烂泥:centos6 yum方式升级内核
本文由ilanniweb提供友情赞助,首发于烂泥行天下 想要获得更多的文章,可以关注我的微信ilanniweb 最近没有时间好久没有写文章了,今天由于需要安装docker学习虚拟容器的知识,需要升级O ...
- 萌新笔记——linux下(ubuntu)反删除(误删恢复)与回收站制作
刚刚有个小伙伴不小心删了他写了好几的天代码,为他心疼之余帮他找回了文件. 想到我之前也常常误删一些文件,就干脆分享一下我的反删除方法,并说说我做的回收站(好low的,求大神指点) 首先是反删除软件ex ...
- 【转】[fix] Wireshark error: There are no interfaces on which a capture can be done. on Mac OS X
I got the following error message when trying to open a network interface for capture using Wireshar ...