SSM的搭建
1.首先是工具的准备。
- eclipse
- jdk1.7
- maven 3.5.4
- tomcat 8.5
2.工具环境的搭建
首先,new建立选择maven project工程,勾选simple project,next后如下图所示,goup id起名为com.blog,artifact id为ssm-build,packing为war。
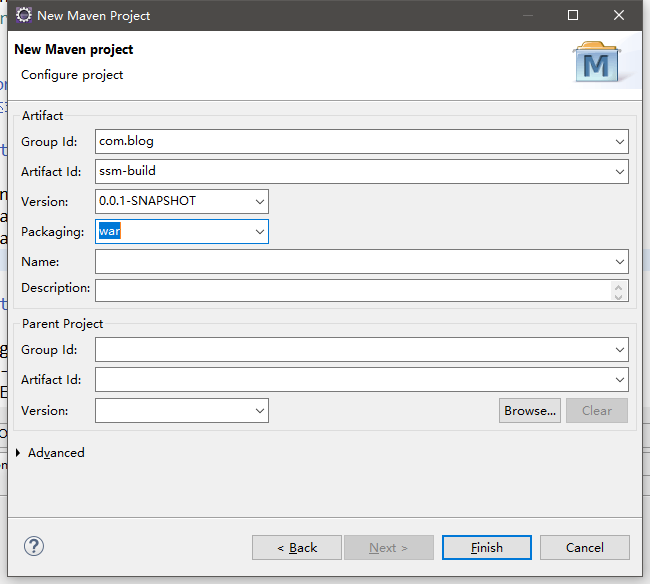
点击finish后完成maven工程的创建。如下图所示,目录webapp下,没有我们的WEB-INF,web.xml等。
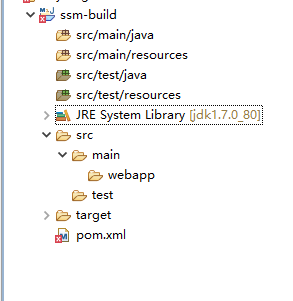
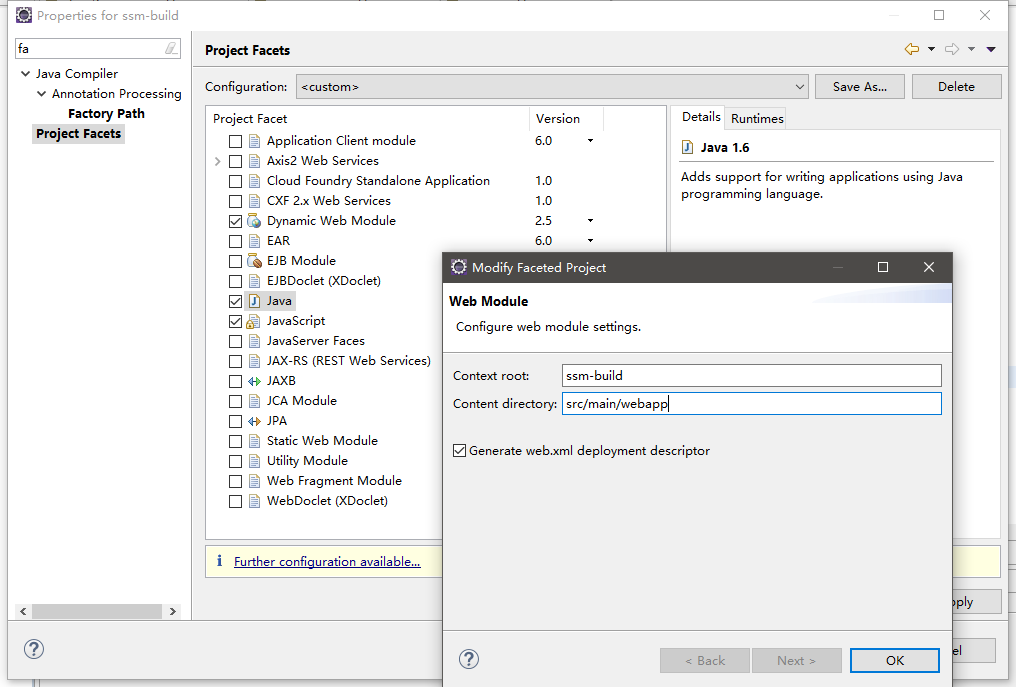
我们可以右击项目properties,搜素project facets,去除Dynamic Web Module选项apply,再次勾选,可进行自动生成设置,如下图所示,生成目录为src/main/webapp,勾选生成,ok即可完成,项目的目录搭建。
3.准备项目所需的环境对应的配置文件等
1.引入pom相关依赖,依赖可从maven repository官网进行查询配置
<dependencies>

          <!--引入spring相关依赖  -->

        <dependency>

            <groupId>org.springframework</groupId>

            <artifactId>spring-webmvc</artifactId>

            <version>4.3.7.RELEASE</version>

        </dependency>

        <!-- Spring-Jdbc -->

        <dependency>

            <groupId>org.springframework</groupId>

            <artifactId>spring-jdbc</artifactId>

            <version>4.3.7.RELEASE</version>

        </dependency>

        <!--Spring-test -->

        <dependency>

            <groupId>org.springframework</groupId>

            <artifactId>spring-test</artifactId>

            <version>4.3.7.RELEASE</version>

        </dependency>

        <!-- Spring面向切面编程 -->

        <dependency>

            <groupId>org.springframework</groupId>

            <artifactId>spring-aspects</artifactId>

            <version>4.3.7.RELEASE</version>

        </dependency>

        <!--MyBatis -->

        <dependency>

            <groupId>org.mybatis</groupId>

            <artifactId>mybatis</artifactId>

            <version>3.4.2</version>

        </dependency>

        <!-- MyBatis整合Spring的适配包 -->

        <dependency>

            <groupId>org.mybatis</groupId>

            <artifactId>mybatis-spring</artifactId>

            <version>1.3.1</version>

        </dependency>

        <!-- 数据库连接池、驱动 -->

        <dependency>

            <groupId>com.alibaba</groupId>

            <artifactId>druid</artifactId>

            <version>1.1.10</version>

        </dependency>

        <!--mysql连接驱动 -->

        <dependency>

            <groupId>mysql</groupId>

            <artifactId>mysql-connector-java</artifactId>

            <version>5.1.41</version>

        </dependency>

        <!-- (jstl,servlet-api,junit) -->

        <dependency>

            <groupId>jstl</groupId>

            <artifactId>jstl</artifactId>

            <version>1.2</version>

        </dependency>

        <dependency>

            <groupId>javax.servlet</groupId>

            <artifactId>javax.servlet-api</artifactId>

            <version>3.0.1</version>

            <scope>provided</scope>

        </dependency>

        <!-- junit -->

        <dependency>

            <groupId>junit</groupId>

            <artifactId>junit</artifactId>

            <version>4.12</version>

        </dependency>

    </dependencies>
2.配置resource.properties数据库文件
jdbc.driver=com.mysql.jdbc.Driver

jdbc.url=jdbc:mysql://localhost:3306/test?characterEncoding=utf-8

jdbc.username=root

jdbc.password=root
3.配置springMVC.xml文件,与前端交互的。
<?xml version="1.0" encoding="UTF-8"?>

<beans xmlns="http://www.springframework.org/schema/beans"

    xmlns:xsi="http://www.w3.org/2001/XMLSchema-instance"

    xmlns:context="http://www.springframework.org/schema/context"

    xmlns:aop="http://www.springframework.org/schema/aop"

    xmlns:mvc="http://www.springframework.org/schema/mvc"

    xmlns:tx="http://www.springframework.org/schema/tx"

    xsi:schemaLocation="http://www.springframework.org/schema/aop http://www.springframework.org/schema/aop/spring-aop-4.3.xsd

        http://www.springframework.org/schema/beans http://www.springframework.org/schema/beans/spring-beans-3.2.xsd

        http://www.springframework.org/schema/tx http://www.springframework.org/schema/tx/spring-tx-4.3.xsd

        http://www.springframework.org/schema/mvc http://www.springframework.org/schema/mvc/spring-mvc-4.3.xsd

        http://www.springframework.org/schema/context http://www.springframework.org/schema/context/spring-context-4.3.xsd">

    <!--SpringMVC的配置文件,包含网站跳转逻辑的控制,配置  -->

    <context:component-scan base-package="com.blog.controller"/>

    <!--两个标准配置  -->

    <!-- 将springmvc不能处理的请求交给tomcat -->

    <mvc:default-servlet-handler/>

    <!-- 能支持springmvc更高级的一些功能,JSR303校验,快捷的ajax...映射动态请求 -->

    <mvc:annotation-driven/>

    <!--配置视图解析器,方便页面返回  -->

    <bean class="org.springframework.web.servlet.view.InternalResourceViewResolver">

        <property name="prefix" value="/WEB-INF/views/"></property>

        <property name="suffix" value=".jsp"></property>

    </bean>

</beans>
4.创建applicaitonContext.xml文件用于我们的业务逻辑
<?xml version="1.0" encoding="UTF-8"?>

<beans xmlns="http://www.springframework.org/schema/beans"

    xmlns:xsi="http://www.w3.org/2001/XMLSchema-instance"

    xmlns:mvc="http://www.springframework.org/schema/mvc"

    xmlns:context="http://www.springframework.org/schema/context"

    xmlns:aop="http://www.springframework.org/schema/aop"

    xmlns:tx="http://www.springframework.org/schema/tx"

    xsi:schemaLocation="http://www.springframework.org/schema/aop http://www.springframework.org/schema/aop/spring-aop-4.3.xsd

        http://www.springframework.org/schema/beans http://www.springframework.org/schema/beans/spring-beans-3.2.xsd

        http://www.springframework.org/schema/tx http://www.springframework.org/schema/tx/spring-tx-4.3.xsd

        http://www.springframework.org/schema/context http://www.springframework.org/schema/context/spring-context-4.3.xsd">

    <!-- 属性读取 -->

    <context:property-placeholder location="classpath:resource.properties" />

    <context:component-scan base-package="com.blog">

        <!-- 扫描符合@Controller的类 -->

        <context:include-filter type="annotation" expression="org.springframework.stereotype.Controller"/>

    </context:component-scan>

    <!-- 数据库连接池 -->

    <bean id="dataSource" class="com.alibaba.druid.pool.DruidDataSource"

        destroy-method="close">

        <property name="url" value="${jdbc.url}" />

        <property name="username" value="${jdbc.username}" />

        <property name="password" value="${jdbc.password}" />

        <property name="driverClassName" value="${jdbc.driver}" />

        <property name="maxActive" value="10" />

        <property name="minIdle" value="5" />

    </bean>

    <!--================== 配置和MyBatis的整合=============== -->

    <bean id="sqlSessionFactory" class="org.mybatis.spring.SqlSessionFactoryBean">

        <!-- 指定mybatis全局配置文件的位置 -->

        <property name="dataSource" ref="dataSource"></property>

    </bean>

    <bean class="org.mybatis.spring.mapper.MapperScannerConfigurer">

        <property name="basePackage" value="com.blog" />

        <property name="sqlSessionFactoryBeanName" value="sqlSessionFactory" />

    </bean>

    <!-- ===============事务控制的配置 ================-->

    <!-- 配置事务管理器 -->

    <bean id="transactionManager" class="org.springframework.jdbc.datasource.DataSourceTransactionManager">

        <property name="dataSource" ref="dataSource" />

    </bean>

    <!-- 拦截器方式配置事物 -->

    <tx:advice id="transactionAdvice" transaction-manager="transactionManager">

        <tx:attributes>

            <tx:method name="add*" propagation="REQUIRED" />

            <tx:method name="append*" propagation="REQUIRED" />

            <tx:method name="insert*" propagation="REQUIRED" />

            <tx:method name="save*" propagation="REQUIRED" />

            <tx:method name="update*" propagation="REQUIRED" />

            <tx:method name="modify*" propagation="REQUIRED" />

            <tx:method name="edit*" propagation="REQUIRED" />

            <tx:method name="delete*" propagation="REQUIRED" />

            <tx:method name="remove*" propagation="REQUIRED" />

            <tx:method name="repair" propagation="REQUIRED" />

            <tx:method name="delAndRepair" propagation="REQUIRED" />

            <tx:method name="get*" propagation="SUPPORTS" />

            <tx:method name="find*" propagation="SUPPORTS" />

            <tx:method name="load*" propagation="SUPPORTS" />

            <tx:method name="search*" propagation="SUPPORTS" />

            <tx:method name="datagrid*" propagation="SUPPORTS" />

            <tx:method name="*" propagation="SUPPORTS" />

        </tx:attributes>

    </tx:advice>

    <aop:config>

        <aop:pointcut id="transactionPointcut" expression="execution(* com.blog.service.*.*(..))" />

        <aop:advisor pointcut-ref="transactionPointcut" advice-ref="transactionAdvice" />

    </aop:config>

</beans>
上面的四个文件是必备步骤,接下来配置web.xml文件
<?xml version="1.0" encoding="UTF-8"?>

<web-app xmlns:xsi="http://www.w3.org/2001/XMLSchema-instance"

xmlns="http://java.sun.com/xml/ns/javaee"

 xsi:schemaLocation="http://java.sun.com/xml/ns/javaee http://java.sun.com/xml/ns/javaee/web-app_2_5.xsd" id="WebApp_ID"

 version="2.5">

 <!--1、启动Spring的容器  -->

    <context-param>

        <param-name>contextConfigLocation</param-name>

        <param-value>classpath:applicationContext.xml</param-value>

    </context-param>

    <listener>

        <listener-class>org.springframework.web.context.ContextLoaderListener</listener-class>

    </listener>

    <!--2、springmvc的前端控制器,拦截所有请求  -->

    <servlet>

        <servlet-name>springMVC</servlet-name>

        <servlet-class>org.springframework.web.servlet.DispatcherServlet</servlet-class>

        <init-param>

            <param-name>contextConfigLocation</param-name>

            <param-value>classpath:springMVC.xml</param-value>

        </init-param>

        <load-on-startup>1</load-on-startup>

    </servlet>

    <servlet-mapping>

        <servlet-name>springMVC</servlet-name>

        <url-pattern>*.do</url-pattern>

    </servlet-mapping>

    <!-- 默认访问的页面 -->

    <welcome-file-list>

        <welcome-file>/index.jsp</welcome-file>

    </welcome-file-list>

    <!-- 3、字符编码过滤器,一定要放在所有过滤器之前 -->

    <filter>

        <filter-name>CharacterEncodingFilter</filter-name>

        <filter-class>org.springframework.web.filter.CharacterEncodingFilter</filter-class>

        <init-param>

            <param-name>encoding</param-name>

            <param-value>utf-8</param-value>

        </init-param>

        <init-param><!--是否强制使用encoding编码  -->

            <param-name>forceRequestEncoding</param-name>

            <param-value>true</param-value>

        </init-param>

        <init-param><!--是否强制使用encoding编码  -->

            <param-name>forceResponseEncoding</param-name>

            <param-value>true</param-value>

        </init-param>

    </filter>

    <filter-mapping>

        <filter-name>CharacterEncodingFilter</filter-name>

        <url-pattern>/*</url-pattern>

    </filter-mapping>

 </web-app>
到这里我们已经基本配置完毕了,有什么需求,可以进行任意的增加,接下来我们编辑网页部分,在webapp下简历index.jsp文件,这是web.xml配置的默认访问位置
为了使页面更好看
引入bootstrap美化页面
如图,在webapp目录下建立了static目录,放入了jquery以及bootstrap,这些官网可进行直接下载。
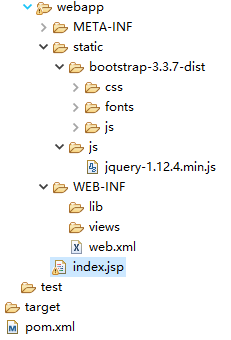
在index.jsp中引入这些jquery和bootstrap样式。
<%@ page language="java" contentType="text/html; charset=UTF-8" pageEncoding="UTF-8"%>
<%@taglib uri="http://java.sun.com/jsp/jstl/core" prefix="c"%>
<!DOCTYPE html PUBLIC "-//W3C//DTD HTML 4.01 Transitional//EN" "http://www.w3.org/TR/html4/loose.dtd">
<html>
<head>
<meta charset="UTF-8">
<title>hello,ssm</title>
<script type="text/javascript" src="static/js/jquery-1.12.4.min.js"></script>
<link href="static/bootstrap-3.3.7-dist/css/bootstrap.min.css" rel="stylesheet">
<script src="static/bootstrap-3.3.7-dist/js/bootstrap.min.js"></script>
</head>
<body>
<form style="margin-top:18%;margin-left:38%" >
<div class="form-group">
<label for="exampleInputEmail1">用户名</label>
<input type="email" style="width:500px;" class="form-control" id="exampleInputEmail1" placeholder="Email">
</div>
<div class="form-group">
<label for="exampleInputPassword1">密码</label>
<input type="password" style="width:500px;" class="form-control" id="exampleInputPassword1" placeholder="Password">
</div>
<div class="checkbox">
<label>
<input type="checkbox">记住密码
</label>
</div>
<button type="submit" style="width:500px;" class="btn btn-success">登录</button>
</form>
</body>
</html
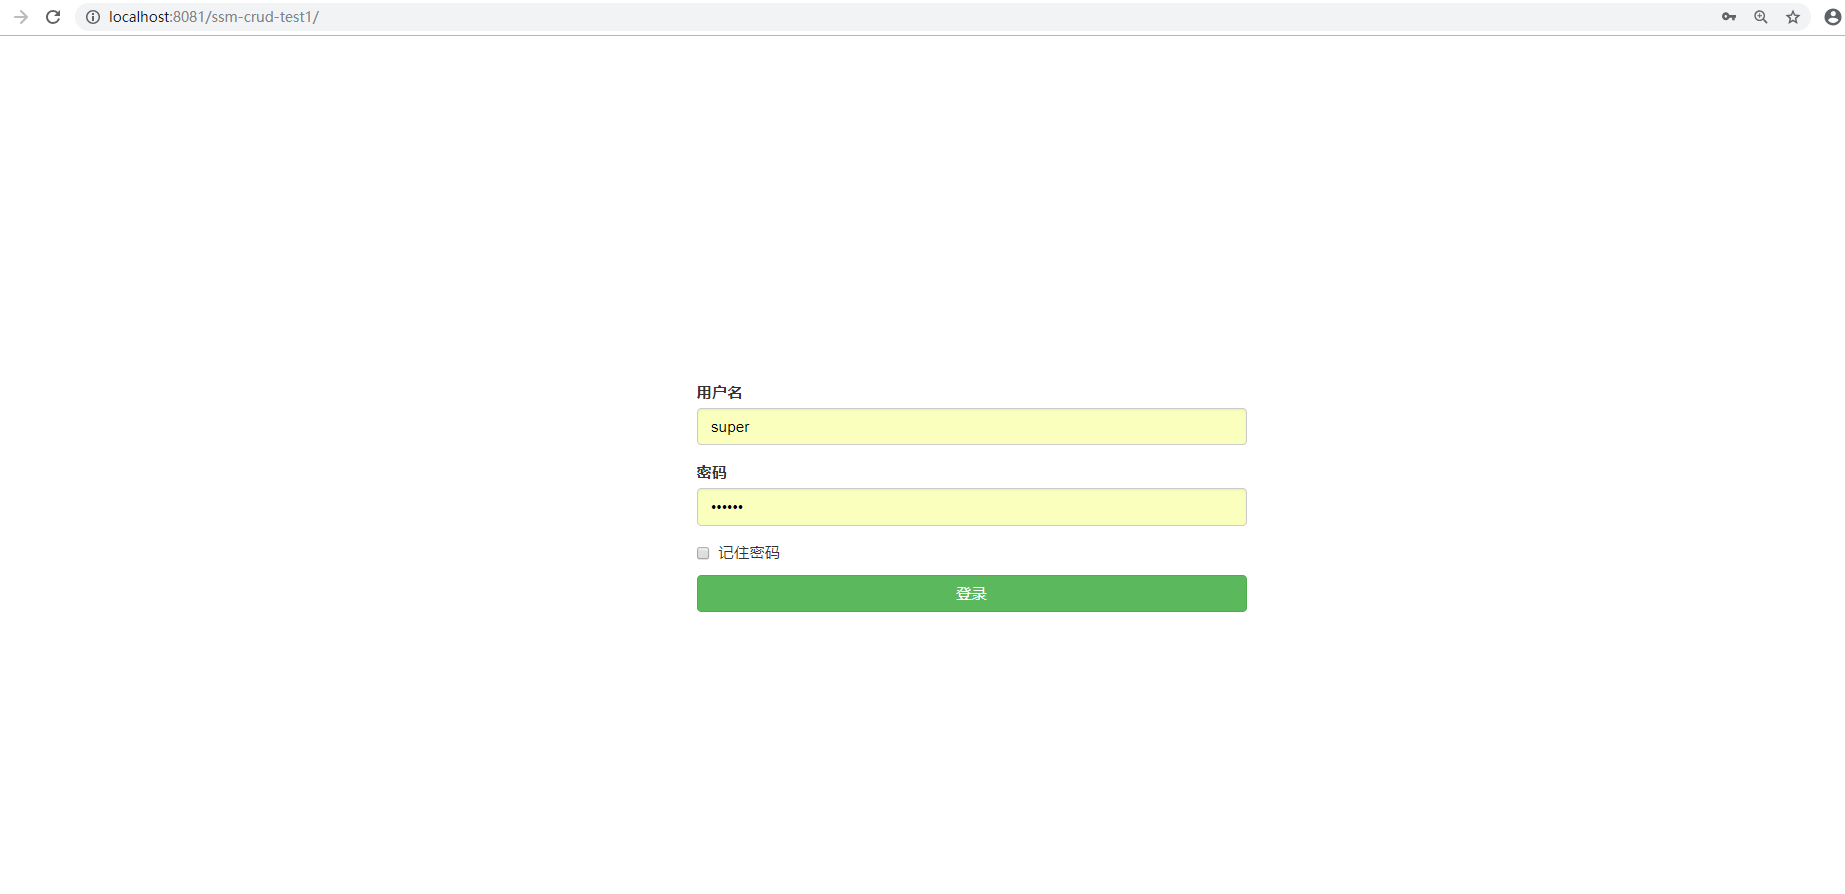
把项目加载到tomcat上运行,到此已经完成最基本的ssm环境运行了,成功页面如下图所示。
SSM的搭建的更多相关文章
- SSM框架搭建web服务器实现登录功能(Spring+SpringMVC+Mybatis)
初学java EE,虽然知道使用框架会使开发更加便捷高效,但是对于初学者来说,感到使用框架比较迷惑,尤其是各种jar包的引用.各种框架的配置.注解的使用等等. 最好的学习方法就是实践,于是下载了一个现 ...
- SSM 框架搭建
SSM框架搭建(Spring.SpringMVC.Mybatis) 一:基本概念 Spring : Spring是一个开源框架,Spring是于2003 年兴起的一个轻量级的Java 开发框 ...
- ssm基础搭建步骤
今天搭建新的项目环境,从网上找了些ssm的搭建步骤,终于找到了一位csdn的大佬,可以说写的特别详细,按照上面步骤搭建即可,为了方便日后参考,转载到本人博客,原文链接:https://blog.csd ...
- Java开发学习心得(一):SSM环境搭建
目录 Java开发学习心得(一):SSM环境搭建 1 SSM框架 1.1 Spring Framework 1.2 Spring MVC Java开发学习心得(一):SSM环境搭建 有一点.NET的开 ...
- SSM框架搭建教程(从零开始,图文结合)
1.准备 IntelliJ IDEA Tomcat JDK Maven mysql spring.springmvc.mybatis 了解 现在假设如上条件你都具备,那么通过我这篇博客 你一定可以整合 ...
- 实习小结(二)--- SSM框架搭建
SSM项目框架搭建 前几天做了一个学生信息管理的项目,使用纯控制台输入,查询数据库,将信息在控制台中打印,功能完善得差不多之后,老师让将这个项目移植到Web中,使用Spring+SpringMVC+M ...
- SpringMVC笔记——SSM框架搭建简单实例
落叶枫桥 博客园 首页 新随笔 联系 订阅 管理 SpringMVC笔记——SSM框架搭建简单实例 简介 Spring+SpringMVC+MyBatis框架(SSM)是比较热门的中小型企业级项目开发 ...
- idea ssm框架搭建
1.分享一篇完整的ssm框架搭建连接 大牛博客:https://www.cnblogs.com/toutou/p/ssm_spring.html#_nav_0 2.我的搭建的完整项目连接,可以进入我的 ...
- 本人亲测-SSM环境搭建(使用eclipse作为示例,过程挺全的,可作为参考)
本人亲测-SSM环境搭建(使用eclipse作为示例,过程挺全的,可作为参考) 本人亲测-SSM环境搭建(使用eclipse作为示例,过程挺全的,可作为参考) 本人亲测-SSM环境搭建(使用eclip ...
- 026 SSM综合练习02--数据后台管理系统--数据库表创建及SSM环境搭建
1.数据库准备 本项目我们Oracle数据库,Oracle 为每个项目创建单独user,oracle数据表存放在表空间下,每个用户有独立表空间. (1)采用数据库管理员账号:SYSTEM,再配合数据库 ...
随机推荐
- 易忽视的Python知识点
1.sort和sorted (1)sort:会直接修改原始列表的序列,只是排序,不去重. >>> a=[2,5,7,8,3,5,1,3,9,6,2] >>> a.s ...
- 游戏人工智能编程案例精粹(修订版) (Mat Buckland 著)
https://www.jblearning.com/catalog/productdetails/9781556220784 第1章 数学和物理学初探 (已看) 第2章 状态驱动智能体设计 (已看) ...
- 通过type类型 新建对象
Activator根System命名空间中的类非常强大. 将参数传递给构造函数等有很多重载.查看以下文档: http://msdn.microsoft.com/en-us/library/system ...
- Linux updatedb命令详解
Linux updatedb命令 updatedb 命令用来创建或更新 locate 命令所必需的数据库文件. updatedb 命令的执行过程较长,因为在执行时它会遍历整个系统的目录树,并将所有的文 ...
- DDS生成正弦波
DDS生成正弦波 `timescale 1ns / 1ps ////////////////////////////////////////////////////////////////////// ...
- cmd常用命令总结
1.cmd不同盘符之间切换 方法(1): cd /d 路径如:cd /d c:/windows 方法(2): d:2.cls 清空cmd窗口dir 查看文件夹下的目录md 创建文件夹rd 删除文件夹c ...
- 【环境部署】centos7安装mysql-5.7.19 group-replication
--mysql高可用官方文档: https://dev.mysql.com/doc/refman/5.7/en/group-replication.html mysql下载地址: https://ww ...
- Vue项目中GraphQL入门学习与应用
1.GraphQL是什么,能干什么? 正如官网所说,GraphQL是一种用于API查询的语言.Facebook 的移动应用从 2012 年就开始使用 GraphQL.GraphQL 规范于 2015 ...
- webAPP如何实现移动端拍照上传(Vue组件示例)?
摘要:使用HTML5编写移动Web应用,主要是为了尝试一下“一套代码多处运行”,一个webapp几乎可以不加修改的运行在PC/Android/iOS等上面运行.但是写到现在觉得虽然这种方式弊大于利,不 ...
- Java Socket NIO
服务端: public class NIOServer { private static final String HOST = "localhost"; private stat ...
