【转】Ubuntu环境搭建svn服务器
记录一次使用Ubuntu环境搭建svn服务器的详细步骤
一、查看是否已经安装svn
命令:svn
如果显示以下信息,说明已安装

二、卸载已安装的svn
命令:sudo apt-get remove --purge subversion
三、安装svn
1.安装svn
更新命令:sudo apt-get update
安装svn:sudo apt-get install subversion
2.创建svn版本库
在home目录下创建svn目录,然后在svn中创建repository目录
命令:sudo mkdir /home/svn
sudo mkdir /home/svn/repository
3.修改repository文件中权限
命令:sudo chmod -R 777 /home/svn/repository
4.创建版本库
命令:sudo svnadmin create /home/svn/repository
执行完毕之后,repository目录下会有如下文件

5.切换当前目录到repository
命令:cd /home/svn/repository
6.设置db文件的权限
命令:sudo chmod -R 777 db
7.切换当前目录打破conf
命令:cd conf
8.修改配置文件svnserve.conf
命令:sudo vi svnserve.conf
修改前:
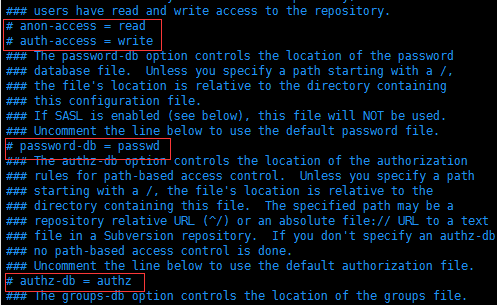
修改后:

说明:(去掉前面的#,并且顶格)
anon-access = none 匿名用户不可读
auth-access = write 权限用户可写
password-db = passwd 密码文件为passwd
authz-db = authz 权限文件为authz
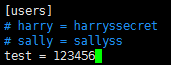
9.修改password文件,添加访问用户
命令:sudo vi passwd
新增用户格式:名字 = 密码
10.给用户test增加目录权限
命令:sudo vi authz
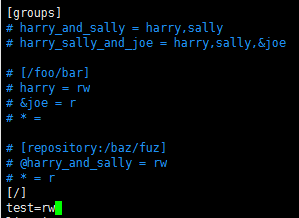
用户test拥有版本库根目录读写的权限
四、启动服务,并且监听81端口
命令:svnserve -d -r /home/svn --listen-port 81
如果提示:权限不够

切换到root权限
命令:sudo su
重试启动svn:svnserve -d -r /home/svn --listen-port 81
查看svn是否启动
命令:ps -ef | grep svnserve

五、停止服务
命令:killall svnserve
附:精确目录权限控制
[/]
A=rw
A拥有版本库根目录读写的权限
[/Android]
A=rw
B=r
A拥有Android目录读写的权限
B拥有Android目录读的权限,但没有写的权限
[/Android/Project1]
A=rw
*=r
A拥有/Android/Project1目录读写的权限
所有人都拥有/Android/Project1目录读的权限
转载于:https://www.cnblogs.com/daimengxiaoerge/p/10238503.html
六、获取当前最新修订版本号
svnlook youngest /home/svn/repository/

七、配置HTTP访问【暂时测试通不过,后面再测试】
1 安装apache
sudo apt-get install apache2
2 修改版本库权限
sudo chown -R www-data:www-data 版本库路径

例如:sudo chown -R www-data:www-data /home/svn/repository/db
3 配置apache2
sudo vi /etc/apache2/mods-available/dav_svn.conf
# dav_svn.conf - Example Subversion/Apache configuration

#

# For details and further options see the Apache user manual and

# the Subversion book.

#

# NOTE: for a setup with multiple vhosts, you will want to do this

# configuration in /etc/apache2/sites-available/*, not here.

# <Location URL> ... </Location>

# URL controls how the repository appears to the outside world.

# In this example clients access the repository as http://hostname/svn/

# Note, a literal /svn should NOT exist in your document root.

<Location /svn>  # 配置svn的http路径,如这里配置了svn后路径为http://hostname/svn/

  # Uncomment this to enable the repository

  DAV svn

  # Set this to the path to your repository

  #SVNPath /root/SVN/repo/

  # Alternatively, use SVNParentPath if you have multiple repositories under

  # under a single directory (/var/lib/svn/repo1, /var/lib/svn/repo2, ...).

  # You need either SVNPath and SVNParentPath, but not both.

  SVNParentPath /home/svn  # 当在一个父目录中有多个库时使用SVNParentPath

  SVNListParentPath On     # 显示仓库根目录

  # Access control is done at 3 levels: (1) Apache authentication, via

  # any of several methods.  A "Basic Auth" section is commented out

  # below.  (2) Apache <Limit> and <LimitExcept>, also commented out

  # below.  (3) mod_authz_svn is a svn-specific authorization module

  # which offers fine-grained read/write access control for paths

  # within a repository.  (The first two layers are coarse-grained; you

  # can only enable/disable access to an entire repository.)  Note that

  # mod_authz_svn is noticeably slower than the other two layers, so if

  # you don't need the fine-grained control, don't configure it.

  # Basic Authentication is repository-wide.  It is not secure unless

  # you are using https.  See the 'htpasswd' command to create and

  # manage the password file - and the documentation for the

  # 'auth_basic' and 'authn_file' modules, which you will need for this

  # (enable them with 'a2enmod').

  AuthType Basic                    # 基本权限验证功能

  AuthName "Subversion Repository"  # 权限名字,随便都行

  AuthUserFile /etc/apache2/dav_svn.passwd  # 保存授权用户的账户密码的文件路径

  # To enable authorization via mod_authz_svn (enable that module separately):

  #<IfModule mod_authz_svn.c>

  #AuthzSVNAccessFile /etc/apache2/dav_svn.authz

  #</IfModule>

  # The following three lines allow anonymous read, but make

  # committers authenticate themselves.  It requires the 'authz_user'

  # module (enable it with 'a2enmod').

  # 除了以下描述的GET OPTIONS操作外,其他的HTTP操作都需要授权用户才可以

  <LimitExcept GET PROPFIND OPTIONS REPORT>

    Require valid-user

  </LimitExcept>

</Location>
4、修改端口
sudo vi /etc/apache2/ports.conf
# If you just change the port or add more ports here, you will likely also

# have to change the VirtualHost statement in

# /etc/apache2/sites-enabled/000-default.conf

Listen 82

<IfModule ssl_module>

        Listen 443

</IfModule>

<IfModule mod_gnutls.c>

        Listen 443

</IfModule>
5 启动Apache服务
sudo /etc/init.d/apache2 restart
【转】Ubuntu环境搭建svn服务器的更多相关文章
- Ubuntu环境搭建svn服务器
记录一次使用Ubuntu环境搭建svn服务器的详细步骤 一.查看是否已经安装svn 命令:svn如果显示以下信息,说明已安装 二.卸载已安装的svn 命令:sudo apt-get remove ...
- ubuntu下搭建svn服务器
[ubuntu下搭建svn服务器] 1.创建目录 mkdir ~/svn/repository/ 2.创建仓库 svnadmin create repository 3.进入 repository/c ...
- Ubuntu系统搭建SVN服务器
Ubuntu系统搭建SVN服务器 参考地址:http://git.devzeng.com/blog/aliyun-ubuntu-svn-server.html 安装软件 依次在终端中执行下面的命令安装 ...
- ubuntu 如何搭建svn 服务器
1.在终端中直接输入 sudo apt-get install subversion,选择安装即可 来这个subversion同时包含了服务端和客户端. 2.(可选)看版本命令 svnserve - ...
- 【转】阿里云Ubuntu系统搭建SVN服务器
##SVN服务器相关软件安装 1.使用SSH远程服务器 (1)对于MAC OS/Liunx的用户直接打开终端输入 ssh 用户名@实例名,例如 ssh root@192.168.1.100 执行上面 ...
- ubuntu中搭建svn服务器步骤
1.安装软件包: sudo apt-get install subversion 2.建立相关文件夹(这里svn放在home文件夹中) cd /home sudo mkdir svn cd /home ...
- Ubuntu/CentOs 搭建SVN服务器
安装 CentOS : yum install subversion Ubuntu: sudo apt-get install subversion 查看Subversion版本: 使用“svn -- ...
- Ubuntu 下搭建SVN服务器
root@iZ25q0jd99eZ:~# sudo apt-get install subversion root@iZ25q0jd99eZ:/etc/subversion# mkdir /svn r ...
- ubuntu环境搭建DNS服务器
1 安装bind9 apt install bind9 2 修改 named.conf.local,添加要解析的域名及对应的域名配置文件 zone "test.cn"{ type ...
随机推荐
- getProperty获取属性值
- mybatis框架-SqlSession会话操作数据库的两种方式
1.通过SqlSession实力来直接执行已经映射的sql语句 例如,查询整个用户表中的信息 在UserMapper.xml中编写sql语句 编写测试方法: 注意:这里使用的selectList方法: ...
- go 学习 (五):包管理
一.设置环境变量 二.启用 go modules 功能 并设置代理 https://goproxy.io/zh/ 补充: GO111MODULE 有三个值:on.off.auto GO111MODU ...
- [Dynamic Programming] 198. House Robber
You are a professional robber planning to rob houses along a street. Each house has a certain amount ...
- hibernate的持久化类、主键生成策略
一.hibernate的持久化类 1.什么是持久化类: 持久化:将数据存储到关系型数据库. 持久化类:与数据库中的数据表建立了某种关系的java类.(持久化类=javabean+映射配置文件) 2.持 ...
- 洛谷 P3197 [HNOI2008]越狱 题解
P3197 [HNOI2008]越狱 题目描述 监狱有连续编号为 \(1-N\) 的 \(N\) 个房间,每个房间关押一个犯人,有 \(M\) 种宗教,每个犯人可能信仰其中一种.如果相邻房间的犯人的宗 ...
- GoCN每日新闻(2019-10-03)
GoCN每日新闻(2019-10-03) 国庆专辑:GopherChina祝大家国庆节快乐 GoCN每日新闻(2019-10-03) 1. 垃圾回收器如何监控你的应用程序 https://medium ...
- linux高性能服务器编程 (一) --Tcp/Ip协议族
前言: 在学习swoole入门基础的过程中,遇到了很多知识瓶颈,比方说多进程.多线程.以及进程池和线程池等都有诸多的疑惑.之前也有学习相关知识,但只是单纯的知识面了解.而没有真正的学习他们的来龙去脉. ...
- nginx reload和reopen
nginx被停止(nginx -s stop)或者直接杀掉了进程(kill -9 nginx的进程号)后,调用命令(nginx -s reload 或者 nginx -s reopen)会报错:无法找 ...
- koa post提交数据,koa-bodyparser中间件来获取post提交数据
原生 Nodejs 获取 post 提交数据 首先创建并初始化一个node应用,根路由使用index.ejs模板 var Koa=require('koa') var router = require ...