使用idea搭建maven项目时 java目录下的xml文件没有加载的解决方法
今天在idea集成开发环境下 使用maven搭建了ssm项目,遇到了3个问题
首先我们先复习一下知识点:
第一步:在web.xml中配置spring监听器
  <!-- spring监听器  加载spring容器 -->

  <listener>

    <listener-class>org.springframework.web.context.ContextLoaderListener</listener-class>

  </listener>

  <context-param>

    <param-name>contextConfigLocation</param-name>

    <param-value>classpath:spring/applicationContext.xml</param-value>

  </context-param>
然后创建对应的spring核心配置文件applicationContext.xml
<?xml version="1.0" encoding="UTF-8"?>

<beans xmlns="http://www.springframework.org/schema/beans"

       xmlns:xsi="http://www.w3.org/2001/XMLSchema-instance"

       xmlns:context="http://www.springframework.org/schema/context" xmlns:tx="http://www.springframework.org/schema/tx"

       xsi:schemaLocation="http://www.springframework.org/schema/beans

               http://www.springframework.org/schema/beans/spring-beans-4.0.xsd

               http://www.springframework.org/schema/context

               http://www.springframework.org/schema/context/spring-context-4.0.xsd

               http://www.springframework.org/schema/tx

               http://www.springframework.org/schema/tx/spring-tx-4.0.xsd">

    <!-- 引入外部文件 -->

    <context:property-placeholder location="classpath:db.properties"/>

    <!-- 配置数据源 dbcp -->

    <bean id="dataSource" class="org.apache.commons.dbcp.BasicDataSource"

          destroy-method="close">

        <property name="driverClassName" value="${jdbc.driver}"/>

        <property name="url" value="${jdbc.url}"/>

        <property name="username" value="${jdbc.username}"/>

        <property name="password" value="${jdbc.password}"/>

        <property name="maxActive" value="10"/>

        <property name="maxIdle" value="5"/>

    </bean>

    <!-- 配置sqlsessionfacory -->

    <bean id="sqlSessionFactory" class="org.mybatis.spring.SqlSessionFactoryBean">

        <property name="configLocation" value="classpath:mybatis/sqlMapConfig.xml"></property>

        <property name="dataSource" ref="dataSource"></property>

    </bean>

    <!-- 配置mapper 使用mapper扫描 自动扫描与装配进spring容器中  id=类名首字母小写-->

    <!--只能配置在这里  不能配置在springmvc.xml中-->

    <bean class="org.mybatis.spring.mapper.MapperScannerConfigurer">

        <property name="basePackage" value="org.dao"></property>

        <!-- name属性中只能写成sqlSessionFactoryBeanName -->

        <property name="sqlSessionFactoryBeanName" value="sqlSessionFactory"></property>

    </bean>

    <!-- 配置事务管理器 -->

    <bean id="transactionManager"

          class="org.springframework.jdbc.datasource.DataSourceTransactionManager">

        <property name="dataSource" ref="dataSource"></property>

    </bean>

    <!-- 开启注解驱动扫描 -->

    <tx:annotation-driven transaction-manager="transactionManager"/>

</beans>
第二步:在web.xml中配置springmvc前端控制器
  <!-- springmvc前端控制器(servlet) -->

  <servlet>

    <servlet-name>springmvc</servlet-name>

    <servlet-class>org.springframework.web.servlet.DispatcherServlet</servlet-class>

    <init-param>

      <param-name>contextConfigLocation</param-name>

      <param-value>classpath:spring/springmvc.xml</param-value>

    </init-param>

  </servlet>

  <servlet-mapping>

    <servlet-name>springmvc</servlet-name>

    <!-- 拦截所有的请求 / -->

    <url-pattern>*.action</url-pattern>

  </servlet-mapping>
然后创建对应的springmvc配置文件
<?xml version="1.0" encoding="UTF-8"?>

<beans xmlns="http://www.springframework.org/schema/beans"

       xmlns:mvc="http://www.springframework.org/schema/mvc" xmlns:xsi="http://www.w3.org/2001/XMLSchema-instance"

       xmlns:context="http://www.springframework.org/schema/context"

       xsi:schemaLocation="http://www.springframework.org/schema/beans

               http://www.springframework.org/schema/beans/spring-beans-4.0.xsd

               http://www.springframework.org/schema/context

               http://www.springframework.org/schema/context/spring-context-4.0.xsd

               http://www.springframework.org/schema/mvc

               http://www.springframework.org/schema/mvc/spring-mvc.xsd">

    <!-- 对于注解开发的handler可以单个进行配置 实际开发中建议使用组件扫描的方式-->

    <!--

        组件扫描 把符合条件的类加入到容器中 可以扫描@controller @service.... spring注解开发中使用过

        指定需要扫描的包 org.

        代表扫描org下的所有包 不要写成org ,或者org.* , org.ssm.controller最准确 或者org.ssm.

         文件夹下如果有子文件 写到子文件上个文件夹+. 如果文件夹下直接是对应的java文件  那么直接org.ssm.controller这种形式

    -->

    <!--这种方式 org.* 在eclipse中没有报错 在idea中会报错-->

    <!--<context:component-scan base-package="org.*"/>-->

    <!--这个扫描写在applicationContext.xml中 运行时 找不到路径-->

    <context:component-scan base-package="org.controller,org.service"></context:component-scan>

    <!-- 使用mvc注解驱动代替 注解适配器和注解映射器 -->

    <mvc:annotation-driven></mvc:annotation-driven>

    <!-- 视图解析器 解析jsp页面  默认使用jstl表签  classpath下得有jstl包-->

    <bean

            class="org.springframework.web.servlet.view.InternalResourceViewResolver">

        <!-- 前缀  请求时 可以省略前缀路径 -->

        <property name="prefix" value="/WEB-INF/jsp/"></property>

        <!-- 后缀:设置转发页面时  可以省略.jsp -->

        <property name="suffix" value=".jsp"></property>

    </bean>

</beans>
对springmvc中注解器和映射器不熟悉的可以看一下这篇文章(SpringMVC中注解和非注解方式下的映射器和适配器总结) http://blog.csdn.net/eson_15/article/details/51699103
---------------------------------
首先第一个问题就是上边蓝色背景出现的问题 相同的项目我在eclipse上配置的时候 可以写为org.*的方式 而在idea中就不能这样写 否则报以下错误:


也不知道是为什么 所以我们需要记得:在idea中不能这样写
-----------------------------
第二个需要注意的问题:
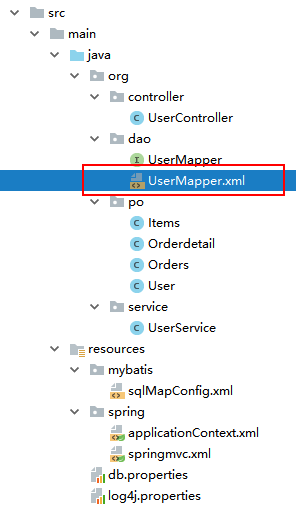
先看我的目录结构:

同样的代码在eclipse上可以正常运行 但是idea不行 真尼玛坑爹啊
启动项目 之后 前台传递给后台id 然后按照传统的方式进行查询对象 我debug了一下
可以保证:id传递给了controller controller调用service service中的mapper接口对象 也注入成功了 就是通过mapper接口对象调用方法查询的时候 报错了

大致意思:无效的绑定声明(未找到):org.dao.UserMapper.loginquery
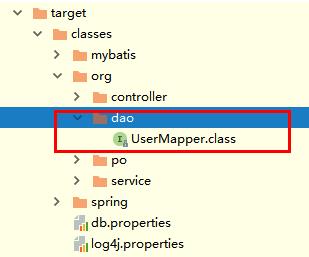
然后找了好久。。。最后终于找到了问题所在 大家请看我服务器启动之后的输出文件

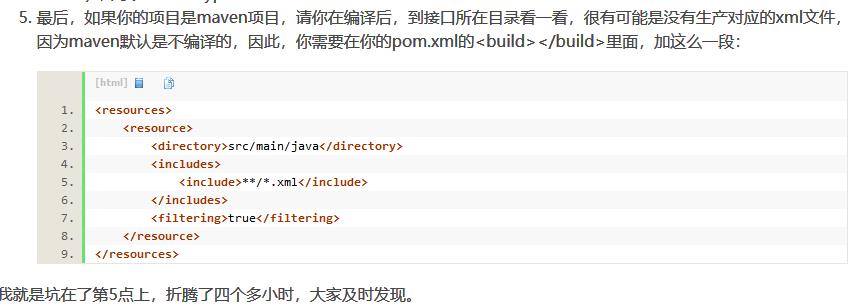
可以看到xml文件没有生成 我在网上找到了答案 参考文章:http://blog.csdn.net/ppppfly/article/details/46847299

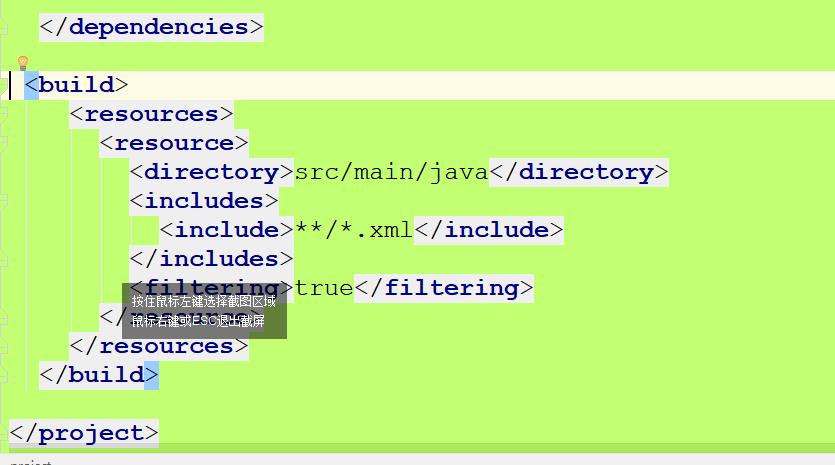
于是 我按照上边说的那样 就加上了如下代码:

<build>

    <resources>

      <resource>

        <directory>src/main/java</directory>

        <includes>

          <include>**/*.xml</include>

        </includes>

        <filtering>true</filtering>

      </resource>

    </resources>

  </build>
然后重新启动 果然生成了xml文件

运行项目 发现这个问题正确解决
-------------------------------------------------------
使用idea搭建maven项目时 java目录下的xml文件没有加载的解决方法的更多相关文章
- IDEA中不编译src/main/java目录下的*.xml文件
使用idea构建maven项目时不编译src/main/java目录下写的mapper.xml文件,这是找到pom.xml文件,在<build>节点下添加如下代码: <!-- map ...
- 工程代码不编译src的java目录下的xml文件问题及解决
IDEA的maven项目中,默认源代码目录下(src/main/java目录)的xml等资源文件并不会在编译的时候一块打包进classes文件夹,而是直接舍弃掉.如果使用的是Eclipse,Eclip ...
- 解决使用intellij idea开发MAVEN项目在target目录下不存在mapper.xml文件
原 解决使用intellij idea开发MAVEN项目在target目录下不存在mapper.xml文件 原文章链接:https://blog.csdn.net/beauxie/article/de ...
- 转载 Silverlight实用窍门系列:1.Silverlight读取外部XML加载配置---(使用WebClient读取XAP包同目录下的XML文件))
转载:程兴亮文章,地址;http://www.cnblogs.com/chengxingliang/archive/2011/02/07/1949579.html 使用WebClient读取XAP包同 ...
- Silverlight实用窍门系列:1.Silverlight读取外部XML加载配置---(使用WebClient读取XAP包同目录下的XML文件))【附带实例源码】
使用WebClient读取XAP包同目录下的XML文件 我们想要读取XAP包下面的XML文件,需要将此XML文件放在加载XAP包的网页的目录中去,然后使用URI方式读取此URL方式下的XML文件. 首 ...
- Idea在导入有maven项目时,不能自动识别pom.xml
当在idea中导入maven项目时,不能自动识别pom文件,显示为普通橙色xml文件. 解决方法:点击最右侧侧边栏,点击添加(蓝的的小加号),选择你导入项目的pom.xml文件
- 将IDEA maven项目中src源代码下的xml等资源文件编译进classes文件夹
如果使用的是Eclipse,Eclipse的src目录下的xml等资源文件在编译的时候会自动打包进输出到classes文件夹.Hibernate和Spring有时会将配置文件放置在src目录下,编译后 ...
- IDEA将Maven项目中src源代码下的xml配置文件编译进classes
遇到这样的情况,maven项目启动报错,src中某个包下面的xml文件找不到. eclipse编译项目会自动将xml配置文件编译进classes,IDEA却不行 在报错项目的pom.xml文件中添加: ...
- Idea导入多个maven项目到同一目录下
目标 简单导入多个maven项目进入同一个project(相当于eclipse的workspace) 过程 1.新建一个目录作为仿eclipse的workspace,这里起名为idea-workspa ...
随机推荐
- tflearn中num_epoch含义就是针对所有样本的一次迭代
In tensorflow get started code: import tensorflow as tf import numpy as np features = [tf.contrib.la ...
- Java中的锁概念
掌握Java中锁是Java多线程编程中绕不开的知识,只有知道理解Java各种锁才能在编码过程中灵活运用,写出更高效的多线程程序.而理解掌握锁的第一步,可从宏观上对比理解一下各种锁概念. 公平锁/非公平 ...
- 最新昆石VOS2009/VOS3000手机号段导入文件(手机归属地)
使用2017年4月最新版手机号段归属地制作,支持所有版本的VOS 共360569条记录,兼容所有版本的昆石VOS,包括VOS2009.vos3000.vos5000 导入比较简单.下载后解压到桌面在V ...
- js定义类和方法
js中定义一个类 //定义一个user类 var user = function(){ //类中的属性 var age; //设置age的值 var setAge = function(age){ t ...
- Agri-Net(prim)
http://poj.org/problem?id=1258 #include<stdio.h> #include<string.h> ; <<; int map[ ...
- 《疯狂Python讲义》重要笔记——Python简介
简介 Python是一种面向对象.解释型.弱类型的脚本语言,同时也是一种功能强大的通过语言,它提供了高效的高级数据结构,还有简单有效的面向对象编程. 在大数据.人工智能(AI)领域应用广泛,因此变得流 ...
- POJ 3322 Bloxorz I
首先呢 这个题目的名字好啊 ORZ啊 如果看不懂题意的话 请戳这里 玩儿几盘就懂了[微笑] http://www.albinoblacksheep.com/games/bloxorz 就是这个神奇的木 ...
- CSS中的五大字体家族(cursive 手写字体族更吸引我)
这是CSS中的五大字体家族. serifserif 中文翻译为“衬线字体族”.serif 具有末端加粗.扩张或尖细末端,或以实际的衬线结尾的一类字体.可以看出 serif 总是在文字末端做文章,这样做 ...
- SQLServer外部数据导入--Excel版
例如要在test表里插入多行数据 假设字段有: ID.Name 首先要有需要导入的数据的Excel A1 对应ID B1 对应Name 选中Excel第一行的空白处,比如C1,在工具栏的函数文本框里输 ...
- 用CSS伪类制作一个不断旋转的八卦图?
前言 介绍一下如何制作一个不断旋转的八卦图.快速预览代码及效果,点击:八卦图 代码如下: HTML部分 <!DOCTYPE html> <html> <head> ...
