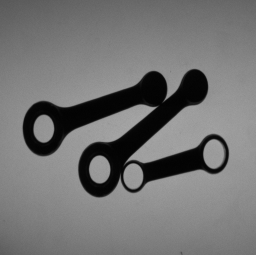
Detach blobs with a contact point
https://answers.opencv.org/question/87583/detach-blobs-with-a-contact-point/


#include "pch.h"
#include <iostream>
#include <string>
#include <cstring>
#include <cstdlib>
#include <vector>
#include "gocvhelper.h"
using namespace std;
using namespace cv;
//2020年11月8日10:26:09
//ssd 流水线文件
int main(int argc, char *argv[])
{
// Load your image
cv::Mat src = cv::imread("e:/template/twoblobs_1.bmp");
// Check if everything was fine
if (!src.data)
return -1;
// Show source image
cv::imshow("src", src);
// Create binary image from source image
cv::Mat gray;
cv::cvtColor(src, gray,COLOR_BGR2GRAY);
//cv::imshow("gray", gray);
// Obtain binary image
Mat bw;
cv::threshold(gray, bw, 40, 255, cv::THRESH_BINARY_INV|cv::THRESH_OTSU);
cv::imshow("bin", bw);
// Erode a bit
Mat kernel = Mat::ones(3, 3, CV_8UC1);
erode(bw, bw, kernel);
//imshow("erode", bw);
// Perform the distance transform algorithm
Mat dist;
distanceTransform(bw, dist, cv::DIST_L2, 5);
// Normalize the distance image for range = {0.0, 1.0}
// so we can visualize and threshold it
normalize(dist, dist, 0, 1., NORM_MINMAX);
imshow("distTransf", dist);
// Threshold to obtain the peaks
// This will be the markers for the foreground objects
threshold(dist, dist, .5, 1., cv::THRESH_BINARY);
// Dilate a bit the dist image, this can be optional since in
// other use case might cause problems. Here though it works quite well
Mat kernel1 = Mat::ones(5, 5, CV_8UC1);
dilate(dist, dist, kernel1, Point(-1, -1), 2);
imshow("peaks", dist);
// Create the CV_8U version of the distance image
// It is needed for findContours()
Mat dist_8u;
dist.convertTo(dist_8u, CV_8U);
// Find total markers
vector<Vec4i> hierarchy;
vector<vector<Point> > contours;
findContours(dist_8u, contours, hierarchy, cv::RETR_TREE,cv::CHAIN_APPROX_SIMPLE);
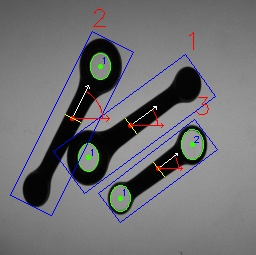
// Find the rotated rectangles
vector<RotatedRect> minRect(contours.size());
for (size_t i = 0; i < contours.size(); i++)
{
minRect[i] = minAreaRect(Mat(contours[i]));
}
RNG rng(12345);
for (size_t i = 0; i < contours.size(); i++)
{
Scalar color = Scalar(rng.uniform(0, 255), rng.uniform(0, 255), rng.uniform(0, 255));
// contour
drawContours(src, contours, static_cast<int>(i), color, 1, 8, vector<Vec4i>(), 0, Point());
// rotated rectangle
Point2f rect_points[4]; minRect[i].points(rect_points);
for (int j = 0; j < 4; j++)
line(src, rect_points[j], rect_points[(j + 1) % 4], color, 1, 8);
}
/* From here you can extract the orientation of each object by using
* the information that you can extract from the contours and the
* rotate rectangles. For example, the center point, rectange angle, etc...
*/
cv::imshow("result", src);
waitKey(0);
return 0;
}
#include "pch.h"
#include <iostream>
#include <string>
#include <cstring>
#include <cstdlib>
#include <vector>
#include "gocvhelper.h"
using namespace std;
using namespace cv;
//2020年11月8日10:26:09
//ssd 流水线文件
int main(int argc, char *argv[])
{
// Load your image
cv::Mat src = cv::imread("e:/template/twoblobs_1.bmp");
if (src.empty())
return -1;
Mat bw;
cvtColor(src, bw, COLOR_BGR2GRAY);
bw = bw < 60;
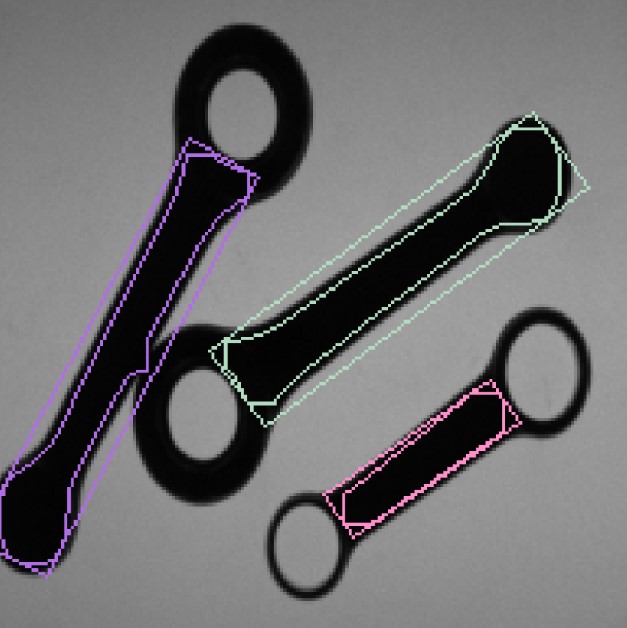
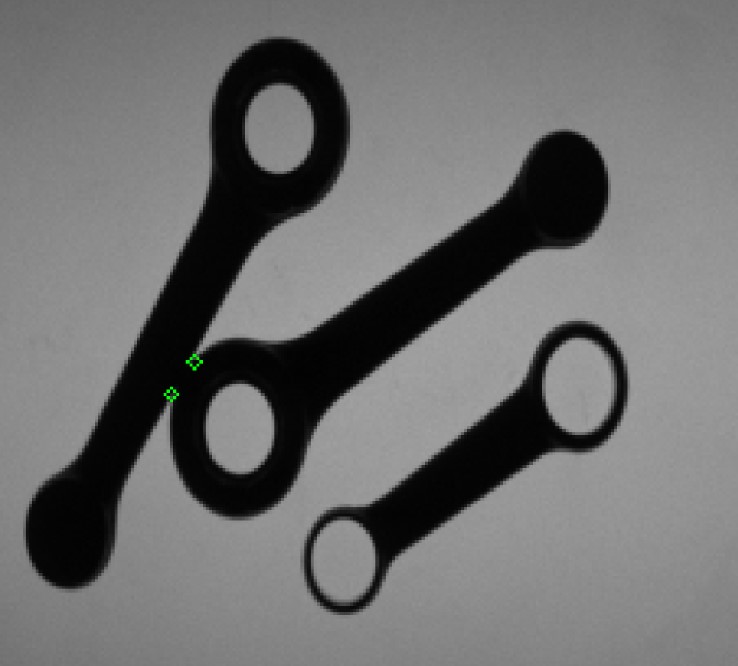
// Find contours
vector<vector<Point> > contours;
vector<int> contoursHull;
vector<Vec4i> defects;
findContours(bw, contours, RETR_EXTERNAL, CHAIN_APPROX_NONE);
for (size_t i = 0; i < contours.size(); i++)
{
if (contourArea(contours[i]) > 500)
{
approxPolyDP(contours[i], contours[i], 9, true);//多边形拟合
convexHull(contours[i], contoursHull, true);//寻找凸包
convexityDefects(contours[i], contoursHull, defects);//计算缺陷
for (size_t j = 0; j < defects.size(); j++)
{
Vec4i defpoint = defects[j];
circle(src, contours[i][defpoint[2]], 2, Scalar(0, 255, 0), 1);
}
}
}
imshow("result", src);
waitKey();
return 0;
}
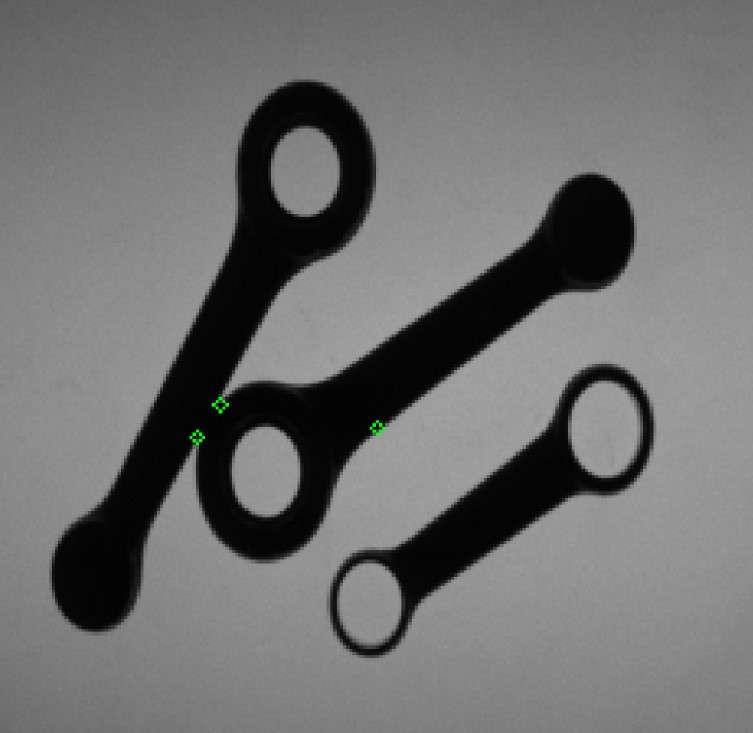
#include "pch.h"
#include <iostream>
#include <string>
#include <cstring>
#include <cstdlib>
#include <vector>
#include "gocvhelper.h"
using namespace std;
using namespace cv;
//2020年11月8日10:26:09
//ssd 流水线文件
int main(int argc, char *argv[])
{
    // Load your image
    cv::Mat src = cv::imread("e:/template/twoblobs_1.bmp");
    if (src.empty())
        return -1;
    Mat bw;
    cvtColor(src, bw, COLOR_BGR2GRAY);
    bw = bw < 60;
    // Find contours
    vector<vector<Point> > contours;
    vector<int> contoursHull;
    vector<Vec4i> defects;
    findContours(bw.clone(), contours, RETR_EXTERNAL, CHAIN_APPROX_NONE);
    for (size_t i = 0; i < contours.size(); i++)
    {
        if (contourArea(contours[i]) > 500)
        {
            approxPolyDP(contours[i], contours[i], 2, true);
            convexHull(contours[i], contoursHull, true);
            convexityDefects(contours[i], contoursHull, defects);
            for (size_t j = 0; j < defects.size(); j++)
            {
                Vec4i defpoint = defects[j];
                Point pt = contours[i][defpoint[2]]; // get defect point
                Rect r3x3(pt.x - 2, pt.y - 2, 5, 5); // create 5x5 Rect from defect point
                // maybe no need but to be sure that the rect is in the image
                r3x3 = r3x3 & Rect(0, 0, bw.cols, bw.rows);
                int non_zero_pixels = countNonZero(bw(r3x3));
                cout << non_zero_pixels << endl;
                if (non_zero_pixels > 17)
                    circle(src, contours[i][defpoint[2]], 2, Scalar(0, 255, 0), 1);
            }
        }
    }
    imshow("result", src);
    waitKey();
    return 0;
    waitKey();
    return 0;
}
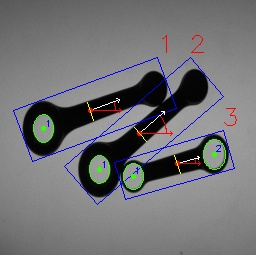
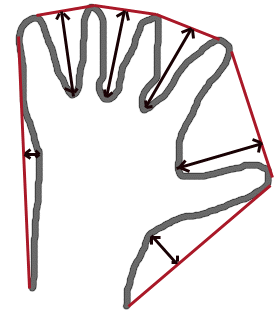
// Drawing orientation angle
float angle = -rod.orientation;
float length = rod.length/5;
ellipse(image, rod.barycenter, Size(rod.length/6,rod.length/6), 0, 0, -rod.orientation, Scalar(0,0,255));
Point2f P2;
P2.x =  (rod.barycenter.x + length * cos(angle * CV_PI / 180.0));
P2.y =  (rod.barycenter.y + length * sin(angle * CV_PI / 180.0));
arrowedLine(image, rod.barycenter, P2, Scalar(255,255,255));
P2.x =  (rod.barycenter.x + length * cos(0));
P2.y =  (rod.barycenter.y + length * sin(0));
arrowedLine(image, rod.barycenter, P2, Scalar(0,0,255));
Detach blobs with a contact point的更多相关文章
- Detach Volume 操作 - 每天5分钟玩转 OpenStack(55)
上一节我们成功地通过 attach 操作为 instance 添加了 volume,而与之相对的操作是 detach,就是将 volume 从 instance 上卸载下来. 下图是 Detach 操 ...
- jQuery之empty、remove、detach
三者都有把元素移除的作用,但细微的差别,造就了它们的使命不同. 最权威的解释当然是jQuery_API咯,下面是API中关于他三儿的部分截取. 一.empty: This method removes ...
- 2014 Visual Studio Contact(); 直播笔记
昨天微软干了几件了不起的事:.NET开发环境将开源.跨平台支持(Mac OS X和Linux).多设备支持(WP.Android和iOS)和Visual Studio免费(Visual Studio ...
- GConf error:Failed to contact configuration server
Linux系统运行一直正常,但是图形界面使用root账号登录时遇到下面错误,第一次遇到这么怪异的状况 具体错误信息如下所示: GConf error:Failed to contact configu ...
- 【USACO 3.1】Contact(01子串按出现次数排序)
题意:给你一个01字符串,将长度为a到b之间(包含a.b)的子串按照出现次数排序.注意输入输出格式 题解:01子串对应一个二进制,为了区别11和011这样的不同子串,我们把长度也记录下来,官方题解是在 ...
- Contact项目梳理
1. 共三张表:user用户表 group分组表 contact联系人表 entity 分模块,三个实体类,三个模块 2. 先注册再登录 DAO:UserDAOImpl public User g ...
- 01 选择 Help > Install New Software,在出现的对话框里,点击Add按钮,在对话框的name一栏输入“ADT”,点击Archive...选择离线的ADT文件,contact all update ....千万不要勾选点击Add按钮,在对话框的name一栏输入“ADT”,点击Archive...选择离线的ADT文件,contact all update ....千万不要勾
引言 好久没碰过android,今天重新搭建了一次环境,遇到的问题记录下载.共以后使用. 安装 软件的软件有jdk+eclipse+adt+sdk 主要记录安装adt和sdk的过程,注意,adt和sd ...
- Spring-JDBC实现Contact的CRUD
Spring-JDBC完成Contact的CRUD. 两点注意: 1.log4j.properties文件不能少 2.注意导入的包之间的依赖关系以及版本要求. 项目结构: 主要文件: 建表脚本: CR ...
- Account problem-There may be a problem with your account. Please contact us. Sign out
很多人在使用开发者账号AppleID的时候,都会碰到如下问题 There may be a problem with your account. Please contact us. 登录到苹果的开发 ...
随机推荐
- TypeScript Errors All In One
TypeScript Errors All In One 1. Property 'name' has no initializer and is not definitely assigned in ...
- TypeScript 1.7 & TypeScript 1.8
TypeScript 1.7 & TypeScript 1.8 1 1 https://zh.wikipedia.org/wiki/TypeScript TypeScript是一种由微软开发的 ...
- O² & O₂
O² & O₂ special symbol O² & O₂ HTML HTML subscript and superscript Tags HTML 下标元素 HTML 上标元素 ...
- 2020 front-end interview
2020 front-end interview https://juejin.im/post/5e083e17f265da33997a4561 xgqfrms 2012-2020 www.cnblo ...
- open an iOS simulator from the terminal
open an iOS simulator from the terminal # simulator $ open -a Simulator flutter https://flutter.dev/ ...
- js 获取是否为闰年,以及各月的天数 & isLeapYear
js 获取是否为闰年,以及各月的天数 calendar utils isLeapYear const isLeapYear = (year) => { return (year % 4 === ...
- 用Qt写了个将视频设置为壁纸的软件
软件功能很简单,使用时占用的资源和播放的视频有关: 依赖于FFplay,Github源码 效果图:
- WEB 用视频替换GIF动画
原文 download ffmpeg gif to video 转化后文件大小大大降低 $ ffmpeg -i my-animation.gif -b:v 0 -crf 25 -f mp4 -vcod ...
- js bese64转化为blob使用FormData上传
原文 工作示例 <!DOCTYPE html> <html lang="en"> <head> <meta charset="U ...
- 「NGK每日快讯」2021.1.22日NGK公链第80期官方快讯!