Maven+Eclipse+Spring MVC简单实例
1. ToolsVersion and Preparations:
Eclipse: 3.5 (eclipse-jee-galileo-win32)
Maven: 2.0.11
Spring MVC : 3.0.5 Release
JDK:1.6
Eclipse Maven的插件
2.Stepby step:
2.1 在Eclipse 里建立Maven项目
选择File-> New -> Other,在New窗口中选择 Maven -> Maven Project
Click ‘Next’ button:
Click ‘Next’ button:
在‘Filter’后面的文本框输入:maven-archetype-webapp
Click and select "org.apache.maven.archetypes" row, then click ‘Next’ button:
Click ‘Finish’ button , thenthe new Maven project will be successfully created.
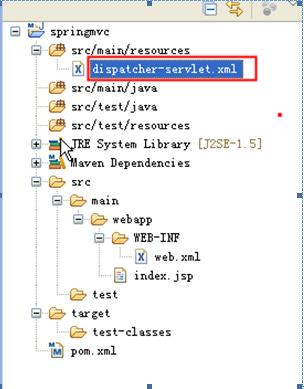
建立好后的文件结构如下图:
2.2 创建Source目录结构,达到标准Maven项目的结构
分别添加如下三个Source Folder:
src/main/java , src/test/java , src/test/resources
2.3向Maven项目里添加所依赖的Jar包
Copy below pom.xml contents to your project pom.xml.
<projectxmlns="http://maven.apache.org/POM/4.0.0"xmlns:xsi="http://www.w3.org/2001/XMLSchema-instance"
xsi:schemaLocation="http://maven.apache.org/POM/4.0.0http://maven.apache.org/maven-v4_0_0.xsd">
<modelVersion>4.0.0</modelVersion>
<groupId>springmvc.maven.example</groupId>
<artifactId>springmvc</artifactId>
<packaging>war</packaging>
<version>0.0.1-SNAPSHOT</version>
<name>springmvc MavenWebapp</name>
<url>http://maven.apache.org</url>
<properties>
<context.path>springmvc</context.path>
<compiler.version>1.5</compiler.version>
<tomcat.port>8083</tomcat.port>
</properties>
<dependencies>
<dependency>
<groupId>junit</groupId>
<artifactId>junit</artifactId>
<version>4.8.1</version>
<scope>test</scope>
</dependency>
<dependency>
<groupId>org.springframework</groupId>
<artifactId>spring-aop</artifactId>
<version>3.0.5.RELEASE</version>
<type>jar</type>
<scope>compile</scope>
</dependency>
<dependency>
<groupId>org.springframework</groupId>
<artifactId>spring-asm</artifactId>
<version>3.0.5.RELEASE</version>
<type>jar</type>
<scope>compile</scope>
</dependency>
<dependency>
<groupId>org.springframework</groupId>
<artifactId>spring-aspects</artifactId>
<version>3.0.5.RELEASE</version>
<type>jar</type>
<scope>compile</scope>
</dependency>
<dependency>
<groupId>org.springframework</groupId>
<artifactId>spring-beans</artifactId>
<version>3.0.5.RELEASE</version>
<type>jar</type>
<scope>compile</scope>
</dependency>
<dependency>
<groupId>org.springframework</groupId>
<artifactId>spring-context</artifactId>
<version>3.0.5.RELEASE</version>
<type>jar</type>
<scope>compile</scope>
</dependency>
<dependency>
<groupId>org.springframework</groupId>
<artifactId>spring-context-support</artifactId>
<version>3.0.5.RELEASE</version>
<type>jar</type>
<scope>compile</scope>
</dependency>
<dependency>
<groupId>org.springframework</groupId>
<artifactId>spring-core</artifactId>
<version>3.0.5.RELEASE</version>
<type>jar</type>
<scope>compile</scope>
</dependency>
<dependency>
<groupId>org.springframework</groupId>
<artifactId>spring-expression</artifactId>
<version>3.0.5.RELEASE</version>
<type>jar</type>
<scope>compile</scope>
</dependency>
<dependency>
<groupId>org.springframework</groupId>
<artifactId>spring-jdbc</artifactId>
<version>3.0.5.RELEASE</version>
<type>jar</type>
<scope>compile</scope>
</dependency>
<dependency>
<groupId>org.springframework</groupId>
<artifactId>spring-jms</artifactId>
<version>3.0.5.RELEASE</version>
<type>jar</type>
<scope>compile</scope>
</dependency>
<dependency>
<groupId>org.springframework</groupId>
<artifactId>spring-orm</artifactId>
<version>3.0.5.RELEASE</version>
<type>jar</type>
<scope>compile</scope>
</dependency>
<dependency>
<groupId>org.springframework</groupId>
<artifactId>spring-oxm</artifactId>
<version>3.0.5.RELEASE</version>
<type>jar</type>
<scope>compile</scope>
</dependency>
<dependency>
<groupId>org.springframework</groupId>
<artifactId>spring-tx</artifactId>
<version>3.0.5.RELEASE</version>
<type>jar</type>
<scope>compile</scope>
</dependency>
<dependency>
<groupId>org.springframework</groupId>
<artifactId>spring-web</artifactId>
<version>3.0.5.RELEASE</version>
<type>jar</type>
<scope>compile</scope>
</dependency>
<dependency>
<groupId>org.springframework</groupId>
<artifactId>spring-webmvc</artifactId>
<version>3.0.5.RELEASE</version>
<type>jar</type>
<scope>compile</scope>
</dependency>
<dependency>
<groupId>org.springframework</groupId>
<artifactId>spring-test</artifactId>
<version>3.0.5.RELEASE</version>
<type>jar</type>
<scope>compile</scope>
</dependency>
<dependency>
<groupId>javax.servlet</groupId>
<artifactId>jstl</artifactId>
<version>1.2</version>
<type>jar</type>
<scope>compile</scope>
</dependency>
</dependencies>
<build>
<defaultGoal>tomcat:run</defaultGoal>
<resources>
<resource>
<directory>${basedir}/src/main/java</directory>
<includes>
<include>**/*.xml</include>
</includes>
</resource>
<resource>
<directory>${basedir}/src/main/resources</directory>
<includes>
<include>**/*.xml</include>
<include>**/*.properties</include>
</includes>
</resource>
</resources>
<plugins>
<plugin>
<groupId>org.apache.maven.plugins</groupId>
<artifactId>maven-compiler-plugin</artifactId>
<configuration>
<source>${compiler.version}</source>
<target>${compiler.version}</target>
</configuration>
</plugin>
<plugin>
<groupId>org.codehaus.mojo</groupId>
<artifactId>tomcat-maven-plugin</artifactId>
<configuration>
<port>${tomcat.port}</port>
</configuration>
</plugin>
</plugins>
<finalName>${context.path}</finalName>
</build>
</project>
2.4构建SpringMVC框架
2.4.1 编辑web.xml文件
webx.xml代码如下:
<?xmlversion="1.0" encoding="UTF-8"?>
<web-appxmlns="http://java.sun.com/xml/ns/javaee"
xmlns:xsi="http://www.w3.org/2001/XMLSchema-instance"
xsi:schemaLocation="http://java.sun.com/xml/ns/javaee
http://java.sun.com/xml/ns/javaee/web-app_2_5.xsd"
version="2.5" >
<!-- 区分项目名称,防止默认重名-->
<context-param>
<param-name>webAppRootKey</param-name>
<param-value>maven.example.root</param-value>
</context-param>
<!-- Spring的log4j监听器-->
<listener>
<listener-class>org.springframework.web.util.Log4jConfigListener</listener-class>
</listener>
<!-- 字符集 过滤器 -->
<filter>
<filter-name>CharacterEncodingFilter</filter-name>
<filter-class>org.springframework.web.filter.CharacterEncodingFilter</filter-class>
<init-param>
<param-name>encoding</param-name>
<param-value>UTF-8</param-value>
</init-param>
<init-param>
<param-name>forceEncoding</param-name>
<param-value>true</param-value>
</init-param>
</filter>
<filter-mapping>
<filter-name>CharacterEncodingFilter</filter-name>
<url-pattern>/*</url-pattern>
</filter-mapping>
<!-- Spring view分发器 -->
<servlet>
<servlet-name>dispatcher</servlet-name>
<servlet-class>org.springframework.web.servlet.DispatcherServlet</servlet-class>
<init-param>
<param-name>contextConfigLocation</param-name>
<param-value>classpath*:dispatcher-servlet.xml</param-value>
</init-param>
<load-on-startup>1</load-on-startup>
</servlet>
<servlet-mapping>
<servlet-name>dispatcher</servlet-name>
<url-pattern>*.do</url-pattern>
</servlet-mapping>
</web-app
2.4.2编写Spring配置文件dispatcher-servlet.xml
(src/main/resources/dispatcher-servlet.xml)
如要添加MVC驱动、注解检测、视图解析等。dispatcher-servlet.xml代码如下:
<?xml version="1.0"encoding="UTF-8"?>
<beansxmlns="http://www.springframework.org/schema/beans"
xmlns:aop="http://www.springframework.org/schema/aop"
xmlns:context="http://www.springframework.org/schema/context"
xmlns:mvc="http://www.springframework.org/schema/mvc"
xmlns:tx="http://www.springframework.org/schema/tx"
xmlns:xsi="http://www.w3.org/2001/XMLSchema-instance"
xsi:schemaLocation="http://www.springframework.org/schema/aop
http://www.springframework.org/schema/aop/spring-aop-3.0.xsd
http://www.springframework.org/schema/beans
http://www.springframework.org/schema/beans/spring-beans-3.0.xsd
http://www.springframework.org/schema/context
http://www.springframework.org/schema/context/spring-context-3.0.xsd
http://www.springframework.org/schema/mvc
http://www.springframework.org/schema/mvc/spring-mvc-3.0.xsd
http://www.springframework.org/schema/tx
http://www.springframework.org/schema/tx/spring-tx-3.0.xsd">
<mvc:annotation-driven/>
<context:component-scanbase-package="springmvc.maven.example" />
<beanclass="org.springframework.web.servlet.view.InternalResourceViewResolver">
<propertyname="prefix" value="/WEB-INF/jsp/" />
<propertyname="suffix" value=".jsp" />
</bean>
</beans>
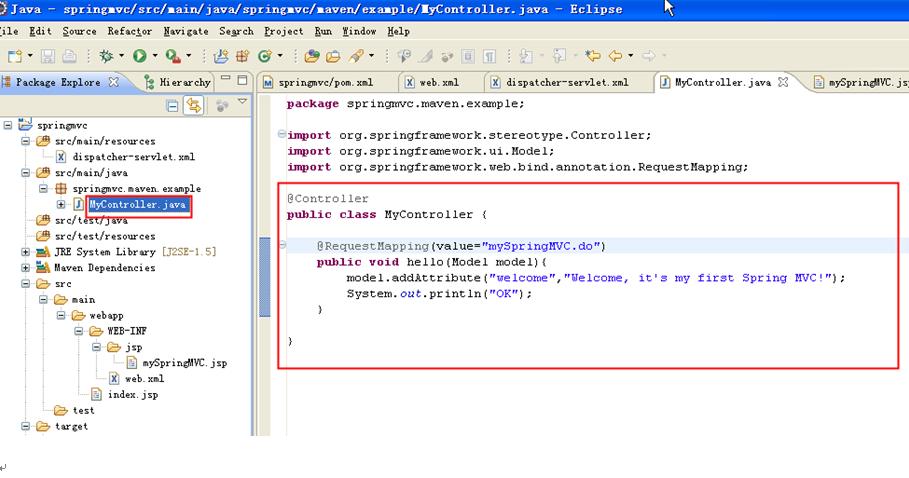
2.4.3编写一个Controller层测试类
2.4.4编写JSP文件
根据dispatcher-servlet.xml和Controller层的代码,我们需要在WEB-INF下建立一个jsp文件夹,在其下建立一个mySpringMVC.jsp文件,内容如下:

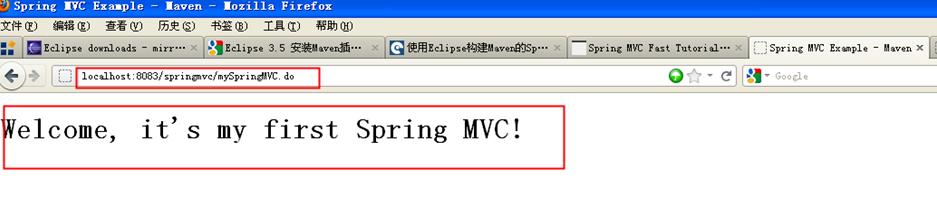
3. Compile, Deploy and Run (All only need one maven command):
Command: mvn clean install –DskipTests=truewar:exploded tomcat:run


Open your browser,then type http://localhost:8083/springmvc/mySpringMVC.do in url, then pressEnter key:
自csdn
Maven+Eclipse+Spring MVC简单实例的更多相关文章
- 使用maven+eclipse搭建最简单的struts2的helloworld
使用maven+eclipse搭建最简单的struts2的helloworld 一.web分层结构简介 1.web[细]粒度分层结构: 按细粒度分层可以分为以下6种: 1).表现层:html/css/ ...
- Spring mvc系列一之 Spring mvc简单配置
Spring mvc系列一之 Spring mvc简单配置-引用 Spring MVC做为SpringFrameWork的后续产品,Spring 框架提供了构建 Web 应用程序的全功能 MVC 模块 ...
- Spring.Net 简单实例-02(属性注入)
说明:接续Spring.Net 简单实例-01(IOC) 话不多说看操作 1:为UserInfo添加属性 2: 修改App.config中代码 <?xml version="1.0&q ...
- Spring MVC框架实例
Spring MVC 背景介绍 Spring 框架提供了构建 Web 应用程序的全功能 MVC 模块.使用 Spring 可插入的 MVC 架构,能够选择是使用内置的 Spring Web 框架还是 ...
- 用maven创建Spring MVC项目
用maven创建Spring MVC项目 mvn archetype:generate -DgroupId=fry-arthur -DartifactId=spring-mvc-study -Darc ...
- eclipse luna maven搭建spring mvc
1. 环境配置 a) Java 1.7 b) Eclipse luna c) Maven3.2.5 d) Spring 4.1.4 2. ...
- Eclipse Maven构建Spring MVC项目
工作中项目开发使用Maven管理项目的构建.打包.编译,框架採用的是Spring MVC框架,而且实现了多模块.多项目的管理.自己也简单的參与了架构的设计.对于刚開始学习的人来说,使用Maven构建项 ...
- 基于XML配置的Spring MVC 简单的HelloWorld实例应用
1.1 问题 使用Spring Web MVC构建helloworld Web应用案例. 1.2 方案 解决本案例的方案如下: 1. 创建Web工程,导入Spring Web MVC相关开发包. Sp ...
- Spring MVC接口实例
概述 前文记录了MVC模式和Spring MVC的初步认识,现在记录创建一个项目,配置Spring MVC,编写接口程序. 创建项目 打开IntelliJ IDEA,点击"File-> ...
随机推荐
- [Android]Dalvik的BOOTCLASSPATH和dexopt流程
BOOTCLASSPATH简介1.BOOTCLASSPATH是Android Linux的一个环境变量,可以在adb shell下用$BOOTCLASSPATH看到.2.BOOTCLASSPATH于/ ...
- 关于64位Windows7系统下INF的安装问题
原文 http://bbs.csdn.net/topics/360262492 我的电脑 ——>属性 ——>设备管理器 ——>操作 ——>添加过时硬件 但是,64位系统上报“指 ...
- Oracle Database 12c Release 1 Installation On Oracle Linux 6.4 x86_64
Create groups and users [root@vmdb12c ~]# groupadd oinstall [root@vmdb12c ~]# groupadd dba [root@vmd ...
- 杭电 HDU 1242 Rescue
http://acm.hdu.edu.cn/showproblem.php?pid=1242 问题:牢房里有墙(#),警卫(x)和道路( . ),天使被关在牢房里位置为a,你的位置在r处,杀死一个警卫 ...
- 直播时代--IOS直播客户端SDK,美艳直播【开源】
看到该文章我非常喜欢,为了方便自己查看和参考所以将其复制过来,源文地址:http://www.cnblogs.com/runner42/p/5241407.html 请支持原作者.原作者如看到请原谅复 ...
- windows和centos用cutycapt截网页的图
centos下:(主要参考http://loosky.net/2816.html) (1)安装qt47 增加qt47的源 vim /etc/yum.repos.d/atrpms.repo //加入如下 ...
- Centos6.5搭建bugzilla
一.安装httpd. mod_ssl. mysql-server . mysql .php-mysql . gcc . perl* . mod-perl-devel [root@localhost ~ ...
- Android跟蓝牙耳机建立连接有两种方式
Android 跟蓝牙耳机建立连接有两种方式. 1. Android 主动跟蓝牙耳机连BluetoothSettings 中和蓝牙耳机配对上之后, BluetoothHeadsetService 会收 ...
- QTP实践总结
QTP实践总结 查询数据库修改freq 1.Testcasetable创建查询select * from testcasetable order by fseq desc 2.设计表-选项-修改自动递 ...
- fragment的切换
1.视图 1)主视图 <LinearLayout xmlns:android="http://schemas.android.com/apk/res/android" xml ...