nginx1.14.0版本https加密配置
修改host文件,为最后访问域名准备
C:\Windows\System32\drivers\etc host文件目录
192.168.10.140 www.joyce.com 在最后添加这个自定义域名
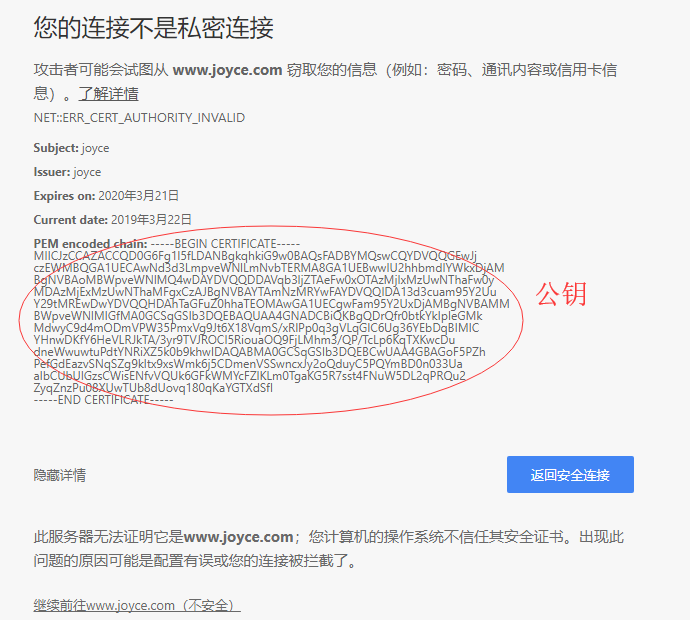
https公钥和私钥定义
服务端:公钥、私钥
服务器持有一对公钥和私钥,并且把自己的公钥发给客户端。
当浏览器发起申请时,数据通过浏览器端的私钥加密发送给服务端。服务端拿到加密密文时,通过浏览器的公钥解密得到数据。
服务端再通过自己的私钥加密返回数据到浏览器,浏览器拿到密文后通过服务端的公钥解密得到数据。
下载nginx和安装
cd /usr/local
wget http://nginx.org/download/nginx-1.14.0.tar.gz 下载
tar -zxvf nginx-1.14.0.tar.gz 解压
/usr/local/nginx/sbin/nginx -V 查看ngixn版本极其编译参数
cd nginx-1.14.0 进入nginx源码目录
./configure
#make & make install 编译和安装
要添加ssl加密模块,需重新编译模块
./configure --prefix=/usr/local/nginx --with-http_stub_status_module --with-http_ssl_module --with-file-aio --with-http_realip_module
make 千万别make & make install,否则就覆盖安装了。make完之后在objs目录下就多了个nginx,这个就是新版本的程序了
cp /usr/local/nginx/sbin/nginx /usr/local/nginx/sbin/nginx.bak 备份旧的nginx程序
rm -rf /usr/local/nginx/sbin/nginx 先删除旧的nginx程序
cp objs/nginx /usr/local/nginx/sbin/nginx 把新的nginx程序覆盖旧的
生成https crt证书文件
yum -y update 更新yum源
yum -y install openssl 安装ssl
cd /usr/local/nginx
mkdir ssl 创建ssl文件夹
cd ssl
openssl genrsa -des3 -out server.key 1024 生成server.key私钥文件,长度为1024,需要指定一个密码:123456
-out filename     :将生成的私钥保存至filename文件,若未指定输出文件,则为标准输出。

-numbits            :指定要生成的私钥的长度,默认为1024。该项必须为命令行的最后一项参数。

-des|-des3|-idea:指定加密私钥文件用的算法,这样每次使用私钥文件都将输入密码,太麻烦所以很少使用。

-passout args    :加密私钥文件时,传递密码的格式,如果要加密私钥文件时单未指定该项,则提示输入密码。传递密码的args的格式见openssl密码格式。
openssl req -new -key server.key -out server.csr 生成server.csr公钥文件,需要输入server.key里指定的密码,我这里是:123456
[root@192 ssl]# openssl req -new -key server.key -out server.csr
Enter pass phrase for server.key:
You are about to be asked to enter information that will be incorporated
into your certificate request.
What you are about to enter is what is called a Distinguished Name or a DN.
There are quite a few fields but you can leave some blank
For some fields there will be a default value,
If you enter '.', the field will be left blank.
-----
Country Name (2 letter code) [XX]:cs
State or Province Name (full name) []:www.joyce.com
Locality Name (eg, city) [Default City]:ShangHai
Organization Name (eg, company) [Default Company Ltd]:joyce
Organizational Unit Name (eg, section) []:
Common Name (eg, your name or your server's hostname) []:joyce
Email Address []:
Please enter the following 'extra' attributes
to be sent with your certificate request
A challenge password []:
An optional company name []:
[root@192 ssl]#
以上这些后面带[]的都是选填,可以直接回车不填。
接下来去除私钥的口令验证,也就是去除用户名密码登录校验
cp server.key server.key.org 先复制一份
openssl rsa -in server.key.org -out server.key 去除口令后,覆盖server.key文件。需要输入server.key里指定的密码:123456
openssl x509 -req -days 365 -in server.csr -signkey server.key -out server.crt 标记证书使用私钥和csr,使用x509格式,有效期限365天
[root@192 ssl]#  openssl x509 -req -days 365 -in server.csr -signkey server.key -out server.crt

Signature ok

subject=/C=cs/ST=www.joyce.com/L=ShangHai/O=joyce/CN=joyce

Getting Private key
注意!server.crt 就是我们需要的证书!
nginx.conf 配置https配置
vim /usr/local/nginx/conf/nginx.conf
worker_processes  1;

events {

    worker_connections  1024;

}

http {

    include       mime.types;

    default_type  application/octet-stream;

    sendfile        on;
server {
listen 80;
server_name www.joyce.com;
return 301 https://$server_name$request_uri; 301重定向到https协议端口,这样访问http://www.joyce.com会自动跳转到https://www.joyce.com
# 可以参考:https://www.cnblogs.com/liuq1991/p/9019900.html (nginx http转 https)
}
    server {

        listen 443 ssl;

        server_name www.joyce.com;

        ssl on;           启用https协议访问

        ssl_certificate /usr/local/nginx/ssl/server.crt;      服务端公钥

        ssl_certificate_key /usr/local/nginx/ssl/server.key;     服务端私钥

        error_log  /usr/local/nginx/logs/error443.log;

        location / {

             proxy_pass http://192.168.10.140:8761;         访问应用

        }

    }

}
测试新的nginx.conf是否配置正确
/usr/local/nginx/sbin/nginx -c /usr/local/nginx/conf/nginx.conf -t
输出如下结果代表nginx.conf配置文件无误:
nginx: theconfiguration file /usr/local/nginx/conf/nginx.conf syntax is ok

nginx:configuration file /usr/local/nginx/conf/nginx.conf test issuccessful
平滑重启nginx
/usr/local/nginx/sbin/nginx -c /usr/local/nginx/conf/nginx.conf -s reload
查看ngixn版本极其编译参数
/usr/local/nginx/sbin/nginx -V
开启443端口(已关闭防火墙firewalld忽略这一步)
关闭防火墙 systemctl stop firewalld
开启防火墙 systemctl start firewalld
查看防火墙状态: systemctl status firewalld
如果防火墙被开启,则有可能存在443端口没有开启监听的情况
firewall-cmd --zone=public --add-port=443/tcp –permanent
firewall-cmd --reload
查看防火墙里添加的端口
firewall-cmd --list-ports
查看是否在防火墙里开启了443端口监听
netstat -antp|grep 443 结果:
tcp 0 0 0.0.0.0:443 0.0.0.0:* LISTEN 2037/nginx:master //代表防火墙开启,并监听了在nginx程序,表示成功。
浏览器端输入https://www.joyce.com 可以查看公钥
注意!最后访问的是https协议!而不是http!
在浏览器里输入https://www.joyce.com/ 即可访问成功!
nginx1.14.0版本https加密配置的更多相关文章
- nginx1.14.0版本负载均衡配置
upstream配置: upstream upstream1 { server 192.168.10.130:8080; server 192.168.10.140:8080; #server 192 ...
- nginx1.14.0版本location路径配置四种方式
假设下面四种情况分别用 http://192.168.1.1/proxy/test.html 进行访问. 第一种:location /proxy/ { proxy_pass http:// 12 ...
- nginx1.14.0版本server、location、rewrite配置
server配置demo 在192.168.10.140(centos7)上修改: /home/program/nginx/conf/nginx.conf 添加一个server server { li ...
- nginx1.14.0版本location路径,多级文件目录配置,root与alias的配置区别
1.多级目录配置 多级目录是指像/html/mypage 等等配置: server { listen 80; server_name localhost; location = /page1/ { # ...
- nginx1.14.0版本高可用——keepalived双机热备
nginx不支持主从,所以我们需要使用keepalive支持高可用. keepalived重要知识点 在局域网内,每个主机上各安装一个keepalived,注意关闭防火墙firewalld,然后设定一 ...
- elementaryos5安装mysql5.7、php7.2、nginx1.14.0
一.mysql5.7 安装mysql5.7: sudo apt-get install mysql-server-5.7 查看安装的mysql版本: mysql -V 5.7版本mysql安装过程中以 ...
- Nginx1.14.0+ModSecurity实现简单的WAF
一.编译安装Nginx 1.安装依赖环境 $ yum -y install gcc-c++ flex bison yajl yajl-devel curl-devel curl GeoIP-devel ...
- nexus3.14.0版本linux环境安装、启动、搭建私库
本文介绍的是nexus3.14.0版本在linux环境下安装.启动.搭建私库. nexus3以上的版本太新了,网上很少介绍安装细节的.据了解和2.X版本有所不同了. 1.前提 linux机器上需先安装 ...
- CentOS 安装Nginx1.14.0
原文地址:http://www.cnblogs.com/ascd-eg/p/9275441.html 一.安装所需环境 1.gcc 安装 yum install gcc-c++ ...
随机推荐
- 运维chroot语法
chroot命令 chroot命令用来在指定的根目录下运行指令.chroot,即 change root directory (更改 root 目录).在 linux 系统中,系统默认的目录结构都是以 ...
- ln语法
Linux文件系统中,有所谓的链接(link),我们可以将其视为档案的别名,而链接又可分为两种 : 硬链接(hard link)与软链接(symbolic link),硬链接的意思是一个文件可以有多个 ...
- esLint 配置
默认eslint规则: 代码末尾不能加分号 ;(强迫症的我受不了)代码中不能存在多行空行:(这个我更也忍不了)tab键不能使用,必须换成两个空格:(超级不习惯)代码中不能存在声明了但未使用的变量:(这 ...
- soapUI的安装及破解
1.下载安装包 SoapUI SoapUI-Pro-x64-5.1.2.exe Protection-4.6.jar scz.key 2.安装SoapUI-Pro-x64-5.1.2.exe 3.拷贝 ...
- WEB学习笔记3-开发环境和工具
WEB前端集成开发环境:Aptana Studio和WebStormWEB前端代码调试:IE浏览器自带的IE Dev Toolbar,Chrome浏览器自带的Developer Tools,Firef ...
- sqlite当天时间的23:59:59
select strftime('%Y-%m-%d %H:%M:%S','now','+1 day','localtime','start of day','-1 seconds')
- django用MySQL数据库链接
在使用的过程中出现了没有mysqld.sock这个文件的情况,无法连接到mysql数据库. 几经周折,设置路径,改文件夹的权限,也都无济于事,只有重新安装mysql服务器,第一次尝试还是失败,服务器安 ...
- 常用vi编辑器命令
对于VI的命令行,不需要特意的去记忆,写下来,让要用到的时候能找到就行 游标控制 h 游标向左移 j 游标向下移 k 游标向上移 l (or spacebar) 游标向右移 w 向前移动一个单词 b ...
- 用chrome和anywhere,配合安卓机搭建最简单的移动端页面测试。
很多时候,我们前端在写移动端页面的时候,虽然目前chrome有调试模式,可以模拟手机的部分效果,但仍有部分效果需要直接在手机上进行页面的调试,今天就在这里推荐一个适合windows+安卓的无需连接局域 ...
- python中shutil模块的使用
可以操作权限的处理文件模块:shutil # 基于路径的文件复制 import shutil shutil.copyfile("oldfile_path","newfil ...