引擎设计跟踪(九.14.3.2) Deferred shading的后续实现和优化
最近完成了deferred shading和spot light的支持, 并作了一部分优化.
之前forward shading也只支持方向光, 现在也支持了点光源和探照光. 对于forward shading, 可以在渲染每个对象之前, 用对象的包围盒, 查询空间内的光源, 然后填入shader cosntant里. 因为空间一般是基于四叉树或者八叉树的划分, 所以查询不会慢.现在透明物体也能通过forward shading 正常光照了。
Deferred shading optimizations
1. Early Z & Early Stencil
上面的文章介绍了deferred shading的一些细节和优化方式, 其中提到了Early Z和early stencil.
对于early z来说, 只能裁掉一半的无效几何数据.如果是less/less qual, 那么光照范围后面的区域也会计算, 如果是greater/greater qual, 光照范围之前的区域也会参与lighting 计算(冗余计算,并没有效果).
early stencil的话需要把light volume加上stencil pass. 本来也打算使用stencil来优化, 过滤掉无效的区域.
后面看到这篇文章:
上面提到了几点, 其中提道stencil 写入的开销太大, 并不高效. 该文章的demo中使用的是early z.
2.Z culling in shader
由于上面使用了earlyz, 所以光照区域平均大概有一半无效的计算.
如果在shader里面根据深度,把另一半的无效区域做early out, 理论上效率会更好.
为了验证我的想法, 在上面intel的那个demo里面加上了几行简单的代码:
 // One per quad - gets expanded in the geometry shader

 struct GPUQuadVSOut

 {

     float4 coords : coords;         // [min.xy, max.xy] in clip space

     float quadZ : quadZ;

     //Crazii

     float quadMaxZ : quadMaxZ;

     //-//Crazii

     uint lightIndex : lightIndex;

 };

 GPUQuadVSOut GPUQuadVS(uint lightIndex : SV_VertexID)

 {

     GPUQuadVSOut output;

     output.lightIndex = lightIndex;

     // Work out tight clip-space rectangle

     PointLight light = gLight[lightIndex];

     output.coords = ComputeClipRegion(light.positionView, light.attenuationEnd);

     // Work out nearest depth for quad Z

     // Clamp to near plane in case this light intersects the near plane... don't want our quad to be clipped

     float quadDepth = max(mCameraNearFar.x, light.positionView.z - light.attenuationEnd);

     // Project quad depth into clip space

     float4 quadClip = mul(float4(0.0f, 0.0f, quadDepth, 1.0f), mCameraProj);

     output.quadZ = quadClip.z / quadClip.w;

     //Crazii

     //quadClip = mul(float4(0.0f, 0.0f, light.positionView.z + light.attenuationEnd, 1.0f), mCameraProj);

     //output.quadMaxZ = quadClip.z / quadClip.w;

     output.quadMaxZ = light.positionView.z + light.attenuationEnd;

     //-Crazii

     return output;

 }

 struct GPUQuadGSOut

 {

     float4 positionViewport : SV_Position;

     // NOTE: Using a uint4 to work around a compiler bug. Otherwise the SV_SampleIndex input to the per-sample

     // shader below gets put into a '.y' which doesn't appear to work on some implementations.

     nointerpolation uint4 lightIndex : lightIndex;

     //Crazii

     nointerpolation float maxDepth : maxDpeth;

     //-Crazii

 };

 // Takes point output and converts into screen-space quads

 [maxvertexcount()]

 void GPUQuadGS(point GPUQuadVSOut input[], inout TriangleStream<GPUQuadGSOut> quadStream)

 {

     GPUQuadGSOut output;

     output.lightIndex = input[].lightIndex;

     //Crazii

     output.maxDepth = input[].quadMaxZ;

     //-Crazii

     output.positionViewport.zw = float2(input[].quadZ, 1.0f);

     // Branch around empty regions (i.e. light entirely offscreen)

     if (all(input[].coords.xy < input[].coords.zw)) {

         output.positionViewport.xy = input[].coords.xw;      // [-1,  1]

         quadStream.Append(output);

         output.positionViewport.xy = input[].coords.zw;      // [ 1,  1]

         quadStream.Append(output);

         output.positionViewport.xy = input[].coords.xy;      // [-1, -1]

         quadStream.Append(output);

         output.positionViewport.xy = input[].coords.zy;      // [ 1, -1]

         quadStream.Append(output);

         quadStream.RestartStrip();

     }

 }

 float4 GPUQuad(GPUQuadGSOut input, uint sampleIndex)

 {

     float3 lit = float3(0.0f, 0.0f, 0.0f);

     [branch] if (mUI.visualizeLightCount) {

         lit = rcp(255.0f).xxx;

     } else {

         //Crazii

         float zBuffer = gGBufferTextures[].Load(input.positionViewport.xy, sampleIndex).x;

         float viewSpaceZ = mCameraProj._43 / (zBuffer - mCameraProj._33);

         if (viewSpaceZ - input.maxDepth > )

             clip(-);

         //-Crazii

         SurfaceData surface = ComputeSurfaceDataFromGBufferSample(uint2(input.positionViewport.xy), sampleIndex);

         // Avoid shading skybox/background pixels

         // NOTE: Compiler doesn't quite seem to move all the unrelated surface computations inside here

         // We could force it to by restructuring the code a bit, but the "all skybox" case isn't useful for

         // our benchmarking anyways.

         if (surface.positionView.z < mCameraNearFar.y) {

             PointLight light = gLight[input.lightIndex.x];

             AccumulateBRDF(surface, light, lit /*Crazii*/, true /*-Crazii*/);

         }

     }

     return float4(lit, 1.0f);

 }
代码修改并不多: vertex shader里面计算view space z, 因为demo 使用了less equal, 所以需要加上额外的max z, 相当于shader里面手动做greater过滤(类似Depth Bounds Test).
最后的结果, 在730M上测试, 使用这种方式效率提高50%-100%,当灯光个数比较多的时候,deferred shading的效率会翻倍!, 当然比起tiled方法毕竟还是too young, 因为多个光源光照范围重合的部分, 仍然需要sampling和blending多次.
| GT 730M, 1280x720, scene: power plant | 64 Lights | 128 Lights | 256 Lights | 512 Lights | 1024 Lights |
| Tile based deferred shading | 188.5 FPS | 180.9 FPS | 160.6 FPS | 136.2 FPS | 106.8 FPS |
| Deferred shading | 169.5 FPS | 117 FPS | 56.9 FPS | 31.8 FPS | 17.16 FPS |
| Deferred shading + shader depth clip | 209 FPS | 170 FPS | 107.5 FPS | 71.5 FPS | 44.5 FPS |
all shader compild with flag D3DCOMPILE_OPTIMIZATION_LEVEL3
从上面可以看出, shader里使用zculling以后, 128盏灯光以前, deferred shading和tiled方式的性能差别不大 (如果是更低端的GPU, 可能会有差别, 而且要注意tile based方式并没有做任何优化).
分析: 因为shader里面做深度比较时, 只需要采样depth buffer, 如果不在范围内, 直接clip & return, 所以后面的采样和计算以及混合都不需要了.
顺便记录一下clip, 默认shader不开优化的时候, clip只是取消的像素blend到back buffer, shader还是会继续执行的, 除非手动添加上return,或者开启优化(D3DCOMPILE_OPTIMIZATION_LEVEL3).
而动态分支和clip对于SM3.0+以上都是更好的方式, 至少现有文档里面DX10及以上的API都是鼓励使用clip和分支, 来减少shader计算量.
如果不使用clip, 而是返回float4(0,0,0,0)虽然显示结果一样,但是效率会降低,因为还是要blend到backbuffer.
而旧的GPU, clip和branch反而可能导致shader divergence, 所以clip有可能只通知discard掉当前fragment, shader还是会照样执行.
还需要注意的是, 如果开启了depth write, clip会导致early Z 失效(这算是常识,原因不用备忘). 而在deferred shading这里, shading pass不会写深度, 所以没有问题.
对应blade的实现, 因为使用了INTZ, 而INTZ在某些A卡上, 如果同是作为纹理采样, 并用作depth stencil做深度测试时会有效率损失(http://aras-p.info/texts/D3D9GPUHacks.html),
需要blit出另外一个zbuffer分别使用, 反而更麻烦, 所以blade不使用early z(关闭深度测试), 直接在shader里面做两个depth clip并early out:
vertex shader:
 #if !defined(DIRECTIONAL)

     //use outer sphere to make sure rays covers entire volume

 #    if defined(POINT)

     float4 posVS = float4(viewSpacePos.xyz, );

     float3 halfSize = viewSpacePos.w;

 #    else

     float4 posVS = viewSpaceBounding[];

     float3 halfSize = viewSpaceBounding[].xyz;

 #    endif

     //view space depth range. note posVS.z < 0 in Right handed system

     outDethRange = float2(-(posVS.z + halfSize.z), -(posVS.z - halfSize.z));    //min,max

 ...

 #endif
pixel shader:
 #if !defined(DIRECTIONAL)

     //GBuffer depth

     float2 depthUV = UV * depthUVSpace.zw + depthUVSpace.xy;

     float depth = tex2D(depthBuffer, depthUV).r;    //INTZ

     depth = depth * depthFactor.z + depthFactor.w;    //depth to NDC [0,1] or [-1,1]

     float viewDepth = depthFactor.y / (depth + depthFactor.x);    //right handed inverse calculation from NDC to viewZ (viewZ < 0, and make it > 0 )

     if (viewDepth - depthRange.x <  || viewDepth - depthRange.y > )

     {

         clip(-);

         //return float4(0, 0, 0, 0); /optimized level 3(O3) will auto return on clip

     }

 ...

 #endif
代码跟上面的修改类似, 在vertex shader里面根据view space的bounding, 计算light volume 的zmin和zmax, 在pixel shader里面做剔除。
需要注意, 尽量使用view space的李linear depth来比较,因为直接比较zbuffer depth的话, 误差会比较大. 如果加上误差容许, 那么远处的depth因为精度低的原因, 会导致没有被clip掉, 也就是说因为zbuffer的深度是非线性的,所以误差根距离相关并不好控制.
做完基于depth的clip之后, 还可以基于光照属性,比如light 的范围, spot light的angle来clip, 这样只会有少量的计算(ray计算position,然后计算是否受光照), 如果不在范围内就clip掉,避免后面的color/normal采样和光照计算。 而比较时需要用的这些参数计算, 因为计算光照也需要, 所以并不浪费。
3. Quad vs volume
intel的pdf中也提到, 使用quad效率要比使用light volume效率高, light volume顶点多有点浪费. 所以blade也改成quad绘制, 用scrren space的full screen quad做vertex buffer, vertex shader里面做scale+offset. light helper依然使用volume来显示, 这样看起来比较直观方便。
这里记录一些小的细节:
不管是用light volume还是quad, 都可能会有极少部分没有计算光照:
     /* using farther plane:

     light volume: use farther/center plane causing volume not fully covered (filled in x)

     +------------------+

     |\                /|

     |x\              /x|

     |xx\            /xx|

     |xxx\          /xxx|

     +----\        /----+

       minRay    maxRay

     */
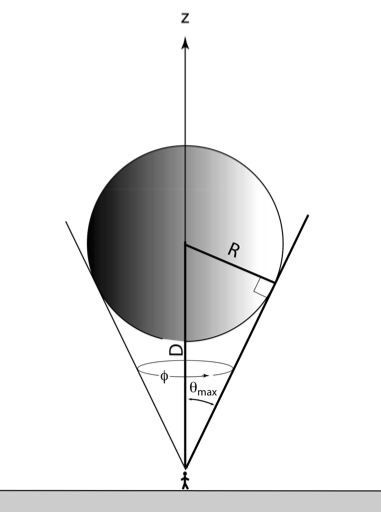
即便使用light volume(sphere), 两个view ray也不能完全覆盖前面部分的半球, 会有极少部分遗漏,偶尔会发现光照突然消失的竖块。如果使用back plane(further plane)问题更严重。
更新: light volume会覆盖切线, 切线内的范围是光照的最大范围, 所以范围够了. 唯一的两个问题是mesh精度导致没有到切线; 以及过了切线的部分有重复shading
intel的那个实现使用的是front plane+depth less的深度测试。front plane投影的面积虽然大, 可以覆盖全部volume,但是在视锥外的时候,会被设备clip掉(1或者-1之外),导致计算光照错误:
     /* using nearer(front) plane:

     +--------------------------+

      \                        /

       \                   +--/--+ farther plane

        \                  | /   |

         \                 |/    | Center

          \                /     |

           \              /+-----+ nearer plane  - clipped!

     */
仍然有部分光照没有计算。
blade的解决方法是: 使用back plane并放大,放大到和front plane投影面积一样大。scale可以根据深度参数计算,而深度在前面需要depth clip的时候后正好已经计算过了, 所以成本很低:
     //screen pos:

     posVS.z -= halfSize.z;    //use farther plane, to avoid near clip (xy outrange[-1,1])

     float4 projCenter = mul(posVS, projMatrix);

     projCenter /= projCenter.w;

     //farther plane is too small to cover the volume, scale it to the same projection size of nearer plane

     float scale = outDethRange.y / outDethRange.x;

     posVS.xy += halfSize.xy*scale;

     float4 projMax = mul(posVS, projMatrix);

     projMax /= projMax.w;

     pos.xy = pos.xy*(projMax.xy - projCenter.xy) + projCenter.xy;
这样就可以把(-1,-1),(-1,1),(1,1),(1,-1)的full screen quad计算到屏幕上覆盖light范围的quad。
还有需要注意的是vertex shader中计算出的ray不能normalize, 之前在方向光的时候normalize不影响,因为投影到全屏是等距离的,ray的长度必定相等,不影响GPU插值,没有出现问题;light volume因为顶点比较多所以插值误差比较小;现在quad只有四个顶点,非方向光的话,quad的位置在屏幕并不对称,两个ray的长度通常不相等, normalize之后插值的结果方向不对。
4. Light quad merging
如果使用了quad来lighting, 那么也很方便在screen space合并灯光的quad, 这样理论上可以分割,合并所有重合区域, 在合并的区域内迭代计算每个光源, 最终效果是, Gbuffer只采样一次, blending也没有重复, 这样的效率应该不比tile based 方法低,
不过这一点目前只是简单探讨和感想, 具体怎么分割和合并还没有具体去想。
5.Tile based deferred shading
这个是现在比较高效的方法, 还有一个cluster的方法,比这个方法更复杂,效率更高一点。原理都很类似, 划分区域并减少重复的sampling和blending,解决deferred方式的IO瓶颈。
目前正在考虑是否要在SM3.0上实现tiled方法, 这里有个龚大大的文章, 值得参考:
根据tile based原理,可以做出很多具体实现和变种,龚敏敏大大的实现就是一种,我也想了一种实现,效率不一定比他的高,但是记下来以便以后尝试:
在CPU端计算screen space下每个光源对每个tile的影响, (忽略tiled方法中每个tile的深度), 生成一张每个tile的光源索引的texture, 然后再pixel shader里面索引光照并计算.
这种方式可以支持任意多的光源, 并不需要多个批次, 但是culling变成per pixel的, 所以比常规tile based方式效率要低, 但是仍在tile里迭代计算, 因为没有多次sampling和blending, 效率应该比deferred shading高, 后面有时间的话会尝试一下, 待议。因为128盏灯光一般来说游戏已经够用了,这个时候deffered shading效率可以接受。如果硬件配置比较低,或者灯光数量太多时用再考虑。
最后还是传统,发截图留念

引擎设计跟踪(九.14.3.2) Deferred shading的后续实现和优化的更多相关文章
- 引擎设计跟踪(九.14.3.1) deferred shading: Depthstencil as GBuffer depth
问题汇总 1.Light support for Editor编辑器加入了灯光工具, 可以添加和修改灯光. 问题1. light object的用户互交.point light可以把对应的volume ...
- 引擎设计跟踪(九.14.3.3) Deferred shading的一些小细节
1.ambient light 之前的shader里面, 方向光会加上ambient 的计算. 但是如果没有方向光, 就没有ambient. 这是把全局方向光改为点光源之后发现的, 因为透明物体的fo ...
- 引擎设计跟踪(九.14.2a) 导出插件问题修复和 Tangent Space 裂缝修复
由于工作很忙, 近半年的业余时间没空搞了, 不过工作马上忙完了, 趁十一有时间修了一些小问题. 这次更新跟骨骼动画无关, 修复了一个之前的, 关于tangent space裂缝的问题: 引擎设计跟踪( ...
- 引擎设计跟踪(九.14.3) deferred shading 准备
目前做的一些准备工作 1.depth prepass for forward shading. 做depth prepass的原因是为了完善渲染流程, 虽然架构上支持多个pass, 但实际上从来没有测 ...
- 引擎设计跟踪(九.14.2 final) Inverse Kinematics: CCD 在Blade中的实现
因为工作忙, 好久没有记笔记了, 但是有时候发现还得翻以前的笔记去看, 所以还是尽量记下来备忘. 关于IK, 读了一些paper, 觉得之前翻译的那篇, welman的paper (http://gr ...
- 引擎设计跟踪(九.14.2i) Android GLES 3.0 完善
最近把渲染设备对应的GLES的API填上了. 主要有IRenderDevice/IShader/ITexture/IGraphicsResourceManager/IIndexBuffer/IVert ...
- 引擎设计跟踪(九.14.2g) 将GNUMake集成到Visual Studio
最近在做纹理压缩工具, 以及数据包的生成. shader编译已经在vs工程里面了, 使用custom build tool, build命令是调用BladeShaderComplier, 并且每个文件 ...
- 引擎设计跟踪(九.14.2f) 最近更新: OpenGL ES & tools
之前骨骼动画的IK暂时放一放, 最近在搞GLES的实现. 之前除了GLES没有实现, Android的代码移植已经完毕: [原]跨平台编程注意事项(三): window 到 android 的 移植 ...
- 引擎设计跟踪(九.14.2d) [翻译] shader的跨平台方案之2014
Origin: http://aras-p.info/blog/2014/03/28/cross-platform-shaders-in-2014/ 简译 translation: 作者在2012年写 ...
随机推荐
- C++中:(*p)++和*(p++)和*p++的区别
1. 理解自增自减运算符 (1)后置自增自减运算符优先级>前置自增自减运算符. (2)前置自增自减运算符“变量先自增自减再使用”. (3)后置自增自减运算符“变量先使用再自增自减”. ...
- Windows挂载NFS共享盘
Centos7添加NFS方法请见如下链接: https://www.cnblogs.com/jackyzm/p/10285845.html 一:添加NFS服务 1.1:此电脑-右键-管理-window ...
- Vmware网络不可达
1. ifconfig -a 查看当前的网卡 2. cd /etc/sysconfig/network-scripts/ 3. 打开对应网卡名称文件, 具体修改内容参考(https://www. ...
- Linux系统调用列表(转)
以下是Linux系统调用的一个列表,包含了大部分常用系统调用和由系统调用派生出的的函数.这可能是你在互联网上所能看到的唯一一篇中文注释的Linux系统调用列表,即使是简单的字母序英文列表,能做到这么完 ...
- 自己练习的一个小的demo的时候a标签关于href链接的问题
一.Js的几种调用方法(参考总结的) 1.a href="javascript:js_method();" 这是常用的方法,但是这种方法在传递this等参数的时候很容易出问题,而且 ...
- 2018-2019-2 《网络对抗技术》Exp5 MSF基础应用 20165326
Exp5 MSF基础应用 实践内容 主动攻击实践 ms17_010_enternalblue 靶机:win7 x64成功 针对浏览器的攻击 ms14_064_ole_code_execution 靶机 ...
- 高精度加法——经典题 洛谷p1601
题目背景 无 题目描述 高精度加法,x相当于a+b problem,[b][color=red]不用考虑负数[/color][/b] 输入输出格式 输入格式: 分两行输入a,b<=10^500 ...
- C#获取常用的路径
常用的这两个足够了,其他需要的自行百度 //获取新的 Process 组件并将其与当前活动的进程关联的主模块的完整路径,包含文件名(进程名). string str = System.Diagnost ...
- TCP 总结
TCP(Transmission Control Protocol 传输控制协议)是一种面向连接的.可靠的.基于字节流的传输层通信协议,由IETF的RFC 793定义. [TCP连接的特点] [ref ...
- kafka学习笔记整理01
Apache Kafka 消息中间件->流式数据处理平台 特点: 高可靠性(分布式.分区.复制和容错).高吞吐量.持久化 消息模式:1)队列式(或点对点):在点对点消息系统中,消息被保存在队列中 ...