ExpandableListView控件实现二级列表
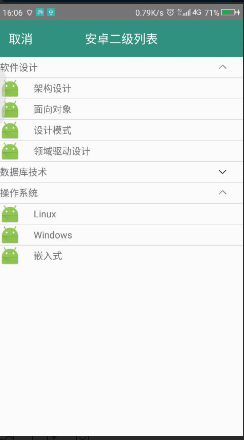
效果图如下:

二级列表附有点击事件。
1、布局文件:
此处加了一个自定义的导航RelativeLayout,记得注activity的时候添加 android:theme="@style/Theme.AppCompat.Light.NoActionBar" 去掉自带的导航。
 <?xml version="1.0" encoding="utf-8"?>

 <LinearLayout xmlns:android="http://schemas.android.com/apk/res/android"

     android:orientation="vertical"

     android:layout_width="match_parent"

     android:layout_height="match_parent">

     <RelativeLayout

         android:layout_width="match_parent"

         android:layout_height="@dimen/dimen_55"

         android:background="@color/main_title"

         >

         <TextView

             android:layout_centerVertical="true"

             android:layout_width="wrap_content"

             android:layout_height="wrap_content"

             android:text="取消"

             android:textColor="@color/white"

             android:textSize="@dimen/dimen_18"

             android:layout_marginLeft="@dimen/dimen_13"

             android:onClick="goBack"

             />

         <TextView

             android:layout_centerVertical="true"

             android:layout_centerHorizontal="true"

             android:layout_width="wrap_content"

             android:layout_height="wrap_content"

             android:text="安卓二级列表"

             android:textColor="@color/white"

             android:textSize="@dimen/dimen_18"/>

     </RelativeLayout>

     <!--二级菜单-->

     <ExpandableListView

         android:id="@+id/expandableListView"

         android:layout_width="match_parent"

         android:layout_height="wrap_content">

     </ExpandableListView>

 </LinearLayout>
2、一级列表布局:
ImageView是用来自定义打开闭合图标的(不自定义也可以,箭头会默认在最左边),建议自己用一个ImageView控件来控制上下箭头。图标可以去阿里巴巴矢量图上下载。
<?xml version="1.0" encoding="utf-8"?>

<LinearLayout xmlns:android="http://schemas.android.com/apk/res/android"

    android:orientation="horizontal" android:layout_width="match_parent"

    android:layout_height="wrap_content">

<!--一级列表 item布局-->

    <RelativeLayout

        android:layout_width="match_parent"

        android:layout_height="wrap_content">

        <TextView

            android:id="@+id/tv_group"

            android:layout_width="wrap_content"

            android:layout_height="30dp"

            android:gravity="center"

            android:text="group text"

            />

        <ImageView

            android:id="@+id/iv_group"

            android:layout_alignParentRight="true"

            android:layout_centerVertical="true"

            android:layout_marginRight="@dimen/dimen_20"

            android:layout_width="20dp"

            android:layout_height="20dp" />

    </RelativeLayout>

</LinearLayout>
3、二级列表布局:
<?xml version="1.0" encoding="utf-8"?>

<LinearLayout xmlns:android="http://schemas.android.com/apk/res/android"

    android:orientation="horizontal" android:layout_width="match_parent"

    android:layout_height="wrap_content"

    android:gravity="center">

<!--二级列表 item布局-->

    <ImageView

        android:id="@+id/iv_child"

        android:layout_width="30dp"

        android:layout_height="30dp"

        android:src="@mipmap/ic_launcher" />

    <TextView

        android:id="@+id/tv_child"

        android:layout_marginLeft="@dimen/dimen_20"

        android:layout_width="match_parent"

        android:layout_height="wrap_content"

        android:text="item text" />

</LinearLayout>
4、activity代码:
     private ExpandableListView expandableListView;

     //一级列表数据源

     private String[] groups = {"软件设计", "数据库技术", "操作系统"};

     //二级列表数据源

     private String[][] childs={{"架构设计","面向对象","设计模式","领域驱动设计"},{"SQL Server","Oracle","MySql", "Dameng "},{"Linux","Windows","嵌入式"}};

     @Override

     protected void onCreate(Bundle savedInstanceState) {

         super.onCreate(savedInstanceState);

         setContentView(R.layout.activity_expandable_listview);

         initView();

     }

     private void initView() {

         expandableListView = (ExpandableListView)findViewById(R.id.expandableListView);

         //#TODO 去掉自带箭头,在一级列表中动态添加

         expandableListView.setGroupIndicator(null);

         expandableListView.setAdapter(new MyExpandableListView());

     }

     public void goBack(View view) {

         finish();

     }
5、ExpandableListView适配器:
继承自BaseExpandableListAdapter,重写ExpandableListAdapter中的10个方法
 class MyExpandableListView extends BaseExpandableListAdapter {

         /*一级列表个数*/

         @Override

         public int getGroupCount() {

             return groups.length;

         }

         /*每个二级列表的个数*/

         @Override

         public int getChildrenCount(int groupPosition) {

             return childs[groupPosition].length;

         }

         /*一级列表中单个item*/

         @Override

         public Object getGroup(int groupPosition) {

             return groups[groupPosition];

         }

         /*二级列表中单个item*/

         @Override

         public Object getChild(int groupPosition, int childPosition) {

             return childs[groupPosition][childPosition];

         }

         @Override

         public long getGroupId(int groupPosition) {

             return groupPosition;

         }

         @Override

         public long getChildId(int groupPosition, int childPosition) {

             return childPosition;

         }

         /*每个item的id是否固定,一般为true*/

         @Override

         public boolean hasStableIds() {

             return true;

         }

         /*#TODO 填充一级列表

         * isExpanded 是否已经展开

         * */

         @Override

         public View getGroupView(int groupPosition, boolean isExpanded, View convertView, ViewGroup parent) {

             if (convertView == null) {

                 convertView = getLayoutInflater().inflate(R.layout.list_item_expandablelistview,null);

             }

             TextView tv_group = (TextView) convertView.findViewById(R.id.tv_group);

             ImageView iv_group = (ImageView) convertView.findViewById(R.id.iv_group);

             tv_group.setText(groups[groupPosition]);

             //控制是否展开图标

             if (isExpanded) {

                 iv_group.setImageResource(R.drawable.expand_iv_up);

             } else {

                 iv_group.setImageResource(R.drawable.expand_iv_down);

             }

             return convertView;

         }

         /*#TODO 填充二级列表*/

         @Override

         public View getChildView(int groupPosition, int childPosition, boolean isLastChild, View convertView, ViewGroup parent) {

             if (convertView == null) {

                 convertView = getLayoutInflater().inflate(R.layout.list_item_expandablelistview_child,null);

             }

             ImageView image = (ImageView) convertView.findViewById(R.id.iv_child);

             TextView tv = (TextView) convertView.findViewById(R.id.tv_child);

             tv.setText(childs[groupPosition][childPosition]);

             return convertView;

         }

         /*二级列表中每个能否被选中,如果有点击事件一定要设为true*/

         @Override

         public boolean isChildSelectable(int groupPosition, int childPosition) {

             return true;

         }

     }
到这里基本就完成了,最后再配置一下每个二级列表的点击事件即可:
 expandableListView.setOnChildClickListener(new ExpandableListView.OnChildClickListener() {

             @Override

             public boolean onChildClick(ExpandableListView parent, View v, int groupPosition, int childPosition, long id) {

                 TextView childAt = (TextView)((LinearLayout) v).getChildAt(1);//获得点击列表中TextView的值,需要强转一下,否则找不到getChildAt方法
5                 Toast.makeText(ExpandableListViewActivity.this, "点击了 "+childAt.getText()+" 列表", Toast.LENGTH_SHORT).show();

                 return true;
              }
  });
ExpandableListView控件实现二级列表的更多相关文章
- android ExpandAbleListView控件
ExpandAbleListView控件 1.API对ExpandAbleListView的解释:
- Android中ExpandableListView控件基本使用
本文採用一个Demo来展示Android中ExpandableListView控件的使用,如怎样在组/子ListView中绑定数据源.直接上代码例如以下: 程序结构图: layout文件夹下的 mai ...
- Qt实现表格控件-支持多级列表头、多级行表头、单元格合并、字体设置等
目录 一.概述 二.效果展示 三.定制表头 1.重写数据源 2.重写QHeaderView 四.设置属性 五.相关文章 原文链接:Qt实现表格控件-支持多级列表头.多级行表头.单元格合并.字体设置等 ...
- [WP8.1UI控件编程]SemanticZoom控件实现分组列表
11.1.5 SemanticZoom实现分组列表 SemanticZoom控件可以让用户实现一种更加高级的列表,这种列表可以对列表的项目进行分组,同时这个SemanticZoom控件会提供两个具有相 ...
- MFC程序实现窗口分割,视图快捷插入控件和插入列表
将视图中插入列表: 1.创建一个MFC应用程序,在MFC Wizard中,生成的类选项,如图 2.选择CListView作为基类 3.在CXXView.cpp(XX为你的程序名)重写虚函数OnInit ...
- PagedDataSource数据绑定控件和AspNetPager分页控件结合使用列表分页
1.引用AspNetPager.dll. 2.放置Repeater数据绑定控件. <asp:Repeater ID="Repeater1" runat="serve ...
- Android 关于ExpandableListView控件setOnChildClickListener无效问题
其实很简单,在适配器里面重写isChildSelectable的时候返回值切记为true,这样才能使得二级监听有响应. 其次注意继承的是BaseExpandableListAdapter
- winfrom 窗体控件实现二级联动
ComboBox绑定数据源时触发SelectedIndexChanged事件的处理办法 事件,而这个时候用户并没有选择内容,其SelectedValue也不是对应字段的值.那么时写在SelectedI ...
- Windows的公共控件窗口类列表
The following window class names are provided by the common control library: ANIMATE_CLASS Creates a ...
随机推荐
- .NET源码Stack<T>和Queue<T>的实现
这阵子在重温数据结构的时候,顺便用ILSpy看了一些.NET类库的实现,发现一些基本的数据结构的实现方法也是挺有意思的,所以这里拿出来跟大家分享一下.这篇文章讨论的是Stack和Queue的泛型实现. ...
- python代码位置引发的错误
觉得python对代码位置的要求简直是变态,缩进引发的错误我以前在博客里讲过了,如果不懂可以看看我以前的博客,今天又遇到了一个代码位置所引发的错误,现在给大家分享一下: 我想要打印出来一个5*5的实心 ...
- spring boot整合Swagger2
Swagger 是一个规范和完整的框架,用于生成.描述.调用和可视化RESTful风格的 Web 服务.总体目标是使客户端和文件系统作为服务器以同样的速度来更新.文件的方法,参数和模型紧密集成到服务器 ...
- Spring统一异常处理
1.为什么要用Spring的统一异常处理? 项目中无论是controller层.service层还是dao层都会有异常发生.每个过程都单独处理异常,系统的代码耦合度高,工作量大且不好统一,维护的工作量 ...
- SpringAOP-基于@AspectJ的简单入门
一.AOP的基本概念: 连接点(Jointpoint):表示需要在程序中插入横切关注点的扩展点,连接点可能是类初始化.方法执行.方法调用.字段调用或处理异常等等,Spring只支持方法执行连接点,在A ...
- win10上走网络打印机(不需找驱动包,会自动)
不多说,直接上干货! 之前是 现在是 结束 欢迎大家,加入我的微信公众号:大数据躺过的坑 人工智能躺过的坑 同时,大家可以关注我的个人博客: http://www.cn ...
- WordPress上传文件类型限制解决办法
文件类型不符合安全规则.试试别的文件. 这种错误是由于WordPress中做了文件上传格式的限制,这种限制可以在WordPress中的wp-include/functions.php的get_allo ...
- Python -- 游戏开发 -- PyGame的使用
弹球 pong.py import sys import pygame from pygame.locals import * class MyBallClass(pygame.sprite.Spri ...
- 使用Windbg找出死锁,解决生产环境中运行的软件不响应请求的问题
前言 本文介绍本人的一次使用Windbg分析dump文件找出死锁的过程,并重点介绍如何确定线程所等待的锁及判断是否出现了死锁. 对于如何安装及设置Windbg请参考:<使用Windbg和SoS扩 ...
- [转]Global exception handling in Web API 2.1 and NLog
本文转自:https://stackoverflow.com/questions/25865610/global-exception-handling-in-web-api-2-1-and-nlog ...
