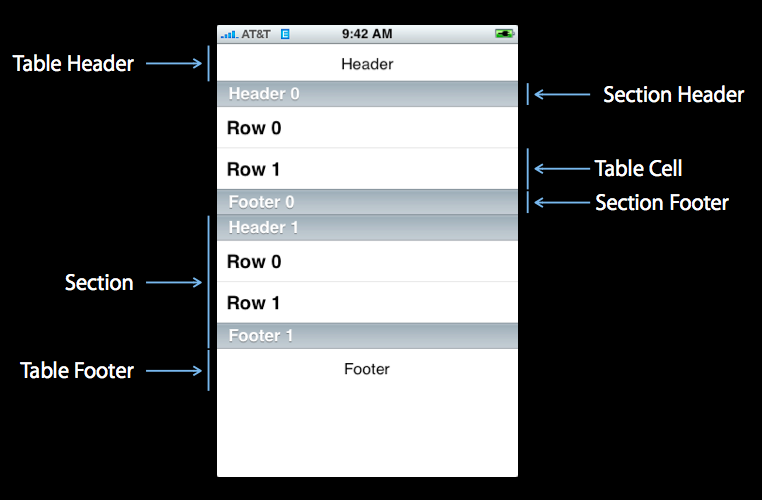
***iOS学习之Table View的简单使用和DEMO示例(共Plain普通+Grouped分组两种)
Table View简单描述:
在iPhone和其他iOS的很多程序中都会看到Table View的出现,除了一般的表格资料展示之外,设置的属性资料往往也用到Table View,Table View主要分为以下两种:

- Plain:这是普通的列表风格
- Grouped :这是分块风格。
 :
:
1、新建项目

- #import <UIKit/UIKit.h>
- @interface ViewController : UIViewController<UITableViewDelegate, UITableViewDataSource>
- @property (strong, nonatomic) NSArray *list;
- @end
5、打开.m文件,添加:
- @synthesize list = _list;

这是发现有两个警告,提示未完成的实现,这提示的是UITableViewDelegate, UITableViewDataSource这个两个头文件里的协议的方法未实现。待会我们去实现它。
- - (void)viewDidLoad
- {
- [super viewDidLoad];
- // Do any additional setup after loading the view, typically from a nib.
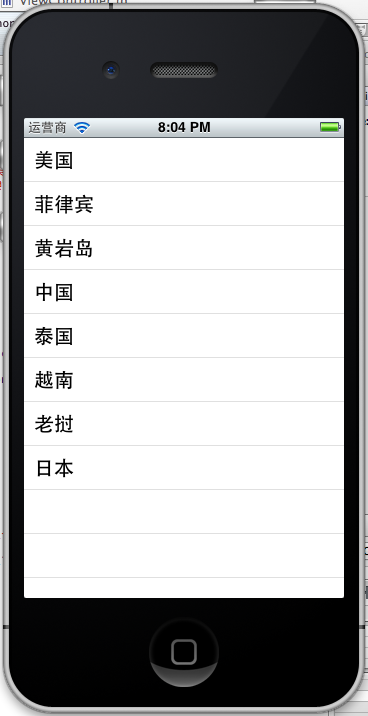
- NSArray *array = [[NSArray alloc] initWithObjects:@"美国", @"菲律宾",
- @"黄岩岛", @"中国", @"泰国", @"越南", @"老挝",
- @"日本" , nil];
- self.list = array;
- }
- - (void)viewDidUnload
- {
- [super viewDidUnload];
- // Release any retained subviews of the main view.
- self.list = nil;
- }
7、生成row
- - (UITableViewCell *)tableView:(UITableView *)tableView
- cellForRowAtIndexPath:(NSIndexPath *)indexPath {
- static NSString *TableSampleIdentifier = @"TableSampleIdentifier";
- UITableViewCell *cell = [tableView dequeueReusableCellWithIdentifier:
- TableSampleIdentifier];
- if (cell == nil) {
- cell = [[UITableViewCell alloc]
- initWithStyle:UITableViewCellStyleDefault
- reuseIdentifier:TableSampleIdentifier];
- }
- NSUInteger row = [indexPath row];
- cell.textLabel.text = [self.list objectAtIndex:row];
- return cell;
- }
UITableViewCell *cell = [tableView dequeueReusableCellWithIdentifier: TableSampleIdentifier];
这个语句根据标识符TableSampleIdentifier寻找当前可以重用的UITableViewCell。当某行滑出当前可见区域后,我们重用它所对应的UITableViewCell对象,那么就可以节省内存和资源。
注意参数(NSIndexPath *)indexPath,它将行号row和部分号section合并了,通过[indexPath row];获取行号。之后给cell设置其文本:
cell.textLabel.text = [self.list objectAtIndex: row];
8、现在一个简单的TableView就弄好看,运行下看效果
 、、
、、- NSUInteger row = [indexPath row];
- cell.textLabel.text = [self.list objectAtIndex:row];
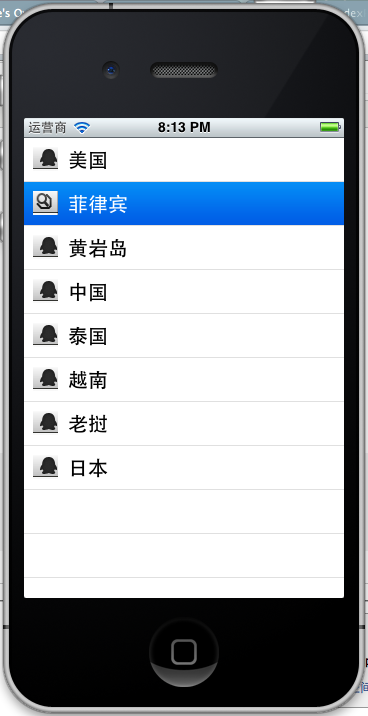
- UIImage *image = [UIImage imageNamed:@"qq"];
- cell.imageView.image = image;
- UIImage *highLighedImage = [UIImage imageNamed:@"youdao"];
- cell.imageView.highlightedImage = highLighedImage;
- return cell;
效果如下:
UITableViewCellStyleDefault
UITableViewCellStyleSubtle
UITableViewCellStyleValue1
UITableViewCellStyleValue2
cell.detailTextLabel.text =@"打打打打";
return cell;

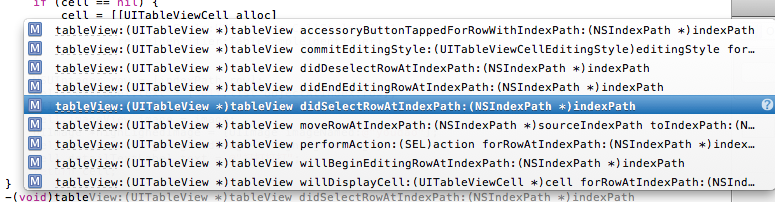
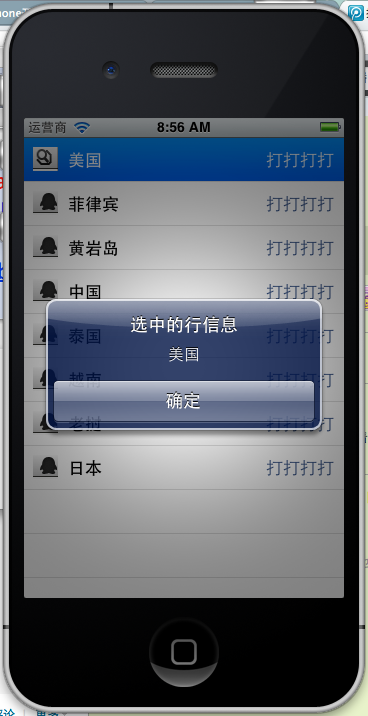
-(void)tableView:(UITableView *)tableView didSelectRowAtIndexPath:(NSIndexPath *)indexPath
选中是做个提示,提示选中了那个信息,代码实现如下:
- -(void)tableView:(UITableView *)tableView didSelectRowAtIndexPath:(NSIndexPath *)indexPath{
- NSString *rowString = [self.list objectAtIndex:[indexPath row]];
- UIAlertView * alter = [[UIAlertView alloc] initWithTitle:@"选中的行信息" message:rowString delegate:self cancelButtonTitle:@"确定" otherButtonTitles:nil, nil];
- [alter show];
- }
效果:
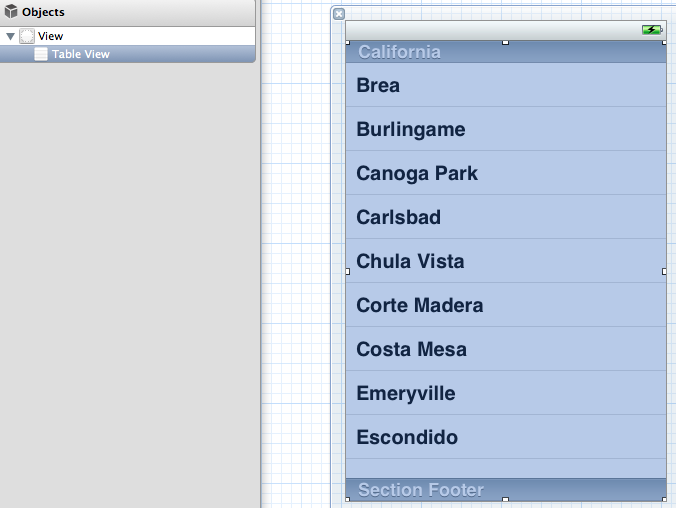
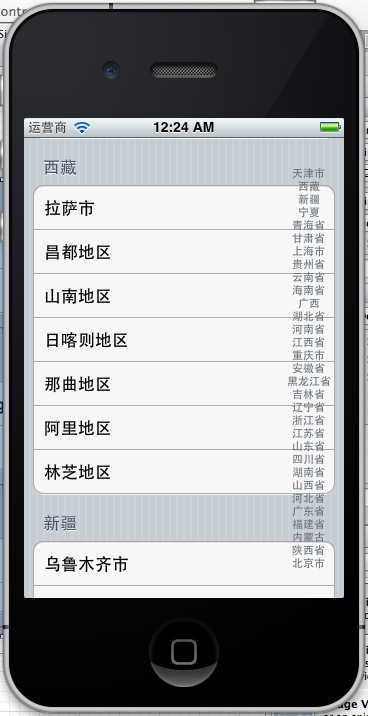
简介:上篇做了Table View的一些介绍 ,还做了一个TableView 的Plain样式的例子,这篇我们学习Grouped样式表的例子,还有用到前面读取Plist的知识(见iOS学习之 plist文件的读写),把Plist文件中的数据读取出来,放到Table view里展示出来。这里把全国30多个省份的城市,都列出来了,plist文件里还有城市的行政区,不过这里只列出省份和城市就ok了。效果图如下:

那么开始吧。
1、新建项目
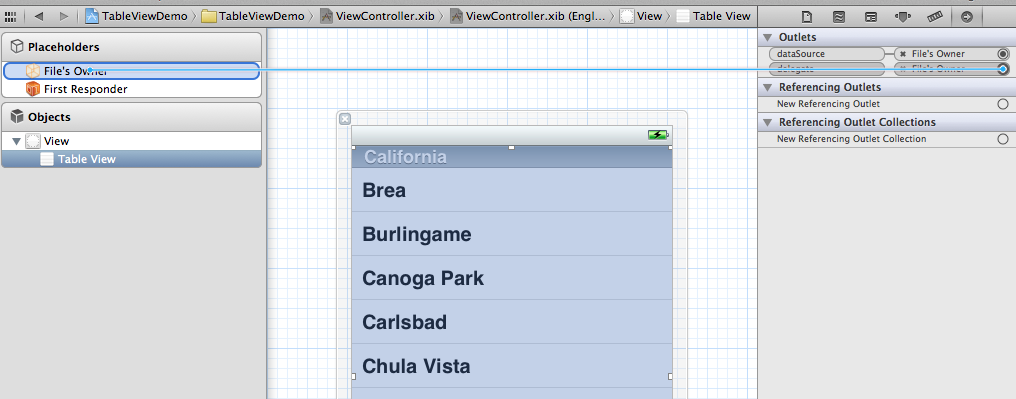
新的一个名称为TableViewGrouped的Single View Application项目,打开项目的xib文件,拖拽TableView控件到xib文件中,摆正位置。
2、给新建的TableView找到他的归属
选中新添的TableView ,Connection Inspector,找到delegate和datasource,从它们右边的圆圈拉线到Files Owner图标上,参考上篇的第3步:
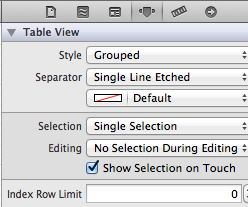
3、设置Table View的属性为Grouped样式
4、导入plist文件
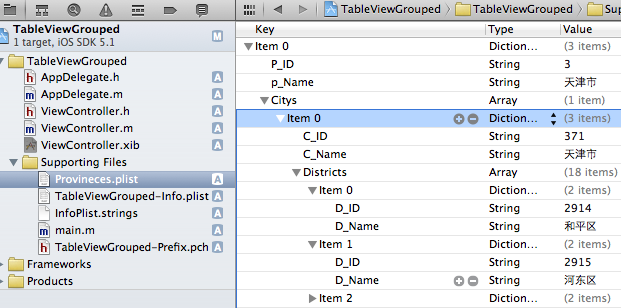
从其他文件夹导入Provineces.plist文件,这个文件我会传到源代码里,大家都能方便使用了,包括全国30个省份和城市,还有城市的区也有。

5、添加.h .m的实现代码。
.h文件添加一个property
- #import <UIKit/UIKit.h>
- @interface ViewController : UIViewController
- @property (strong, nonatomic) NSArray *provinces;
- @end
第一步从Plist读取出数据,第二步给Table添加数据。
在viewDidLoad读取Plist,plist是个array类型的,所以使用Array读取。
.m文件的实现。
- @implementation ViewController
- @synthesize provinces;
- - (void)viewDidLoad
- {
- [super viewDidLoad];
- // Do any additional setup after loading the view, typically from a nib.
- NSBundle *bundle = [NSBundle mainBundle];
- NSString *plistPath = [bundle pathForResource:@"Provineces" ofType:@"plist"];
- NSMutableArray *array=[[NSMutableArray alloc] initWithContentsOfFile:plistPath];
- self.provinces = array;
- }
实现TableView表格部分,下面这些方法看方法名就能大概明白意思。
- 这个方法用来告诉表格有几个分组
- - (NSInteger)numberOfSectionsInTableView:(UITableView *)tableView {
- return [provinces count];
- }
- 这个方法告诉表格第section个分段有多少行
- - (NSInteger)tableView:(UITableView *)tableView numberOfRowsInSection:(NSInteger)section {
- NSArray *cities = [[provinces objectAtIndex:section]objectForKey:@"Citys"];
- return [cities count];
- }
- 这个方法用来告诉某个分组的某一行是什么数据,返回一个UITableViewCell
- - (UITableViewCell *)tableView:(UITableView *)tableView cellForRowAtIndexPath:(NSIndexPath *)indexPath {
- NSUInteger section = [indexPath section];
- NSUInteger row = [indexPath row];
- NSArray *cities = [[provinces objectAtIndex:section]objectForKey:@"Citys"] ;
- static NSString *GroupedTableIdentifier = @"cell";
- UITableViewCell *cell = [tableView dequeueReusableCellWithIdentifier:
- GroupedTableIdentifier];
- if (cell == nil) {
- cell = [[UITableViewCell alloc]
- initWithStyle:UITableViewCellStyleDefault
- reuseIdentifier:GroupedTableIdentifier];
- }
- //给Label附上城市名称 key 为:C_Name
- cell.textLabel.text = [[cities objectAtIndex:row] objectForKey:@"C_Name"];
- return cell;
- }
- 这个方法用来告诉表格第section分组的名称
- - (NSString *)tableView:(UITableView *)tableView titleForHeaderInSection:(NSInteger)section {
- NSString *provincName = [[provinces objectAtIndex:section] objectForKey:@"p_Name"];
- return provincName;
- }
- 重点介绍下这个方法:
- - (NSArray *)sectionIndexTitlesForTableView:(UITableView *)tableView {
- //返回省份的数组
- NSMutableArray *array = [NSMutableArray arrayWithCapacity:35];
- for (NSDictionary *dict in provinces) {
- [array addObject:[dict objectForKey:@"p_Name"]];
- }
- return array;
- }
返回所有省份名称的数组 ,通过点击右边的省份名称能快速定位到这个省份的城市,也就是快速定位到这个section。
OK,运行。效果如下:
试试改成plain样式的分段TableView看看:

以上例子的全部
例子的代码:http://download.csdn.net/detail/totogo2010/4361876
https://github.com/schelling/YcDemo/tree/master/TableViewGrouped
***iOS学习之Table View的简单使用和DEMO示例(共Plain普通+Grouped分组两种)的更多相关文章
- iOS学习之Table View的简单使用
Table View简单描述: 在iPhone和其他iOS的很多程序中都会看到Table View的出现,除了一般的表格资料展示之外,设置的属性资料往往也用到Table View,Table View ...
- IOS学习笔记3—Objective C—简单的内存管理
今天简述一下简单的内存管理,在IOS5.0以后Apple增加了ARC机制(Automatic Reference Counting),给开发人员带来了不少的方便,但是为了能更好的理解IOS内存管理机制 ...
- 【iOS开发-56】案例BUG:button的enabled、控件的userInteractionEnabled以及两种提示框UIAlert和UIActionSheet
接上述案例找BUG:[iOS开发-51]案例学习:动画新写法.删除子视图.视图顺序.延迟方法.button多功能使用方法及icon图标和启动页设置 (1)BUG:答案满了就不能再点击optionbut ...
- iOS学习之UITableView中Cell的操作
接着iOS学习之Table View的简单使用 这篇,这里主要讲UITableView 中的Cell的操作,包括标记.移动.删除.插入. 为了简单快捷,直接从原来那篇的代码开始,代码下载地址:http ...
- Table View Programming Guide for iOS---(五)---Creating and Configuring a Table View
Creating and Configuring a Table View Your app must present a table view to users before it can mana ...
- Table View Programming Guide for iOS---(一)---About Table Views in iOS Apps
About Table Views in iOS Apps Table views are versatile user interface objects frequently found in i ...
- Table View Programming Guide for iOS---(二)----Table View Styles and Accessory Views
Table View Styles and Accessory Views 表格视图的风格以及辅助视图 Table views come in distinctive styles that are ...
- 在iOS中怎样创建可展开的Table View?(上)
原文地址 本文作者:gabriel theodoropoulos 原文:How To Create an Expandable Table View in iOS 原文链接 几乎所有的app都有一个共 ...
- iOS 利用长按手势移动 Table View Cells
本文译自:Cookbook: Moving Table View Cells with a Long Press Gesture 目录: 你需要什么? 如何做? 如何将其利用至UICollection ...
随机推荐
- cordova应用使用手机调试
对于cordova应用的调试,最方便调试方式还是作为h5应用在浏览器来调试,调试好了再打包cordova应用和打包apk.然而h5应用时的效果跟最终在安卓手机运行还有少数情况会不一样,因此,也需要有能 ...
- VCS 查看代码覆盖率
代码覆盖率 代码覆盖率测试一般包括行覆盖,条件覆盖,FSM覆盖,翻转覆盖率等.在不同的代码级别有不同的覆盖率,Behavioral code包含line+condition+path(branch)+ ...
- http://blog.chinaunix.net/uid-9845710-id-1996675.html snmpd配置
http://blog.chinaunix.net/uid-9845710-id-1996675.html http://lihuipeng.blog.51cto.com/3064864/643960 ...
- ubuntu系统apache日志文件的位置
Debian,Ubuntu或Linux Mint上的Apache错误日志位置 默认的错误日志 在基于Debian的Linux上,系统范围的Apache错误日志默认位置是/var/log/apache2 ...
- 原创 :单刷深渊 在Linux中系统安装mysql实战直播
[root@web108 tools]# ###开始装mysql 1添加用户 [root@web108 tools]# useradd -s /sbin/nologin -M mysql 2解压 [r ...
- 2015 AlBaath Collegiate Programming Contest(2月14日训练赛)
A (By ggg): 题意:一个人还有x秒到红绿灯,这个红绿灯有g秒绿灯,y秒黄 灯,r秒红灯,问你到红绿灯的时候是什么灯.值得注意的是绿 灯变黄灯时,第g秒是黄灯了. B (By Anxdada) ...
- C#飞行棋总结
以下是掷色子的一个代码,比较有代表性,里面的逻辑和内容都已注释,可通过注释了解这一方法的运作模式. public static void RowTouZi(int playerPos) //掷色子 { ...
- axure使用经验
泛化不常用======伸展也是拉动原件收缩也是拉动原件====== 动态模板相互影响(有的时候会出现这个问题,只需要设置两者的高度,不让两者有包含关系(一点点可以有):====== 实现高级菜单栏(同 ...
- Python中Pickle模块的dump()方法和load()方法
Python中的Pickle模块实现了基本的数据序列与反序列化. 经常遇到在Python程序运行中得到了一些字符串.列表.字典等数据,想要长久的保存下来,方便以后使用,而不是简单的放入内存中关机断电就 ...
- vue 模块 props
inbody.vue <template> <div> <Breadcrumb :style="{margin: '24px 0'}"> < ...