FCM实现手机推送,推送的方式,真机调试
FCM实现手机
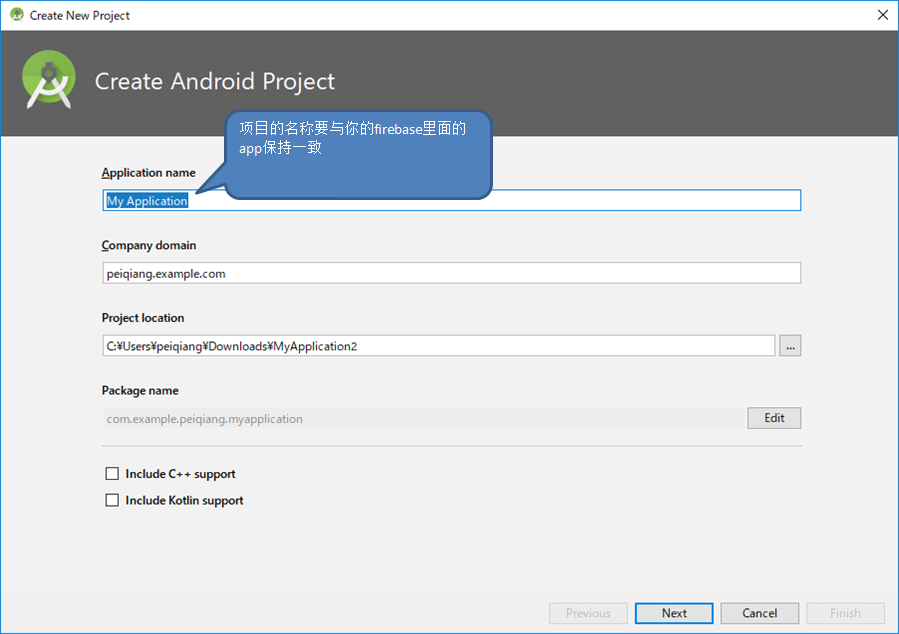
1 下载Androidstudio 3.2 版本,之后新建一个项目
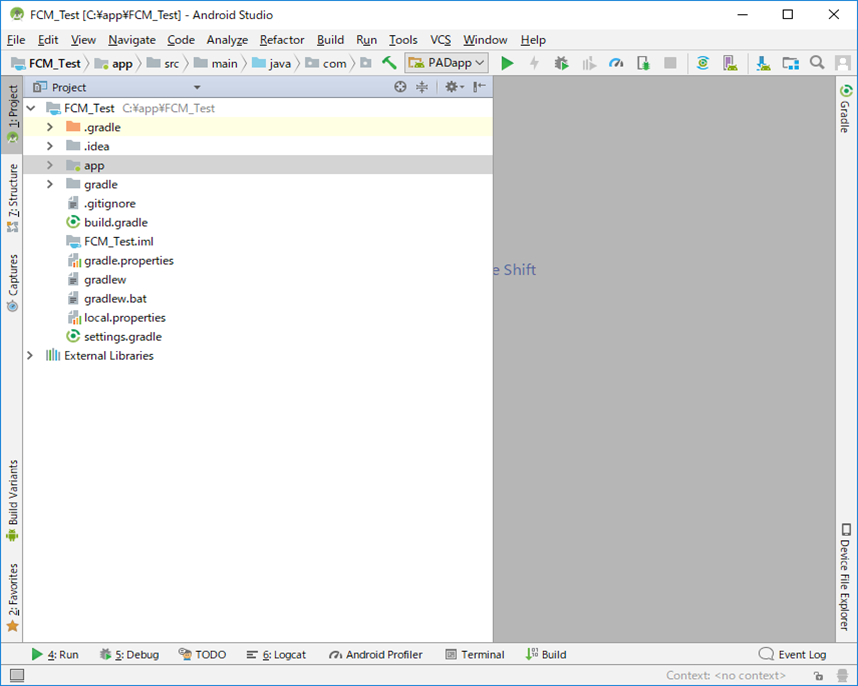
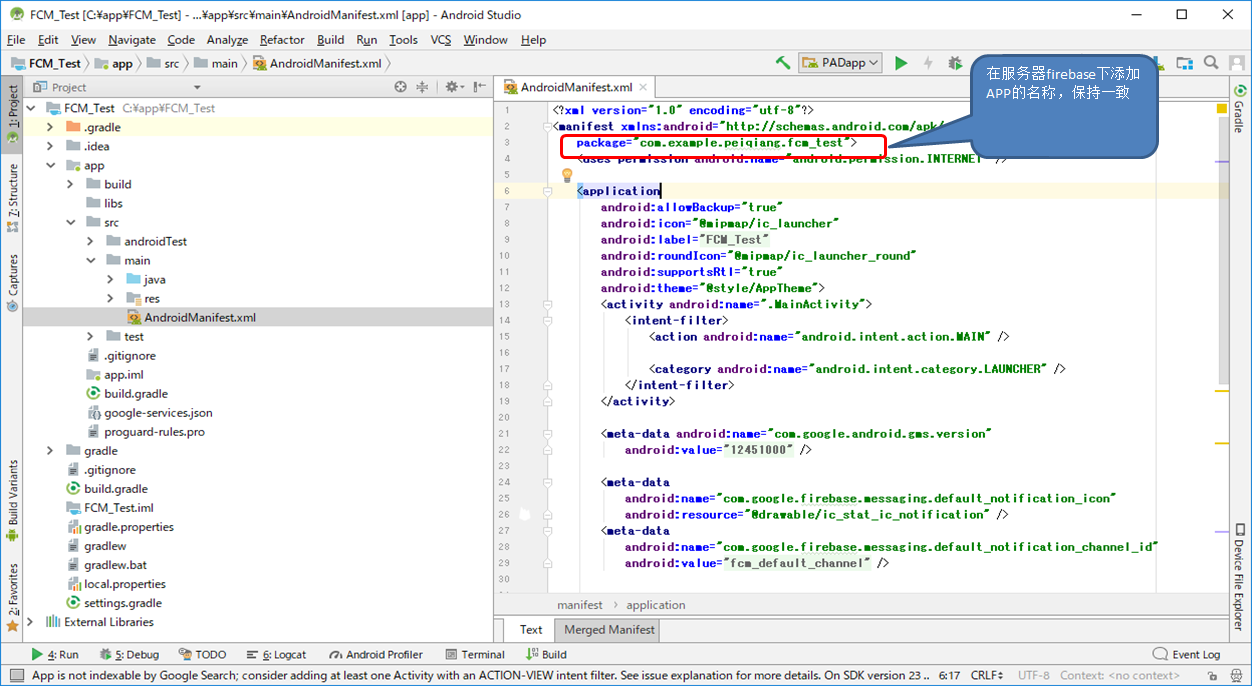
2 创建完项目之后查找文件AndroidMainifest.xml
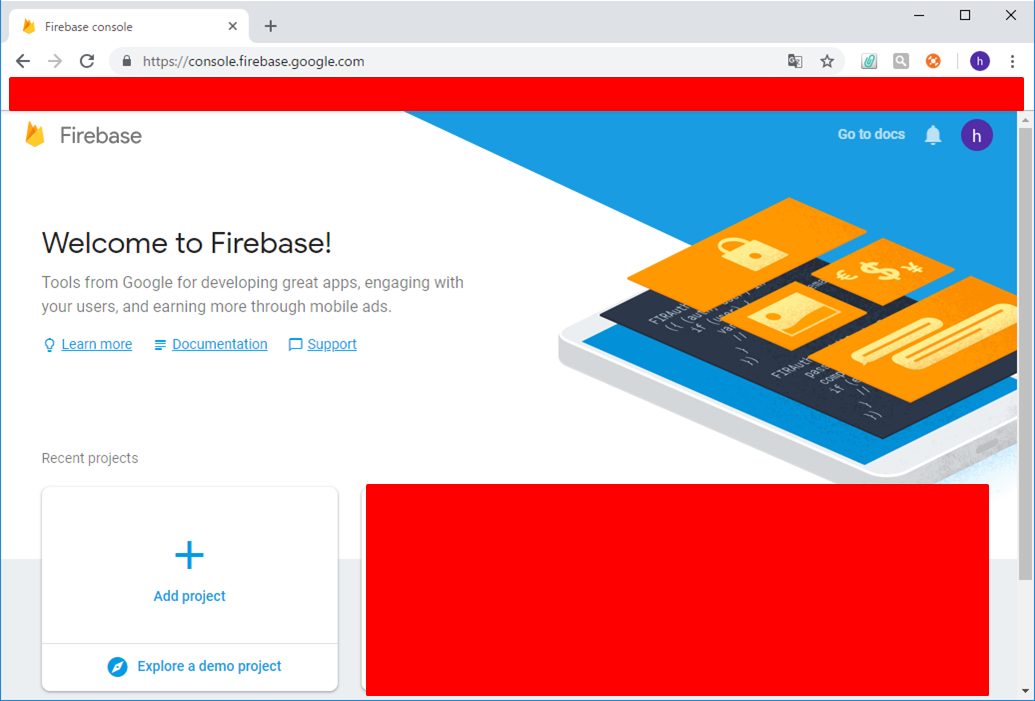
3 访问网站注册一个自己的firebase的账户 https://console.firebase.google.com
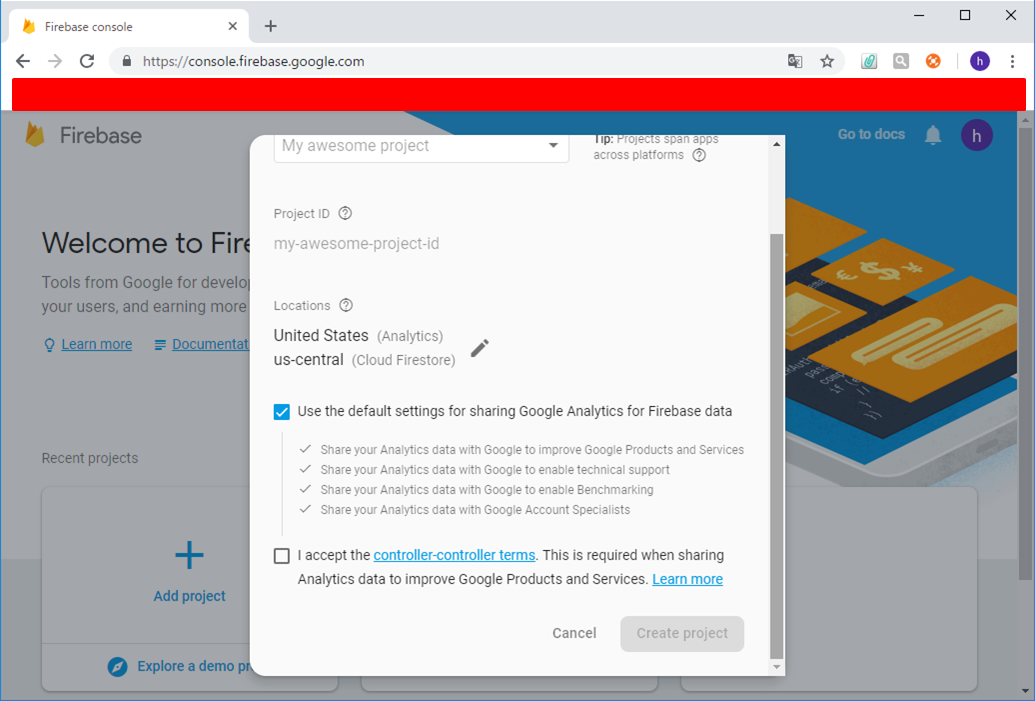
5 进入自己的项目当中,之后添加自己的app,可以是Android的也可以是iOS,在这里我们以Android为例子

6 选择Android的APP之后会让你注册这个APP
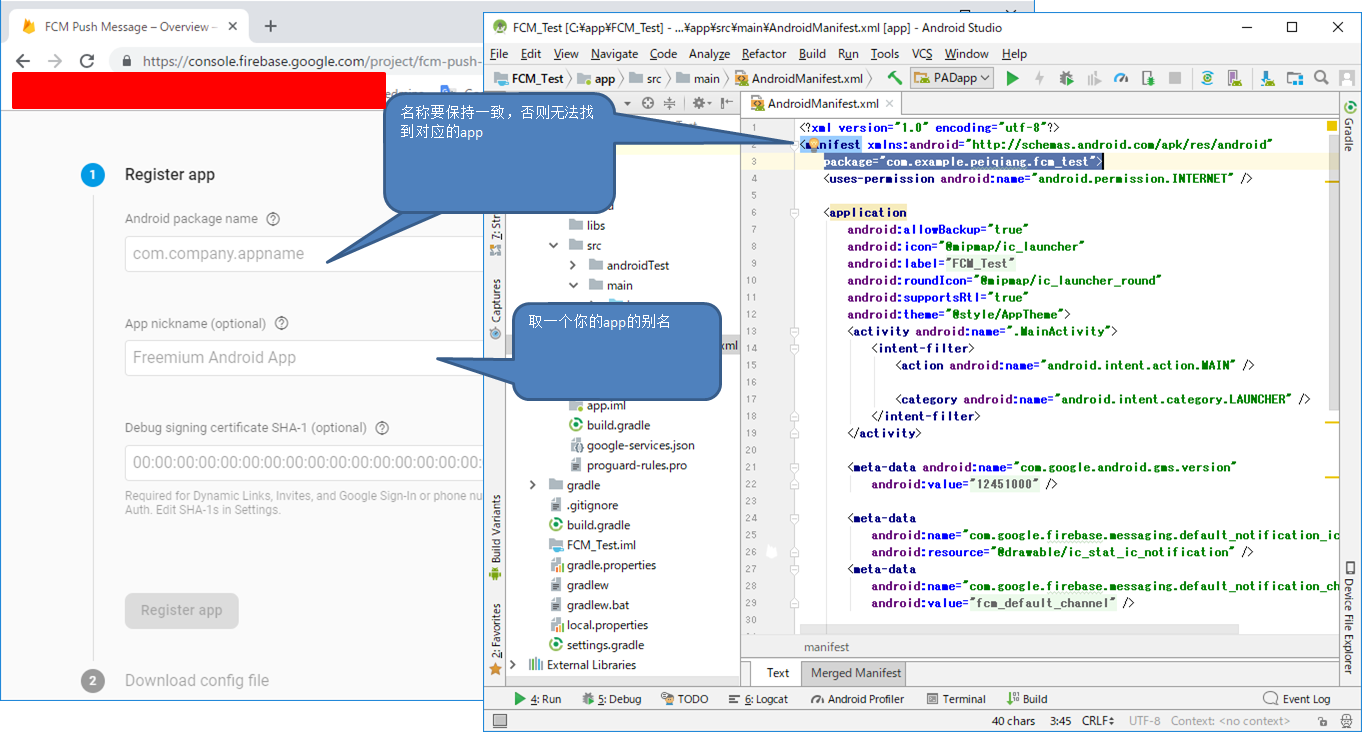
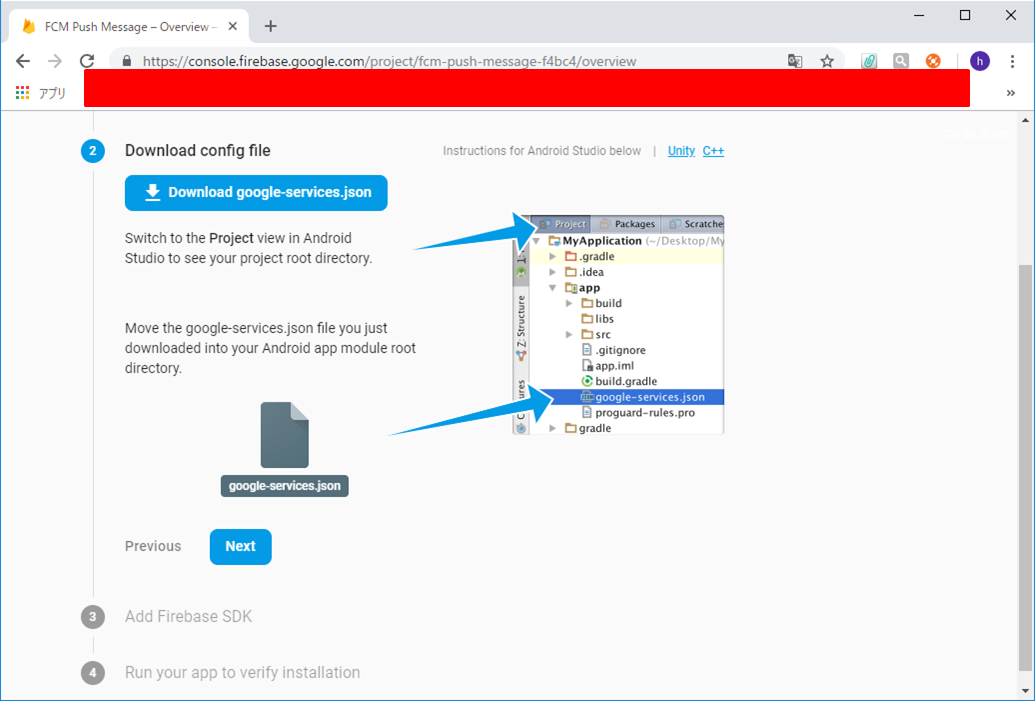
7 点击Register app之后会生成下面的画面,之后点击下载.json文件放到指定的目录下即可
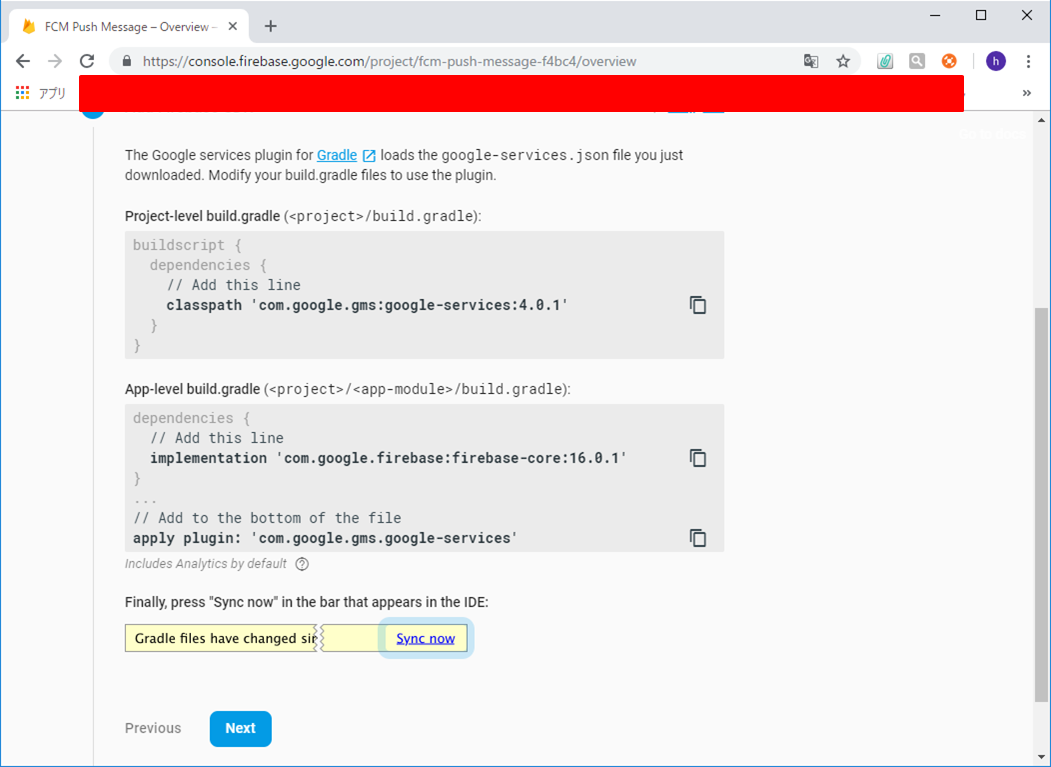
8 按照指定的操作即可,把下面的代码拷贝到指定的文件下,之后点击同步
9 同步是否成功看你是否出错
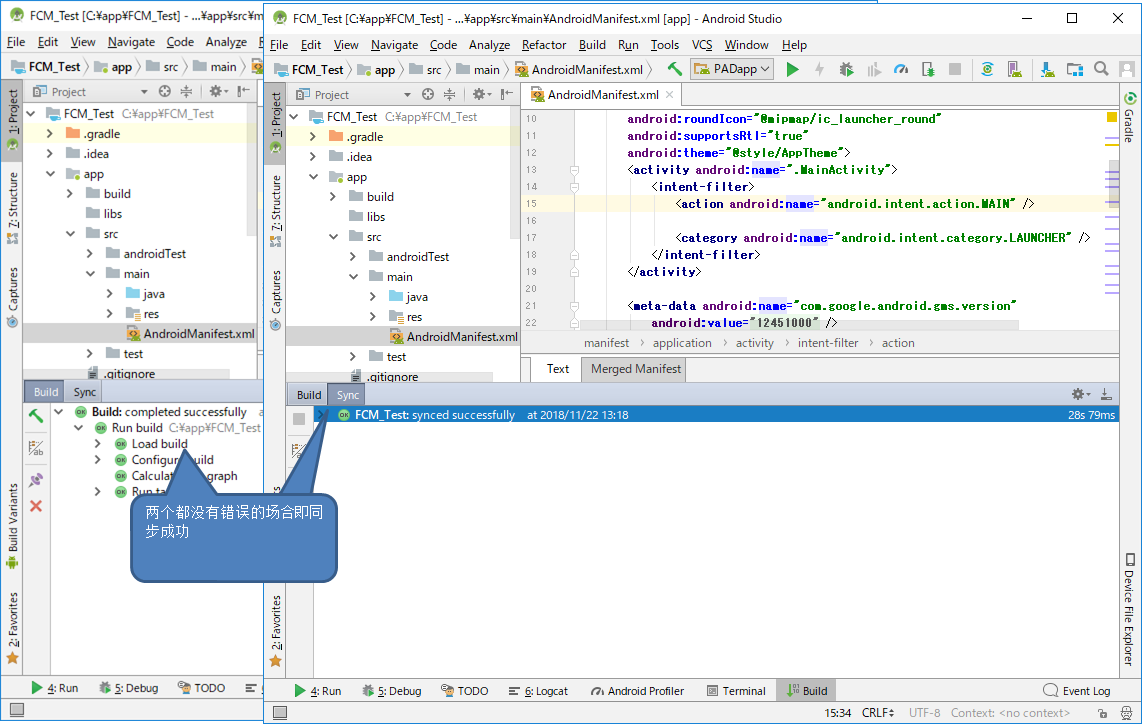
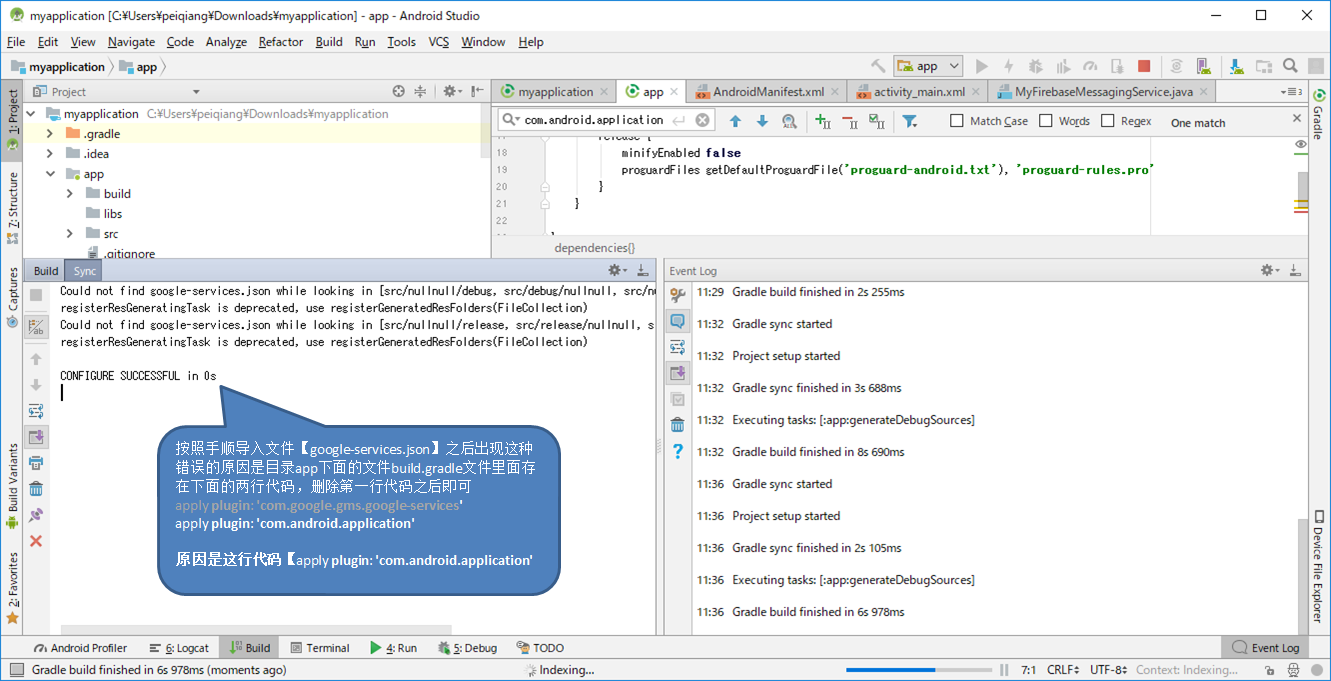
同步的时候可能会出现下面的错误
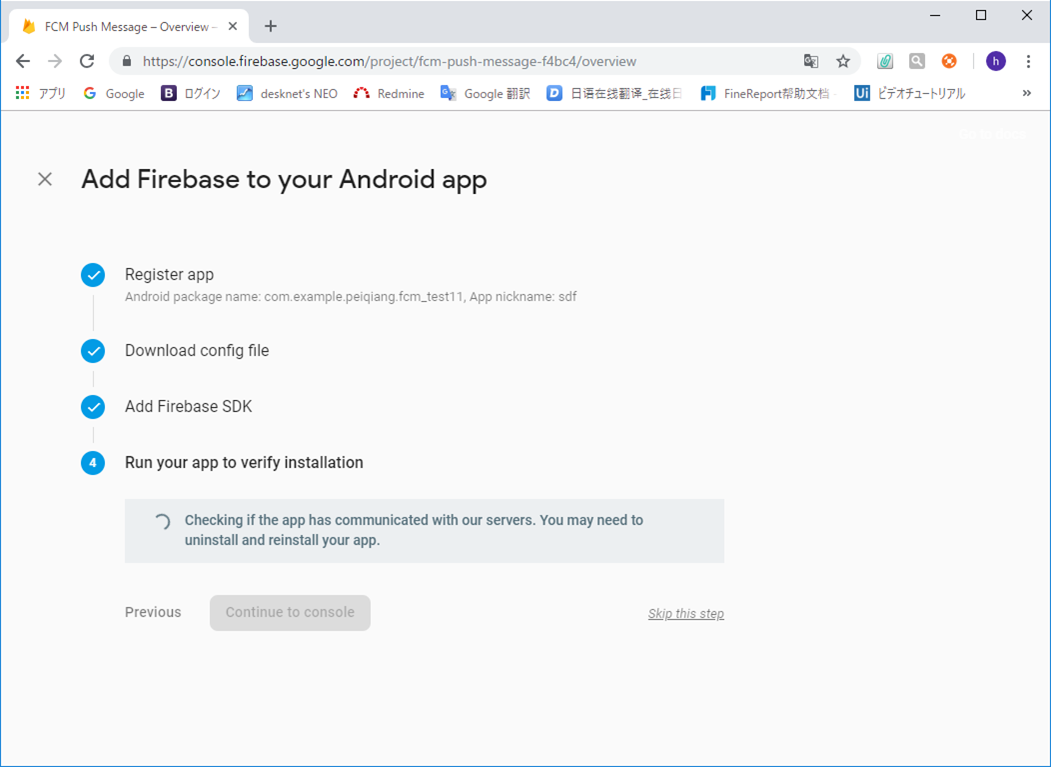
10 在这一步可能会很慢,不用管他,直接点击Skip this step 即可
11 之后会生成一个app:sdf
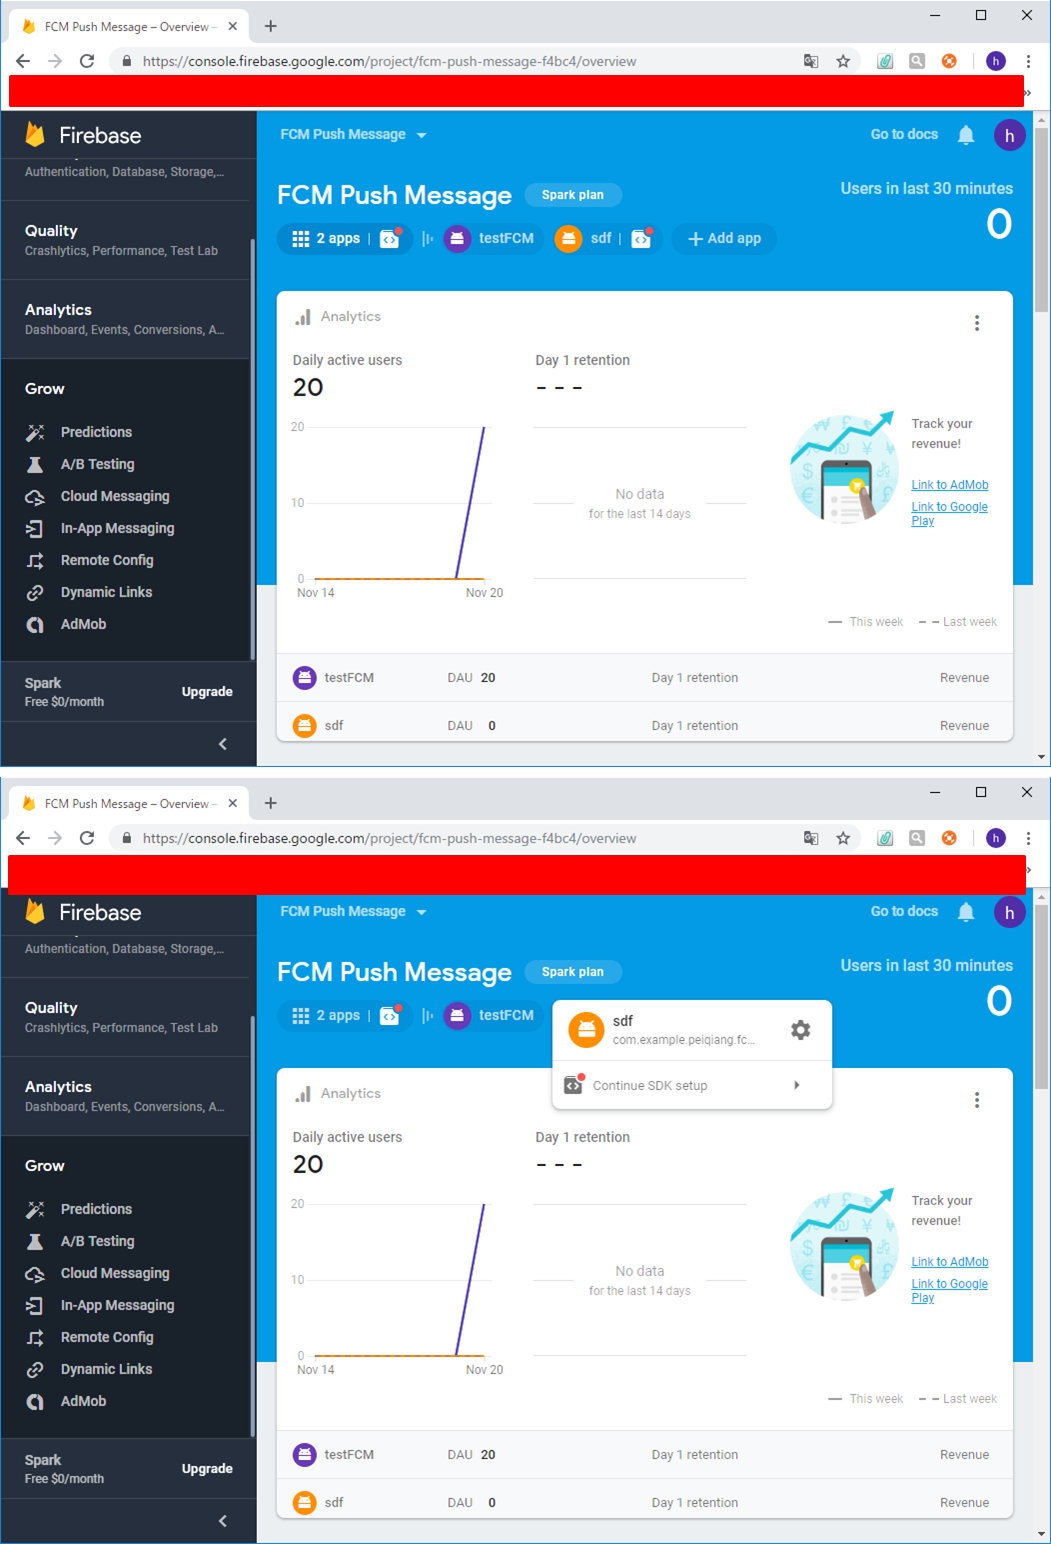
12 到此firebase的服务器配置完了
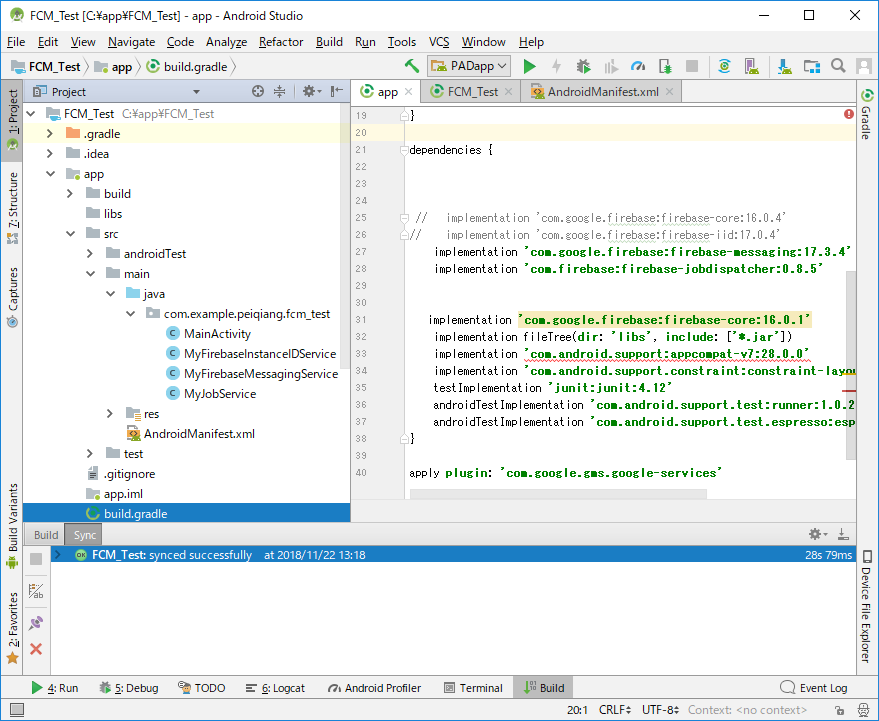
13 配置前台,找到文件app下的build.gradle下面追加下面的两行代码,如下图所示
- implementation 'com.google.firebase:firebase-messaging:17.3.4'
- implementation 'com.firebase:firebase-jobdispatcher:0.8.5'
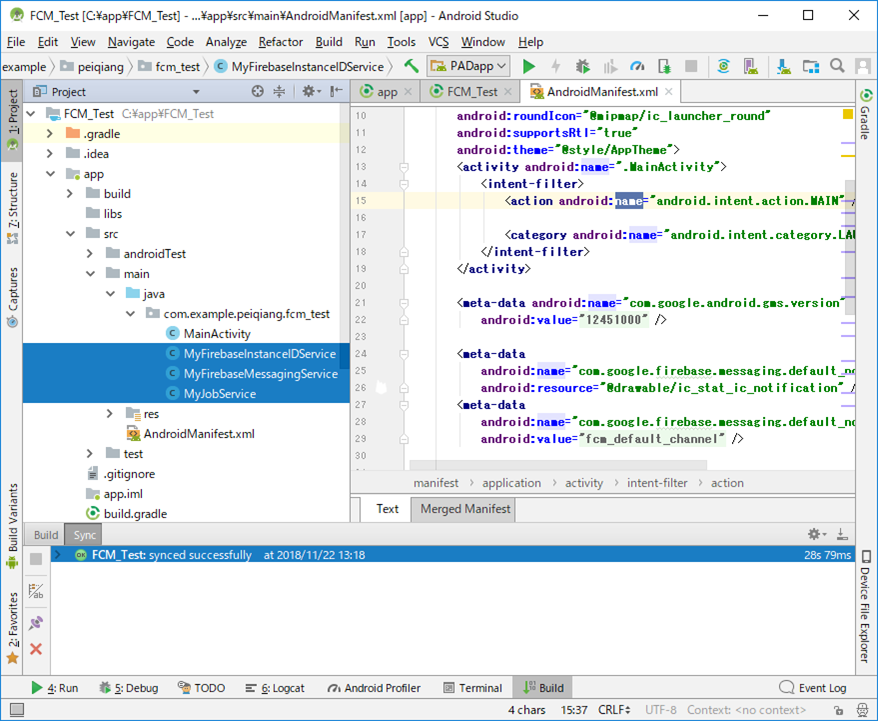
14 在下面的路径下追加三个类,并修改AndroidMainifest.xml文件
MyJobService
- package com.example.peiqiang.fcm_test;
- import android.util.Log;
- import com.firebase.jobdispatcher.JobParameters;
- import com.firebase.jobdispatcher.JobService;
- public class MyJobService extends JobService {
- private static final String TAG = "MyJobService";
- @Override
- public boolean onStartJob(JobParameters jobParameters) {
- Log.d(TAG, "Performing long running task in scheduled job");
- // TODO(developer): add long running task here.
- return false;
- }
- @Override
- public boolean onStopJob(JobParameters jobParameters) {
- return false;
- }
- }
MyFirebaseMessagingService
- /**
- * Copyright 2016 Google Inc. All Rights Reserved.
- * <p>
- * Licensed under the Apache License, Version 2.0 (the "License");
- * you may not use this file except in compliance with the License.
- * You may obtain a copy of the License at
- * <p>
- * http://www.apache.org/licenses/LICENSE-2.0
- * <p>
- * Unless required by applicable law or agreed to in writing, software
- * distributed under the License is distributed on an "AS IS" BASIS,
- * WITHOUT WARRANTIES OR CONDITIONS OF ANY KIND, either express or implied.
- * See the License for the specific language governing permissions and
- * limitations under the License.
- */
- package com.example.peiqiang.fcm_test;
- import android.app.NotificationChannel;
- import android.app.NotificationManager;
- import android.app.PendingIntent;
- import android.content.Context;
- import android.content.Intent;
- import android.media.RingtoneManager;
- import android.net.Uri;
- import android.os.Build;
- import android.support.v4.app.NotificationCompat;
- import android.text.Html;
- import android.util.Log;
- import com.firebase.jobdispatcher.FirebaseJobDispatcher;
- import com.firebase.jobdispatcher.GooglePlayDriver;
- import com.firebase.jobdispatcher.Job;
- import com.google.firebase.messaging.FirebaseMessagingService;
- import com.google.firebase.messaging.RemoteMessage;
- public class MyFirebaseMessagingService extends FirebaseMessagingService {
- private static final String TAG = "MyFirebaseMsgService";
- /**
- * Called when message is received.
- *
- * @param remoteMessage Object representing the message received from Firebase Cloud Messaging.
- */
- // [START receive_message]
- @Override
- public void onMessageReceived(RemoteMessage remoteMessage) {
- // [START_EXCLUDE]
- // There are two types of messages data messages and notification messages. Data messages
- // are handled
- // here in onMessageReceived whether the app is in the foreground or background. Data
- // messages are the type
- // traditionally used with GCM. Notification messages are only received here in
- // onMessageReceived when the app
- // is in the foreground. When the app is in the background an automatically generated
- // notification is displayed.
- // When the user taps on the notification they are returned to the app. Messages
- // containing both notification
- // and data payloads are treated as notification messages. The Firebase console always
- // sends notification
- // messages. For more see: https://firebase.google.com/docs/cloud-messaging/concept-options
- // [END_EXCLUDE]
- // TODO(developer): Handle FCM messages here.
- // Not getting messages here? See why this may be: https://goo.gl/39bRNJ
- Log.d(TAG, "From: " + remoteMessage.getFrom());
- // Check if message contains a data payload.
- if (remoteMessage.getData().size() > 0) {
- Log.d(TAG, "Message data payload: " + remoteMessage.getData());
- if (/* Check if data needs to be processed by long running job */ true) {
- // For long-running tasks (10 seconds or more) use Firebase Job Dispatcher.
- scheduleJob();
- } else {
- // Handle message within 10 seconds
- handleNow();
- }
- }
- // Check if message contains a notification payload.
- if (remoteMessage.getNotification() != null) {
- Log.d(TAG, "Message Notification Body: " + remoteMessage.getNotification().getBody());
- }
- // super.onMessageReceived(remoteMessage);
- // sendNotification(remoteMessage);
- // Also if you intend on generating your own notifications as a result of a received FCM
- // message, here is where that should be initiated. See sendNotification method below.
- }
- // [END receive_message]
- // private void sendNotification(RemoteMessage message) {
- // Intent intent;
- // intent = new Intent(this, MainActivity.class);
- // Log.d(TAG, message.getData().toString());
- //
- // intent.setFlags(Intent.FLAG_ACTIVITY_NEW_TASK | Intent.FLAG_ACTIVITY_CLEAR_TASK);
- // PendingIntent pendingIntent = PendingIntent.getActivity(this, 0 /* Request code */, intent,
- // PendingIntent.FLAG_ONE_SHOT);
- // Uri defaultSoundUri = RingtoneManager.getDefaultUri(RingtoneManager.TYPE_NOTIFICATION);
- //
- // NotificationCompat.Builder notificationBuilder = new NotificationCompat.Builder(this)
- // .setSmallIcon(R.mipmap.ic_launcher)
- // .setContentTitle(message.getData().get("title"))
- // .setContentText(Html.fromHtml(message.getData().get("body")))
- // .setAutoCancel(true)
- // .setSound(defaultSoundUri)
- // .setContentIntent(pendingIntent);
- //
- // NotificationManager notificationManager =
- // (NotificationManager) getSystemService(Context.NOTIFICATION_SERVICE);
- // notificationManager.notify(0, notificationBuilder.build());
- // saveMessage(message);
- // }
- // [START on_new_token]
- /**
- * Called if InstanceID token is updated. This may occur if the security of
- * the previous token had been compromised. Note that this is called when the InstanceID token
- * is initially generated so this is where you would retrieve the token.
- */
- @Override
- public void onNewToken(String token) {
- Log.d(TAG, "Refreshed token: " + token);
- // If you want to send messages to this application instance or
- // manage this apps subscriptions on the server side, send the
- // Instance ID token to your app server.
- sendRegistrationToServer(token);
- }
- // [END on_new_token]
- /**
- * Schedule a job using FirebaseJobDispatcher.
- */
- private void scheduleJob() {
- // [START dispatch_job]
- FirebaseJobDispatcher dispatcher = new FirebaseJobDispatcher(new GooglePlayDriver(this));
- Job myJob = dispatcher.newJobBuilder()
- .setService(MyJobService.class)
- .setTag("my-job-tag")
- .build();
- dispatcher.schedule(myJob);
- // [END dispatch_job]
- }
- /**
- * Handle time allotted to BroadcastReceivers.
- */
- private void handleNow() {
- Log.d(TAG, "Short lived task is done.");
- }
- /**
- * Persist token to third-party servers.
- *
- * Modify this method to associate the user's FCM InstanceID token with any server-side account
- * maintained by your application.
- *
- * @param token The new token.
- */
- private void sendRegistrationToServer(String token) {
- // TODO: Implement this method to send token to your app server.
- }
- /**
- * Create and show a simple notification containing the received FCM message.
- *
- * @param messageBody FCM message body received.
- */
- private void sendNotification(String messageBody) {
- Intent intent = new Intent(this, MainActivity.class);
- intent.addFlags(Intent.FLAG_ACTIVITY_CLEAR_TOP);
- PendingIntent pendingIntent = PendingIntent.getActivity(this, 0 /* Request code */, intent,
- PendingIntent.FLAG_ONE_SHOT);
- String channelId = getString(R.string.default_notification_channel_id);
- Uri defaultSoundUri = RingtoneManager.getDefaultUri(RingtoneManager.TYPE_NOTIFICATION);
- NotificationCompat.Builder notificationBuilder =
- new NotificationCompat.Builder(this, channelId)
- .setSmallIcon(R.drawable.ic_stat_ic_notification)
- .setContentTitle(getString(R.string.fcm_message))
- .setContentText(messageBody)
- .setAutoCancel(true)
- .setSound(defaultSoundUri)
- .setContentIntent(pendingIntent);
- NotificationManager notificationManager =
- (NotificationManager) getSystemService(Context.NOTIFICATION_SERVICE);
- // Since android Oreo notification channel is needed.
- if (Build.VERSION.SDK_INT >= Build.VERSION_CODES.O) {
- NotificationChannel channel = new NotificationChannel(channelId,
- "Channel human readable title",
- NotificationManager.IMPORTANCE_DEFAULT);
- notificationManager.createNotificationChannel(channel);
- }
- notificationManager.notify(0 /* ID of notification */, notificationBuilder.build());
- }
- }
MyFirebaseInstanceIDService
- /**
- * Copyright 2016 Google Inc. All Rights Reserved.
- * <p>
- * Licensed under the Apache License, Version 2.0 (the "License");
- * you may not use this file except in compliance with the License.
- * You may obtain a copy of the License at
- * <p>
- * http://www.apache.org/licenses/LICENSE-2.0
- * <p>
- * Unless required by applicable law or agreed to in writing, software
- * distributed under the License is distributed on an "AS IS" BASIS,
- * WITHOUT WARRANTIES OR CONDITIONS OF ANY KIND, either express or implied.
- * See the License for the specific language governing permissions and
- * limitations under the License.
- */
- package com.example.peiqiang.fcm_test;
- import android.util.Log;
- import com.google.firebase.iid.FirebaseInstanceId;
- import com.google.firebase.iid.FirebaseInstanceIdService;
- public class MyFirebaseInstanceIDService extends FirebaseInstanceIdService {
- private static final String TAG = "MyFirebaseIIDService";
- /**
- * Called if InstanceID token is updated. This may occur if the security of
- * the previous token had been compromised. Note that this is called when the InstanceID token
- * is initially generated so this is where you would retrieve the token.
- */
- // [START refresh_token]
- @Override
- public void onTokenRefresh() {
- // Get updated InstanceID token.
- String refreshedToken = FirebaseInstanceId.getInstance().getToken();
- Log.d(TAG, "Refreshed token: " + refreshedToken);
- // If you want to send messages to this application instance or
- // manage this apps subscriptions on the server side, send the
- // Instance ID token to your app server.
- sendRegistrationToServer(refreshedToken);
- }
- // [END refresh_token]
- /**
- * Persist token to third-party servers.
- *
- * Modify this method to associate the user's FCM InstanceID token with any server-side account
- * maintained by your application.
- *
- * @param token The new token.
- */
- private void sendRegistrationToServer(String token) {
- // TODO: Implement this method to send token to your app server.
- // SendBird.registerPushTokenForCurrentUser(token, new SendBird.RegisterPushTokenWithStatusHandler() {
- // @Override
- // public void onRegistered(SendBird.PushTokenRegistrationStatus pushTokenRegistrationStatus, SendBirdException e) {
- // if (e != null) {
- // Toast.makeText(MyFirebaseInstanceIDService.this, "" + e.getCode() + ":" + e.getMessage(), Toast.LENGTH_SHORT).show();
- // return;
- // }
- //
- // if (pushTokenRegistrationStatus == SendBird.PushTokenRegistrationStatus.PENDING) {
- // Toast.makeText(MyFirebaseInstanceIDService.this, "Connection required to register push token.", Toast.LENGTH_SHORT).show();
- // }
- // }
- // });
- }
- }
- <?xml version="1.0" encoding="utf-8"?>
- <manifest xmlns:android="http://schemas.android.com/apk/res/android"
- package="com.example.peiqiang.fcm_test">
- <uses-permission android:name="android.permission.INTERNET" />
- <application
- android:allowBackup="true"
- android:icon="@mipmap/ic_launcher"
- android:label="@string/app_name"
- android:roundIcon="@mipmap/ic_launcher_round"
- android:supportsRtl="true"
- android:theme="@style/AppTheme">
- <activity android:name=".MainActivity">
- <intent-filter>
- <action android:name="android.intent.action.MAIN" />
- <category android:name="android.intent.category.LAUNCHER" />
- </intent-filter>
- </activity>
- <meta-data android:name="com.google.android.gms.version"
- android:value="@integer/google_play_services_version" />
- <meta-data
- android:name="com.google.firebase.messaging.default_notification_icon"
- android:resource="@drawable/ic_stat_ic_notification" />
- <meta-data
- android:name="com.google.firebase.messaging.default_notification_channel_id"
- android:value="@string/default_notification_channel_id" />
- <service android:name=".MyFirebaseMessagingService">
- <intent-filter>
- <action android:name="com.google.firebase.MESSAGING_EVENT"/>
- </intent-filter>
- </service>
- <service android:name=".MyFirebaseInstanceIDService">
- <intent-filter>
- <action android:name="com.google.firebase.INSTANCE_ID_EVENT"/>
- </intent-filter>
- </service>
- <service android:name=".MyJobService" android:exported="false">
- <intent-filter>
- <action android:name="com.firebase.jobdispatcher.ACTION_EXECUTE"/>
- </intent-filter>
- </service>
- </application>
- </manifest>
15 在此期间可能会报错,报错的原因是没有找到XXX,这个时候就要去定义一些常量文件。
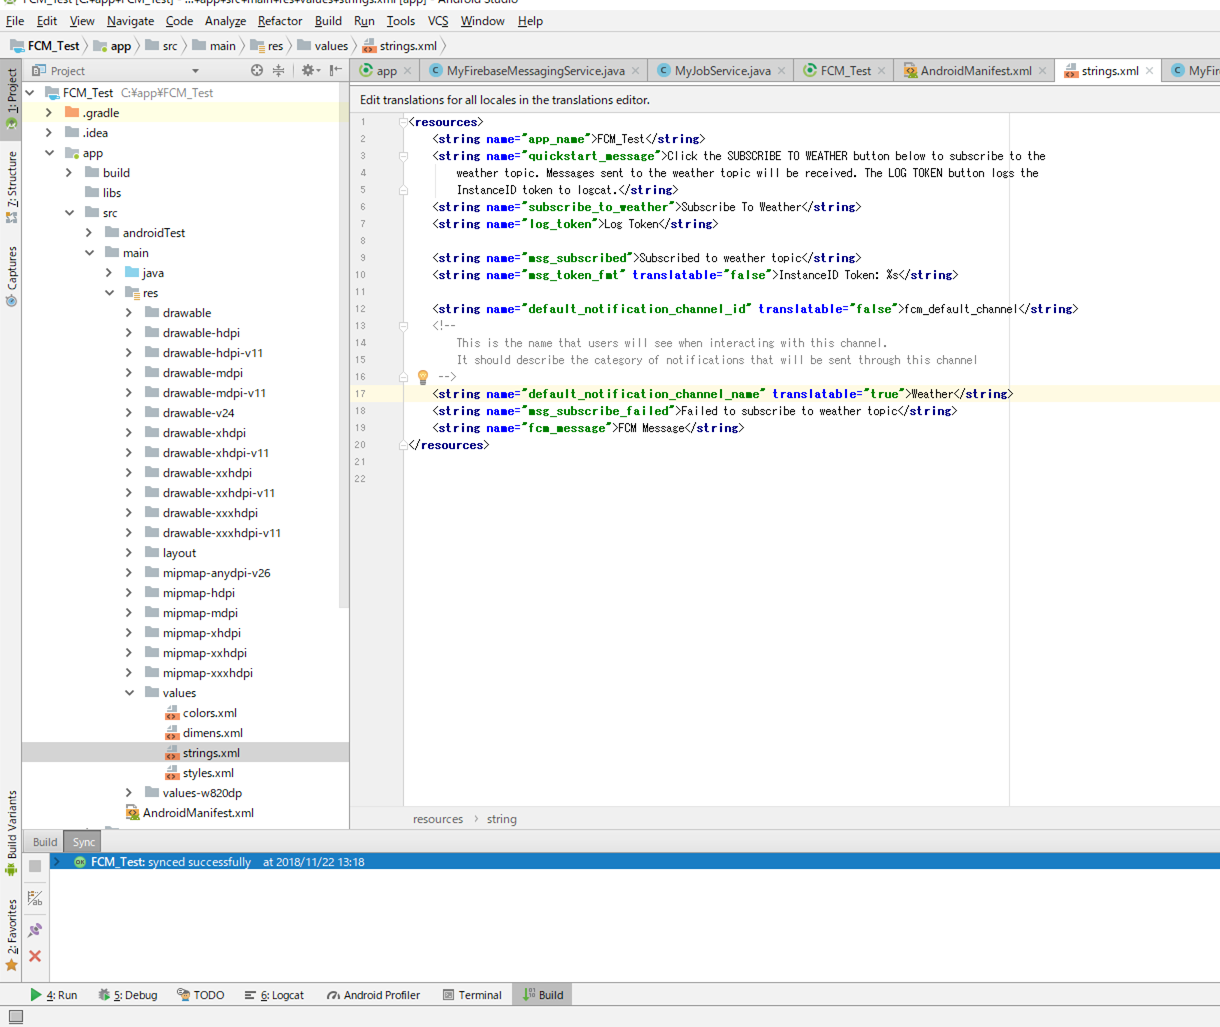
string.xml
- <resources>
- <string name="app_name">FCM_Test</string>
- <string name="quickstart_message">Click the SUBSCRIBE TO WEATHER button below to subscribe to the
- weather topic. Messages sent to the weather topic will be received. The LOG TOKEN button logs the
- InstanceID token to logcat.</string>
- <string name="subscribe_to_weather">Subscribe To Weather</string>
- <string name="log_token">Log Token</string>
- <string name="msg_subscribed">Subscribed to weather topic</string>
- <string name="msg_token_fmt" translatable="false">InstanceID Token: %s</string>
- <string name="default_notification_channel_id" translatable="false">fcm_default_channel</string>
- <!--
- This is the name that users will see when interacting with this channel.
- It should describe the category of notifications that will be sent through this channel
- -->
- <string name="default_notification_channel_name" translatable="true">Weather</string>
- <string name="msg_subscribe_failed">Failed to subscribe to weather topic</string>
- <string name="fcm_message">FCM Message</string>
- </resources>
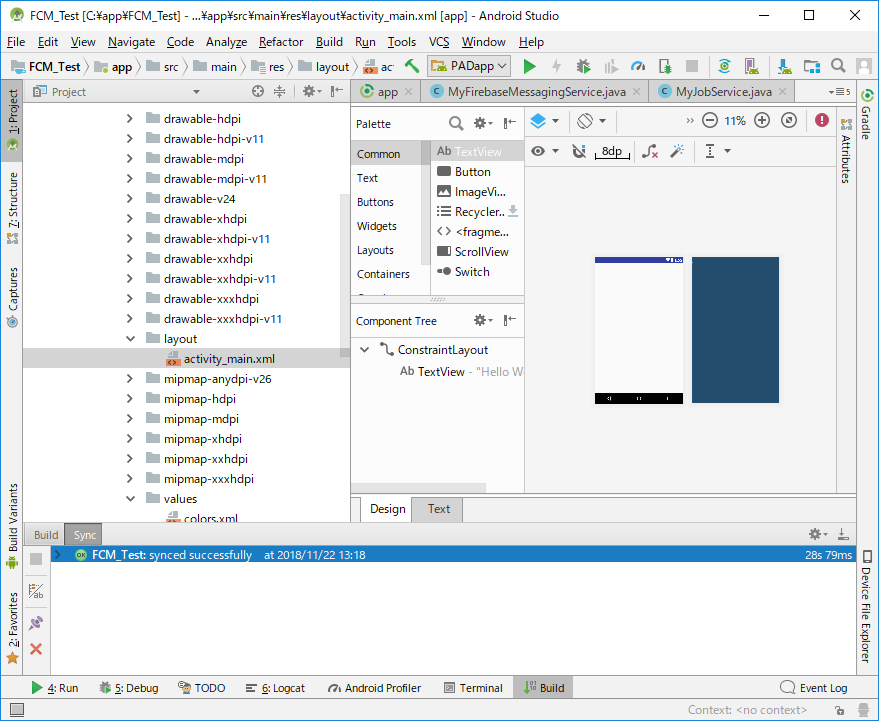
activity_main.xml文件是设计你的app在手机上的具体显示
配置完之后可能会出现一些图片找不到的情况,这样你就要去下面的网址找到对应的图片,放到你自己的工程下面,路径参照网址
https://github.com/firebase/quickstart-android/tree/master/messaging/app/src/main/res
16 编译如果没有错误的话,到目前为止就算是OK了
17 启动你的虚拟机
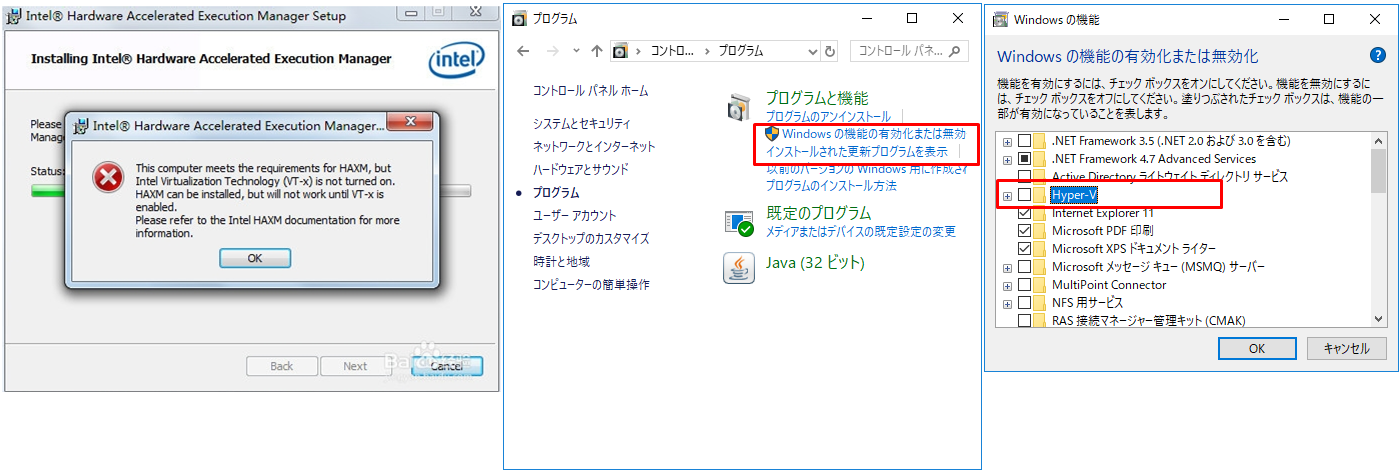
在这遇到的坑有,haxm安装不上
Android studio的虚拟手机启动不起来,window10系统需要安装haxm的文件,如果你没有安装的话再window10系统启动不起来的,window7系统好像可以直接启动,可以尝试着看一下,如果不好用的话在寻找haxm文件
haxm文件自己去C盘下搜索所有的文件就可以找到。当你安装的时候报下图错误的时候,可以上网自己找一下,有相关的解答。解决的办法就是取你的BIOS里面设置一下。Window10设置完之后还是启动不了的话,就去找你的系统是否安装
过window10 自带的虚拟机,如果安装过,OK问题就在这了。去查找你的控制面板里面,找到下图的地方,把Hyper-V给去掉之后再重新安装haxm文件,应该就不会出现这种问题了
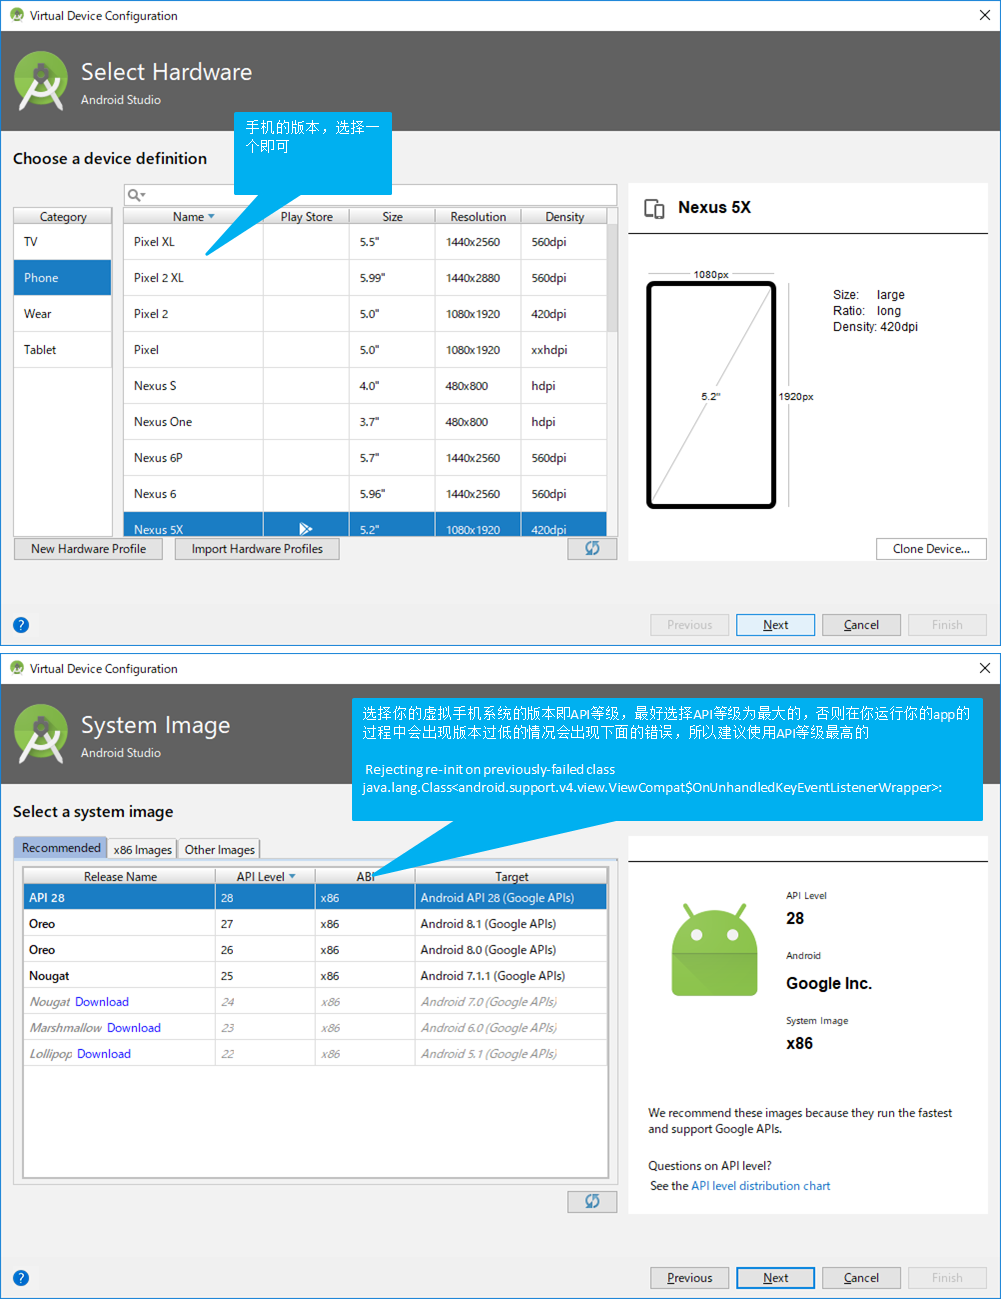
18 启动你的虚拟机之后会让你选择你的手机虚拟机的版本问题
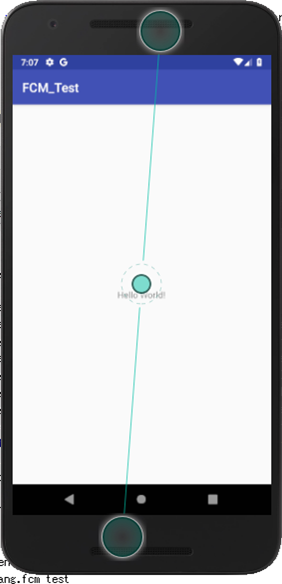
19 运行起来之后你的虚拟手机上会出现你自己创建的app
20 到此为止,你的前台和后台配置完成了接下来就是发送消息
发送消息有两种模式,一种是用postman来发送,一种是用firebase的服务器来发送
postman来发送
上网自己下载一个postman的一个软件打开之后如下图
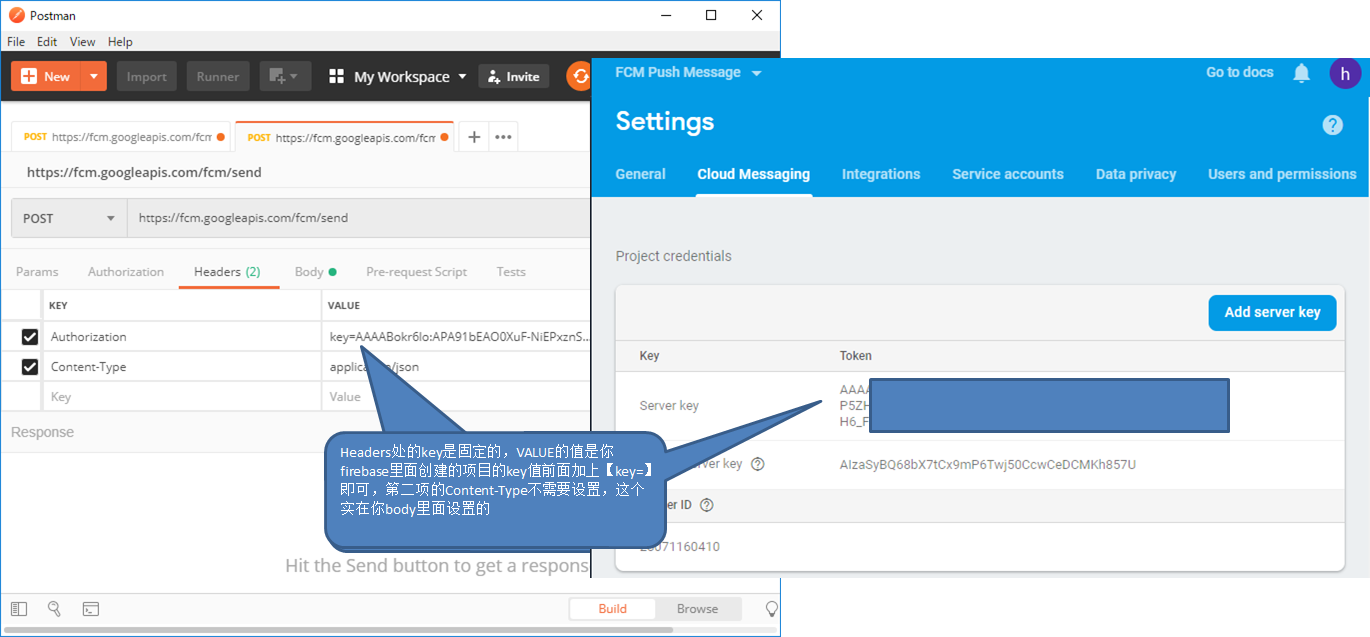
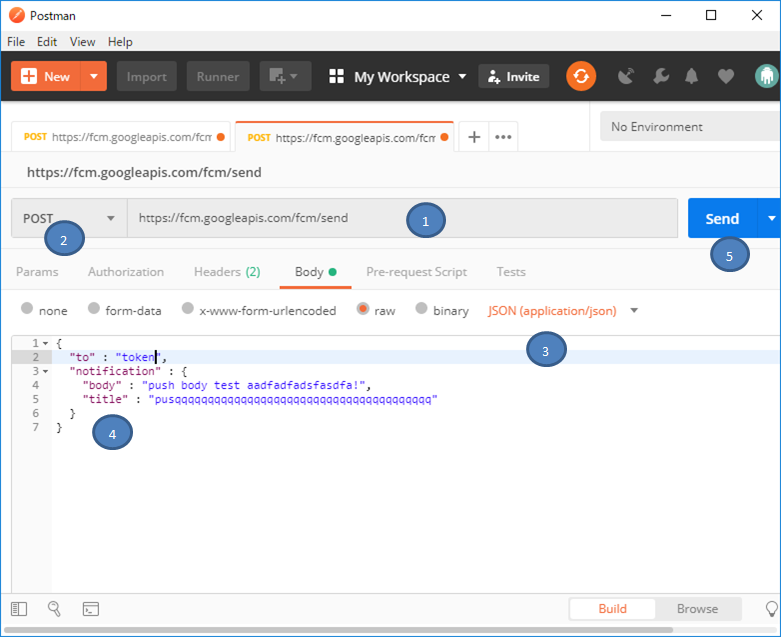
解释说明
1. 网址URL是固定的,调用你的firebase服务器 【https://fcm.googleapis.com/fcm/send】
2. 传送方式是POST形式
3. 选择你传送出去的参数形式
4.具体的数据。
{
"to" : "token",
"notification" : {
"body" : "push body test aadfadfadsfasdfa!",
"title" : "pusqqqqqqqqqqqqqqqqqqqqqqqqqqqqqqqqqqqqqqq"
}
}
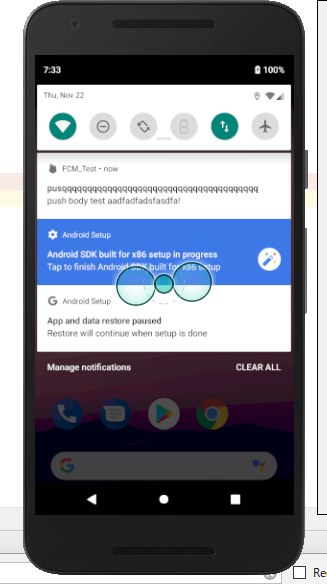
5.点击send之后就会把消息发送到你手机设备上面
在运行的时候遇到的一些盲点,有经验的人知道,对于像我这样的菜鸟来说,就是一个非常大的坑,坑了我三天,还是在有经验的人那里学到的测试的方法
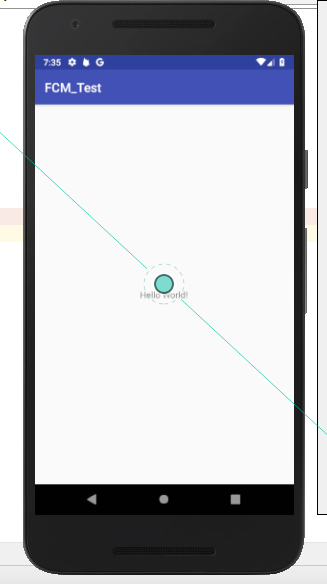
在目前我们的代码程度上,如果你的画面是下面的画面的话,之后你在点击send进行发信的话,恭喜你,你也与我一样。在下面的画面上进行推送是不成功的,你手机不会收到消息的
只有把我们的app隐藏,或者是在后台执行,这种情况下是可以推送到我们的手机上的,如果想要在app在画面上显示之后进行推送的话,就要再写代码,代码怎么可以自己上网查,我还没做到这一步
再有一点就是postman他有的时候会延迟,不会及时的送到消息,一般的情况下会及时的推送到你手机上,但是有的情况下是不会即使的推送到你手机上面的,要多等一会,这个需要注意
测试时候的小窍门,就是把你的app给卸载之后在启动Androidstudio,来回往复
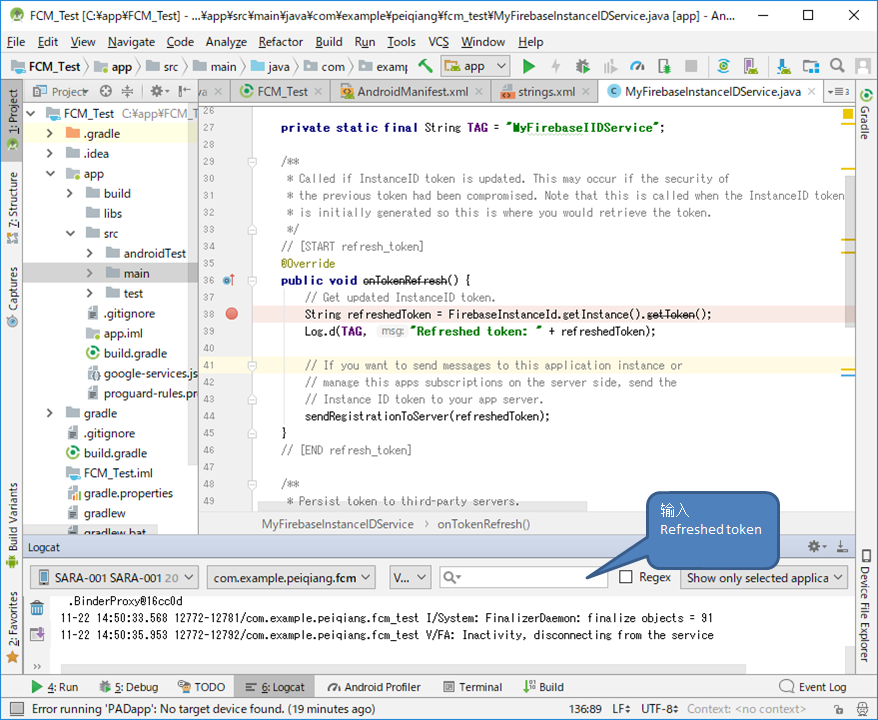
token取得方法,在你运行的时候会把你安装的在虚拟手机上面的token号直接打在Logcat里面,
请注意,只有每次app安装的时候token才会打到logcat里面,如果第一次安装了,没有卸载的情况下,执行这个重启app或者重启虚拟机都打不出来token的
用firebase服务器来发送消息,具体参照下图
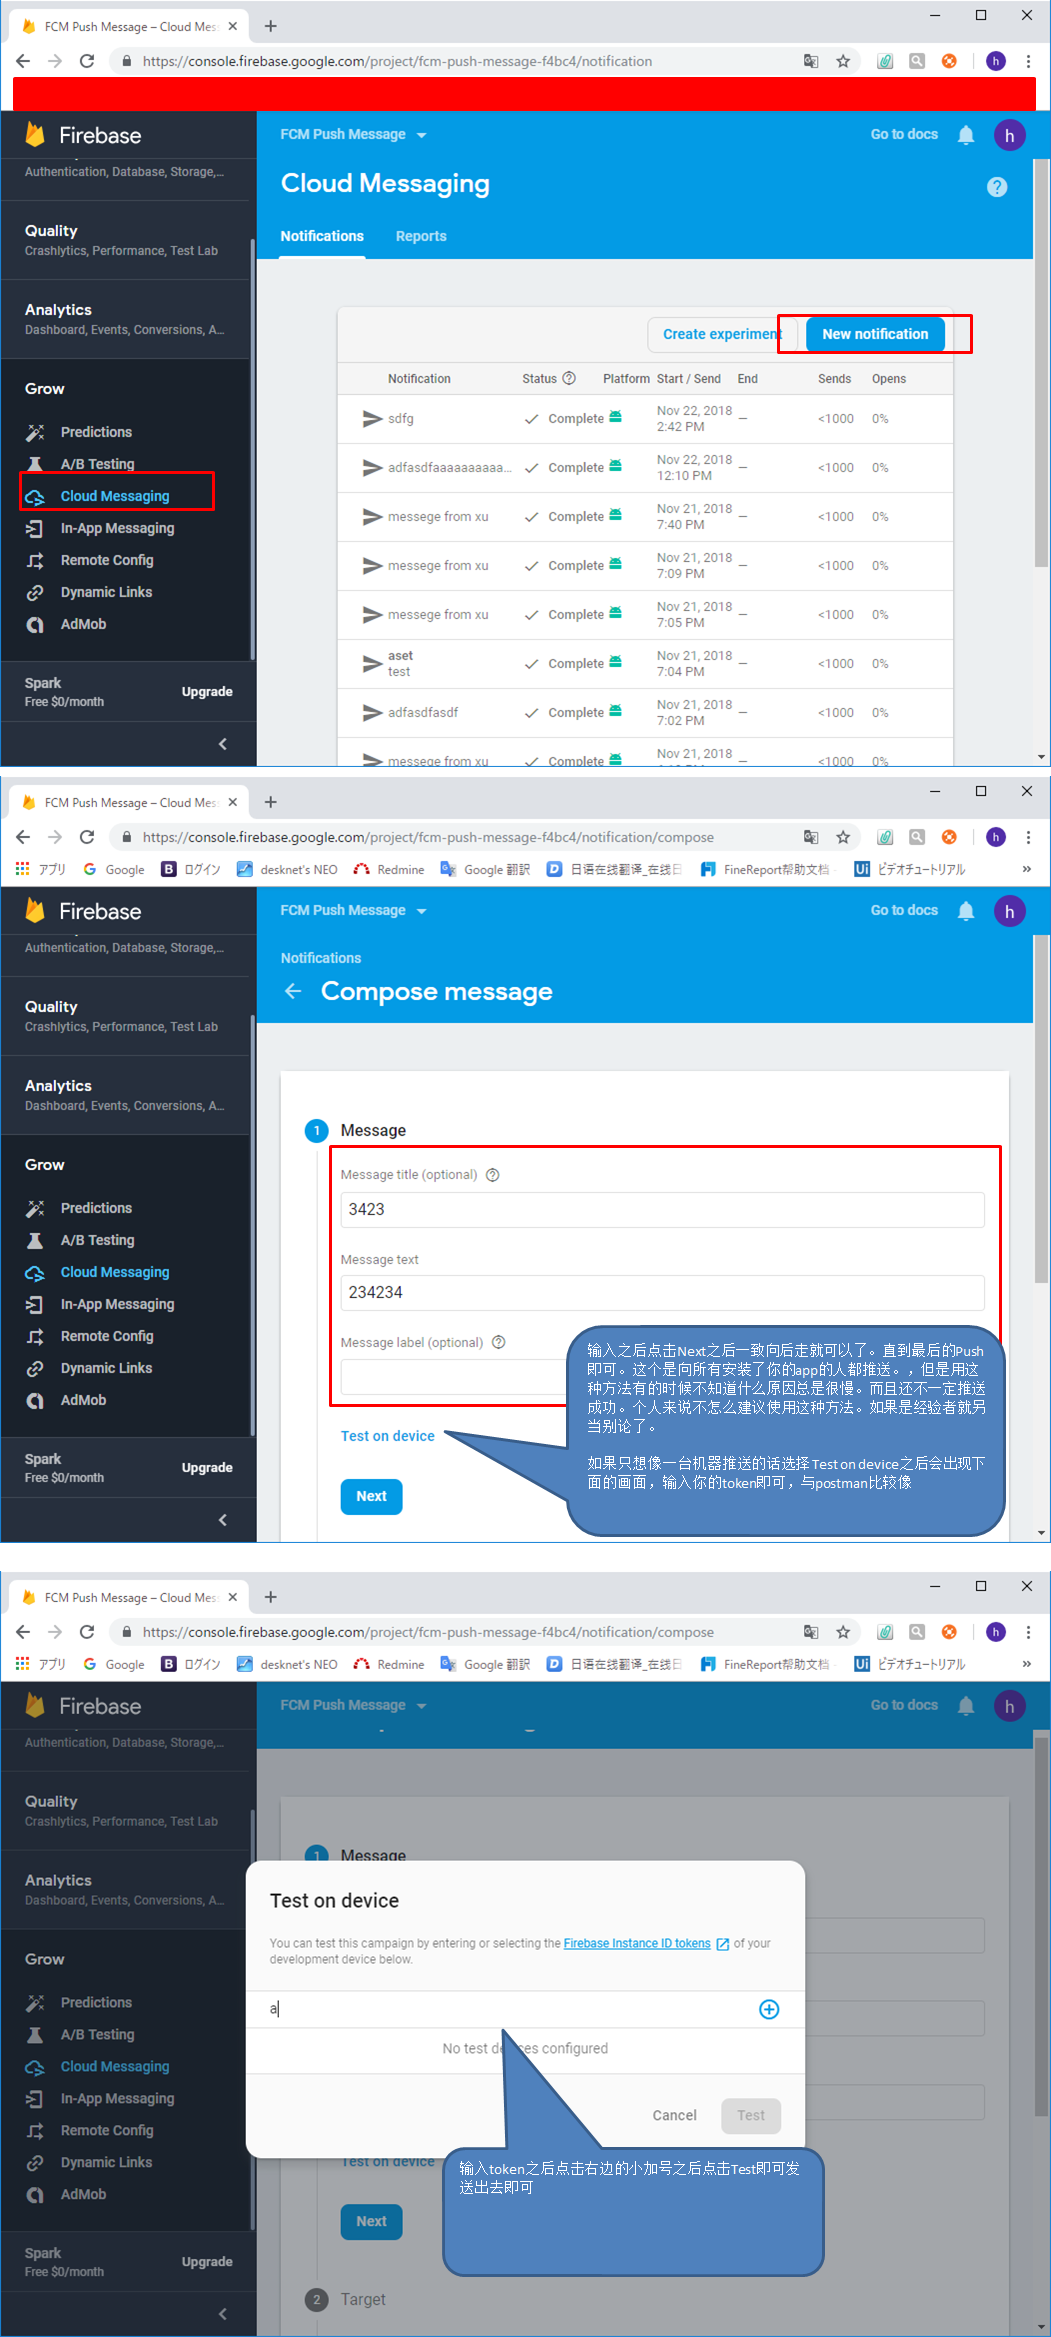
21 虚拟机弄好之后就要用真机器来试验你做的app有没有问题了,这里讲一下用真机器来调试你的APP
Android studio工具里面点击下图的标识之后会出现增加Android APP的界面
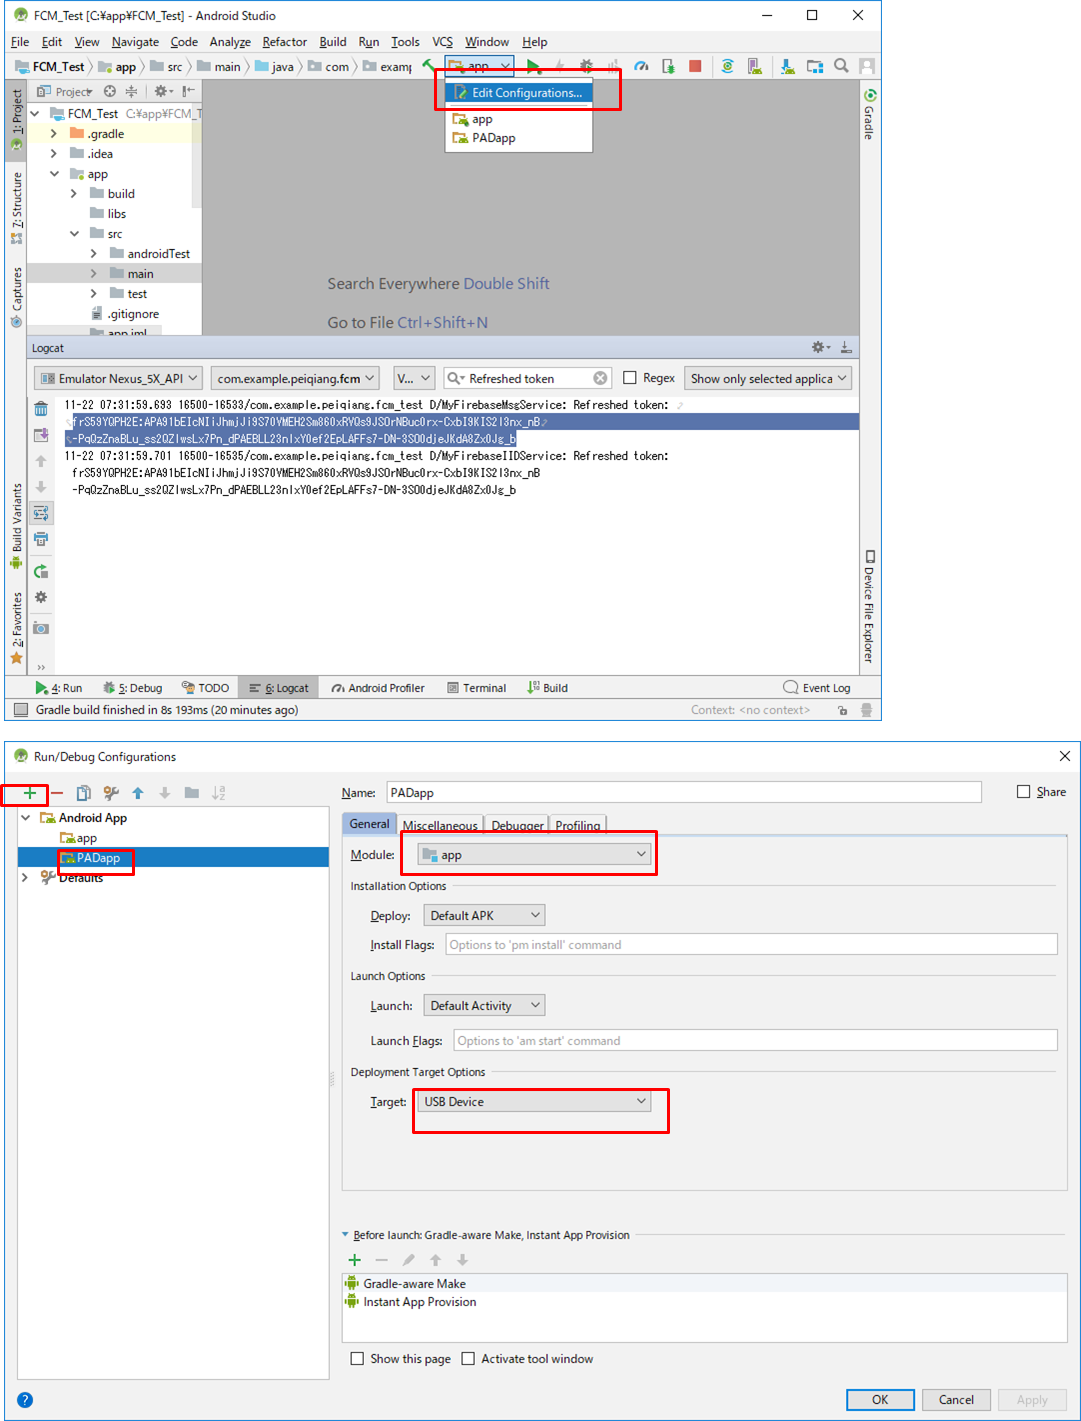
手机打开你的开发者选项,如果不知道在哪的话可以在网上搜一下,打开USB调试即可,有的手机即使打开了USB调试了但是在运行你的Android studio的时候是会报错的,这样的话你就要换一台手机了
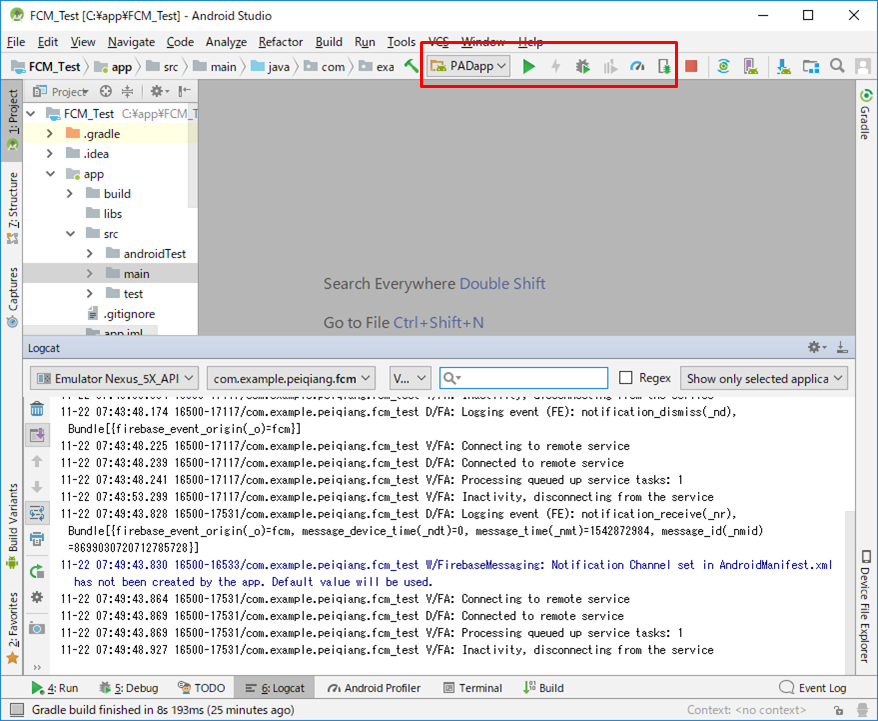
用数据线链接你的手机和电脑之后就可以按照下图的方式点击运行APP就会安装在你的手机上面,如果是debug的话,是可以打断点的
FCM实现手机推送,推送的方式,真机调试的更多相关文章
- C#学习日志 day 5 ------ windows phone 8.1真机调试手机应用
在vs2013中,可以写windows phone 8.1的程序,但是调试时需要用到windows自带的虚拟机hyper-V 正版的系统开启hyper—V的时候不会有问题,但是盗版的系统可能导致系统不 ...
- iOS——关于创建真机调试证书(发布证书,测试(调试)证书,推送调试证书)、iOS开发者账号申请 请用开发者账号去iTunes connect 查看状态
- 友盟iOS推送配置(从真机调试到推送)
下面我来讲解一下友盟iOS的推送配置,其实友盟只是一个示例,换做其余的第三方推送服务也会适用,只是第三方的后面服务变了而已. iOS推送(包括真机调试)所需要的步骤和文件如下: 备注:这里我将省略掉一 ...
- iOS-关于创建真机调试证书(发布证书,测试证书,推送调试证书)【转】
- app发布证书、真机调试证书、测试证书、推送证书详细过程
原文网址: http://www.cnblogs.com/cxbblog/p/4028159.html 一:发布证书 遵旨:哪个开发者的哪台电脑要发布哪个app (这句话可以多读几遍) 通过上边的遵旨 ...
- ios真机调试教程(不上架App Store安装到手机)
原文 不上架App Store安装到手机调试测试,需要用到ios真机调试证书打包的ipa才能安装到非越狱的手机使用. 2017年最新整理的ios真机调试的详细图文步骤流程,轻松的把你开发的ios ap ...
- xamarin.forms uwp app部署到手机移动设备进行测试,真机调试(device portal方式部署)
最近学习xamarin.刚好 手上有一个lumia 930.所以试一试把uwp app部署到手机上,并真机调试一把. 目前环境: 1.开发pc电脑是win10,版本1607.加入了insider,所以 ...
- 手机升级到iOS10,用Xcode7.3进行真机调试方法
今天发布的正式版的iOS10,手机果断升级了,结果发现Xcode7.3不能真机调试了,原因是Xcode7.3里面没有iOS10的sdk,下面这个压缩包你可以下载下来放在你的Xcode7.3里面,当然了 ...
- 真机调试之android手机+chrome
真机调试之android手机+chrome 虽然chrome上的移动设备模拟器很强大,但是在真机运行的时候,总会遇到一些小问题,这时就需要使用真机调试了. 第一步:准备一台android手机,并在手机 ...
- Eclipse 真机调试检测不到手机解决方案
想用Eclipse真机调试,但是死活检测不到手机. 手机已经打开了usb调试模式. 开始用的华为Mate9,后面试了下小米,都不行. 在网上搜了一堆,什么安全驱动.adb占用.删除360手机助手.修改 ...
随机推荐
- am335x system upgrade kernel emmc(十八)
1 Scope of Document This document describes EMMC hardware design 2 Requiremen 2.1 Func ...
- 当margin和padding的值是百分比时,如何计算
对元素的margin设置百分数时,百分数是相对于自身包含块的width计算(包含块传送门),不管是margin-top/margin-bottom还是margin-left/margin-right. ...
- [转]C++ 类中的static成员的初始化和特点
在C++的类中有些成员变量初始化和一般数据类型的成员变量有所不同.以下测试编译环境为: ➜ g++ -v Using built-in specs. COLLECT_GCC=g++ Target: x ...
- ubuntu16.04安装matlab_R2018a/R2017a
ubuntu16.04安装matlab_R2018a/R2017a 1. 文件准备 我把Matlab2018a安装镜像及破解文件放在了/home/haes/Downloads/matlab下 2.挂载 ...
- GC类型以及不同类型GC的搭配
jdk1.7 默认垃圾收集器Parallel Scavenge(新生代)+Parallel Old(老年代) jdk1.8 默认垃圾收集器Parallel Scavenge(新生代)+Parallel ...
- [转]Python3之max key参数学习记录
Python3之max key参数学习记录 转自https://www.cnblogs.com/zhangwei22/p/9892422.html 今天用Python写脚本,想要实现这样的功能:对于给 ...
- Cesium入门-2-增加地形
<!DOCTYPE html> <html lang="en"> <head> <meta charset="UTF-8&quo ...
- Code First 迁移----官方 应用程序启动时自动升级(MigrateDatabaseToLatestVersion 初始值设定项)
Code First 迁移 如果使用的是 Code First 工作流,推荐使用 Code First 迁移改进应用程序的数据库架构. 迁移提供一组允许以下操作的工具: 创建可用于 EF 模型的初始数 ...
- VS code写stm32
第一次在知乎写博客,献丑了. VS code写stm32 今天实在觉得KEIL太丑,突然想到VS code也可以实现STM32代码的编写,遂决定写一个文章,把VScode变成一个STM32的IDE ...
- https://en.wikipedia.org/wiki/Green_threads
https://en.wikipedia.org/wiki/Green_threads