[RN] React Native 自定义 底部 弹出 选择框 实现
React Native 自定义 底部选择框 实现
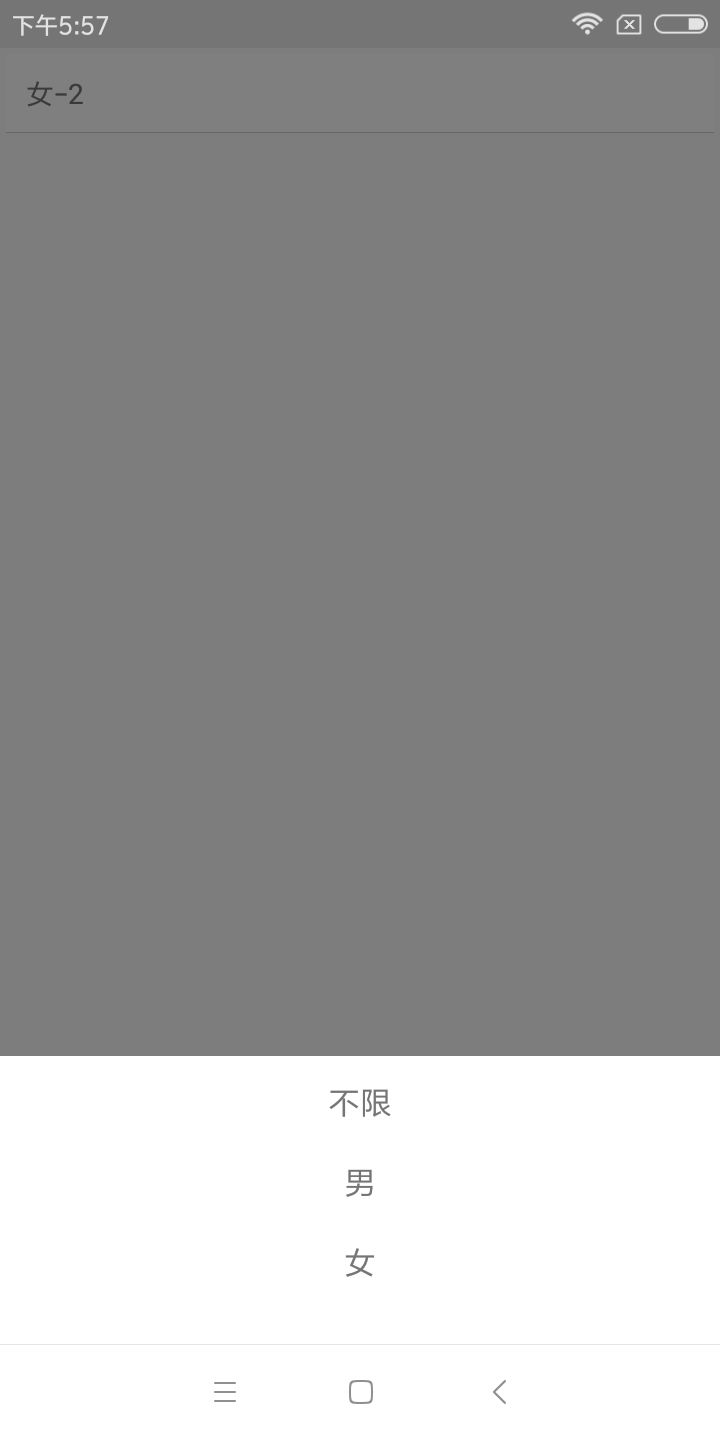
效果如图所示:

实现方法:
一、组件封装
CustomAlertDialog.js
import React, {Component} from 'react';

import {Dimensions, Modal, StyleSheet, Text, TouchableOpacity, View} from 'react-native';

const {width} = Dimensions.get('window');

export default class CustomAlertDialog extends Component {

    constructor(props) {

        super(props);

        this.state = {

            isVisible: this.props.show,

        };

        this.entityList = this.props.entityList;

    }

    componentWillReceiveProps(nextProps) {

        this.setState({isVisible: nextProps.show});

    }

    closeModal() {

        this.setState({

            isVisible: false

        });

        this.props.closeModal(false);

    }

    renderItem(item, i) {

        return (

            <TouchableOpacity key={i} onPress={this.choose.bind(this, i)} style={styles.item}>

                <Text style={styles.itemText}>{item}</Text>

            </TouchableOpacity>

        );

    }

    choose(i) {

        if (this.state.isVisible) {

            this.props.callback(i);

            this.closeModal();

        }

    }

    renderDialog() {

        return (

            <View style={styles.modalStyle}>

                <View style={styles.optArea}>

                    {

                        this.entityList.map((item, i) => this.renderItem(item, i))

                    }

                </View>

            </View>

        )

    }

    render() {

        return (

            <View style={{flex: }}>

                <Modal

                    transparent={true}

                    visible={this.state.isVisible}

                    animationType={'fade'}

                    onRequestClose={() => this.closeModal()}>

                    <TouchableOpacity style={styles.container} activeOpacity={}

                                      onPress={() => this.closeModal()}>

                        {this.renderDialog()}

                    </TouchableOpacity>

                </Modal>

            </View>

        );

    }

}

const styles = StyleSheet.create({

    container: {

        flex: ,

        backgroundColor: 'rgba(0, 0, 0, 0.5)',

    },

    modalStyle: {

        position: "absolute",

        left: ,

        bottom: ,

        width: width,

        flex: ,

        flexDirection: "column",

        backgroundColor: '#ffffff',

    },

    optArea: {

        flex: ,

        flexDirection: 'column',

        marginTop: ,

        marginBottom: ,

    },

    item: {

        width: width,

        height: ,

        paddingLeft: ,

        paddingRight: ,

        alignItems: 'center',

    },

    itemText: {

        fontSize: ,

    },

    cancel: {

        width: width,

        height: ,

        marginTop: ,

        alignItems: 'center',

        backgroundColor: '#ffffff'

    },

});
使用
TestCustomAlert.js
import React, {Component} from "react";

import {StyleSheet, Text, TouchableHighlight, View,} from 'react-native';

import CustomAlertDialog from "./CustomAlertDialog";

const typeArr = ["不限", "男", "女"];

export default class TestCustomAlert extends Component {

    constructor(props) {

        super(props);

        this.state = {

            typeName: '性别',

            type: ,

            showTypePop: false,

        }

    }

    _openTypeDialog() {

        this.setState({showTypePop: !this.state.showTypePop})

    }

    render() {

        return (

            <View style={{flex: }}>

                <TouchableHighlight onPress={() => this._openTypeDialog()} style={styles.button}

                                    underlayColor="#a5a5a5">

                    <Text>{this.state.typeName}-{this.state.type}</Text>

                </TouchableHighlight>

                <CustomAlertDialog entityList={typeArr} callback={(i) => {

                    this.setState({

                        type: i,

                        typeName: typeArr[i],

                    })

                }} show={this.state.showTypePop} closeModal={(show) => {

                    this.setState({

                        showTypePop: show

                    })

                }}/>

            </View>

        );

    }

}

const styles = StyleSheet.create({

    button: {

        margin: ,

        backgroundColor: 'white',

        padding: ,

        borderBottomWidth: StyleSheet.hairlineWidth,

        borderBottomColor: '#cdcdcd'

    },

});
本博客地址: wukong1688
本文原文地址:https://www.cnblogs.com/wukong1688/p/11038382.html
转载请著名出处!谢谢~~
[RN] React Native 自定义 底部 弹出 选择框 实现的更多相关文章
- [deviceone开发]-底部弹出选择
一.简介 个人上传的第一个示例源码,两天空闲时间写的,一点简单组件,写的挺乱还没啥注释,仅供新手学习. 底部弹出选择,可滑动选择选项,如果停留在选项中间,可自动校正位置,加了一点简单的动画效果,需要的 ...
- 【ABAP系列】SAP ALV 导出报表数据 始终使用选定的格式”,一旦勾上,就再也不会弹出选择框了。
公众号:SAP Technical 本文作者:matinal 原文出处:http://www.cnblogs.com/SAPmatinal/ 原文链接:[ABAP系列]SAP ALV 导出报表数据 始 ...
- [RN] React Native 自定义导航栏随滚动渐变
React Native 自定义导航栏随滚动渐变 实现效果预览: 代码实现: 1.定义导航栏 NavPage.js import React, {Component} from 'react'; im ...
- 微信小程序之 动画 —— 自定义底部弹出层
wxml: <view class='buy' bindtap='showBuyModal'>立即购买</view> <!-- 点击立即购买 弹出购买遮罩层 --> ...
- Jquery实现弹出选择框选择后返回,支持多级分类
<!DOCTYPE HTML PUBLIC "-//W3C//DTD HTML 4.01 Transitional//EN" "http://www.w3.org/ ...
- appium+python自动化98-非select弹出选择框定位解决
前言 遇到问题:document.getElementsByClassName(...)[0] is undefined 选择框如果是select标签的,可以直接用select专用的方法去定位点击操作 ...
- 框架-弹出选择框(Jquery传递Json数组)
给一个button按钮,执行方法 Json传值$("body").on("click", "#btnsure", function() { ...
- 微信小程序之自定义底部弹出框动画
最近做小程序时,会经常用到各种弹框.直接做显示和隐藏虽然也能达到效果,但是体验性太差,也比较简单粗暴.想要美美地玩,添加点动画还是非常有必要的.下面做一个底部上滑的弹框. wxml <view ...
- Android仿IOS底部弹出选择菜单ActionSheet
使用Dialog的实现方式,解决原ActionSheet使用Fragment实现而出现的部分手机取消按钮被遮盖的问题 java部分代码: import android.app.Dialog; impo ...
随机推荐
- Create GUID / UUID in JavaScript?
Code function uuidv4() { return ([1e7]+-1e3+-4e3+-8e3+-1e11).replace(/[018]/g, c => (c ^ crypto.g ...
- MYSQL LIMIT 性能测试
查询语句 # 普通表 SELECT * FROM test_page LIMIT m,n # 内存表 SELECT * FROM test_page_memory LIMIT m,n 总结 查询位置( ...
- day11——函数名的使用、f格式化、迭代器、递归
day11 函数名的第一类对象及使用 1.可以当作值被赋值给变量 def func(): print(1) print(func) a = func a() 2.当作元素存放在容器中 def func ...
- K8s 学习者绝对不能错过的最全知识图谱(内含 58个知识点链接)
作者 | 平名 阿里服务端开发技术专家 导读:Kubernetes 作为云原生时代的“操作系统”,熟悉和使用它是每名用户的必备技能.本篇文章概述了容器服务 Kubernetes 的知识图谱,部分内容参 ...
- 新的部署架构之下,如何拿shell?
和朋友聊起一个话题,服务器部署架构升级对安全的影响.从最简单的一台服务器,到应用.数据库.文件服务器分离:从本地机房服务器到云服务器产品矩阵:从虚拟化到容器化部署,一直在往更安全的方向改变. 本文试图 ...
- 一个JS正则的字符串替换函数
直接上函数吧 不废话 function replacestring(oldstr,newstr,text) { var exp = new RegExp(oldstr,'g'); var c=tex ...
- 【转】Redis的各项功能解决了哪些问题?
作者:Blackheart 出处:http://linianhui.cnblogs.com 先看一下Redis是一个什么东西.官方简介解释到:Redis是一个基于BSD开源的项目,是一个把结构化的数据 ...
- python 练习题:使用迭代查找一个list中最小和最大值,并返回一个tuple
# -*- coding: utf-8 -*- # 请使用迭代查找一个list中最小和最大值,并返回一个tuple from collections import Iterable def findM ...
- 基于Golang的逃逸分析(Language Mechanics On Escape Analysis)
何为逃逸分析 在编译程序优化理论中,逃逸分析是一种确定指针动态范围的方法——分析在程序的哪些地方可以访问到指针.它涉及到指针分析和形状分析. 当一个变量(或对象)在子程序中被分配时,一个指向变量的指针 ...
- 浅聊几种主流Docker网络的实现原理
原文:https://mp.weixin.qq.com/s/Jdxct8qHrBUtkUq-hnxSRw 参考:https://blog.csdn.net/yarntime/article/detai ...
