20、Task原理剖析与源码分析
一、Task原理
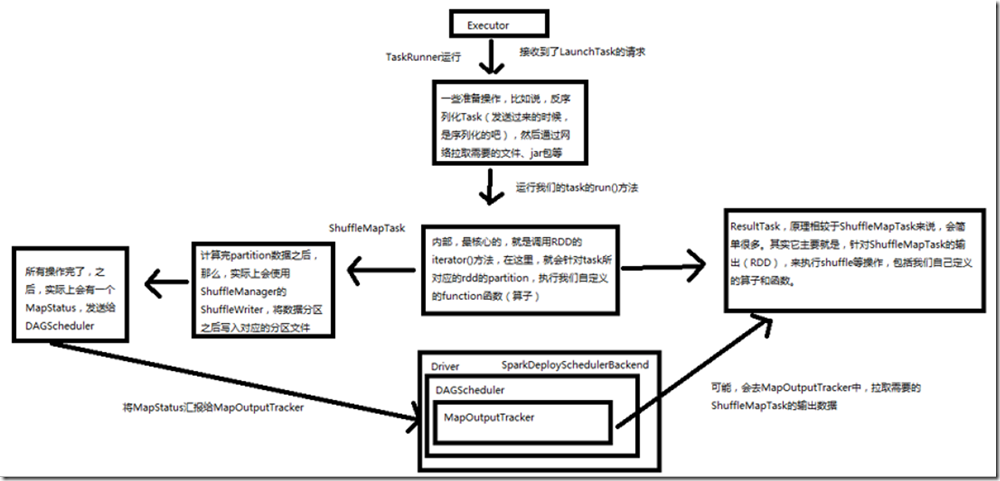
1、图解
二、源码分析
1、
###org.apache.spark.executor/Executor.scala

/**

    * 从TaskRunner开始,来看Task的运行的工作原理

    */

  class TaskRunner(

      execBackend: ExecutorBackend,

      val taskId: Long,

      val attemptNumber: Int,

      taskName: String,

      serializedTask: ByteBuffer)

    extends Runnable {

    @volatile private var killed = false

    @volatile var task: Task[Any] = _

    @volatile var attemptedTask: Option[Task[Any]] = None

    @volatile var startGCTime: Long = _

    def kill(interruptThread: Boolean) {

      logInfo(s"Executor is trying to kill $taskName (TID $taskId)")

      killed = true

      if (task != null) {

        task.kill(interruptThread)

      }

    }

    override def run() {

      val deserializeStartTime = System.currentTimeMillis()

      Thread.currentThread.setContextClassLoader(replClassLoader)

      val ser = env.closureSerializer.newInstance()

      logInfo(s"Running $taskName (TID $taskId)")

      execBackend.statusUpdate(taskId, TaskState.RUNNING, EMPTY_BYTE_BUFFER)

      var taskStart: Long = 0

      startGCTime = gcTime

      try {

        // 对序列化的task数据,进行反序列化

        val (taskFiles, taskJars, taskBytes) = Task.deserializeWithDependencies(serializedTask)

        // 然后,通过网络通信,将需要的文件、资源、jar拷贝过来

        updateDependencies(taskFiles, taskJars)

        // 最后,通过正式的反序列化操作,将整个task的数据集反序列化回来

        // 这里用到了java的ClassLoader,因为java的ClassLoader可以干很多事情,比如,用反射的方式来动态加载一个类,创建这个类的对象,

        // 还有比如,可以用于对指定上下文的相关资源,进行加载和读取

        task = ser.deserialize[Task[Any]](taskBytes, Thread.currentThread.getContextClassLoader)

        // If this task has been killed before we deserialized it, let's quit now. Otherwise,

        // continue executing the task.

        if (killed) {

          // Throw an exception rather than returning, because returning within a try{} block

          // causes a NonLocalReturnControl exception to be thrown. The NonLocalReturnControl

          // exception will be caught by the catch block, leading to an incorrect ExceptionFailure

          // for the task.

          throw new TaskKilledException

        }

        attemptedTask = Some(task)

        logDebug("Task " + taskId + "'s epoch is " + task.epoch)

        env.mapOutputTracker.updateEpoch(task.epoch)

        // Run the actual task and measure its runtime.

        // 计算出task开始的时间

        taskStart = System.currentTimeMillis()

        // 执行task,用的是task的run()方法

        // 这里的value,对于ShuffleMapTask来说,其实就是MapStatus,封装了ShuffleMapTask计算的数据,输出的位置

        // 后面还是一个ShuffleMapTask,那么就会去联系MapOutputTracker,来获取上一个ShuffleMapTasks的输出位置,然后通过网络拉取数据

        // ResultTask,也是一样的

        val value = task.run(taskAttemptId = taskId, attemptNumber = attemptNumber)

        // 计算出task结束的时间

        val taskFinish = System.currentTimeMillis()

        // If the task has been killed, let's fail it.

        if (task.killed) {

          throw new TaskKilledException

        }

        // 这个,其实就是针对MapStatus进行了各种序列化和封装,因为后面要发送给Driver(通过网络)

        //

        val resultSer = env.serializer.newInstance()

        val beforeSerialization = System.currentTimeMillis()

        val valueBytes = resultSer.serialize(value)

        val afterSerialization = System.currentTimeMillis()

        // 计算出task相关的一些metrics,就是统计信息,包括运行了多长时间、反序列化消耗了多长时间、java虚拟机gc耗费了多长时间

        // 结果的序列化耗费了多长时间,这些东西,其实会在我们的SparkUI上显示

        for (m <- task.metrics) {

          m.setExecutorDeserializeTime(taskStart - deserializeStartTime)

          m.setExecutorRunTime(taskFinish - taskStart)

          m.setJvmGCTime(gcTime - startGCTime)

          m.setResultSerializationTime(afterSerialization - beforeSerialization)

        }

        val accumUpdates = Accumulators.values

        val directResult = new DirectTaskResult(valueBytes, accumUpdates, task.metrics.orNull)

        val serializedDirectResult = ser.serialize(directResult)

        val resultSize = serializedDirectResult.limit

        // directSend = sending directly back to the driver

        val serializedResult = {

          if (maxResultSize > 0 && resultSize > maxResultSize) {

            logWarning(s"Finished $taskName (TID $taskId). Result is larger than maxResultSize " +

              s"(${Utils.bytesToString(resultSize)} > ${Utils.bytesToString(maxResultSize)}), " +

              s"dropping it.")

            ser.serialize(new IndirectTaskResult[Any](TaskResultBlockId(taskId), resultSize))

          } else if (resultSize >= akkaFrameSize - AkkaUtils.reservedSizeBytes) {

            val blockId = TaskResultBlockId(taskId)

            env.blockManager.putBytes(

              blockId, serializedDirectResult, StorageLevel.MEMORY_AND_DISK_SER)

            logInfo(

              s"Finished $taskName (TID $taskId). $resultSize bytes result sent via BlockManager)")

            ser.serialize(new IndirectTaskResult[Any](blockId, resultSize))

          } else {

            logInfo(s"Finished $taskName (TID $taskId). $resultSize bytes result sent to driver")

            serializedDirectResult

          }

        }

        // 其实就是调用了Executor所在的CoarseGrainedExecutorBackend的statusUpdate()方法

        execBackend.statusUpdate(taskId, TaskState.FINISHED, serializedResult)

      }

}

###org.apache.spark.executor/Executor.scala

private def updateDependencies(newFiles: HashMap[String, Long], newJars: HashMap[String, Long]) {

    // 获取hadoop配置文件

    lazy val hadoopConf = SparkHadoopUtil.get.newConfiguration(conf)

    // 这里,使用java的synchronized进行了多线程并发访问的同步

    // 因为task实际上是以java线程的方式,在一个CoarseGrainedExecutorBackend进程内并发运行的

    // 如果在执行业务逻辑的时候,要访问一些共享的资源,那么就可能会出现多线程并发访问安全问题

    // 所以,spark在这里选择进行了多线程并发访问的同步(synchronized),因为在这里面访问了诸如currentFiles等等这些共享资源

    synchronized {

      // Fetch missing dependencies

      // 遍历要拉取的文件

      // 通过Utils的fetchFile()方法,通过网络通信,从远程拉取文件

      for ((name, timestamp) <- newFiles if currentFiles.getOrElse(name, -1L) < timestamp) {

        logInfo("Fetching " + name + " with timestamp " + timestamp)

        // Fetch file with useCache mode, close cache for local mode.

        Utils.fetchFile(name, new File(SparkFiles.getRootDirectory), conf,

          env.securityManager, hadoopConf, timestamp, useCache = !isLocal)

        currentFiles(name) = timestamp

      }

      // 遍历要拉取的jar

      for ((name, timestamp) <- newJars) {

        val localName = name.split("/").last

        // 判断一下时间戳,要求jar当前时间戳必须小于目标时间戳

        // 通过Utils的fetchFile(),拉取jar文件

        val currentTimeStamp = currentJars.get(name)

          .orElse(currentJars.get(localName))

          .getOrElse(-1L)

        if (currentTimeStamp < timestamp) {

          logInfo("Fetching " + name + " with timestamp " + timestamp)

          // Fetch file with useCache mode, close cache for local mode.

          Utils.fetchFile(name, new File(SparkFiles.getRootDirectory), conf,

            env.securityManager, hadoopConf, timestamp, useCache = !isLocal)

          currentJars(name) = timestamp

          // Add it to our class loader

          val url = new File(SparkFiles.getRootDirectory, localName).toURI.toURL

          if (!urlClassLoader.getURLs.contains(url)) {

            logInfo("Adding " + url + " to class loader")

            urlClassLoader.addURL(url)

          }

        }

      }

    }

  }

###org.apache.spark.scheduler/Task.scala

  final def run(taskAttemptId: Long, attemptNumber: Int): T = {

    // 创建一个TaskContext,就是task的执行上下文,里面记录了task执行的一些全局性的数据,比如task重试了几次

    // 比如task属于哪个stage,task要处理的是rdd的哪个partition等等

    context = new TaskContextImpl(stageId = stageId, partitionId = partitionId,

      taskAttemptId = taskAttemptId, attemptNumber = attemptNumber, runningLocally = false)

    TaskContextHelper.setTaskContext(context)

    context.taskMetrics.setHostname(Utils.localHostName())

    taskThread = Thread.currentThread()

    if (_killed) {

      kill(interruptThread = false)

    }

    try {

      // 调用抽象方法,runTask()

      runTask(context)

    } finally {

      context.markTaskCompleted()

      TaskContextHelper.unset()

    }

  }

###org.apache.spark.scheduler/Task.scala

  // 调用到了抽象方法,那就意味着这个类,只是一个模板类,或者抽象父类,仅仅封装了一些子类通用的数据和操作

  // 而关键的操作,全部都要依赖于子类的实现,task的子类,有ShuffleMapTask、ResultTask

  // 要运行子类的runTask()方法,才能执行我们自己定义的算子和逻辑

  def runTask(context: TaskContext): T
2、
接下来分别看下ShuffleMapTask和ResultTask的runTask()方法:
一个ShuffleMapTask会将一个RDD的元素,切分为多个bucket,基于一个在ShuffleDependency中指定的partitioner,默认就是HashPartition;

###org.apache.spark.scheduler/ShuffleMapTask.scala

/**

    * ShuffleMapTask的runTask()方法有MapStatus返回值

    */

  override def runTask(context: TaskContext): MapStatus = {

    // Deserialize the RDD using the broadcast variable.

    // 对task要处理的rdd相关的数据,做一些反序列化操作

    // 这里有一个问题,如何拿到这个要处理的RDD

    // 多个task运行在多个Executor中,都是并行运行,或者并发运行的,可能都不在一个地方,但是一个stage的task,其实要处理的rdd是一样,所以task如何拿到自己要处理的rdd数据?

    // 这里会通过broadcast variable 直接拿到

    val ser = SparkEnv.get.closureSerializer.newInstance()

    val (rdd, dep) = ser.deserialize[(RDD[_], ShuffleDependency[_, _, _])](

      ByteBuffer.wrap(taskBinary.value), Thread.currentThread.getContextClassLoader)

    metrics = Some(context.taskMetrics)

    var writer: ShuffleWriter[Any, Any] = null

    try {

      // 获取ShuffleManager

      val manager = SparkEnv.get.shuffleManager

      // 从ShuffleManager中获取ShuffleWriter

      writer = manager.getWriter[Any, Any](dep.shuffleHandle, partitionId, context)

      // 首先调用了,rdd的iterator()方法,并且传入了,当前task要处理哪个partition

      // 所以核心的逻辑,就在rdd的iterator()方法中,在这里,实现了针对rdd的某个partition,执行我们自己定义的算子,或者是函数

      // 执行完了我们自己定义的算子、或者函数,就相当于是,针对rdd的partition执行了处理,会有返回的数据

      // 返回的数据,都是通过ShuffleWriter,经过HashPartitioner进行分区之后,写入自己对应的分区bucket

      writer.write(rdd.iterator(partition, context).asInstanceOf[Iterator[_ <: Product2[Any, Any]]])

      // 最后,返回结果MapStatus,MapStatus里面封装了ShuffleMapTask计算后的数据,数据存储在哪里,其实就是BlockManager的相关信息

      // BlockManager是Spark底层的内存,数据,磁盘数据管理的组件

      return writer.stop(success = true).get

    } catch {

      case e: Exception =>

        try {

          if (writer != null) {

            writer.stop(success = false)

          }

        } catch {

          case e: Exception =>

            log.debug("Could not stop writer", e)

        }

        throw e

    }

  }

###org.apache.spark.rdd/RDD.scalal

  final def iterator(split: Partition, context: TaskContext): Iterator[T] = {

    if (storageLevel != StorageLevel.NONE) {

      // cacheManager相关东西

      SparkEnv.get.cacheManager.getOrCompute(this, split, context, storageLevel)

    } else {

      // 进行rdd partition的计算

      computeOrReadCheckpoint(split, context)

    }

  }

###org.apache.spark.rdd/MapPartitionsRDD.scala

  // 这里,就是针对rdd中的某个partition执行我们给这个rdd定义的算子和函数

  // 这里的f,可以理解为我们自己定义的算子和函数,但是是Spark内部进行了封装的,还实现了一些其他的逻辑

  // 执行到了这里,就是在针对RDD的partition,执行自定义的计算操作,并返回新的rdd的partition数据

  override def compute(split: Partition, context: TaskContext) =

    f(context, split.index, firstParent[T].iterator(split, context))

###org.apache.spark.scheduler/ResultTask.scala

  override def runTask(context: TaskContext): U = {

    // Deserialize the RDD and the func using the broadcast variables.

    // 进行了基本的反序列化

    val ser = SparkEnv.get.closureSerializer.newInstance()

    val (rdd, func) = ser.deserialize[(RDD[T], (TaskContext, Iterator[T]) => U)](

      ByteBuffer.wrap(taskBinary.value), Thread.currentThread.getContextClassLoader)

    metrics = Some(context.taskMetrics)

    // 执行通过rdd的iterator,执行我们定义的算子和函数

    func(context, rdd.iterator(partition, context))

  }

###org.apache.spark.executor/Executor.scala

// 其实就是调用了Executor所在的CoarseGrainedExecutorBackend的statusUpdate()方法

execBackend.statusUpdate(taskId, TaskState.FINISHED, serializedResult)

###org.apache.spark.executor/CoarseGrainedExecutorBackend.scalal

  override def statusUpdate(taskId: Long, state: TaskState, data: ByteBuffer) {

    // 向CoarseGrainedSchedulerBackend发送一个StatusUpdate消息

    driver ! StatusUpdate(executorId, taskId, state, data)

  }

###org.apache.spark.scheduler.cluster/CoarseGrainedSchedulerBackend.scalla

      // 处理task执行结束的事件

      case StatusUpdate(executorId, taskId, state, data) =>

        scheduler.statusUpdate(taskId, state, data.value)

        if (TaskState.isFinished(state)) {

          executorDataMap.get(executorId) match {

            case Some(executorInfo) =>

              executorInfo.freeCores += scheduler.CPUS_PER_TASK

              makeOffers(executorId)

            case None =>

              // Ignoring the update since we don't know about the executor.

              logWarning(s"Ignored task status update ($taskId state $state) " +

                "from unknown executor $sender with ID $executorId")

          }

        }

###org.apache.spark.scheduler/TaskSchedulerlmpl.scala

  def statusUpdate(tid: Long, state: TaskState, serializedData: ByteBuffer) {

    var failedExecutor: Option[String] = None

    synchronized {

      try {

        // 判断如果task是lost了,实际上,可能会经常发现task lost了,这就是因为各种各样的原因,执行失败了

        if (state == TaskState.LOST && taskIdToExecutorId.contains(tid)) {

          // We lost this entire executor, so remember that it's gone

          // 移除Executor,将它加入失败队列

          val execId = taskIdToExecutorId(tid)

          if (activeExecutorIds.contains(execId)) {

            removeExecutor(execId)

            failedExecutor = Some(execId)

          }

        }

        // 获取对应的taskSet

        taskIdToTaskSetId.get(tid) match {

          case Some(taskSetId) =>

            // 如果task结束了,从内存缓存中移除

            if (TaskState.isFinished(state)) {

              taskIdToTaskSetId.remove(tid)

              taskIdToExecutorId.remove(tid)

            }

            // 如果正常结束,也做相应的处理

            activeTaskSets.get(taskSetId).foreach { taskSet =>

              if (state == TaskState.FINISHED) {

                taskSet.removeRunningTask(tid)

                taskResultGetter.enqueueSuccessfulTask(taskSet, tid, serializedData)

              } else if (Set(TaskState.FAILED, TaskState.KILLED, TaskState.LOST).contains(state)) {

                taskSet.removeRunningTask(tid)

                taskResultGetter.enqueueFailedTask(taskSet, tid, state, serializedData)

              }

            }

          case None =>

            logError(

              ("Ignoring update with state %s for TID %s because its task set is gone (this is " +

               "likely the result of receiving duplicate task finished status updates)")

              .format(state, tid))

        }

      } catch {

        case e: Exception => logError("Exception in statusUpdate", e)

      }

    }

    // Update the DAGScheduler without holding a lock on this, since that can deadlock

    if (failedExecutor.isDefined) {

      dagScheduler.executorLost(failedExecutor.get)

      backend.reviveOffers()

    }

  }
20、Task原理剖析与源码分析的更多相关文章
- 65、Spark Streaming:数据接收原理剖析与源码分析
一.数据接收原理 二.源码分析 入口包org.apache.spark.streaming.receiver下ReceiverSupervisorImpl类的onStart()方法 ### overr ...
- 18、TaskScheduler原理剖析与源码分析
一.源码分析 ###入口 ###org.apache.spark.scheduler/DAGScheduler.scala // 最后,针对stage的task,创建TaskSet对象,调用taskS ...
- 66、Spark Streaming:数据处理原理剖析与源码分析(block与batch关系透彻解析)
一.数据处理原理剖析 每隔我们设置的batch interval 的time,就去找ReceiverTracker,将其中的,从上次划分batch的时间,到目前为止的这个batch interval ...
- 64、Spark Streaming:StreamingContext初始化与Receiver启动原理剖析与源码分析
一.StreamingContext源码分析 ###入口 org.apache.spark.streaming/StreamingContext.scala /** * 在创建和完成StreamCon ...
- 21、Shuffle原理剖析与源码分析
一.普通shuffle原理 1.图解 假设有一个节点上面运行了4个 ShuffleMapTask,然后这个节点上只有2个 cpu core.假如有另外一台节点,上面也运行了4个ResultTask,现 ...
- 19、Executor原理剖析与源码分析
一.原理图解 二.源码分析 1.Executor注册机制 worker中为Application启动的executor,实际上是启动了这个CoarseGrainedExecutorBackend进程: ...
- 23、CacheManager原理剖析与源码分析
一.图解 二.源码分析 ###org.apache.spark.rdd/RDD.scalal ###入口 final def iterator(split: Partition, context: T ...
- 22、BlockManager原理剖析与源码分析
一.原理 1.图解 Driver上,有BlockManagerMaster,它的功能,就是负责对各个节点上的BlockManager内部管理的数据的元数据进行维护, 比如Block的增删改等操作,都会 ...
- 16、job触发流程原理剖析与源码分析
一.以Wordcount为例来分析 1.Wordcount val lines = sc.textFile() val words = lines.flatMap(line => line.sp ...
随机推荐
- 测试PHP-FPM的工作流中的疑惑点
顺序比较乱,想到什么测试什么,测试环境 PHP7.2 和 MariaDB10.3.11 PHP-FPM是 master/worker 多进程模型master负责和web-server通讯,把接受到请求 ...
- asp.net core 一个中小型项目实战的起手式——Swagger配置
交流群:863563315 一.Swagger是什么 Swagger 是一款RESTFUL接口的.基于YAML.JSON语言的文档在线自动生成.代码自动生成的工具. 二.如何在项目中加入Swagger ...
- DDL和DML 的区别
DDL (Data Definition Language 数据定义语言) create table 创建表 alter table 修改表 drop table 删除表 truncate table ...
- Bootstraps 4 引入报错 Error: Bootstrap tooltips require Tether
问题: 解决办法 (http://github.hubspot.com/tether/) Bootstrap 4 needs Tether, so you need to include tether ...
- 一分钟读懂低功耗蓝牙(BLE)连接数据包
一分钟读懂低功耗蓝牙(BLE)连接数据包 1.概述 BLE 连接过程中有三个重要的数据包:SCAN_REQ, SCAN_RSP 和 CONNECT_REQ. SCAN_REQ: 扫描请求,由主设备(M ...
- [转]数据库性能优化(老Key)
数据库性能优化一:数据库自身优化(大数据量) https://www.cnblogs.com/AK2012/archive/2012/12/25/2012-1228.html 数据库性能优化二:数据库 ...
- mysql 开启日志与性能调优
#查看日期情况 #show variables like '%general%'; #开启日志 #SET GLOBAL general_log = 'On'; #指定日志文件 #SET GLOBAL ...
- SpringBoot返回date日期格式化
SpringBoot返回date日期格式化,解决返回为TIMESTAMP时间戳格式或8小时时间差 问题描述 在Spring Boot项目中,使用@RestController注解,返回的java对象中 ...
- Java List<String> list=new ArrayList<String>();为什么要声明为List,而不是ArrayList<String>
例如:代码List list = new ArrayList(); 下面通过list来操作集合.假如代码编写后却发现集合使用的不准确,应该使用LinkedList,那么只要修改一行代码List lis ...
- Surface 系统恢复
Surface Pro 6超详细教程之下载Surface 系统恢复镜像并制作系统恢复U盘 https://www.jianshu.com/p/d1b41d913f91 怎样创建Windows 10系统 ...