高级UI-自定义动画框架
有的时候会需要做一些自定义的动画效果,在会反复用到的动画效果可以考虑做成动画框架,方便使用,做成框架的话就需要考虑很多的问题,最典型的问题就是属性和方法必须要是可配置的,这里就来聊一聊自定义动画框架的做法
重难点分析
在自定义动画框架里面,最难的一个问题就是怎么样获得属性,如果直接写自定义的属性,那么编译时候就会报错了,那么自然就想到了在外层包裹自定义的属性,通过处理自定义的属性来得到,这样便是android源代码一些控件的解决办法,其实就是一招偷梁换柱,在处理的时候,如果是自定义的属性,就自己处理,如果不是自定义的属性,就交由系统处理,然后在addView上再做手脚,另外从xml的解析入手,可以自定义LayoutInflater,然后重写onCreateView(),在里面就可以完成偷梁换柱,故这里有两种方法可以完成
在addView时候拦截做法
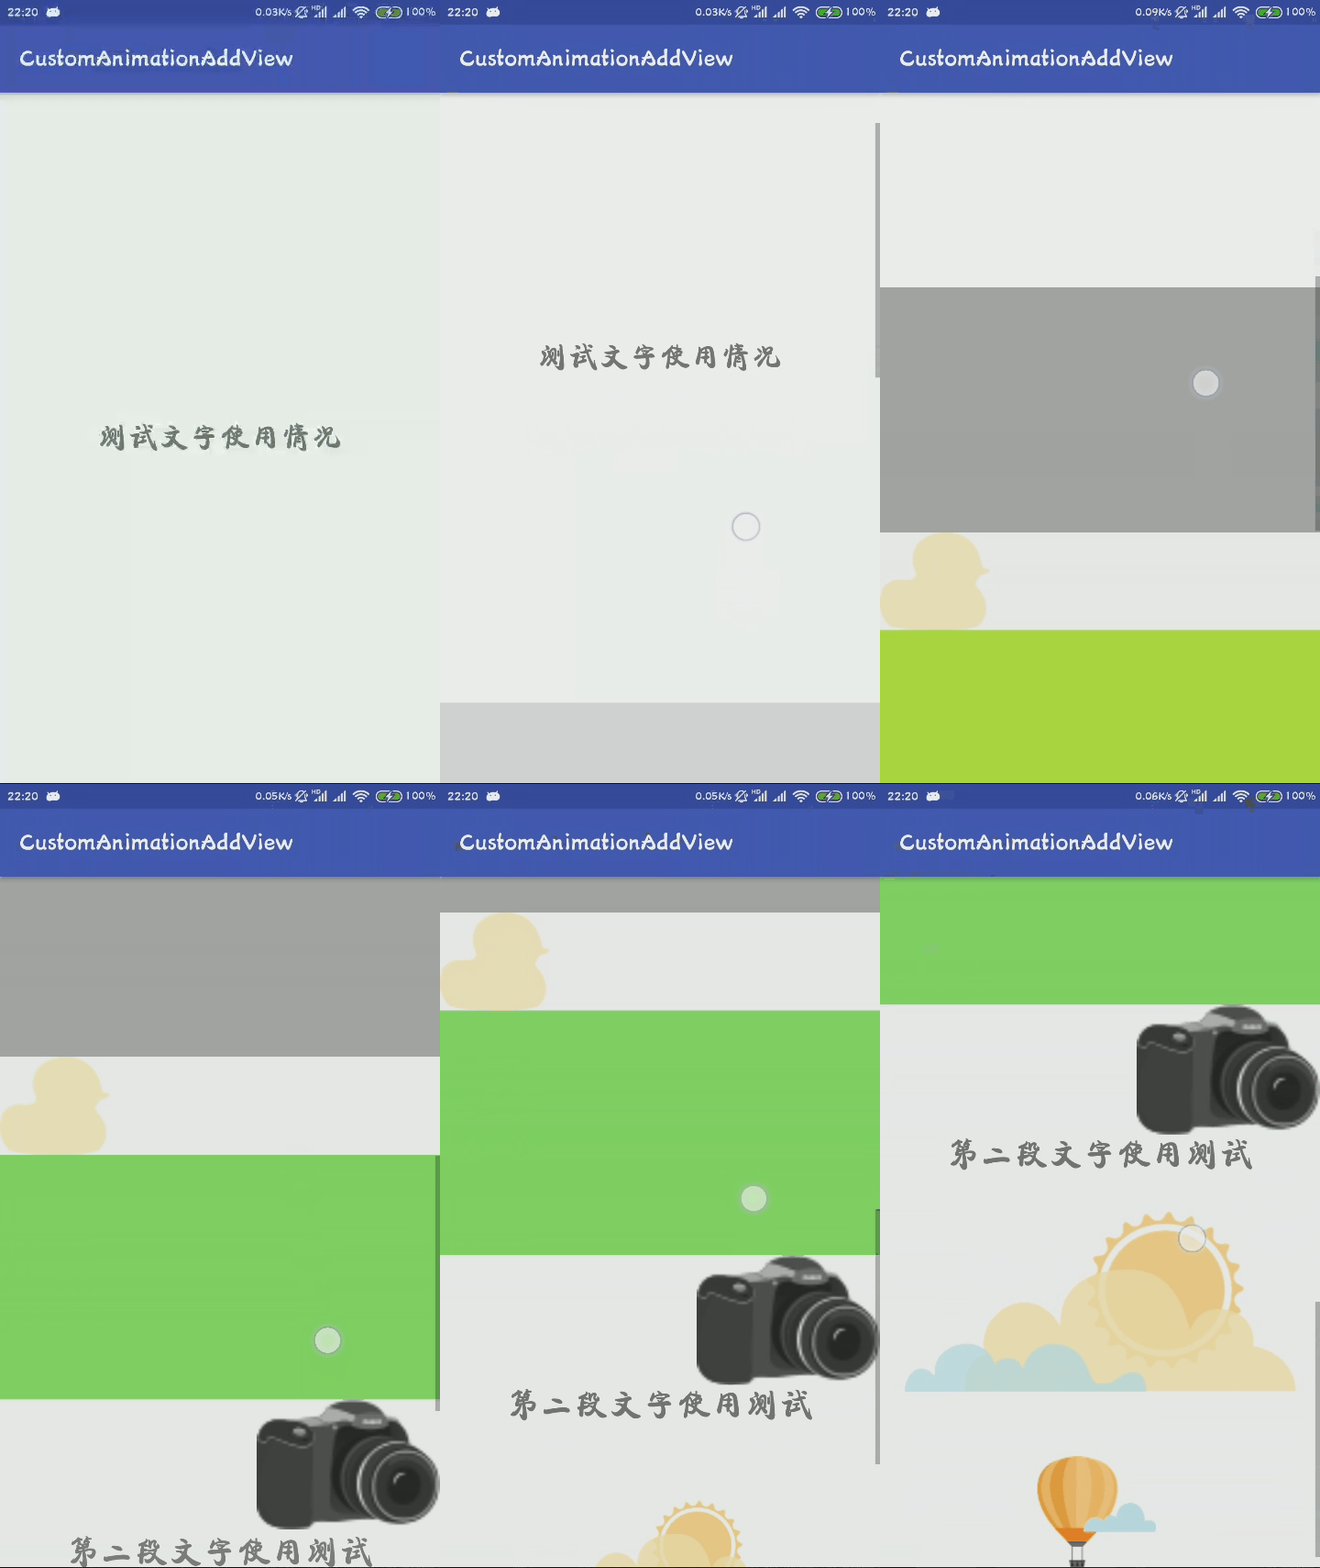
这里做一个滑动的自定义动画
在滑动的View里面,需要实现滑动时候和重置的工作,这里有一个接口,及实现接口的方法来做
public interface DiscrollvableInterface {//当滑动的时候调用该方法,用来控制里面的控件执行相应的动画void onDiscrollve(float ratio);//重置view的属性----恢复view的原来属性void onResetDiscrollve();}
实现上面的接口
public class DiscrollvableView extends FrameLayout implements DiscrollvableInterface {private static final int TRANSLATION_FROM_TOP = 0x01;private static final int TRANSLATION_FROM_BOTTOM = 0x02;private static final int TRANSLATION_FROM_LEFT = 0x04;private static final int TRANSLATION_FROM_RIGHT = 0x08;//颜色估值器private static ArgbEvaluator sArgbEvaluator = new ArgbEvaluator();//自定义属性的一些接收的变量private int mDiscrollveFromBgColor;//背景颜色变化开始值private int mDiscrollveToBgColor;//背景颜色变化结束值private boolean mDiscrollveAlpha;//是否需要透明度动画private int mDisCrollveTranslation;//平移值private boolean mDiscrollveScaleX;//是否需要x轴方向缩放private boolean mDiscrollveScaleY;//是否需要y轴方向缩放private int mHeight;//本view的高度private int mWidth;//宽度public void setmDiscrollveFromBgColor(int mDiscrollveFromBgColor) {this.mDiscrollveFromBgColor = mDiscrollveFromBgColor;}public void setmDiscrollveToBgColor(int mDiscrollveToBgColor) {this.mDiscrollveToBgColor = mDiscrollveToBgColor;}public void setmDiscrollveAlpha(boolean mDiscrollveAlpha) {this.mDiscrollveAlpha = mDiscrollveAlpha;}public void setmDisCrollveTranslation(int mDisCrollveTranslation) {this.mDisCrollveTranslation = mDisCrollveTranslation;}public void setmDiscrollveScaleX(boolean mDiscrollveScaleX) {this.mDiscrollveScaleX = mDiscrollveScaleX;}public void setmDiscrollveScaleY(boolean mDiscrollveScaleY) {this.mDiscrollveScaleY = mDiscrollveScaleY;}@Overrideprotected void onSizeChanged(int w, int h, int oldw, int oldh) {super.onSizeChanged(w, h, oldw, oldh);mWidth = w;mHeight = h;onResetDiscrollve();}public DiscrollvableView(Context context, AttributeSet attrs) {super(context, attrs);}public DiscrollvableView(Context context) {super(context);}@Overridepublic void onDiscrollve(float ratio) {// ratio:0~1//控制自身的动画属性if (mDiscrollveAlpha) {setAlpha(ratio);}if (mDiscrollveScaleX) {setScaleX(ratio);}if (mDiscrollveScaleY) {setScaleY(ratio);}//判断到底是哪一种值:fromTop,fromBottom,fromLeft,fromRightif (isDiscrollTranslationFrom(TRANSLATION_FROM_BOTTOM)) {setTranslationY(mHeight * (1 - ratio));//mHeight-->0(代表原来的位置)}if (isDiscrollTranslationFrom(TRANSLATION_FROM_TOP)) {setTranslationY(-mHeight * (1 - ratio));//-mHeight-->0(代表原来的位置)}if (isDiscrollTranslationFrom(TRANSLATION_FROM_LEFT)) {setTranslationX(-mWidth * (1 - ratio));//-width-->0(代表原来的位置)}if (isDiscrollTranslationFrom(TRANSLATION_FROM_RIGHT)) {setTranslationX(mWidth * (1 - ratio));//width-->0(代表原来的位置)}//颜色渐变动画if (mDiscrollveFromBgColor != -1 && mDiscrollveToBgColor != -1) {//ratio=0.5 color=中间颜色setBackgroundColor((Integer) sArgbEvaluator.evaluate(ratio, mDiscrollveFromBgColor, mDiscrollveToBgColor));}}private boolean isDiscrollTranslationFrom(int translationMask) {if (mDisCrollveTranslation == -1) {return false;}//fromLeft|fromBottom & fromBottom = fromBottomreturn (mDisCrollveTranslation & translationMask) == translationMask;}@Overridepublic void onResetDiscrollve() {//控制自身的动画属性if (mDiscrollveAlpha) {setAlpha(0);}if (mDiscrollveScaleX) {setScaleX(0);}if (mDiscrollveScaleY) {setScaleY(0);}//判断到底是哪一种值:fromTop,fromBottom,fromLeft,fromRightif (isDiscrollTranslationFrom(TRANSLATION_FROM_BOTTOM)) {setTranslationY(mHeight);//mHeight-->0(代表原来的位置)}if (isDiscrollTranslationFrom(TRANSLATION_FROM_TOP)) {setTranslationY(-mHeight);//-mHeight-->0(代表原来的位置)}if (isDiscrollTranslationFrom(TRANSLATION_FROM_LEFT)) {setTranslationX(-mWidth);//-width-->0(代表原来的位置)}if (isDiscrollTranslationFrom(TRANSLATION_FROM_RIGHT)) {setTranslationX(mWidth);//width-->0(代表原来的位置)}}}
那么便完成了对于滑动效果的控制,为了便于控制,自定义View继承ScrollView
public class DiscrollView extends ScrollView {private DiscrollViewContent mContent;public DiscrollView(Context context, AttributeSet attrs) {super(context, attrs);}@Overrideprotected void onFinishInflate() {super.onFinishInflate();View content = getChildAt(0);mContent = (DiscrollViewContent) content;}@Overrideprotected void onSizeChanged(int w, int h, int oldw, int oldh) {super.onSizeChanged(w, h, oldw, oldh);View first = mContent.getChildAt(0);first.getLayoutParams().height = getHeight();}@Overrideprotected void onScrollChanged(int l, int t, int oldl, int oldt) {super.onScrollChanged(l, t, oldl, oldt);int scrollViewHeight = getHeight();//监听滑动----接口---->控制DiscrollViewContent的属性//遍历MyLinearLayout里面所有子控件(MyViewGroup)for (int i = 0; i < mContent.getChildCount(); i++) {View child = mContent.getChildAt(i);if (!(child instanceof DiscrollvableInterface)) {continue;}//ratio:0~1DiscrollvableInterface discrollvableInterface = (DiscrollvableInterface) child;//1.child离scrollview顶部的高度int discrollvableTop = child.getTop();int discrollvableHeight = child.getHeight();//2.得到scrollview滑出去的高度//3.得到child离屏幕顶部的高度int discrollvableAbsoluteTop = discrollvableTop - t;//什么时候执行动画?当child滑进屏幕的时候if (discrollvableAbsoluteTop <= scrollViewHeight) {int visibleGap = scrollViewHeight - discrollvableAbsoluteTop;//确保ratio是在0~1,超过了1 也设置为1discrollvableInterface.onDiscrollve(clamp(visibleGap / (float) discrollvableHeight, 1f, 0f));} else {//否则,就恢复到原来的位置discrollvableInterface.onResetDiscrollve();}}}public static float clamp(float value, float max, float min) {return Math.max(Math.min(value, max), min);}}
设置属性,偷梁换柱
public class DiscrollViewContent extends LinearLayout {public DiscrollViewContent(Context context, AttributeSet attrs) {super(context, attrs);setOrientation(VERTICAL);}@Overridepublic LayoutParams generateLayoutParams(AttributeSet attrs) {// 得到xml里面穿过来的参数return new MyLayoutParams(getContext(), attrs);}@Overridepublic void addView(View child, int index, android.view.ViewGroup.LayoutParams params) {//从child里面拿到我自定义的属性,传到discrollvableView里面MyLayoutParams p = (MyLayoutParams) params;if (!isDiscrollvable(p)) {//判断该view是否穿了自定义属性值,不是就不需要执行动画,不包一层FrameLayoutsuper.addView(child, index, params);} else {//在addView里面插一脚,往child外面包裹一层FrameLayoutDiscrollvableView discrollvableView = new DiscrollvableView(getContext());discrollvableView.setmDiscrollveAlpha(p.mDiscrollveAlpha);discrollvableView.setmDisCrollveTranslation(p.mDisCrollveTranslation);discrollvableView.setmDiscrollveScaleX(p.mDiscrollveScaleX);discrollvableView.setmDiscrollveScaleY(p.mDiscrollveScaleY);discrollvableView.setmDiscrollveFromBgColor(p.mDiscrollveFromBgColor);discrollvableView.setmDiscrollveToBgColor(p.mDiscrollveToBgColor);discrollvableView.addView(child);super.addView(discrollvableView, index, params);}}private boolean isDiscrollvable(MyLayoutParams p) {return p.mDiscrollveAlpha || p.mDiscrollveScaleX|| p.mDiscrollveScaleY || p.mDisCrollveTranslation != -1|| (p.mDiscrollveFromBgColor != -1 && p.mDiscrollveToBgColor != -1);}public static class MyLayoutParams extends LinearLayout.LayoutParams {public int mDiscrollveFromBgColor;//背景颜色变化开始值public int mDiscrollveToBgColor;//背景颜色变化结束值public boolean mDiscrollveAlpha;//是否需要透明度动画public int mDisCrollveTranslation;//平移值public boolean mDiscrollveScaleX;//是否需要x轴方向缩放public boolean mDiscrollveScaleY;//是否需要y轴方向缩放public MyLayoutParams(Context context, AttributeSet attrs) {super(context, attrs);// 从child里面拿到我自定义的属性TypedArray a = context.obtainStyledAttributes(attrs, R.styleable.DiscrollView_LayoutParams);mDiscrollveAlpha = a.getBoolean(R.styleable.DiscrollView_LayoutParams_discrollve_alpha, false);mDiscrollveScaleX = a.getBoolean(R.styleable.DiscrollView_LayoutParams_discrollve_scaleX, false);mDiscrollveScaleY = a.getBoolean(R.styleable.DiscrollView_LayoutParams_discrollve_scaleY, false);mDisCrollveTranslation = a.getInt(R.styleable.DiscrollView_LayoutParams_discrollve_translation, -1);mDiscrollveFromBgColor = a.getColor(R.styleable.DiscrollView_LayoutParams_discrollve_fromBgColor, -1);mDiscrollveToBgColor = a.getColor(R.styleable.DiscrollView_LayoutParams_discrollve_toBgColor, -1);a.recycle();}}}
最后是一些自定义属性
<?xml version="1.0" encoding="UTF-8"?><resources><declare-styleable name="DiscrollView_LayoutParams"><attr name="discrollve_alpha" format="boolean"/><attr name="discrollve_scaleX" format="boolean"/><attr name="discrollve_scaleY" format="boolean"/><attr name="discrollve_fromBgColor" format="color"/><attr name="discrollve_toBgColor" format="color"/><attr name="discrollve_translation"/></declare-styleable><attr name="discrollve_translation"><flag name="fromTop" value="0x01" /><flag name="fromBottom" value="0x02" /><flag name="fromLeft" value="0x04" /><flag name="fromRight" value="0x08" /></attr></resources>
布局
<com.cj5785.customanimationaddview.DiscrollView xmlns:android="http://schemas.android.com/apk/res/android"xmlns:custom="http://schemas.android.com/apk/res-auto"android:layout_width="match_parent"android:layout_height="match_parent"><com.cj5785.customanimationaddview.DiscrollViewContentandroid:layout_width="match_parent"android:layout_height="match_parent"><TextViewandroid:layout_width="match_parent"android:layout_height="560dp"android:background="@android:color/white"android:gravity="center"android:text="测试文字使用情况"android:textSize="25sp" /><Viewandroid:layout_width="match_parent"android:layout_height="200dp"android:background="@android:color/darker_gray"custom:discrollve_alpha="true" /><ImageViewandroid:layout_width="89dp"android:layout_height="80dp"android:src="@drawable/duck"custom:discrollve_alpha="true"custom:discrollve_translation="fromLeft|fromBottom" /><Viewandroid:layout_width="match_parent"android:layout_height="200dp"custom:discrollve_fromBgColor="#ffff00"custom:discrollve_toBgColor="#88EE66" /><ImageViewandroid:layout_width="150dp"android:layout_height="106dp"android:layout_gravity="right"android:src="@drawable/camera"custom:discrollve_translation="fromRight" /><TextViewandroid:layout_width="match_parent"android:layout_height="wrap_content"android:gravity="center"android:text="第二段文字使用测试"android:textSize="28sp"custom:discrollve_alpha="true"custom:discrollve_translation="fromBottom" /><ImageViewandroid:layout_width="wrap_content"android:layout_height="wrap_content"android:layout_gravity="center"android:layout_margin="20dp"android:src="@drawable/sun"custom:discrollve_scaleX="true"custom:discrollve_scaleY="true" /><ImageViewandroid:layout_width="wrap_content"android:layout_height="wrap_content"android:layout_gravity="center"android:layout_margin="20dp"android:src="@drawable/balloon"custom:discrollve_translation="fromLeft|fromBottom" /></com.cj5785.customanimationaddview.DiscrollViewContent></com.cj5785.customanimationaddview.DiscrollView>
效果如下

自定义LayoutInflater
这里实现一个仿小红书的视差动画效果
首先定义一个根布局,然后实例化其自定义控件
<RelativeLayout xmlns:android="http://schemas.android.com/apk/res/android"xmlns:tools="http://schemas.android.com/tools"android:layout_width="match_parent"android:layout_height="match_parent"android:background="@android:color/white"><com.cj5785.customanimationlayoutinflater.ParallaxContainerandroid:id="@+id/parallax_container"android:layout_width="match_parent"android:layout_height="match_parent"/><ImageViewandroid:id="@+id/iv_man"android:layout_width="66dp"android:layout_height="202dp"android:layout_alignParentBottom="true"android:layout_centerHorizontal="true"android:layout_marginBottom="10dp"android:background="@drawable/intro_item_manrun_1"/></RelativeLayout>
实例化自定义控件,在最后一个登陆界面,由于与前面的不同,使用切换Fragment的方式,需要使用到适配器
适配器
public class ParallaxAdapter extends FragmentPagerAdapter {private List<ParallaxFragment> fragmentList;public ParallaxAdapter(FragmentManager fm, List<ParallaxFragment> fragmentList) {super(fm);this.fragmentList = fragmentList;}@Overridepublic Fragment getItem(int position) {return fragmentList.get(position);}@Overridepublic int getCount() {return fragmentList.size();}}
自定义Fragment,其主要的偷梁换柱工作就是在这里完成的,返回我们处理以后的View
public class ParallaxFragment extends Fragment {private List<View> parallaxViews = new ArrayList<>();@Nullable@Overridepublic View onCreateView(@NonNull LayoutInflater inflater, @Nullable ViewGroup container, @Nullable Bundle savedInstanceState) {Bundle bundle = getArguments();int layoutId = bundle.getInt("layoutId");//正常情况下在这里获得view,然后返回,我们就在这里偷梁换柱// View view = inflater.inflate(layoutId, container);//使用自定义的渲染器渲染ParallaxLayoutInflater layoutInflater = new ParallaxLayoutInflater(inflater, getActivity(), this);return layoutInflater.inflate(layoutId, null);}public List<View> getParallaxViews() {return parallaxViews;}}
动画引导层
//引导页的最外层布局public class ParallaxContainer extends FrameLayout implements OnPageChangeListener {private List<ParallaxFragment> fragmentList;private ParallaxAdapter adapter;private float containerWidth;private ImageView iv_man;public ParallaxContainer(@NonNull Context context, @Nullable AttributeSet attrs) {super(context, attrs);}//指定引导页的所有页面布局文件public void setUp(int... ids) {//初始化framentList,在调用处直接调用setUp()fragmentList = new ArrayList<>();for (int i = 0; i < ids.length; i++) {ParallaxFragment fragment = new ParallaxFragment();Bundle bundle = new Bundle();//Fragment中需要加载的布局文件idbundle.putInt("layoutId", ids[i]);fragment.setArguments(bundle);fragmentList.add(fragment);}//设置ViewPagerViewPager viewPager = new ViewPager(getContext());viewPager.setLayoutParams(new LayoutParams(LayoutParams.MATCH_PARENT, LayoutParams.MATCH_PARENT));viewPager.setId(R.id.parallax_pager);adapter = new ParallaxAdapter(((MainActivity) getContext()).getSupportFragmentManager(), fragmentList);viewPager.setAdapter(adapter);addView(viewPager, 0);//设置监听viewPager.addOnPageChangeListener(this);}@Overridepublic void onPageScrolled(int position, float positionOffset, int positionOffsetPixels) {containerWidth = getWidth();//在翻页的过程中,不断根据视图的标签中对应的动画参数,改变视图的位置或者透明度//获取到进入的页面ParallaxFragment inFragment = null;try {inFragment = fragmentList.get(position - 1);} catch (Exception e) {}//获取到退出的页面ParallaxFragment outFragment = null;try {outFragment = fragmentList.get(position);} catch (Exception e) {}if (inFragment != null) {//获取Fragment上所有的视图,实现动画效果List<View> inViews = inFragment.getParallaxViews();if (inViews != null) {for (View view : inViews) {//获取标签,从标签上获取所有的动画参数ParallaxViewTag tag = (ParallaxViewTag) view.getTag(R.id.parallax_view_tag);if (tag == null) {continue;}//translationY改变view的偏移位置,translationY=100,代表view在其原始位置向下移动100//仔细观察进入的fragment中view从远处过来,不断向下移动,最终停在原始位置view.setTranslationX((containerWidth - positionOffsetPixels) * tag.xIn);view.setTranslationY((containerWidth - positionOffsetPixels) * tag.yIn);}}}if (outFragment != null) {List<View> outViews = outFragment.getParallaxViews();if (outViews != null) {for (View view : outViews) {ParallaxViewTag tag = (ParallaxViewTag) view.getTag(R.id.parallax_view_tag);if (tag == null) {continue;}//仔细观察退出的fragment中view从原始位置开始向上移动,translationY应为负数view.setTranslationX((-positionOffsetPixels) * tag.xOut);view.setTranslationY((-positionOffsetPixels) * tag.yOut);}}}}@Overridepublic void onPageSelected(int position) {if (position == adapter.getCount() - 1) {iv_man.setVisibility(INVISIBLE);} else {iv_man.setVisibility(VISIBLE);}}@Overridepublic void onPageScrollStateChanged(int state) {AnimationDrawable animation = (AnimationDrawable) iv_man.getBackground();switch (state) {case ViewPager.SCROLL_STATE_DRAGGING:animation.start();break;case ViewPager.SCROLL_STATE_IDLE:animation.stop();break;default:break;}}public void setIv_man(ImageView iv_man) {this.iv_man = iv_man;}}
拦截系统处理xml
public class ParallaxLayoutInflater extends LayoutInflater {private static final String TAG = "ParallaxLayoutInflater";private ParallaxFragment parallaxFragment;protected ParallaxLayoutInflater(LayoutInflater original, Context newContext, ParallaxFragment parallaxFragment) {super(original, newContext);this.parallaxFragment = parallaxFragment;//源代码中存在://View view;//if (mFactory2 != null) {// view = mFactory2.onCreateView(parent, name, context, attrs);//} else if (mFactory != null) {// view = mFactory.onCreateView(name, context, attrs);//} else {// view = null;//}//if (view == null && mPrivateFactory != null) {// view = mPrivateFactory.onCreateView(parent, name, context, attrs);//}//也就是说只要实现Factory,那么就不会调用后面的方法setFactory(new ParallaxFactory(this));}@Overridepublic LayoutInflater cloneInContext(Context newContext) {//实际用于创建LayoutInflater的方法return new ParallaxLayoutInflater(this, newContext, parallaxFragment);}//这个框架最核心的地方就是在这里设置Factory,从而进行拦截class ParallaxFactory implements LayoutInflater.Factory{private LayoutInflater inflater;//系统提供的视图分为android.widget.xxx和android.view.xxxprivate final String[] prefixs = {"android.widget.","android.view."};public ParallaxFactory(LayoutInflater inflater) {this.inflater = inflater;}@Overridepublic View onCreateView(String name, Context context, AttributeSet attrs) {//实例化viewView view = null;if (view == null) {view = createViewOrFailQuietly(name,context,attrs);}if (view != null) {//获取自定义属性,并将自定义标签值绑定到view上面getCustomAttrs(context, attrs, view);parallaxFragment.getParallaxViews().add(view);}return view;}private void getCustomAttrs(Context context, AttributeSet attrs, View view) {//所有自定义的属性int[] attrIds = {R.attr.a_in,R.attr.a_out,R.attr.x_in,R.attr.x_out,R.attr.y_in,R.attr.y_out};//获取TypedArray typedArray = context.obtainStyledAttributes(attrs, attrIds);if (typedArray != null && typedArray.length() > 0) {//获取自定义属性的值Log.d(TAG, "getCustomAttrs");ParallaxViewTag tag = new ParallaxViewTag();tag.alphaIn = typedArray.getFloat(0, 0f);tag.alphaOut = typedArray.getFloat(1, 0f);tag.xIn = typedArray.getFloat(2, 0f);tag.xOut = typedArray.getFloat(3, 0f);tag.yIn = typedArray.getFloat(4, 0f);tag.yOut = typedArray.getFloat(5, 0f);view.setTag(R.id.parallax_view_tag, tag);}typedArray.recycle();}private View createViewOrFailQuietly(String name, String prefix, Context context, AttributeSet attrs) {try {//通过系统的inflater创建视图,读取系统的属性return inflater.createView(name, prefix, attrs);} catch (ClassNotFoundException e) {e.printStackTrace();return null;}}private View createViewOrFailQuietly(String name, Context context, AttributeSet attrs) {//通过系统inflater创建视图//1.自定义控件标签名称带点,所以创建时不需要前缀if (name.contains(".")) {return createViewOrFailQuietly(name, null, context, attrs);}//2.系统视图需要加上前缀for (String prefix : prefixs) {View view = createViewOrFailQuietly(name, prefix, context, attrs);if (view != null) {return view;}}return null;}}}
参数控制
//视差动画播放时参数的控制public class ParallaxViewTag {protected int index;protected float xIn;protected float xOut;protected float yIn;protected float yOut;protected float alphaIn;protected float alphaOut;@Overridepublic String toString() {return "ParallaxViewTag [index=" + index + ", xIn=" + xIn + ", xOut=" + xOut + ", yIn=" + yIn+ ", yOut=" + yOut + ", alphaIn=" + alphaIn + ", alphaOut=" + alphaOut + "]";}}
同时完成人行走的帧动画
<?xml version="1.0" encoding="utf-8"?><animation-list xmlns:android="http://schemas.android.com/apk/res/android"android:oneshot="false"><itemandroid:drawable="@drawable/intro_item_manrun_1"android:duration="200" /><itemandroid:drawable="@drawable/intro_item_manrun_2"android:duration="200" /></animation-list>
自定义属性
<?xml version="1.0" encoding="utf-8"?><resources><attr name="a_in" format="float" /><attr name="a_out" format="float" /><attr name="x_in" format="float" /><attr name="x_out" format="float" /><attr name="y_in" format="float" /><attr name="y_out" format="float" /></resources>
ids
<?xml version="1.0" encoding="utf-8"?><resources><item name="parallax_pager" type="id"/><item name="parallax_view_tag" type="id"/></resources>
实现效果如下图所示

高级UI-自定义动画框架的更多相关文章
- 深入学习jQuery自定义动画
× 目录 [1]属性对象 [2]可选参数 [3]选项参数 前面的话 很多情况下,前面介绍的jQuery动画的简单效果无法满足用户的各种需求,那么就需要对动画有更多的限制,需要采取一些高级的自定义动画来 ...
- 高级UI晋升之自定义View实战(六)
更多Android高级架构进阶视频学习请点击:https://space.bilibili.com/474380680本篇文章将从Android 自定义属性动画&Camera动画来介绍自定义V ...
- 高级UI晋升之自定义View实战(五)
更多Android高级架构进阶视频学习请点击:https://space.bilibili.com/474380680本篇文章将从自定义View利器Canvas和Paint来进行详解 一.Canvas ...
- Android开发UI之自定义动画
自定义动画,需要新建一个类,继承Animation类. 重写applyTransformation()方法和initialize()方法. applyTransformation(float inte ...
- UI设计篇·入门篇·简单动画的实现,透明动画/旋转动画/移动动画/缩放动画,混合动画效果的实现,为动画设置监听事件,自定义动画的方法
基本的动画构成共有四种:透明动画/旋转动画/移动动画/缩放动画. 配置动画的方式有两种,一种是直接使用代码来配置动画效果,另一种是使用xml文档配置动画效果 相比而言,用xml文档写出来的动画效果,写 ...
- 高级UI晋升之常用View(三)中篇
更多Android高级架构进阶视频学习请点击:https://space.bilibili.com/474380680本篇文章将从ViewPager来介绍常用View:文章目录 一.简介 二.基本使用 ...
- firefox 扩展开发笔记(三):高级ui交互编程
firefox 扩展开发笔记(三):高级ui交互编程 前言 前两篇链接 1:firefox 扩展开发笔记(一):jpm 使用实践以及调试 2:firefox 扩展开发笔记(二):进阶开发之移动设备模拟 ...
- Android 高级UI设计笔记07:RecyclerView 的详解
1. 使用RecyclerView 在 Android 应用程序中列表是一个非常重要的控件,适用场合非常多,如新闻列表.应用列表.消息列表等等,但是从Android 一出生到现在并没有非常 ...
- iOS 8自定义动画转场上手指南
原文:http://www.cocoachina.com/ios/20150126/11011.html iOS 5发布的时候,苹果针对应用程序界面的设计,提出了一种全新的,革命性的方法—Storyb ...
随机推荐
- 【HTML】解析原理
标准的web前端工程师需要知道 ◎浏览器(或者相应播放器)的渲染/重绘原理 这我得加把劲了.我还真的说的不是很清楚,我就G下,结果不是很多,找到了有一个,就记下来了... 以下部分来自handawei ...
- cube.js 学习(一)简单项目创建
cube.js 是一个很不错的模块化分析框架,基于schema生成sql 同时内置可代码生成,可以快速的搞定 web 分析应用的开发 安装cli 工具 npm install -g cubejs-cl ...
- Codevs 3160 最长公共子串(后缀数组)
3160 最长公共子串 时间限制: 2 s 空间限制: 128000 KB 题目等级 : 大师 Master 题目描述 Description 给出两个由小写字母组成的字符串,求它们的最长公共子串的长 ...
- 洛谷 P1842 奶牛玩杂技 题解
P1842 奶牛玩杂技 题目背景 Farmer John 养了N(1<=N<=50,000)头牛,她们已经按1~N依次编上了号.FJ所不知道的是,他的所有牛都梦想着从农场逃走,去参加马戏团 ...
- 转载:Spark GraphX详解
1.GraphX介绍 1.1 GraphX应用背景 Spark GraphX是一个分布式图处理框架,它是基于Spark平台提供对图计算和图挖掘简洁易用的而丰富的接口,极大的方便了对分布式图处理的需求. ...
- Loadrunner录制+运行+结果-【飞机订票系统实战】
目录结构: 一.LoadRunner实现订票系统脚本录制 二.Loadrunner实现订票系统IP欺骗(此处可以不设置) 三.Loadrunner运行录制的脚本 四.Load generator配置 ...
- 13.mysql数据库
1.mysql数据库建立 yum install mysql-server mysql -u root mysqladmin ...
- input type color
<input type="color"> https://developer.mozilla.org/en-US/docs/Web/HTML/Element/input ...
- 关于Delphi中二维数组的声明和大小调整
这是一个实例: procedure TMainForm.Button1Click(Sender: TObject);var arr:array of array of string;begin s ...
- 后端小白的Bootstrap笔记 一
栅格系统 下面这张图是Bootstrap对栅格系统有关系数的规定 什么是栅格体统? 栅格系统是Bootstrap提供的移动优先的网格系统, 各个分界点如上: 576px 720px 992px 120 ...
