Nginx入门篇(四)之常用配置解析
1、Nginx状态信息功能
Nginx的模块当中有一个ngx_http_stub_status_module模块,这个模块主要记录Nginx的基本访问信息,要使用该模块,需要在编译的时候增加http_stub_status_module模块进行支持,可使用以下方法检查是否安装该模块:
[root@localhost ~]# nginx -V

nginx version: nginx/1.15.

built by gcc 4.8.  (Red Hat 4.8.-) (GCC)

built with OpenSSL 1.0.2k-fips   Jan

TLS SNI support enabled

configure arguments: --user=nginx --group=nginx --prefix=/usr/local/nginx1.15.1 --with-http_stub_status_module --with-http_ssl_module
配置Nginx status
[root@localhost vhosts]# vim www.abc.org.conf

server {

    listen ;

    server_name www.abc.org;

    root /vhosts/html/www;

    index index.html index.htm index.php;

    location /nginx_status {

        stub_status on;  #打开状态信息开关

        access_log off;

    }

}

[root@localhost vhosts]# nginx -t

nginx: the configuration file /usr/local/nginx1.15.1/conf/nginx.conf syntax is ok

nginx: configuration file /usr/local/nginx1.15.1/conf/nginx.conf test is successful

[root@localhost vhosts]# nginx -s reload
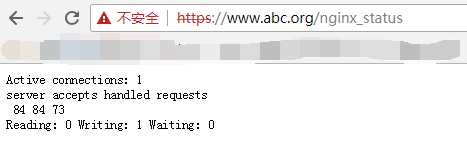
访问:http://www.abc.org/nginx_status
Active connections:    #表示Nginx正在处理的活动连接

server accepts handled requests

Reading:  Writing:  Waiting:

第一个server表示Nginx启动到现在工处理了27个连接;
第二个accepts表示Nginx启动到现在工成功创建了27次握手;
请求丢失数 = (握手数 - 连接数),可以看出,本次状态显示没有请求丢失
第三个handled requested,表示总共处理了29次请求;
Reading为Nginx读取到客户端的Header信息数;
Writing为Nginx返回给客户端的Header信息数;
Waiting为Nginx已经处理完正在等候下一次请求指令的驻留连接。在开启keepalived的情况下,这个值等于active - (reading + writing)
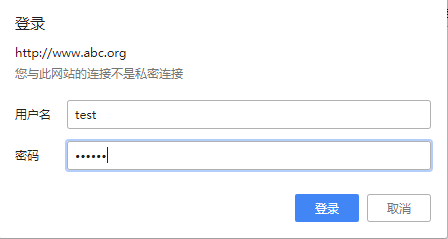
为了安全起见,一般该状态信息连接,需要防止外部用户访问,那么可以采用用户认证的方式进行限制,如下
2、Nginx的用户认证
(1)添加test用户,并使用md5加密
[root@localhost vhosts]# htpasswd -c -m /usr/local/nginx/conf/htpasswd test

New password: 123456

Re-type new password: 123456

Adding password for user test

(2)修改虚拟主机配置文件

[root@localhost vhosts]# vim www.abc.org.conf

server {

        listen ;

        server_name www.abc.org;

        root /vhosts/html/www;

        index index.html index.htm index.php;

        location /nginx_status {

                auth_basic "Please input your acount";  #添加认证提示

                auth_basic_user_file /usr/local/nginx/conf/htpasswd;  #指定basic的密码文件

                stub_status on;

                access_log off;

        }

}


(3)检测语法,重载nginx

[root@localhost vhosts]# nginx -t

nginx: the configuration file /usr/local/nginx1.15.1/conf/nginx.conf syntax is ok

nginx: configuration file /usr/local/nginx1.15.1/conf/nginx.conf test is successful

[root@localhost vhosts]# nginx -s reload
再次访问:http://www.abc.org/nginx_status,将会提示需要输入用户密码验证才能访问
3、Nginx的错误日志配置
Nginx会把自身运行的故障信息及用户访问的日志信息记录到指定的日志文件当中。配置记录Nginx的错误信息是调试Nginx的重要手段,属于ngx_core_module模块的参数,参数名为error_log,可以放在main区块中全局配置,也可以放在不同的虚拟主机进行单独记录。
error_log的语法格式及参数语法说明:
error_log    file        level;

关键字     日志文件    错误日志级别
其中,关键字error_log不能改变,日志文件可以指定任意存放日志的目录,错误日志级别常见的有[debug |info |notice|warn|error|crit|alert|emerg],级别越高,记录的信息越少,一般使用warn|error|crit这三个级别之一,注意不要配置info这种较低级别,会带来巨大的磁盘I/O消耗。
[root@localhost vhosts]# vim www.abc.org.conf

server {

        listen ;

        server_name www.abc.org;

        root /vhosts/html/www;

        index index.html index.htm index.php;

        error_log logs/www.abc.org_error.log crit;  #配置错误日志,级别为crit

        location /nginx_status {

                auth_basic "Please input your acount";

                auth_basic_user_file /usr/local/nginx/conf/htpasswd;

                stub_status on;

                access_log off;

        }

}

[root@localhost vhosts]# nginx -t

nginx: the configuration file /usr/local/nginx1.15.1/conf/nginx.conf syntax is ok

nginx: configuration file /usr/local/nginx1.15.1/conf/nginx.conf test is successful

[root@localhost vhosts]# nginx -s reload

[root@localhost vhosts]# ll /usr/local/nginx/logs/www.abc.org_error.log   #查看产生的错误日志文件

-rw-r--r--  root root  Jul  : /usr/local/nginx/logs/www.abc.org_error.log
4、Nginx访问日志配置
Nginx软件会把每个用户访问网站的日志信息都记录到指定的日志文件中,可以让运维人员更好地分析用户的浏览行为,该功能由ngx_http_log_module模块负责。其访问日志主要有2个参数控制:
log_format:定义记录日志的格式
access_log:指定日志子文件的路径以及使用哪种日志格式记录。
Nginx的默认日志格式如下:
log_format  main  '$remote_addr - $remote_user [$time_local] "$request" '

                      '$status $body_bytes_sent "$http_referer" '

                      '"$http_user_agent" "$http_x_forwarded_for"';

日志中的变量说明:
$remote_addr:记录访问网站的客户端地址
$http_x_forwarded_for:当前端有代理服务器时,设置Web节点记录客户端地址的配置,此参数生效的前提是代理服务器上也进行了相关的x_forwarded_for设置
$remote_user:远程客户端用户名称
$time_local:记录访问时间和时区
$request:用户的http请求起始行信息
$status:http状态码,记录请求返回的状态,例如:200、503
$body_bytes_sents:服务器发送给客户端的响应主体字节数
$http_referer:记录此次请求是从哪个链接访问过来的,可以根据referer进行防盗链设置
$http_user_agent:记录客户端访问信息,例如:浏览器、手机客户端等
记录日志配置如下:
access_log logs/access.log main;
实际应用例子:
[root@localhost vhosts]# cat /usr/local/nginx/logs/www.abc.org_access.log   #每个对应相应的颜色

192.168.56.1 - test [17/Jul/2018:07:20:44 -0400] "GET / HTTP/1.1"   "-" "Mozilla/5.0 (Windows NT 6.1; Win64; x64) AppleWebKit/537.36 (KHTML, like Gecko) Chrome/67.0.3396.87 Safari/537.36" "-"
$remoote_addr - $remote_user [time_local]       $request  $status  $body_bytes_sent  $http_referer  $$http_user_agent                                         $http_x_forwarded_for
在记录日志参数中加上buuffer和flush选项,可以在高并发的场景下提升网站的访问性能。buffer=size为存放访问日志的缓冲区大小,flush=time为将缓冲区的日志刷到磁盘的时间,gzip[=level]表示压缩级别。配置举例如下:
access_log logs/www.abc.org_access.log main gzip buffer=32k flush=5s;
由于日志记录会逐渐庞大,可以对某些资源的访问日志取消记录,配置如下:
location ~.*\.(gif|jpg|jpeg|png|bmp|swf|js|css)$

{

expires 30d;       //配置图片缓存时间

access_log off;    //表示不记录gif|jpg等类型文件

}

location ~ .*\.(js|css)$

{

     expires 12h;     //配置图片缓存时间

     access_log off;

}

过期时间指的是图片会在浏览器存储指定时间,超过这个时间就会重新刷新,配置缓存的目的是为了让网站的访问速度更加快,节省带宽。
默认的情况下Nginx会把所有的访问日志都输出到一个access.log的日志当中,时间久了,就会导致日志臃肿,不利于分析和处理,所以有必要地对日志进行按天或按小时进行切割保存。切割的方式Nginx并没有像apache一样自带日志切割工具(rotatelogs),所以只能使用脚本的方式对日志进行切割。脚本如下:
[root@localhost ~]# vim cut_nginx_log.sh

#!/bin/bash

Dateformat=$(date +%Y%m%d)

Basedir="/usr/local/nginx"

Nginxlogdir="$Basedir/logs"

Logname="access_www"

[ -d $Nginxlogdir ] && cd $Nginxlogdir || exit

[ -f ${Logname}.log || exit

/bin/mv ${Logname}.log ${Dateformat}_${Logname}.log

$Basedir/sbin/nginx -s reload

[root@localhost ~] crontab -e  #定时任务实现每天00点执行日志切割脚本
00 00 * * * /bin/bash /root/cut_nginx_log.sh >/dev/null 2>&1
5、Nginx的location语法
location使用的语法为:
location [ = | ~ | ~* | ^~ ] uri { ... }

location @name { ... }

location:指令
[=|~|~*|^~|@]:匹配标识,~和~*的区别是~为区分大小写匹配,~*为不区分大小写匹配,还可以加上逻辑符号!表示取反。^~的作用是在进行常规的字符串匹配检查后,不做正则表达式的检查。
uri:匹配的网站的网址
{...}:匹配URI后需要执行的配置段
location匹配示例:
location  = / {

  # 精确匹配 / ,主机名后面不能带任何字符串

  [ configuration A ]

}

location  / {

  # 因为所有的地址都以 / 开头,所以这条规则将匹配到所有请求

  # 但是正则和最长字符串会优先匹配

  [ configuration B ]

}

location /documents/ {

  # 匹配任何以 /documents/ 开头的地址,匹配符合以后,还要继续往下搜索

  # 只有后面的正则表达式没有匹配到时,这一条才会采用这一条

  [ configuration C ]

}

location ~ /documents/Abc {

  # 匹配任何以 /documents/ 开头的地址,匹配符合以后,还要继续往下搜索

  # 只有后面的正则表达式没有匹配到时,这一条才会采用这一条

  [ configuration C ]

}

location ^~ /images/ {

  # 匹配任何以 /images/ 开头的地址,匹配符合以后,停止往下搜索正则,采用这一条。

  [ configuration D ]

}

location ~* \.(gif|jpg|jpeg)$ {

  # 匹配所有以 gif,jpg或jpeg 结尾的请求

  # 然而,所有请求 /images/ 下的图片会被 config D 处理,因为 ^~ 到达不了这一条正则

  [ configuration E ]

}

location /images/ {

  # 字符匹配到 /images/,继续往下,会发现 ^~ 存在

  [ configuration F ]

}

location /images/abc {

  # 最长字符匹配到 /images/abc,继续往下,会发现 ^~ 存在

  # F与G的放置顺序是没有关系的

  [ configuration G ]

}

location ~ /images/abc/ {

  # 只有去掉 config D 才有效:先最长匹配 config G 开头的地址,继续往下搜索,匹配到这一条正则,采用

    [ configuration H ]

}

location ~* /js/.*/\.js
官方说明:
location = / {多个location配置的情况下匹配顺序为首先匹配 = 其次匹配 ^~ 其次是按文件中的顺序的正则匹配,最后是交给 / 通用匹配。 当匹配成功的时候,停止匹配,按当前匹配规则处理请求。

   #规则A

}

location = /login {

   #规则B

}

location ^~ /static/ {

   #规则C

}

location ~ \.(gif|jpg|png|js|css)$ {

   #规则D

}

location ~* \.png$ {

   #规则E

}

location !~ \.xhtml$ {

   #规则F

}

location !~* \.xhtml$ {

   #规则G

}

location / {

   #规则H

}

那么产生的效果如下:

访问根目录/, 比如http://localhost/ 将匹配规则A

访问 http://localhost/login 将匹配规则B,http://localhost/register 则匹配规则H

访问 http://localhost/static/a.html 将匹配规则C

访问 http://localhost/a.gif, http://localhost/b.jpg 将匹配规则D和规则E,但是规则D顺序优先,规则E不起作用,而http://localhost/static/c.png 则优先匹配到规则C

访问 http://localhost/a.PNG 则匹配规则E,而不会匹配规则D,因为规则E不区分大小写。

访问 http://localhost/a.xhtml 不会匹配规则F和规则G,http://localhost/a.XHTML不会匹配规则G,因为不区分大小写。规则F,规则G属于排除法,符合匹配规则但是不会匹配到,所以想想看实际应用中哪里会用到。

访问 http://localhost/category/id/1111 则最终匹配到规则H,因为以上规则都不匹配,这个时候应该是nginx转发请求给后端应用服务器,比如FastCGI(php),tomcat(jsp),nginx作为反向代理服务器存在。
所以实际使用中,个人觉得至少有三个匹配规则定义,如下:

直接匹配网站根,通过域名访问网站首页比较频繁,使用这个会加速处理,官网如是说。

这里是直接转发给后端应用服务器了,也可以是一个静态首页
第一个必选规则

location = / {

proxy_pass http://tomcat:8080/index

}

第二个必选规则是处理静态文件请求,这是nginx作为http服务器的强项

有两种配置模式,目录匹配或后缀匹配,任选其一或搭配使用

location ^~ /static/ {

root /webroot/static/;

}

location ~* .(gif|jpg|jpeg|png|css|js|ico)$ {

root /webroot/res/;

}

第三个规则就是通用规则,用来转发动态请求到后端应用服务器

非静态文件请求就默认是动态请求,自己根据实际把握

毕竟目前的一些框架的流行,带.php,.jsp后缀的情况很少了

location / {

proxy_pass http://tomcat:8080/

}
6、Nginx的rewrite语法
和apache一样,nginx作为web服务软件,也可以实现URL地址重写的功能。Nginx的rewrite规则需要pcre的支持。官方文档:http://nginx.org/en/docs/http/ngx_http_rewrite_module.html
rewrite的语法如下:
指令语法:rewrite regex replacement [flag];

默认值:none

应用位置:server、location、if
rewrite是实现URL重写的关键指令,根据regex(正则表达式)部分的内容,重定向到replacement部分,结尾是flag标记,比如:
rewrite ^/(.*) http://www.abc.org/$1 permanent;

在该指令当中,rewrite为固定关键字,表示开启一条rewrite匹配规则,regex部分就是^/(.*),这里是一个正则表达式,表示匹配所有,匹配成功后跳转到http://www.abc.org/$1,这里的$1是取前面的regex中括号里面的部分,即(.*)
结尾permanent,是永久301重定向的标记,即跳转到后面的http://www.abc.org/$1这个地址上。
rewrite指令中flag标记说明:
last – 基本上都用这个Flag。

break – 中止Rewirte,不在继续匹配

redirect – 返回临时重定向的HTTP状态302

permanent – 返回永久重定向的HTTP状态301

因为301和302不能简单的只返回状态码,还必须有重定向的URL,这就是return指令无法返回301,302的原因了。这里 last 和 break 区别有点难以理解:

last一般写在server和if中,而break一般使用在location中

last不终止重写后的url匹配,即新的url会再从server走一遍匹配流程,而break终止重写后的匹配

break和last都能组织继续执行后面的rewrite指令
7、if指令和全局变量
语法为if(condition){…},对给定的条件condition进行判断。如果为真,大括号内的rewrite指令将被执行,if条件(conditon)可以是如下任何内容:
当表达式只是一个变量时,如果值为空或任何以0开头的字符串都会当做false
直接比较变量和内容时,使用=或!=
~正则表达式匹配,~*不区分大小写的匹配,!~区分大小写的不匹配
(1)下面是可以用来判断的表达式:
-f和!-f用来判断是否存在文件
-d和!-d用来判断是否存在目录
-e和!-e用来判断是否存在文件或目录
-x和!-x用来判断文件是否可执行
(2)下面是可以用作判断的全局变量
if ($http_user_agent ~ MSIE) {

    rewrite ^(.*)$ /msie/$ break;

} //如果UA包含"MSIE",rewrite请求到/msid/目录下

if ($http_cookie ~* "id=([^;]+)(?:;|$)") {

    set $id $;

 } //如果cookie匹配正则,设置变量$id等于正则引用部分

if ($request_method = POST) {

    return ;

} //如果提交方法为POST,则返回状态405(Method not allowed)。return不能返回301,302

if ($slow) {

    limit_rate 10k;

} //限速,$slow可以通过 set 指令设置

if (!-f $request_filename){

    break;

    proxy_pass  http://127.0.0.1;

} //如果请求的文件名不存在,则反向代理到localhost 。这里的break也是停止rewrite检查

if ($args ~ post=){

    rewrite ^ http://example.com/ permanent;

} //如果query string中包含"post=140",永久重定向到example.com

location ~* \.(gif|jpg|png|swf|flv)$ {

    valid_referers none blocked www.jefflei.com www.leizhenfang.com;

    if ($invalid_referer) {

        return ;

    } //防盗链

}

例:http://localhost:88/test1/test2/test.php

$host:localhost

$server_port:

$request_uri:http://localhost:88/test1/test2/test.php

$document_uri:/test1/test2/test.php

$document_root:D:\nginx/html

$request_filename:D:\nginx/html/test1/test2/test.php
8、结合if和rewrite实现301跳转
(1)配置虚拟主机www.abc.org.conf
[root@localhost vhosts]# vim www.abc.org.conf

server {

    listen ;

    server_name www.abc.org abc.org;  #增加域名abc.org

    root /vhosts/html/www;

    index index.html index.htm index.php;

    if ( $host != www.abc.org )  #利用if判断访问的域名是否是www.abc.org,如果不是则执行rewrite跳转

    {

        rewrite ^/(.*)$ http://www.abc.org/$1 permanent;

    }

    access_log logs/www.abc.org_access.log main;

    error_log logs/www.abc.org_error.log crit;

    location /nginx_status {

        auth_basic "Please input your acount";

        auth_basic_user_file /usr/local/nginx/conf/htpasswd;

        stub_status on;

        access_log off;

    }

}

[root@localhost vhosts]# nginx -t

nginx: the configuration file /usr/local/nginx1.15.1/conf/nginx.conf syntax is ok

nginx: configuration file /usr/local/nginx1.15.1/conf/nginx.conf test is successful

[root@localhost vhosts]# nginx -s reload

[root@localhost ~]# curl abc.org -I  #测试访问abc.org

HTTP/1.1  Moved Permanently  #提示301跳转

Cache-Control: private

Content-Length:

Content-Type: text/html; charset=utf-

Location: http://www.abc.org/  #资源定位

X-Redirect-Reason: Wrong Portal Alias Requested

Set-Cookie: dnn_IsMobile=False; path=/; HttpOnly

X-Powered-By: ASP.NET

Date: Wed,  Jul  :: GMT
9、Nginx配置防盗链
如果一个网站的图片较多,比如淘宝,每个商品都有很多图片来展示商品,本公司也是做电商产品,有自己的平台,图片也是较多的。但是如果相应的同行就会有竞争,如果被竞争对手拿到了公司网站上的图片链接,然后放到他的网站上访问,这样竞争对手网站上的图片走的访问路径是走本公司的,流量也就在本公司服务器上产生,这会导致成本的增加,所以需要禁止别的网站转载自己网站上的图片。可在虚拟主机中配置:
location ~.*\.(gif|jpg|jpeg|png|bmp|swf|flv|rar|zip|gz|bz2)$

{

               expires 30d;       //配置图片缓存时间

               access_log off;    //表示不记录gif|jpg等类型文件

               valid_referers none blocked servernames *.taobao.com *.baidu.com *.google.com;

               if ($invalid_referer )

               {

                        return ;

                        rewirte ^/http://www.abc.org/nophoto.gif;

               }

}
valid_referers是可用的来源链,
none bolocked server_names是不进行防盗的主机域名,加起来是对于这些可用的链接不进行拦截而是加入白名单。
$invalid_referer,这里用$作为一个变量,变量名是不可用的来源链,和可用的正好相反
盗用我们图片的人访问这些图片时会跳转到http://www.abc.org/nophoto.gif,也可以直接显示403,这样更节省资源。
10、Nginx的常用变量
$args : 这个变量等于请求行中的参数,同$query_string

$content_length : 请求头中的Content-length字段。

$content_type : 请求头中的Content-Type字段。

$document_root : 当前请求在root指令中指定的值。

$host : 请求主机头字段,否则为服务器名称。

$http_user_agent : 客户端agent信息

$http_cookie : 客户端cookie信息

$limit_rate : 这个变量可以限制连接速率。

$status  请求状态

$body_bytes_sent 发送字节

$request_method : 客户端请求的动作,通常为GET或POST。

$remote_addr : 客户端的IP地址。

$remote_port : 客户端的端口。

$remote_user : 已经经过Auth Basic Module验证的用户名。

$request_filename : 当前请求的文件路径,由root或alias指令与URI请求生成。

$scheme : HTTP方法(如http,https)。

$server_protocol : 请求使用的协议,通常是HTTP/.0或HTTP/1.1。

$server_addr : 服务器地址,在完成一次系统调用后可以确定这个值。

$server_name : 服务器名称。

$server_port : 请求到达服务器的端口号。

$request_uri : 包含请求参数的原始URI,不包含主机名,如:”/foo/bar.php?arg=baz”。

$uri : 不带请求参数的当前URI,$uri不包含主机名,如”/foo/bar.html”。

$document_uri : 与$uri相同。
11、Nginx的访问控制
为了实现网站的安全,或者说是某些页面的限制访问,又或者是某个恶意ip的拒绝访问,都可以通过ngx_http_access_module模块允许限制对某些客户端地址的访问。
官方文档示例:
location / {

    deny  192.168.1.1;

    allow 192.168.1.0/;

    allow 10.1.1.0/;

    allow :0db8::/;

    deny  all;

}
按顺序检查规则,直到找到第一个匹配项。在此示例中,仅允许IPv4网络 10.1.1.0/16以及192.168.1.0/24 但不包括地址192.168.1.1,以及IPv6网络2001:0db8::/32对网站进行访问。如果有很多规则, 最好使用 ngx_http_geo_module模块变量。
语法:
语法:    allow address | CIDR | unix: | all;

默认值:    —

应用区段:    http, server, location, limit_except

允许访问的IP。如果unix:指定了特殊值(1.5.),则允许访问所有UNIX域套接字。

语法:    deny address | CIDR | unix: | all;

默认值:    —

应用区段:    http, server, location, limit_except

拒绝访问的IP。如果unix:指定了特殊值(1.5.),则拒绝所有UNIX域套接字的访问。
实际应用举例,对nginx_status进行限制访问
[root@localhost vhosts]# vim www.abc.org.conf   #修改虚拟主机配置文件

server {

        listen ;

        server_name www.abc.org abc.org;

        root /vhosts/html/www;

        index index.html index.htm index.php;

        if ( $host != www.abc.org )

        {

                rewrite ^/(.*)$ http://www.abc.org/$1 permanent;

        }

        access_log logs/www.abc.org_access.log main;

        error_log logs/www.abc.org_error.log crit;

        location /nginx_status {

                #auth_basic "Please input your acount";

                #auth_basic_user_file /usr/local/nginx/conf/htpasswd;

                allow 192.168.56.11;  #允许192.168.56.11该ip访问

                deny all;         #拒绝其他所有的访问

                stub_status on;

                access_log off;

        }

}

[root@localhost vhosts]# nginx -t

nginx: the configuration file /usr/local/nginx1.15.1/conf/nginx.conf syntax is ok

nginx: configuration file /usr/local/nginx1.15.1/conf/nginx.conf test is successful

[root@localhost vhosts]# nginx -s reload

[root@localhost ~]# curl http://www.abc.org/nginx_status  #本机访问测试,可以获取到nginx的状态信息

Active connections:

server accepts handled requests

Reading:  Writing:  Waiting:
windows下访问:http://www.abc.org/nginx_status,会直接提示403,权限拒绝了其他访问

还可以将访问的规则定义在整个server段,表示对网站的访问进行限制,也可以在http段进行限制,表示对全局的站点进行限制访问。
12、生成SSL秘钥加密网站
要生成ssl加密网站,就需要用到nginx的另一个模块:ngx_http_ssl_module,该模块提供https支持,默认情况下不会使用该模块,需要在编译时增加编译参数:--with-http_ssl_module,且该模块还需要openssl库的支持
示例配置:
worker_processes auto;  #配置work进程数量

http {

    ...

    server {

        listen               ssl;  #监听443端口,启用ssl

        keepalive_timeout   ;     #启用保持活动连接

        ssl_protocols       TLSv1 TLSv1. TLSv1.;  #ssl写协议配置

        ssl_ciphers         AES128-SHA:AES256-SHA:RC4-SHA:DES-CBC3-SHA:RC4-MD5;  #ssl加密方式

        ssl_certificate     /usr/local/nginx/conf/cert.pem;  #指定证书文件

        ssl_certificate_key /usr/local/nginx/conf/cert.key;  #指定私钥文件

        ssl_session_cache   shared:SSL:10m;  #启用共享会话缓存

        ssl_session_timeout 10m;  #ssl会话延时配置

        ...

    }
https配置实例:
()生成pem证书和私钥

[root@localhost conf]# openssl genrsa -out cert.key     //生成私钥

Generating RSA private key,  bit long modulus

...................................+++

....+++

e is  (0x10001)

[root@localhost conf]# openssl req -new -x509 -key cert.key -out cert.pem    //生成证书

You are about to be asked to enter information that will be incorporated

into your certificate request.

What you are about to enter is what is called a Distinguished Name or a DN.

There are quite a few fields but you can leave some blank

For some fields there will be a default value,

If you enter '.', the field will be left blank.

-----

Country Name ( letter code) [XX]:zhongshan

string is too long, it needs to be less than   bytes long

Country Name ( letter code) [XX]:zhognshan

string is too long, it needs to be less than   bytes long

Country Name ( letter code) [XX]:zx

State or Province Name (full name) []:zx

Locality Name (eg, city) [Default City]:zx

Organization Name (eg, company) [Default Company Ltd]:

Organizational Unit Name (eg, section) []:

Common Name (eg, your name or your server's hostname) []:

Email Address []:

()查看证书

[root@localhost conf]# ll cert.*

-rw-r--r--  root root  Jul  : cert.key

-rw-r--r--  root root  Jul  : cert.pem

()配置虚拟主机

[root@localhost vhosts]# cat www.abc.org.conf www.abc.org.ssl.conf

server {

    listen ;

    server_name www.abc.org abc.org;

    root /vhosts/html/www;

    index index.html index.htm index.php;

    rewrite ^/(.*)$ https://$host/$1 permanent;    //配置http访问时强制跳转到https

    access_log logs/www.abc.org_access.log main;

    error_log logs/www.abc.org_error.log crit;

}

server {                //ssl站点配置

    listen  ssl;

    server_name www.abc.org abc.org;

    root /vhosts/html/www;

    index index.html index.htm index.php;

      ssl_protocols       TLSv1 TLSv1. TLSv1.;

        ssl_ciphers         AES128-SHA:AES256-SHA:RC4-SHA:DES-CBC3-SHA:RC4-MD5;

        ssl_certificate     /usr/local/nginx/conf/cert.pem;

        ssl_certificate_key /usr/local/nginx/conf/cert.key;

        ssl_session_cache   shared:SSL:10m;

        ssl_session_timeout 10m;

    location /nginx_status {

                #auth_basic "Please input your acount";

                #auth_basic_user_file /usr/local/nginx/conf/htpasswd;

                #allow 192.168.56.11;

                #deny all;

                #include deny.ip;

                stub_status on;

                access_log off;

        }

}
访问:http://www.abc.org/nginx_status会自动跳转到https://www.abc.org/nginx_status,如图:
网站添加了https证书后,当http方式访问网站时就会报404错误,所以需要做http到https的强制跳转设置。以下总结http跳转https的方法:
1) 下面是将所有的http请求通过rewrite重写到https上。
[root@localhost vhosts]# vim www.abc.org.conf     //仅修改www.abc.org.conf

server {

        listen ;

        server_name www.abc.org abc.org;

        root /vhosts/html/www;

        index index.html index.htm index.php;

        #rewrite ^/(.*)$ https://$host/$1 permanent;        //方法一:这是nginx早前写法,一直有效

        #return  https//$server_name$request_uri;        //方法二:这是nginx支持的最新写法

        #if ($host ~* "^abc.org$"){                            //方法三:用if判断跳转,适用于多域名,即使访问abc.org也会跳转

        #        rewrite ^/(.*)$ https//www.abc.org/ permanent;

        #}

        if ($host  = "www.abc.org"){                        //方法四:对$host做精确判断跳转

                rewrite ^/(.*)$ https://www.abc.org/ permanent;

        }

        access_log logs/www.abc.org_access.log main;

        error_log logs/www.abc.org_error.log crit;

}
2)采用nginx的497状态码
497 - normal request was sent to HTTPS
解释:当网站只允许https访问时,当用http访问时nginx会报出497错误码
思路:
利用error_page命令将497状态码的链接重定向到https://www.abc.org这个域名上
[root@localhost vhosts]# vim www.abc.org.conf

server {

        listen ;

        server_name www.abc.org abc.org;

        root /vhosts/html/www;

        index index.html index.htm index.php;

        error_page  https://$host$uri?$args;        //访问www.abc.org或abc.org的http都会强制跳转到https

        access_log logs/www.abc.org_access.log main;

        error_log logs/www.abc.org_error.log crit;

}

也可以将80和43端口放在一起

server {

        listen  ssl;

        listen ;

        server_name www.abc.org abc.org;

        root /vhosts/html/www;

        index index.html index.htm index.php;

        ssl_protocols       TLSv1 TLSv1. TLSv1.;

        ssl_ciphers         AES128-SHA:AES256-SHA:RC4-SHA:DES-CBC3-SHA:RC4-MD5;

        ssl_certificate     /usr/local/nginx/conf/cert.pem;

        ssl_certificate_key /usr/local/nginx/conf/cert.key;

        ssl_session_cache   shared:SSL:10m;

        ssl_session_timeout 10m;

        error_page  https://$host$uri?$args;

        location /nginx_status {

                stub_status on;

                access_log off;

        }

}
3)利用meta的刷新作用将http跳转到https
上述的方法均会耗费服务器的资源,可以借鉴百度使用的方法:巧妙的利用meta的刷新作用,将http跳转到https
[root@localhost vhosts]# cat /vhosts/html/www/index.html     //修改index.html页面

<html>

<meta http-equiv="refresh" content="0;url=https://www.abc.org/">     //元数据刷新

welcome to www.abc.org

</html>

[root@localhost vhosts]# cat www.abc.org.conf

server {

    listen ;

    server_name www.abc.org abc.org;

    index index.html index.php index.htm;

    error_page  https://www.abc.org/;    //将404的页面重定向到https的首页

    access_log logs/www.abc.org_access.log main;

    error_log logs/www.abc.org_error.log crit;

    location ~ / {

        root /vhosts/html/www;

        index index.html index.php index.htm;

    }

}

[root@localhost vhosts]# cat www.abc.org.ssl.conf

server {

    listen  ssl;

    server_name www.abc.org abc.org;

    root /vhosts/html/www;

    index index.html index.htm index.php;

      ssl_protocols       TLSv1 TLSv1. TLSv1.;

    ssl_ciphers         AES128-SHA:AES256-SHA:RC4-SHA:DES-CBC3-SHA:RC4-MD5;

    ssl_certificate     /usr/local/nginx/conf/cert.pem;

    ssl_certificate_key /usr/local/nginx/conf/cert.key;

    ssl_session_cache   shared:SSL:10m;

    ssl_session_timeout 10m;

    location /nginx_status {

                stub_status on;

                access_log off;

        }

}
4)通过proxy_redirec方式
[root@localhost vhosts]# cat www.abc.org.conf

server {

    listen ;

    server_name www.abc.org abc.org;

    index index.html index.php index.htm;

    access_log logs/www.abc.org_access.log main;

    error_log logs/www.abc.org_error.log crit;

    proxy_redirect http:// https://;

    location ~ / {

        root /vhosts/html/www;

        index index.html index.php index.htm;

    }

}
Nginx入门篇(四)之常用配置解析的更多相关文章
- Apache入门 篇(二)之apache 2.2.x常用配置解析
一.httpd 2.2.x目录结构 Cnetos 6.10 YUM安装httpd 2.2.x # yum install -y httpd 程序环境 主配置文件: /etc/httpd/conf/ht ...
- SpringBoot入门(四)——自动配置
本文来自网易云社区 SpringBoot之所以能够快速构建项目,得益于它的2个新特性,一个是起步依赖前面已经介绍过,另外一个则是自动配置.起步依赖用于降低项目依赖的复杂度,自动配置负责减少人工配置的工 ...
- 【SSRS】入门篇(四) -- 向报表添加数据
原文:[SSRS]入门篇(四) -- 向报表添加数据 定义好数据集后 [SSRS]入门篇(三) -- 为报表定义数据集 ,就可以开始设计报表了,将要显示在报表的字段.文本框.图像和其他项从工具箱拖放到 ...
- FPGA基础入门篇(四) 边沿检测电路
FPGA基础入门篇(四)--边沿检测电路 一.边沿检测 边沿检测,就是检测输入信号,或者FPGA内部逻辑信号的跳变,即上升沿或者下降沿的检测.在检测到所需要的边沿后产生一个高电平的脉冲.这在FPGA电 ...
- nginx基本运维及常用配置
nginx基本运维及常用配置 ========================================================== 基本运维 nginx 的启动 nginx -c /p ...
- 最全面 Nginx 入门教程 + 常用配置解析
转自 http://blog.csdn.net/shootyou/article/details/6093562 Nginx介绍和安装 一个简单的配置文件 模块介绍 常用场景配置 进阶内容 参考资料 ...
- Nginx入门篇(三)之虚拟主机配置
一.虚拟主机概念 所谓虚拟主机,在Web服务当中就是一个独立的网站站点,这个站点对应独立的域名(也有可能是IP或者端口),具有独立的程序和资源目录,可以独立地对外提供服务供用户访问. 这个独立的站点在 ...
- nginx入门与实战 安装 启动 配置nginx Nginx状态信息(status)配置 正向代理 反向代理 nginx语法之location详解
nginx入门与实战 网站服务 想必我们大多数人都是通过访问网站而开始接触互联网的吧.我们平时访问的网站服务 就是 Web 网络服务,一般是指允许用户通过浏览器访问到互联网中各种资源的服务. Web ...
- Nginx入门篇-基础知识与linux下安装操作
我们要深刻理解学习NG的原理与安装方法,要切合实际结合业务需求,应用场景进行灵活使用. 一.Nginx知识简述Nginx是一个高性能的HTTP服务器和反向代理服务器,也是一个 IMAP/POP3/SM ...
- Nginx入门篇
Nginx 是一个高性能的 Web 和反向代理服务器, 它具有有很多非常优越的特性: 作为 Web 服务器:相比 Apache,Nginx 使用更少的资源,支持更多的并发连接,体现更高的效率,这点使 ...
随机推荐
- zk集群的快速搭建
1.上传一个zk.tar2.解压3.创建目录data4.修改zoo_sample.cfg ---> zoo.cfg5.修改文件的dataDir改为/data目录,echo 1 >/data ...
- maven的pom.xml文件报错问题
第一次用 Spring Starter Project 创建一个Spring应用时,POM 文件报错: Project build error: Non-resolvable parent POM f ...
- 【redis运维】redis自己主动安装脚本(仅仅安装redis)
Redis自己主动安装部署 本文总共分为4个部分: redis自己主动安装脚本文件夹结构说明: redis自己主动安装脚本内容: redis的操作系统服 ...
- Kali-linux控制Meterpreter
Meterpreter是Metasploit框架中的一个杀手锏,通常作为利用漏洞后的攻击载荷所使用,攻击载荷在触发漏洞后能够返回给用户一个控制通道.当使用Armitage.MSFCLI或MSFCONS ...
- python之使用__future__
Python的新版本会引入一些新的功能特性,但一般一部分的新功能可以在旧版本上测试,测试成功再移植到新的版本上,旧版本可以通过导入__future__模块的某些功能,测试新版本的新功能.(注意:fut ...
- mysql5.6编译安装
1.安装编译源码所需的工具和库 yum install gcc gcc-c++ ncurses-devel perl -y yum -y install wget gcc-c++ ncurses nc ...
- 大数据学习之HDFS的工作机制07
1:namenode+secondaryNameNode工作机制 2:datanode工作机制 3:HDFS中的通信(代理对象RPC) 下面用代码来实现基本的原理 1:服务端代码 package it ...
- Visual Studio 2017 安装过程问题解决
VS已经发布了两三天了,我也着手安装,但是折腾了两个晚上,怎么都到不了安装界面(选择模块的界面),各种尝试,各种重启,也并不顶什么卵用~ 后来经过各种查LOG,发现我电脑访问不了https://dow ...
- Factory(工厂)模式
设计模式一 工厂模式Factory 在面向对象编程中, 最通常的方法是一个new操作符产生一个对象实例,new操作符就是用来构造对象实例的.但是在一些情况下, new操作符直接生成对象会带来一些问题. ...
- HTML5与CSS3网页设计
<!--一个网页的基本结构写法--> <!doctype html> <html> <head>//头部 <title>标题</tit ...