Qt-QML-Canvas写个小小的闹钟
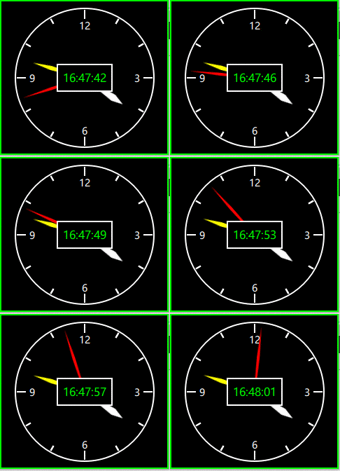
先看下演示效果
大致过程
先绘制仪表盘,圆圈和刻度
剩下再绘制三个指针
最后在绘制上面的电子时钟
下面写源代码
import QtQuick 2.0

Rectangle

{

    id:root

    anchors.centerIn: parent

    width: 200

    height: 200

    color: "transparent"

    property int time_H : 0;

    property int time_M : 0;

    property int time_S : 0;

    Timer

    {

            interval: 500; running: true; repeat: true

            onTriggered:

            {

                time.text = Qt.formatDateTime(new Date(), "hh:mm:ss")

                root.time_H = Qt.formatDateTime(new Date(), "hh")

                root.time_M = Qt.formatDateTime(new Date(), "mm")

                root.time_S = Qt.formatDateTime(new Date(), "ss")

            }

    }

    Canvas

    {

        anchors.fill: parent

        onPaint:

        {

            var ctx = getContext("2d");

            ctx.lineWidth = 2;

            ctx.strokeStyle = "#FFFFFF";

            ctx.globalAlpha = 1.0;

            ctx.beginPath();

            ctx.arc(100,100,99,0,2*Math.PI);

            ctx.stroke();

            ctx.restore();

            for(var i =0;i<32;i++)

            {

                ctx.save();

                ctx.translate(width/2,height/2);

                ctx.rotate(((i)*30)*Math.PI/180);

                ctx.beginPath();

                //判定长短线

                if(i%3 == 0)

                {

                    ctx.moveTo(0,-99+15);

                    ctx.lineTo(0,-99+2);

                }

                else

                {

                    ctx.moveTo(0,-99+10);

                    ctx.lineTo(0,-99+2);

                }

                //绘制

                ctx.stroke();

                ctx.restore();

            }

        }

    }

    Rectangle

    {

        width: 20

        height: 20

        anchors.horizontalCenter: parent.horizontalCenter

        anchors.top: parent.top

        anchors.topMargin: 15

        color: "#00000000"

        Text {

            anchors.centerIn: parent

            font.family: "微软雅黑"

            font.pixelSize: 14

            color: "#FFFFFF"

            text: qsTr("12")

        }

    }

    Rectangle

    {

        width: 20

        height: 20

        anchors.verticalCenter: parent.verticalCenter

        anchors.right: parent.right

        anchors.rightMargin: 15

        color: "#00000000"

        Text {

            anchors.centerIn: parent

            font.family: "微软雅黑"

            font.pixelSize: 14

            color: "#FFFFFF"

            text: qsTr("3")

        }

    }

    Rectangle

    {

        width: 20

        height: 20

        anchors.verticalCenter: parent.verticalCenter

        anchors.left: parent.left

        anchors.leftMargin: 15

        color: "#00000000"

        Text {

            anchors.centerIn: parent

            font.family: "微软雅黑"

            font.pixelSize: 14

            color: "#FFFFFF"

            text: qsTr("9")

        }

    }

    Rectangle

    {

        width: 20

        height: 20

        anchors.horizontalCenter: parent.horizontalCenter

        anchors.bottom: parent.bottom

        anchors.bottomMargin: 15

        color: "#00000000"

        Text {

            anchors.centerIn: parent

            font.family: "微软雅黑"

            font.pixelSize: 14

            color: "#FFFFFF"

            text: qsTr("6")

        }

    }

    Canvas

    {

        id:m_Hour

        property int m_Radius: (root.width>=root.height)? (root.height)/2 : (root.width)/2

        width: m_Radius*2

        height: m_Radius*2

        anchors.centerIn: parent

        rotation: (root.time_H%12)*30 + root.time_M*6/60 + root.time_S*6/60/60 - 180

        onPaint:

        {

            var ctx = getContext("2d");

            ctx.lineWidth = 2;

            ctx.fillStyle = "#FFFFFF";

            ctx.strokeStyle = "#FFFFFF";

            ctx.beginPath()

            ctx.moveTo(m_Radius,m_Radius)

            ctx.lineTo(m_Radius+4,m_Radius+m_Radius*0.5)

            ctx.lineTo(m_Radius,m_Radius*2-37)

            ctx.lineTo(m_Radius-4,m_Radius+m_Radius*0.5)

            ctx.closePath()

            ctx.fill()

            ctx.stroke()

        }

    }

    Canvas

    {

        id:m_Min

        property int m_Radius: (root.width>=root.height)? (root.height)/2 : (root.width)/2

        width: m_Radius*2

        height: m_Radius*2

        anchors.centerIn: parent

        rotation: root.time_M*6 + root.time_S*6/60 - 180

        onPaint:

        {

            var ctx = getContext("2d");

            ctx.lineWidth = 2;

            ctx.fillStyle = "yellow";

            ctx.strokeStyle = "yellow";

            ctx.beginPath()

            ctx.moveTo(m_Radius,m_Radius)

            ctx.lineTo(m_Radius+2,m_Radius+m_Radius*0.5)

            ctx.lineTo(m_Radius,m_Radius*2-32)

            ctx.lineTo(m_Radius-2,m_Radius+m_Radius*0.5)

            ctx.closePath()

            ctx.fill()

            ctx.stroke()

        }

    }

    Canvas

    {

        id:m_Second

        property int m_Radius: (root.width>=root.height)? (root.height)/2 : (root.width)/2

        width: m_Radius*2

        height: m_Radius*2

        anchors.centerIn: parent

        rotation: root.time_S*6 - 180

        onPaint:

        {

            var ctx = getContext("2d");

            ctx.lineWidth = 2;

            ctx.fillStyle = "red";

            ctx.strokeStyle = "red";

            ctx.beginPath()

            ctx.moveTo(m_Radius,m_Radius)

            ctx.lineTo(m_Radius+1,m_Radius+m_Radius*0.5)

            ctx.lineTo(m_Radius,m_Radius*2-28)

            ctx.lineTo(m_Radius-1,m_Radius+m_Radius*0.5)

            ctx.closePath()

            ctx.fill()

            ctx.stroke()

        }

    }

    Rectangle

    {

        border.color: "#FFFFFF"

        border.width: 2

        width: 80

        height: 40

        anchors.centerIn: parent

        color: "#000000"

        Text {

            id:time

            anchors.centerIn: parent

            color: "#00FF00"

            font.family: "微软雅黑"

            font.pixelSize: 16

            text: qsTr("22:22:22")

        }

    }

}

Qt-QML-Canvas写个小小的闹钟的更多相关文章
- qt qml中PropertyAnimation的几种使用方法
qml文章 qt qml中PropertyAnimation的几种使用方法 动画应用场景有以下几种: 首先如果一个Rectangle.动画是要改变它的x和y值 1,Rectangle一旦被创建,就要移 ...
- Qt QML referenceexamples attached Demo hacking
/********************************************************************************************* * Qt ...
- Qt qml的软件架构设计
google: qt qml application architecture 有很多资源. 1 https://www.ics.com/blog/multilayered-architecture- ...
- 用Canvas写桌球游戏!!!
声明:本文为原创文章,如需转载,请注明来源WAxes,谢谢! 昨天上班的时候闲着无事,就用Canvas写了个桌球游戏来玩玩....所以就拿这游戏上来水一发.或许对一些刚学canvas的人有帮助. 话说 ...
- Qt qml 单例模式
Qt qml 单例模式,没什么好说的,看代码吧.单例模式很适合做全局的配置文件. [示例下载] http://download.csdn.net/detail/surfsky/8539313 [以下是 ...
- Qt qml listview 列表视图控件(下拉刷新、上拉分页、滚动轴)
Qt qml listview下拉刷新和上拉分页主要根据contentY来判断.但要加上顶部下拉指示器.滚动条,并封装成可简单调用的组件,着实花了我不少精力:) [先看效果] [功能] 下拉刷新 ...
- qt qml qchart 图表组件
qt qml qchart 图表组件 * Author: Julien Wintz * Created: Thu Feb 13 23:41:59 2014 (+0100) 这玩意是从chart.js迁 ...
- qt qml fuzzyPanel 毛玻璃效果
毛玻璃效果,用qml来写代码真是简短,大爱qml:) [下载地址]http://download.csdn.net/detail/surfsky/8426641 [核心代码] Rectangle{ c ...
- canvas写的一个小时钟demo
<!DOCTYPE html> <html> <head> <title>HTML5 Canvas Demo of clock</title> ...
随机推荐
- 【Mybatis】参数处理
单个参数:mybatis不会做特殊处理, #{参数名/任意名}:取出参数值. 多个参数:mybatis会做特殊处理. 多个参数会被封装成 一个map, key:param1...paramN,或者参数 ...
- QT 简单 TCP 通信,发送数据到服务器
1.首先 添加头文件 #include <QtNetwork/QTcpSocket> 并且 在 xxx.pro(xxx指工程的名称) 中QT += core gui下面,添加 下面两句句话 ...
- android TextView里边实现图文混配效果
做的游戏攻略中的图文载入已经用TextView实现.但看到网易新闻里的内容.点击图片能够调到一个新的Activity ,感觉也像Textview 实现的,但不知道怎么弄,想想能够通过动态载入Textv ...
- Android之zip文件加密解压及进度条的实现
zip文件的解压能够使用java的zip库,可是没有实现对加密文件的解压功能,这里能够使用zip4j来实现.详细能够參看该文<Android下zip压缩文件加密解密的完美解决方式>.该文件 ...
- OpenID Connect Core 1.0(五)使用授权码流验证(下)
3.1.2.6 验证错误响应(Authentication Error Response) 验证错误响应是一个OAuth 2.0授权错误响应消息,是RP发送授权请求的消息,由OP授权终结点的响应返回. ...
- 使用DBNEWID Utility 修改oracle数据库的 db name 和 dbid
使用DBNEWID Utility 工具可以同时修改数据库名.DBID,也可以只修改其中一项 官方参考: https://docs.oracle.com/cd/E11882_01/server.112 ...
- pyntho经典面试题
Python基础篇 1:为什么学习Python 2:通过什么途径学习Python 3:谈谈对Python和其他语言的区别 Python的优势: 4:简述解释型和编译型编程语言 5:Python的解释器 ...
- vue数组赋值
在使用vue开发移动端项目过程中,统一数组在对多个变量赋值时:希望一个数组的改变不影响另外一个数组,此时可以使用如下方式实现: let arr = [] let a1 = JSON.parse(JSO ...
- 服务端接收不到ajax post请求的参数
问题描述 服务端使用request.getParameter()接收不到post请求的参数,导致业务逻辑抛出空指针异常. 解决途径 tomcat对post请求支持的字节数不受限制的配置发生变化.在to ...
- Python中级 —— 06SMTP发送电子邮件
Email的历史比Web还要久远,直到现在,Email也是互联网上应用非常广泛的服务.(未完)

