Centos6.8搭建Git服务(git版本可选)
搭建Git服务器需要准备一台运行Linux的机器,本文以Centos6.8纯净版系统为例搭建自己的Git服务。
准备工作:以root用户登陆自己的Linux服务器。
第一步安装依赖库
[root@localhost ~]# yum install curl-devel expat-devel gettext-devel openssl-devel zlib-devel

[root@localhost ~]# yum install  gcc perl-ExtUtils-MakeMaker
第二步卸载旧版git
加入原先有用yum安装过git,则需要先卸载一下
[root@localhost ~]# yum remove git
第三步下载源码
下载git-2.10.0.tar.gz 到 /usr/local/src
(查找git版本可以到https://www.kernel.org/pub/software/scm/git/下查看git的版本号自行选择下载)
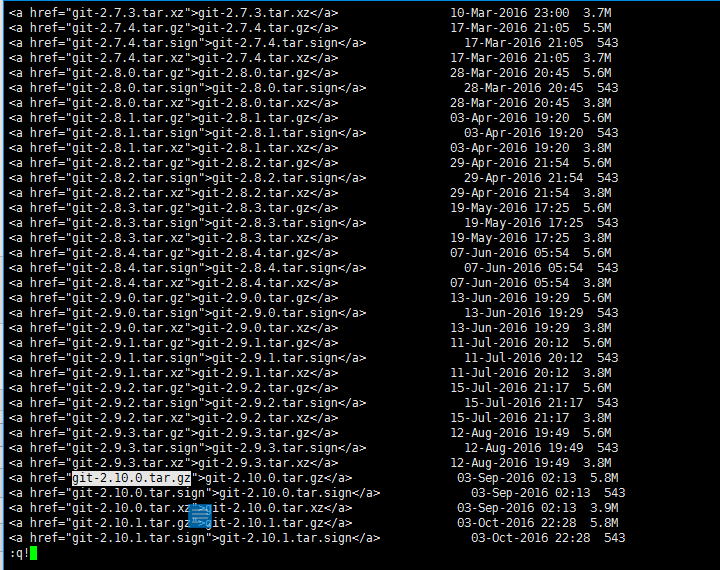
查看版本方法:
[root@iZbp1ap7v4yegqdgzrh7cuZ ~]# wget -v https://www.kernel.org/pub/software/scm/git/
[root@iZbp1ap7v4yegqdgzrh7cuZ ~]# vi index.html
复制想下载的版本 --> Esc --> :q! --> 回车!

这里我选择下载git-2.10.0.tar.gz
[root@localhost ~]# cd /usr/local/src

[root@localhost ~]# wget https://www.kernel.org/pub/software/scm/git/git-2.10.0.tar.gz
第四步解压、编译和安装
[root@localhost ~]# tar -zvxf git-2.10.0.tar.gz

[root@localhost ~]# cd git-2.10.0

[root@localhost ~]# make prefix=/usr/local/git all

[root@localhost ~]# make prefix=/usr/local/git install
第五步将git目录加入PATH
[root@localhost ~]# echo 'export PATH=$PATH:/usr/local/git/bin' >> /etc/bashrc

[root@localhost ~]# source /etc/bashrc
安装成功后就可以查看到git版本了。
[root@localhost ~]# git --version

git version 2.10.0
第六步创建git账号并设置密码
[root@localhost ~]# useradd -m git

[root@localhost ~]# passwd git

Changing password for user git.

New password:

BAD PASSWORD: is too simple

Retype new password:

passwd: all authentication tokens updated successfully.
第七步创建git仓库并初始化
[root@localhost ~]# mkdir -p /home/git/repositories/test.git

[root@localhost ~]# cd /home/git/repositories/test.git

[root@localhost test.git]# git --bare init

Initialized empty Git repository in /home/git/repositories/test.git/
第八步给git仓库目录设置用户和用户组并设置权限
[root@localhost test.git]# chown -R git:git /home/git/repositories

[root@localhost test.git]# chmod 755 /home/git/repositories
第九步限制git账号的ssh连接
查找git-shell所在目录
[root@localhost ~]# whereis git-shell
git-shell: /usr/src/git-2.10.0/git-shell
编辑passwd文件
[root@localhost ~]# vi /etc/passwd
找到这一行
git:x:500:500::/home/git:/bin/bash
将最后的/bin/bash改为:git-shell的目录 /usr/src/git-2.10.0/git-shell 如下:
git:x:500:500::/home/git:/usr/src/git-2.10.0/git-shell
Esc --> :wq! --> 回车!
完成搭建,去克隆提交试试吧!
clone地址:
ssh://git@服务器ip地址:端口/home/git/repositories/test.git
附加:以后每次新建仓库时,只需执行上面第七、八步即可!
Centos6.8搭建Git服务(git版本可选)的更多相关文章
- Centos6.9 搭建rsync服务端与客户端 案例:全网备份项目
rsync的企业工作场景说明 1)定时备份 1.1生产场景集群架构服务器备份方案项目 借助cron+rsync把所有客户服务器数据同步到备份服务器 2)实时复制 本地数据传输模式(local-only ...
- centos6.4搭建lnmp服务(转载)
1.配置防火墙,开启80端口.3306端口vi /etc/sysconfig/iptables-A INPUT -m state --state NEW -m tcp -p tcp --dport 8 ...
- 一文详解CentOS6.5搭建DNS服务
本文详细介绍DNS服务在Linux Operation System 中的搭建过程 一.DNS服务器的工作原理 客户机提出域名解析请求,并将该请求发送给本地的域名服务器.当本地的域名服务器收到请求后, ...
- Centos6.5搭建dhcpd服务
dhcpd动态获取ip地址,对于小型局域网很便利的.在不大的网络社会静态ip也是不错的! 环境 centos6.5 10.10.24.1 (dns-server) winxp sp3 (clie ...
- centos6.7搭建DHCP服务器
centos6.7搭建DHCP服务 2017-03-24 09:47:16 系统环境: centos6.7 安装之前首先使用rpm –qa | grep dhcp查看系统中是否已安装了dhcp软件包. ...
- Centos6.8/7.0搭建Git服务http访问方式
安装Git版本:git 2.10.0 Git访问方式:基于http的基本验证(非SSL) 1. 安装Apache软件: [root@localhost ~]# yum install httpd 设置 ...
- Git服务搭建及github使用教程
.pos { position: fixed; top: 35%; left: 90% } .pos a { border: 2px solid white; background: #99CCFF; ...
- centos上搭建git服务--2
在 Linux 下搭建 Git 服务器 环境: 服务器 CentOS6.6 + git(version 1.7.1)客户端 Windows10 + git(version 2.8.4.window ...
- 基于Gitea搭建属于自己的Git服务
作者:IT王小二 博客:https://itwxe.com 一.搭建环境和前提 搭建环境: 操作系统:CentOS7.6 Docker版本:docker-ce-18.09.9 Lsky Pro版本:1 ...
随机推荐
- C#的MD5哈希值计算
MD5哈希值计算:(仅仅是记录一下) /// <summary> /// 获取字符串的MD5值 /// </summary> /// <param name=" ...
- TCP数据流
1. 引言 如果按照分组数量计算,约有一半的TCP报文段包含成块数据(如FTP.电子邮件等),另一半则包含交互数据(如telnet和rlogin).如果按照字节计算,则成块数据与交互数据的比例约为90 ...
- [svc]cisco ipsec使用证书认证
基础配置 用的c7200-adventerprisek9-mz.151-4.M2.bin - R1 conf t int f0/0 ip add 202.100.1.1 255.255.255.0 n ...
- [na]那些OVER的封装(pppoe/ppp/ipsec)
什么over什么,如pppoe, ppp的封装都在over对象之后,入下图: PPPOE Ipsec
- 说实话当一个程序猿不easy
我以前说过,程序猿不是一般的人,是具有某种超能里的人.但问题是.程序猿往往意识不到自己的这样的特异功能.在他们的眼里.会觉得自己非常普通.跟常人一样,所以,程序猿能做到的事情,其它人--比方他们的客户 ...
- android studio - 解决Android Studio不停的Indexing的问题
File > Invalidate Caches/Restart
- 日期时间函数(1)-time()&gmtime()&strftime()&localtime()
◆time() 取得当前时间.此函数会返回从公元1970年1月1日的UTC时间从0时0分0秒算起到现在所经过的秒数.如果参数t为非空指针的话, 此函数也会将返回值存到t指针所指的内存. 成功则返回秒数 ...
- USB设备驱动程序学习笔记(一)
现象:把USB设备接到PC1. 右下角弹出"发现android phone"2. 跳出一个对话框,提示你安装驱动程序 问1. 既然还没有"驱动程序",为何能知道 ...
- Android开发日记(五)
从服务器端传递多个数据 先在服务器端设置cs文件 using Newtonsoft.Json; using Newtonsoft.Json.Linq; using System; using Syst ...
- JavaScript高级 面向对象(1)--添加一个div标签
说明(2017.3.28): 1. JavaScript是一种基于对象的多范式编程语言,不是面向对象,但离开对象不能活. 范式编程是指编程习惯.方式,分为过程式.对象式和函数式编程. 2. 面向对象是 ...
