WebService--CXF与Spring的整合(jaxws:endpoint形式配置)以及客户端调用(spring配置文件形式,不需要生成客户端代码)
一、CXF与Spring整合(jaxws:endpoint形式配置)
工具要点:idea、maven
1.新建一个maven项目
<?xml version="1.0" encoding="UTF-8"?>

<project xmlns="http://maven.apache.org/POM/4.0.0"

         xmlns:xsi="http://www.w3.org/2001/XMLSchema-instance"

         xsi:schemaLocation="http://maven.apache.org/POM/4.0.0 http://maven.apache.org/xsd/maven-4.0.0.xsd">

  <modelVersion>4.0.0</modelVersion>

  <groupId>com.wp.learn.webservice.webserver</groupId>

  <artifactId>webserver</artifactId>

  <version>1.0-SNAPSHOT</version>

  <properties>

    <cxf.version>2.2.3</cxf.version>

    <spring.version>3.0.2.RELEASE</spring.version>

  </properties>

  <dependencies>

    <dependency>

      <groupId>org.springframework</groupId>

      <artifactId>spring-web</artifactId>

      <version>${spring.version}</version>

    </dependency>

    <dependency>

      <groupId>org.apache.cxf</groupId>

      <artifactId>cxf-rt-frontend-jaxws</artifactId>

      <version>${cxf.version}</version>

      <exclusions>

        <exclusion>

          <groupId>org.springframework</groupId>

          <artifactId>spring-core</artifactId>

        </exclusion>

      </exclusions>

    </dependency>

    <dependency>

      <groupId>org.apache.cxf</groupId>

      <artifactId>cxf-rt-transports-http</artifactId>

      <version>${cxf.version}</version>

      <exclusions>

        <exclusion>

          <groupId>org.springframework</groupId>

          <artifactId>spring-web</artifactId>

        </exclusion>

      </exclusions>

    </dependency>

    <dependency>

      <groupId>org.apache.cxf</groupId>

      <artifactId>cxf-testutils</artifactId>

      <version>${cxf.version}</version>

      <scope>test</scope>

    </dependency>

    <dependency>

      <groupId>org.apache.cxf</groupId>

      <artifactId>cxf-rt-transports-local</artifactId>

      <version>${cxf.version}</version>

      <scope>test</scope>

    </dependency>

    <dependency>

      <groupId>org.apache.cxf</groupId>

      <artifactId>cxf-rt-transports-http-jetty</artifactId>

      <version>${cxf.version}</version>

      <scope>test</scope>

      <exclusions>

        <exclusion>

          <groupId>org.slf4j</groupId>

          <artifactId>slf4j-jdk14</artifactId>

        </exclusion>

        <exclusion>

          <groupId>org.springframework</groupId>

          <artifactId>spring-web</artifactId>

        </exclusion>

      </exclusions>

    </dependency>

    <dependency>

      <groupId>org.apache.cxf</groupId>

      <artifactId>cxf-rt-frontend-jaxrs</artifactId>

      <version>${cxf.version}</version>

      <exclusions>

        <exclusion>

          <groupId>org.springframework</groupId>

          <artifactId>spring-core</artifactId>

        </exclusion>

        <exclusion>

          <groupId>org.springframework</groupId>

          <artifactId>spring-beans</artifactId>

        </exclusion>

        <exclusion>

          <groupId>org.springframework</groupId>

          <artifactId>spring-context</artifactId>

        </exclusion>

      </exclusions>

    </dependency>

    <dependency>

      <groupId>org.springframework</groupId>

      <artifactId>spring-context-support</artifactId>

      <version>${spring.version}</version>

      <scope>compile</scope>

      <exclusions>

        <exclusion>

          <groupId>commons-logging</groupId>

          <artifactId>commons-logging</artifactId>

        </exclusion>

      </exclusions>

    </dependency>

  </dependencies>

</project>
pom.xml
2.web.xml文件中配置CXFServlet以及Spring容器,配置Spring的配置文件,配置webservice的配置文件
web.xml:
<!DOCTYPE web-app PUBLIC

 "-//Sun Microsystems, Inc.//DTD Web Application 2.3//EN"

 "http://java.sun.com/dtd/web-app_2_3.dtd" >

<web-app>

  <display-name>Archetype Created Web Application</display-name>

  <context-param>

    <param-name>contextConfigLocation</param-name>

    <param-value>classpath:applicationContext.xml</param-value>

  </context-param>

  <listener>

    <listener-class>

      org.springframework.web.context.ContextLoaderListener

    </listener-class>

  </listener>

  <servlet>

    <servlet-name>CXFServlet</servlet-name>

    <servlet-class>org.apache.cxf.transport.servlet.CXFServlet</servlet-class>

    <load-on-startup>1</load-on-startup>

  </servlet>

  <servlet-mapping>

    <servlet-name>CXFServlet</servlet-name>

    <url-pattern>/*</url-pattern>

  </servlet-mapping>

</web-app>
web.xml
applicationContext.xml:
<?xml version="1.0" encoding="UTF-8"?>

<beans xmlns="http://www.springframework.org/schema/beans"

       xmlns:xsi="http://www.w3.org/2001/XMLSchema-instance"

       xmlns:context="http://www.springframework.org/schema/context"

       xsi:schemaLocation="

           http://www.springframework.org/schema/beans

           http://www.springframework.org/schema/beans/spring-beans-2.5.xsd

           http://www.springframework.org/schema/context

           http://www.springframework.org/schema/context/spring-context-2.5.xsd">

    <!-- 使用annotation 自动注册bean,并检查@Required,@Autowired的属性已被注入 -->

    <context:component-scan base-package="com.wp.learn.webservice"></context:component-scan>

    <!-- 导入其他配置文件 -->

    <import resource="applicationContext-ws.xml" />

</beans>
applicationContext-ws.xml:
<?xml version="1.0" encoding="UTF-8"?>

<beans xmlns="http://www.springframework.org/schema/beans"

       xmlns:xsi="http://www.w3.org/2001/XMLSchema-instance" xmlns:jaxws="http://cxf.apache.org/jaxws"

       xsi:schemaLocation="

http://www.springframework.org/schema/beans http://www.springframework.org/schema/beans/spring-beans-2.5.xsd

http://cxf.apache.org/jaxws http://cxf.apache.org/schemas/jaxws.xsd">

    <import resource="classpath:META-INF/cxf/cxf.xml" />

    <import resource="classpath:META-INF/cxf/cxf-extension-soap.xml" />

    <import resource="classpath:META-INF/cxf/cxf-servlet.xml" />

    <jaxws:endpoint id="helloWebservice" implementor="#helloServiceImpl"

                    address="/hello" />

</beans>
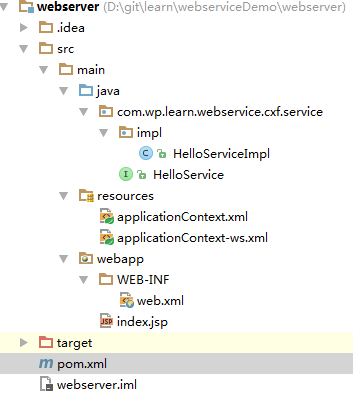
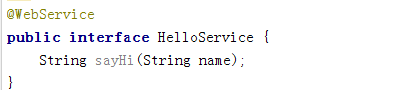
接口HelloService:
Impl类HelloServiceImpl:
情况一、如果Impl类的注解是@Webservice,implementor需要写完全路径

情况二、Impl类注解是@Service,implementor只需“#”号加bean的id名

二、客户端调用(spring配置文件形式,不需要生成客户端代码)
Webservice的客户端调用,可以用ajax前端调用,java中可以通过生产客户端代码调用,也可以通过Spring配置文件、写对应接口信息调用。本例介绍配置文件,写接口信息进行webservice调用。
1.spring配置文件信息
<jaxws:client id="helloService" serviceClass="com.wp.learn.webservice.cxf.service.IHelloService"
   address="http://localhost:8080/ws/HelloService">

</jaxws:client>
2.写对应接口信息
需要注意两点:
- 1、targetNamespace的值必须和webservice服务项目中定义的一致,具体信息可以在WSDL文件中查看
- 2、接口名称可以自己随便起,但是方法名称、参数格式必须保持一致,否则无法找到服务的实现方法。
//注意,该出的targetNamespace的值必须和webService服务项目中定义的必须一致,否则调用不成功

@WebService(targetNamespace = "http://impl.service.cxf.webservice.learn.wp.com/", name = "IHelloService")

public interface IHelloService {

    //接口名称可以不一样,方法名称、参数格式必须保持一致,否则无法找到服务的实现的方法

    public String sayHi(String name);

}
3.加载Spring的配置文件进行测试
public class Test {

    public static void main(String[] args) {

        ApplicationContext context = new ClassPathXmlApplicationContext("applicationContext-ws.xml");

        IHelloService helloService = (IHelloService) context.getBean("helloService");

        String result = helloService.sayHi("帅哥");

        System.out.print(result);

    }

}
4.需要的jar包
<project xmlns="http://maven.apache.org/POM/4.0.0" xmlns:xsi="http://www.w3.org/2001/XMLSchema-instance"

  xsi:schemaLocation="http://maven.apache.org/POM/4.0.0 http://maven.apache.org/maven-v4_0_0.xsd">

  <modelVersion>4.0.0</modelVersion>

  <groupId>com.wp.learn.webservice.webclient</groupId>

  <artifactId>webclient</artifactId>

  <packaging>war</packaging>

  <version>1.0-SNAPSHOT</version>

  <name>webclient Maven Webapp</name>

  <url>http://maven.apache.org</url>

  <properties>

    <cxf.version>2.2.3</cxf.version>

    <spring.version>3.0.2.RELEASE</spring.version>

  </properties>

  <dependencies>

    <dependency>

      <groupId>org.springframework</groupId>

      <artifactId>spring-web</artifactId>

      <version>${spring.version}</version>

    </dependency>

    <dependency>

      <groupId>org.apache.cxf</groupId>

      <artifactId>cxf-rt-frontend-jaxws</artifactId>

      <version>${cxf.version}</version>

      <exclusions>

        <exclusion>

          <groupId>org.springframework</groupId>

          <artifactId>spring-core</artifactId>

        </exclusion>

      </exclusions>

    </dependency>

    <dependency>

      <groupId>org.apache.cxf</groupId>

      <artifactId>cxf-rt-transports-http</artifactId>

      <version>${cxf.version}</version>

      <exclusions>

        <exclusion>

          <groupId>org.springframework</groupId>

          <artifactId>spring-web</artifactId>

        </exclusion>

      </exclusions>

    </dependency>

    <dependency>

      <groupId>org.apache.cxf</groupId>

      <artifactId>cxf-testutils</artifactId>

      <version>${cxf.version}</version>

      <scope>test</scope>

    </dependency>

    <dependency>

      <groupId>org.apache.cxf</groupId>

      <artifactId>cxf-rt-transports-local</artifactId>

      <version>${cxf.version}</version>

      <scope>test</scope>

    </dependency>

    <dependency>

      <groupId>org.apache.cxf</groupId>

      <artifactId>cxf-rt-transports-http-jetty</artifactId>

      <version>${cxf.version}</version>

      <scope>test</scope>

      <exclusions>

        <exclusion>

          <groupId>org.slf4j</groupId>

          <artifactId>slf4j-jdk14</artifactId>

        </exclusion>

        <exclusion>

          <groupId>org.springframework</groupId>

          <artifactId>spring-web</artifactId>

        </exclusion>

      </exclusions>

    </dependency>

    <dependency>

      <groupId>org.apache.cxf</groupId>

      <artifactId>cxf-rt-frontend-jaxrs</artifactId>

      <version>${cxf.version}</version>

      <exclusions>

        <exclusion>

          <groupId>org.springframework</groupId>

          <artifactId>spring-core</artifactId>

        </exclusion>

        <exclusion>

          <groupId>org.springframework</groupId>

          <artifactId>spring-beans</artifactId>

        </exclusion>

        <exclusion>

          <groupId>org.springframework</groupId>

          <artifactId>spring-context</artifactId>

        </exclusion>

      </exclusions>

    </dependency>

    <dependency>

      <groupId>org.springframework</groupId>

      <artifactId>spring-context-support</artifactId>

      <version>${spring.version}</version>

      <scope>compile</scope>

      <exclusions>

        <exclusion>

          <groupId>commons-logging</groupId>

          <artifactId>commons-logging</artifactId>

        </exclusion>

      </exclusions>

    </dependency>

  </dependencies>

  <build>

    <finalName>webclient</finalName>

  </build>

</project>
pom.xml
源码地址:https://gitee.com/wangpinggs/learn/tree/master/webserviceDemo
WebService--CXF与Spring的整合(jaxws:endpoint形式配置)以及客户端调用(spring配置文件形式,不需要生成客户端代码)的更多相关文章
- MongoDB和Java(5):Spring Data整合MongoDB(注解配置)
最近花了一些时间学习了下MongoDB数据库,感觉还是比较全面系统的,涉及了软件安装.客户端操作.安全认证.副本集和分布式集群搭建,以及使用Spring Data连接MongoDB进行数据操作,收获很 ...
- MongoDB和Java(4):Spring Data整合MongoDB(XML配置)
最近花了一些时间学习了下MongoDB数据库,感觉还是比较全面系统的,涉及了软件安装.客户端操作.安全认证.副本集和分布式集群搭建,以及使用Spring Data连接MongoDB进行数据操作,收获很 ...
- Spring Cloud 整合 nacos 实现动态配置中心
上一篇文章讲解了Spring Cloud 整合 nacos 实现服务注册与发现,nacos除了有服务注册与发现的功能,还有提供动态配置服务的功能.本文主要讲解Spring Cloud 整合nacos实 ...
- spring boot2X整合Consul一使用RestTemplate实现服务调用
Consul可以用于实现分布式系统的服务发现与配置 服务调用有两种方式: A.使用RestTemplate 进行服务调用 负载均衡——通过Ribbon注解RestTemplate B.使用Feign ...
- (15)Spring Boot使用Druid和监控配置【从零开始学Spring Boot】
Spring Boot 系列博客] 更多查看博客:http://412887952-qq-com.iteye.com/blog Spring Boot默认的数据源是:org.apache.tomcat ...
- spring boot2X整合nacos一使用Feign实现服务调用
服务调用有两种方式: A.使用RestTemplate 进行服务调用 查看 B.使用Feign 进行声明式服务调用 上一次写了使用RestTemplate的方式,这次使用Feign的方式实现 服务注册 ...
- 基于注解的Spring MVC整合Hibernate(所需jar包,spring和Hibernate整合配置,springMVC配置,重定向,批量删除)
1.导入jar watermark/2/text/aHR0cDovL2Jsb2cuY3Nkbi5uZXQvdG90b3R1enVvcXVhbg==/font/5a6L5L2T/fontsize/400 ...
- VUE开发(一)Spring Boot整合Vue并实现前后端贯穿调用
文章更新时间:2020/03/14 一.前言 作为一个后端程序员,前端知识多少还是要了解一些的,vue能很好的实现前后端分离,且更便于我们日常中的调试,还具备了轻量.低侵入性的特点,所以我觉得是很有必 ...
- 15、Spring Boot使用Druid和监控配置【从零开始学Spring Boot】
转载:http://blog.csdn.net/linxingliang/article/details/52001740目录(?)[-] 1添加Maven依赖 或jar包 2配置数据源相关信息 3 ...
- Spring Cloud实战 | 第九篇:Spring Cloud整合Spring Security OAuth2认证服务器统一认证自定义异常处理
本文完整代码下载点击 一. 前言 相信了解过我或者看过我之前的系列文章应该多少知道点我写这些文章包括创建 有来商城youlai-mall 这个项目的目的,想给那些真的想提升自己或者迷茫的人(包括自己- ...
随机推荐
- 欧拉回路&欧拉路径学习笔记
基础性质(用来判定): 1.无向图欧拉回路没有奇数点 (有向图所有点入度等于出度) 2.无向图欧拉路径只有两个奇数点 (有向图有一个顶点入度比出度大1,有一个顶点出度比入度大1,其他的全相等) 3.图 ...
- 34.node.js之Url & QueryString模块
转自:https://i.cnblogs.com/posts?categoryid=1132005&page=6//引用 var url = require("url"); ...
- mahout历史(二)
mahout历史 Apache Mahout起源于2008年,经过两年的发展,2010年4月ApacheMahout最终成为了Apache的顶级项目.Mahout 项目是由 ApacheLucene( ...
- Linux架设Jsp环境
本文已发表在2010年<网管员世界> 650) this.width=650;" onclick="window.open("http://blog.51ct ...
- Android 多线程下载,断点续传,线程池
你可以在这里看到这个demo的源码: https://github.com/onlynight/MultiThreadDownloader 效果图 这张效果图是同时开启三个下载任务,限制下载线程数量的 ...
- Git安装及密钥的生成并上传本地文件到GitHub上
之前用的GitHub,不太熟练,一直在上传的过程中遇到了一些问题,看了网上诸多教程,总觉得很乱,特参考一些资料,总结了一篇完整的操作步骤,从下载安装到上传文件,亲测有效 1.下载Git软件:https ...
- 【AIM Tech Round 4 (Div. 2) A】Diversity
[链接]http://codeforces.com/contest/844/problem/A [题意] 大水题 [题解] 看看不同的个数num是不是小于k,小于k,看看len-num够不够补的 [错 ...
- Dao层封装泛型实现(spring mvc,springjdbctemplate)
代码片段(6) [全屏查看所有代码] 1. [代码]BaseDao 跳至 [1] [2] [3] [4] [全屏预览] ? 1 2 3 4 5 6 7 8 9 10 11 12 13 14 1 ...
- textview-显示行数限制
在代码中直接添加 android:maxLines="2" android:ellipsize="end" 跟ellipsize搭配使用,超过两行的时候,第二行 ...
- 前台Ajax发送数据给后台
前台发ajax请求给后台 前台代码 let data= [{receiveAdd:receiveAddVal, sendAdd:sendAddVal,distance:distance,goodsNa ...