前端MVC Vue2学习总结(九)——Vuex状态管理插件
一、概要
1.1、Vuex定义与注意事项
Vuex是为vue.js框架更好的管理状态而设计一个插件。Vuex 是一个专为 Vue.js 应用程序开发的状态管理模式。它采用集中式存储管理应用的所有组件的状态,并以相应的规则保证状态以一种可预测的方式发生变化。Vuex 也集成到 Vue 的官方调试工具 devtools extension,提供了诸如零配置的 time-travel 调试、状态快照导入导出等高级调试功能。
使用Vue开发中需要将应用拆分成多个组件,但是组件与组件之间数据共享成了一个问题,父子组件实现起来相对简单,有很多兄弟组件和跨多级组件,实现起来过程繁琐,在多人协同开发上,不利于统一管理,Vuex可以解决这些问题。
1.1.1、状态管理模式
没有使用Vuex时,让我们看一个简单的 Vue 计数应用:
new Vue({

  // state

  data () {

    return {

      count: 0

    }

  },

  // view

  template:'<div>{{ count }}</div>',

  // actions

  methods: {

    increment () {

      this.count++

    }

  }

})
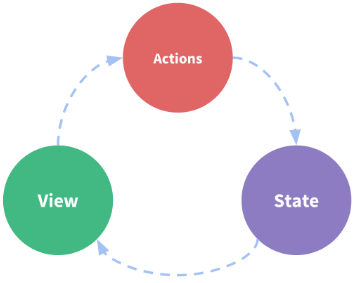
这个状态自管理应用包含以下几个部分:
- state,驱动应用的数据源;
- view,以声明方式将 state 映射到视图;
- actions,响应在 view 上的用户输入导致的状态变化。
以下是一个表示“单向数据流”理念的极简示意:
但是,当我们的应用遇到多个组件共享状态时,单向数据流的简洁性很容易被破坏:
- 多个视图依赖于同一状态。
- 来自不同视图的行为需要变更同一状态。
对于问题一,传参的方法对于多层嵌套的组件将会非常繁琐,并且对于兄弟组件间的状态传递无能为力。对于问题二,我们经常会采用父子组件直接引用或者通过事件来变更和同步状态的多份拷贝。以上的这些模式非常脆弱,通常会导致无法维护的代码。
因此使用Vuex,我们为什么不把组件的共享状态抽取出来,以一个全局单例模式管理呢?在这种模式下,我们的组件树构成了一个巨大的“视图”,不管在树的哪个位置,任何组件都能获取状态或者触发行为!
另外,通过定义和隔离状态管理中的各种概念并强制遵守一定的规则,我们的代码将会变得更结构化且易维护。
这就是 Vuex 背后的基本思想,借鉴了 Flux、 Redux、和 The Elm Architecture。与其他模式不同的是,Vuex 是专门为 Vue.js 设计的状态管理库,以利用 Vue.js 的细粒度数据响应机制来进行高效的状态更新。
1.1.2、使用 Vuex
虽然 Vuex 可以帮助我们管理共享状态,但也附带了更多的概念和框架。这需要对短期和长期效益进行权衡。
如果您不打算开发大型单页应用,使用 Vuex 可能是繁琐冗余的。确实是如此——如果您的应用够简单,您最好不要使用 Vuex。一个简单的 store 模式就足够您所需了。但是,如果您需要构建一个中大型单页应用,您很可能会考虑如何更好地在组件外部管理状态,Vuex 将会成为自然而然的选择。引用 Redux 的作者 Dan Abramov 的话说就是:"Flux 架构就像眼镜:您自会知道什么时候需要它。"
1.1.3、注意事项
Vuex会有一定的门槛和复杂性,它的主要使用场景是大型单页面应用,如果你的项目不是很复杂,用一个bus也可以实现数据的共享(在前面讲组件的内容中已经讲到过bus作为总线进行通信的示例),但是它在数据管理,维护,还只是一个简单的组件,而Vuex可以更优雅高效地完成状态管理,所以,是否使用Vuex取决于你的团队和技术储备。
使用bus作为总线通信的示例:
<!DOCTYPE html>

<html>

<head>

    <meta charset="UTF-8">

    <title>Vue2 Demo</title>

</head>

<body>

<div id="app01">

    <my-comp1></my-comp1>

    <my-comp2></my-comp2>

</div>

<script src="../../js/vue/vue.js"></script>

<script>

    //事件总线

    var bus = new Vue();

    Vue.component("my-comp1", {

        template: "<button @click='incrN'>{{n}}</button>",

        data() {

            return {n: 0}

        },

        methods: {

            incrN: function () {

                this.n++;

                //发布事件

                bus.$emit("inc",this.n);

            }

        }

    });

    Vue.component("my-comp2", {

        template: "<button @click='incrN'>{{n}}</button>",

        data() {

            return {n: 999}

        },

        methods: {

            incrN: function () {

                this.n--;

            }

        },

        //勾子,挂载完成时执行事件

        mounted:function () {

            var _this=this;

            //监听事件,订阅事件

            bus.$on("inc",function (val) {

                _this.n+=val;

            })

        }

    });

    var vm = new Vue({

        el: "#app01",

        data: {}

    });

</script>

</body>

</html>
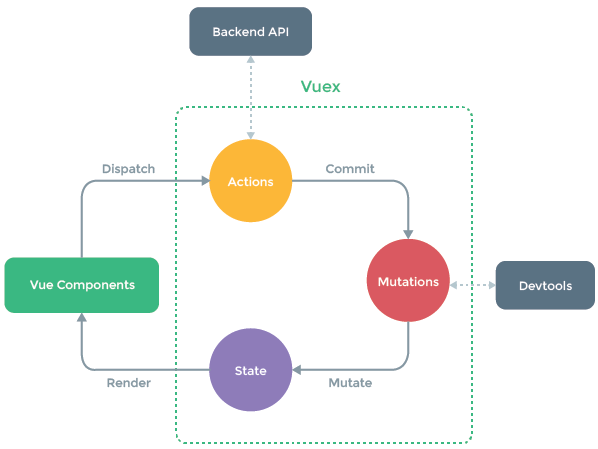
1.2、概念
每一个 Vuex 应用的核心就是store(仓库),store基本上就是一个容器,它包含着你的应用中大部分的状态 (state)。 Vuex和单纯的全局对象有以下两点不同:
1.Vuex 的状态存储是响应式的。当 Vue 组件从 store 中读取状态的时候,若 store 中的状态发生变化,那么相应的组件也会相应地得到高效更新;
2.你不能直接改变 store 中的状态。改变 store 中的状态的唯一途径就是显式地提交 (commit) mutation。这样使得我们可以方便地跟踪每一个状态的变化,从而让我们能够实现一些工具帮助我们更好地了解我们的应用。
- store:表示对Vuex对象的全局引用。组件通过Store来访问Vuex对象中的State。
- state:保存数据的状态、对象的状态,即其所拥有的数据。
- getter:相当于Store的计算属性。因为就像计算属性一样,Getter的返回值会根据它的依赖被缓存起来,且只有当它的依赖值发生了改变才会被重新计算。下面会说到具体的使用场景。
- mutations:定义了对state中数据的修改操作,更改store中的状态的唯一方法是提交mutation。mutation类似于事件:每个mutation都有一个字符串的事 件类型(type),和一个回调函数(handler).利用store.commit('方法名')来调用这个函数。
- mutations-type:可以认为是store中的计算属性,mapGetters是辅助函数,仅仅将store中的getter映射到局部计算属性。
- action :mutation中定义的操作只能执行同步操作,Vuex中的异步操作在Action中进行,Action最终通过调用Mutation的操作来更新数据;类似于mutation,不同在于action提交的是mutation,而不是直接变更状态,action可以包含任意 异步操作。action用store.dispatch方法触发函数。mapActions是辅助函数,将组件的 methods 映射为store.dispatch。
- module:Store和State之间的一层,便于大型项目管理,Store包含多个Module,Module包含State、Mutation和Action。
1.3、资源
github: https://github.com/vuejs/vuex
中文帮助: https://vuex.vuejs.org/zh/(本文大量引用)
英文帮助: https://vuex.vuejs.org/
视频教程: https://www.bilibili.com/video/av17503637/
二、安装
2.1、直接下载或CDN 引用
引用地址: https://unpkg.com/vuex
Unpkg.com 提供了基于 NPM 的 CDN 链接。以上的链接会一直指向 NPM 上发布的最新版本。您也可以通过 https://unpkg.com/vuex@3.0.1/dist/vuex.js这样的方式指定特定的版本。
CDN引用:
<script src="https://unpkg.com/vue"></script>

<script src="https://unpkg.com/vuex"></script>
也可以使用下载后本地引用,vuex的github地址是: https://github.com/vuejs/vuex
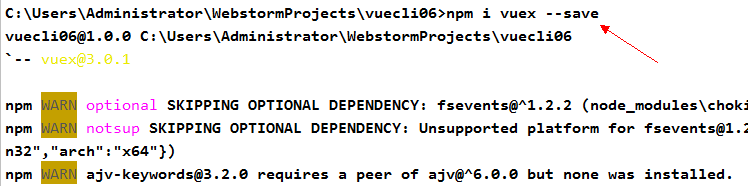
2.2、NPM包管理器
npm i vuex --save
2.3、Yarn
yarn add vuex
在一个模块化的打包系统中,您必须显式地通过 Vue.use() 来安装 Vuex:
import Vue from 'vue'

import Vuex from 'vuex'

Vue.use(Vuex)

//当使用全局 script 标签引用 Vuex 时,不需要以上安装过程。
2.4、Promise
Vuex 依赖 Promise。如果你支持的浏览器并没有实现 Promise (比如 IE),那么你可以使用一个polyfill的库,例如 es6-promise。
你可以通过 CDN 将其引入:
<script src="https://cdn.jsdelivr.net/npm/es6-promise@4/dist/es6-promise.auto.js"></script>
然后 window.Promise 会自动可用。
如果你喜欢使用诸如 npm 或 Yarn 等包管理器,可以按照下列方式执行安装:
npm install es6-promise --save # npm

yarn add es6-promise # Yarn
或者更进一步,将下列代码添加到你使用 Vuex 之前的一个地方:
import 'es6-promise/auto'
2.5、自己构建
如果需要使用 dev 分支下的最新版本,您可以直接从 GitHub 上克隆代码并自己构建。
git clone https://github.com/vuejs/vuex.git node_modules/vuex

cd node_modules/vuex

npm install

npm run build
三、应用
3.1、页面使用Vuex快速起步
创建一个 store,创建过程直截了当——仅需要提供一个初始 state 对象和一些 mutation:
// 如果在模块化构建系统中,请确保在开头调用了 Vue.use(Vuex)

const store = new Vuex.Store({

  state: {

    count: 0

  },

  mutations: {

    increment (state) {

      state.count++

    }

  }

})
现在,你可以通过 store.state 来获取状态对象,以及通过 store.commit 方法触发状态变更:
store.commit('increment')

console.log(store.state.count) // -> 1
再次强调,我们通过提交 mutation 的方式,而非直接改变 store.state.count,是因为我们想要更明确地追踪到状态的变化。这个简单的约定能够让你的意图更加明显,这样你在阅读代码的时候能更容易地解读应用内部的状态改变。此外,这样也让我们有机会去实现一些能记录每次状态改变,保存状态快照的调试工具。有了它,我们甚至可以实现如时间穿梭般的调试体验。
由于 store 中的状态是响应式的,在组件中调用 store 中的状态简单到仅需要在计算属性中返回即可。触发变化也仅仅是在组件的 methods 中提交 mutation。
完整示例代码:
<!DOCTYPE html>

<html lang="en">

<head>

    <meta charset="UTF-8">

    <title>Title</title>

</head>

<body>

<div id="app">

    <p>{{ count }}</p>

    <p>

        <button @click="increment">+</button>

        <button @click="decrement">-</button>

    </p>

    <div>

        <comp1></comp1>

        <comp1></comp1>

    </div>

</div>

<script src="https://unpkg.com/vue"></script>

<script src="https://unpkg.com/vuex"></script>

<script>

    //定义仓库对象

    const store = new Vuex.Store({

        state: {

            count: 0

        },

        mutations: {

            increment: state => state.count++,

            decrement: state => state.count--

        }

    })

    //定义组件

    Vue.component("comp1",{

        template:"<h2>{{count}}</h2>",

        computed: {

            count () {

                return store.state.count

            }

        }

    });

    new Vue({

        el: '#app',

        computed: {

            count () {

                return store.state.count

            }

        },

        methods: {

            increment () {

                store.commit('increment')

            },

            decrement () {

                store.commit('decrement')

            }

        }

    })

</script>

</body>

</html>
运行结果:
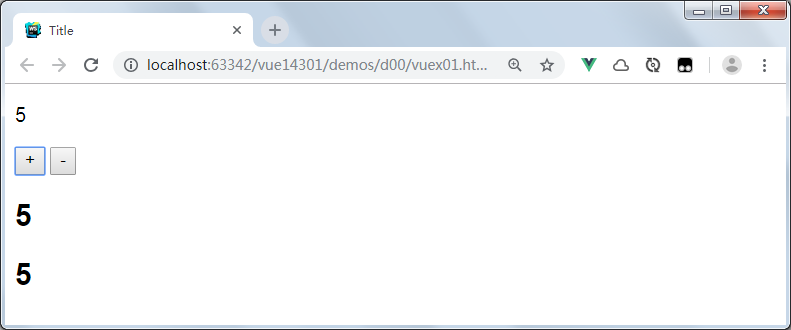
在线示例:这是一个 最基本的 Vuex 记数应用示例
3.2、Vue-cli中使用Vuex快速起步
安装vuex:
插件引用:
//导入插件

import Vuex from 'vuex'

//使用插件

Vue.use( Vuex );

//定义仓库对象

const store = new Vuex.Store({

    //属性

})

//定义vue实例并关联存储仓库

new Vue({

    el: '#app',

    store,

    render: h => h(App)

});
定义状态对象main.js:
import Vue from 'vue'

import Vuex from 'vuex';

import App from './App'

import router from './router/hello'

Vue.config.productionTip = false

Vue.use(Vuex);

//定义仓库对象

const store = new Vuex.Store({

  state: {

    count: 0

  },

  mutations: {

    increment: state => state.count++,

    decrement: state => state.count--

  }

})

/* eslint-disable no-new */

new Vue({

  el: '#app',

  router,

  store,

  components: { App },

  render:r=>r(App)

})
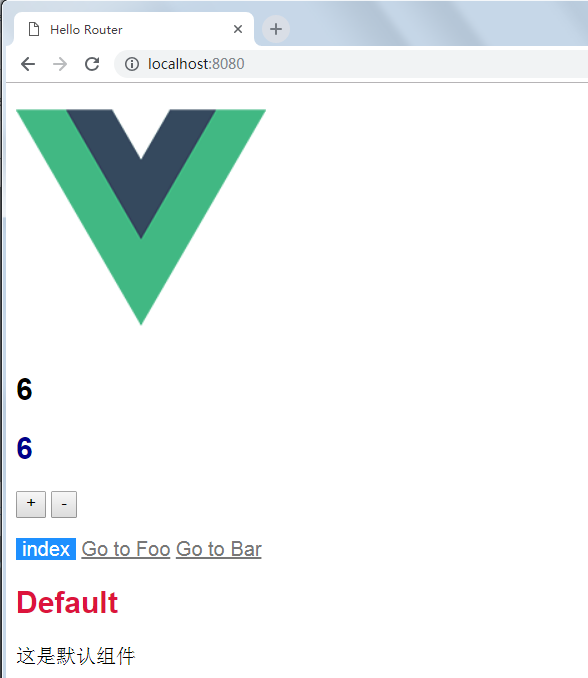
直接使用状态对象中的数据App.vue:
<template>

  <div>

    <img src="./assets/logo.png">

    <h2>

      {{$store.state.count}}

    </h2>

    <Counter/>

    <header>

      <!-- router-link 定义点击后导航到哪个路径下 -->

      <router-link to="/" exact>index</router-link>

      <router-link to="/foo">Go to Foo</router-link>

      <router-link to="/bar">Go to Bar</router-link>

    </header>

    <!-- 对应的组件内容渲染到router-view中 -->

    <router-view></router-view>

  </div>

</template>

<script>

  import Counter from './components/Counter';

  export default {

    components:{Counter}

  }

</script>

<style scoped>

  a {

    color: #777;

  }

  a:hover {

    color: orangered;

  }

</style>
在组件中使用状态对象:
//Counter.vue

<template>

  <div id="app">

    <h2>{{ count }}</h2>

    <p>

      <button @click="increment">+</button>

      <button @click="decrement">-</button>

    </p>

  </div>

</template>

<script>

  export default {

    name: "Counter",

    computed: {

      count() {

        return this.$store.state.count

      }

    },

    methods: {

      increment() {

        this.$store.commit('increment')

      },

      decrement() {

        this.$store.commit('decrement')

      }

    }

  }

</script>

<style scoped>

  h2 {

    color: darkblue;

  }

</style>
引用组件:
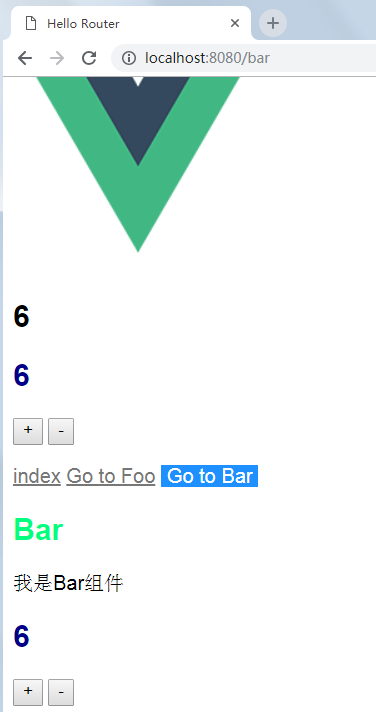
//bar.vue

<template>

  <div>

    <h2>Bar</h2>

    <p>{{msg}}</p>

    <Counter/>

  </div>

</template>

<script>

  import Counter from './Counter';

  export default {

    data() {

      return {

        msg: "我是Bar组件"

      }

    },

    components: {Counter}

  }

</script>

<style scoped>

  h2 {

    color: springgreen;

  }

</style>
App.Vue内容:
<template>

  <div>

    <img src="./assets/logo.png">

    <h2>

      {{$store.state.count}}

    </h2>

    <Counter/>

    <header>

      <!-- router-link 定义点击后导航到哪个路径下 -->

      <router-link to="/" exact>index</router-link>

      <router-link to="/foo">Go to Foo</router-link>

      <router-link to="/bar">Go to Bar</router-link>

    </header>

    <!-- 对应的组件内容渲染到router-view中 -->

    <router-view></router-view>

  </div>

</template>

<script>

  import Counter from './components/Counter';

  export default {

    components:{Counter}

  }

</script>

<style scoped>

  a {

    color: #777;

  }

  a:hover {

    color: orangered;

  }

</style>
运行结果:
切换到一个单页Bar
3.3、没有使用vuex的汽车列表(示例)
为了方便后面的内容讲解这里重新做一个简单的vuex汽车列表示例,这个示例分别有两个组件CarListOne.vue和CarListTwo.vue, 在App.vue的datat中保存着共有的汽车列表, 代码和初始化的效果如下图所示:
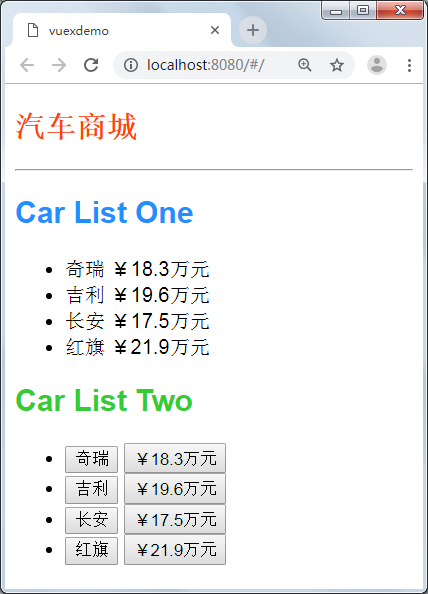
<template>

  <div id="app">

    <h2>汽车商城</h2>

    <hr/>

    <car-list-one v-bind:cars="cars"></car-list-one>

    <car-list-two v-bind:cars="cars"></car-list-two>

  </div>

</template>

<script>

  import CarListOne from './components/CarListOne.vue'

  import CarListTwo from './components/CarListTwo.vue'

  export default {

    name: 'app',

    components: {

      'car-list-one': CarListOne,

      'car-list-two': CarListTwo

    },

    data() {

      return {

        cars: [

          {name: '奇瑞', price: 18.3},

          {name: '吉利', price: 19.6},

          {name: '长安', price: 17.5},

          {name: '红旗', price: 21.9}

        ]

      }

    }

  }

</script>

<style>

  h2 {

    color: orangered;

  }

</style>
CarListOne.vue
<template>

  <div id="car-list-one">

    <h2>Car List One</h2>

    <ul>

      <li v-for="car in cars">

        <span>{{ car.name }}</span>

        <span>¥{{ car.price }}万元</span>

      </li>

    </ul>

  </div>

</template>

<script>

  export default {

    props: ['cars'],

    data() {

      return {}

    }

  }

</script>

<style scoped>

  h2 {

    color: dodgerblue;

  }

</style>
CarListTwo.vue
<template>

  <div id="car-list-two">

    <h2>Car List Two</h2>

    <ul>

      <li v-for="car in cars">

        <button>{{ car.name }}</button>

        <button>¥{{ car.price }}万元</button>

      </li>

    </ul>

  </div>

</template>

<script>

  export default {

    props: ['cars'],

    data() {

      return {}

    }

  }

</script>

<style scoped>

  h2 {

    color: limegreen;

  }

</style>
3.4、State
state就是Vuex中的公共的状态, 我是将state看作是所有组件的data, 用于保存所有组件的公共数据。
此时我们就可以把App.vue中的两个组件共同使用的data抽离出来, 放到state中,代码如下:
//main.js

import Vue from 'vue'

import App from './App.vue'

import Vuex from 'vuex'

Vue.use( Vuex )

const store = new Vuex.Store({

  state:{

    cars: [

      {name: '奇瑞', price: 20},

      {name: '吉利', price: 40},

      {name: '长安', price: 60},

      {name: '比亚迪', price: 80}

    ]

  }

})

new Vue({

  el: '#app',

  store,

  render: h => h(App)

})

此时,CarListOne.vue和CarListTwo.vue也需要做相应的更改

//CarListOne.vue

export default {

    data () {

        return {

            cars : this.$store.state.cars //获取store中state的数据

        }

    }

}

//CarListTwo.vue

export default {

    data () {

        return {

            cars: this.$store.state.cars //获取store中state的数据

        }

    }

}
此时的页面如下图所示, 可以看到, 将公共数据抽离出来后, 页面没有发生变化。
3.5、Getters
我将getters属性理解为所有组件的computed属性, 也就是计算属性。vuex的官方文档也是说到可以将getter理解为store的计算属性,getters的返回值会根据它的依赖被缓存起来,且只有当它的依赖值发生了改变才会被重新计算。
此时,我们可以在main.js中添加一个getters属性, 其中的saleCars对象将state中的价格减少一半(除以2)
//main.js

const store = new Vuex.Store({

  state:{

    cars: [

      {name: '奇瑞', price: 20},

      {name: '吉利', price: 40},

      {name: '长安', price: 60},

      {name: '比亚迪', price: 80}

    ]

  },

  getters:{ //添加getters

    saleCars: (state) => {

      let saleCars = state.cars.map( car => {

        return {

          name: car.name,

          price: car.price / 2

        }

      })

      return saleCars;

    }

  }

})

将carListOne.vue中的cars的值更换为this.$store.getters.saleCars

export default {

    data () {

        return {

            cars : this.$store.getters.saleCars

        }

    }

}
现在的页面中,Car List One中的每项汽车的价格都减少了一半
getters 和 vue 中的 computed 类似 , 都是用来计算 state 然后生成新的数据 ( 状态 ) 的。

还是前面的例子 , 假如我们需要一个与状态 show 刚好相反的状态 , 使用 vue 中的 computed 可以这样算出来 :

computed(){

    not_show(){

        return !this.$store.state.dialog.show;

    }

}

那么 , 如果很多很多个组件中都需要用到这个与 show 刚好相反的状态 , 那么我们需要写很多很多个 not_show , 使用 getters 就可以解决这种问题 :

export default {

    state:{//state

        show:false

    },

    getters:{

        not_show(state){//这里的state对应着上面这个state

            return !state.show;

        }

    },

    mutations:{

        switch_dialog(state){//这里的state对应着上面这个state

            state.show = state.show?false:true;

            //你还可以在这里执行其他的操作改变state

        }

    },

    actions:{

        switch_dialog(context){//这里的context和我们使用的$store拥有相同的对象和方法

            context.commit('switch_dialog');

            //你还可以在这里触发其他的mutations方法

        },

    }

}

我们在组件中使用 $store.state.dialog.show 来获得状态 show , 类似的 , 我们可以使用 $store.getters.not_show 来获得状态 not_show 。

注意 : $store.getters.not_show 的值是不能直接修改的 , 需要对应的 state 发生变化才能修改。
mapState、mapGetters、mapActions

很多时候 , $store.state.dialog.show 、$store.dispatch('switch_dialog') 这种写法又长又臭 , 很不方便 , 我们没使用 vuex 的时候 , 获取一个状态只需要 this.show , 执行一个方法只需要 this.switch_dialog 就行了 , 使用 vuex 使写法变复杂了 ?

使用 mapState、mapGetters、mapActions 就不会这么复杂了。

以 mapState 为例 :

<template>

  <el-dialog :visible.sync="show"></el-dialog>

</template>

<script>

import {mapState} from 'vuex';

export default {

  computed:{

    //这里的三点叫做 : 扩展运算符

    ...mapState({

      show:state=>state.dialog.show

    }),

  }

}

</script>

相当于 :

<template>

  <el-dialog :visible.sync="show"></el-dialog>

</template>

<script>

import {mapState} from 'vuex';

export default {

  computed:{

    show(){

        return this.$store.state.dialog.show;

    }

  }

}

</script>

mapGetters、mapActions 和 mapState 类似 , mapGetters 一般也写在 computed 中 , mapActions 一般写在 methods 中。
3.6、Mutations
我将mutaions理解为store中的methods, mutations对象中保存着更改数据的回调函数,该函数名官方规定叫type, 第一个参数是state, 第二参数是payload, 也就是自定义的参数.
下面,我们在main.js中添加mutations属性,其中minusPrice这个回调函数用于将汽车的价格减少payload这么多, 代码如下:
//main.js

const store = new Vuex.Store({

  state:{

    cars: [

      {name: '奇瑞', price: 20},

      {name: '吉利', price: 40},

      {name: '长安', price: 60},

      {name: '比亚迪', price: 80}

    ]

  },

  getters:{

    saleCars: (state) => {

      let saleCars = state.cars.map( car => {

        return {

          name: car.name,

          price: car.price / 2

        }

      })

      return saleCars;

    }

  },

  mutations:{ //添加mutations

    minusPrice (state, payload ) {

      let newPrice = state.cars.forEach( car => {

        car.price -= payload

      })

    }

  }

})

在CarListTwo.vue中添加一个按钮,为其添加一个点击事件, 给点击事件触发minusPrice方法

//CarListTwo.vue

<template>

    <div id="car-list-two">

        <h2>Car List Two</h2>

        <ul>

            <li v-for="car in cars">

                <span class="name">{{ car.name }}</span>

                <span class="price">${{ car.price }}</span>

            </li>

            <button @click="minusPrice">减少价格</button> //添加按钮

        </ul>

    </div>

</template>

在CarListTwo.vue中注册minusPrice方法, 在该方法中commitmutations中的minusPrice这个回调函数

注意:调用mutaions中回调函数, 只能使用store.commit(type, payload)

//CarListTwo.vue

export default {

    data () {

        return {

            cars: this.$store.state.cars

        }

    },

    methods: {

        minusPrice() {

            this.$store.commit('minusPrice', 2); //提交`minusPrice,payload为2

        }

    }

}
添加按钮, 可以发现, Car List Two中的价格减少了2, 当然你可以自定义payload,以此自定义减少对应的价格.
(Car List One中的价格没有发生变化, 是因为getters将价格进行了缓存)
前面我们提到的对话框例子 , 我们对vuex 的依赖仅仅只有一个 $store.state.dialog.show 一个状态 , 但是如果我们要进行一个操作 , 需要依赖很多很多个状态 , 那管理起来又麻烦了 !

mutations 登场 , 问题迎刃而解 :

export default {

    state:{//state

        show:false

    },

    mutations:{

        switch_dialog(state){//这里的state对应着上面这个state

            state.show = state.show?false:true;

            //你还可以在这里执行其他的操作改变state

        }

    }

}

使用 mutations 后 , 原先我们的父组件可以改为 :

<template>

  <div id="app">

    <a href="javascript:;" @click="$store.commit('switch_dialog')">点击</a>

    <t-dialog></t-dialog>

  </div>

</template>

<script>

import dialog from './components/dialog.vue'

export default {

  components:{

    "t-dialog":dialog

  }

}

</script>

使用 $store.commit('switch_dialog') 来触发 mutations 中的 switch_dialog 方法。

这里需要注意的是:

mutations 中的方法是不分组件的 , 假如你在 dialog_stroe.js 文件中的定义了

switch_dialog 方法 , 在其他文件中的一个 switch_dialog 方法 , 那么

$store.commit('switch_dialog') 会执行所有的 switch_dialog 方法。

mutations里的操作必须是同步的。

你一定好奇 , 如果在 mutations 里执行异步操作会发生什么事情 , 实际上并不会发生什么奇怪的事情 , 只是官方推荐 , 不要在 mutationss 里执行异步操作而已。
3.7、Actions
actions 类似于 mutations,不同在于:
actions提交的是mutations而不是直接变更状态actions中可以包含异步操作,mutations中绝对不允许出现异步actions中的回调函数的第一个参数是context, 是一个与store实例具有相同属性和方法的对象此时,我们在
store中添加actions属性, 其中minusPriceAsync采用setTimeout来模拟异步操作,延迟2s执行 该方法用于异步改变我们刚才在mutaions中定义的minusPrice
//main.js

const store = new Vuex.Store({

  state:{

    cars: [

      {name: '奇瑞', price: 20},

      {name: '吉利', price: 40},

      {name: '长安', price: 60},

      {name: '比亚迪', price: 80}

    ]

  },

  getters:{

    saleCars: (state) => {

      let saleCars = state.cars.map( car => {

        return {

          name: car.name,

          price: car.price / 2

        }

      })

      return saleCars;

    }

  },

  mutations:{

    minusPrice (state, payload ) {

      let newPrice = state.cars.forEach( car => {

        car.price -= payload

      })

    }

  },

  actions:{ //添加actions

    minusPriceAsync( context, payload ) {

      setTimeout( () => {

        context.commit( 'minusPrice', payload ); //context提交

      }, 2000)

    }

  }

})

在CarListTwo.vue中添加一个按钮,为其添加一个点击事件, 给点击事件触发minusPriceAsync方法

<template>

    <div id="car-list-two">

        <h2>Car List Two</h2>

        <ul>

            <li v-for="car in cars">

                <span class="name">{{ car.name }}</span>

                <span class="price">${{ car.price }}</span>

            </li>

            <button @click="minusPrice">减少价格</button>

            <button @click="minusPriceAsync">异步减少价格</button> //添加按钮

        </ul>

    </div>

</template>

在CarListTwo.vue中注册minusPriceAsync方法, 在该方法中dispatchactions中的minusPriceAsync这个回调函数

export default {

    data () {

        return {

            cars: this.$store.state.cars

        }

    },

    methods: {

        minusPrice() {

            this.$store.commit('minusPrice', 2);

        },

        minusPriceAsync() {

            this.$store.dispatch('minusPriceAsync', 5); //分发actions中的minusPriceAsync这个异步函数

        }

    }

}
添加按钮, 可以发现, Car List Two中的价格延迟2s后减少了5
 actions效果
多个 state 的操作 , 使用 mutations 会来触发会比较好维护 , 那么需要执行多个 mutations 就需要用 action 了:

export default {

    state:{//state

        show:false

    },

    mutations:{

        switch_dialog(state){//这里的state对应着上面这个state

            state.show = state.show?false:true;

            //你还可以在这里执行其他的操作改变state

        }

    },

    actions:{

        switch_dialog(context){//这里的context和我们使用的$store拥有相同的对象和方法

            context.commit('switch_dialog');

            //你还可以在这里触发其他的mutations方法

        },

    }

}

那么 , 在之前的父组件中 , 我们需要做修改 , 来触发 action 里的 switch_dialog 方法:

<template>

  <div id="app">

    <a href="javascript:;" @click="$store.dispatch('switch_dialog')">点击</a>

    <t-dialog></t-dialog>

  </div>

</template>

<script>

import dialog from './components/dialog.vue'

export default {

  components:{

    "t-dialog":dialog

  }

}

</script>

使用 $store.dispatch('switch_dialog') 来触发 action 中的 switch_dialog 方法。

官方推荐 , 将异步操作放在 action 中。
3.8、Modules
由于使用单一状态树,应用的所有状态会集中到一个比较大的对象。当应用变得非常复杂时,store 对象就有可能变得相当臃肿。为了解决以上问题,Vuex 允许我们将 store 分割成模块(module)。每个模块拥有自己的 state、mutation、action、getter、甚至是嵌套子模块——从上至下进行同样方式的分割
const moduleA = {

  state: { ... },

  mutations: { ... },

  actions: { ... },

  getters: { ... }

}

const moduleB = {

  state: { ... },

  mutations: { ... },

  actions: { ... }

}

const store = new Vuex.Store({

  modules: {

    a: moduleA,

    b: moduleB

  }

})

store.state.a // -> moduleA 的状态

store.state.b // -> moduleB 的状态
前面为了方便 , 我们把 store 对象写在了 main.js 里面 , 但实际上为了便于日后的维护 , 我们分开写更好 , 我们在 src 目录下 , 新建一个 store 文件夹 , 然后在里面新建一个 index.js :

import Vue from 'vue'

import vuex from 'vuex'

Vue.use(vuex);

export default new vuex.Store({

    state:{

        show:false

    }

})

那么相应的 , 在 main.js 里的代码应该改成 :

//vuex

import store from './store'

new Vue({

  el: '#app',

  router,

  store,//使用store

  template: '<App/>',

  components: { App }

})

这样就把 store 分离出去了 , 那么还有一个问题是 : 这里 $store.state.show 无论哪个组件都可以使用 , 那组件多了之后 , 状态也多了 , 这么多状态都堆在 store 文件夹下的 index.js 不好维护怎么办 ?

我们可以使用 vuex 的 modules , 把 store 文件夹下的 index.js 改成 :

import Vue from 'vue'

import vuex from 'vuex'

Vue.use(vuex);

import dialog_store from '../components/dialog_store.js';//引入某个store对象

export default new vuex.Store({

    modules: {

        dialog: dialog_store

    }

})

这里我们引用了一个 dialog_store.js , 在这个 js 文件里我们就可以单独写 dialog 组件的状态了 :

export default {

    state:{

        show:false

    }

}

做出这样的修改之后 , 我们将之前我们使用的 $store.state.show 统统改为 $store.state.dialog.show 即可。

如果还有其他的组件需要使用 vuex , 就新建一个对应的状态文件 , 然后将他们加入 store 文件夹下的 index.js 文件中的 modules 中。

modules: {

    dialog: dialog_store,

    other: other,//其他组件

}
改进的计算器
eg:store.js

import Vue from 'vue';

import Vuex from 'vuex'; //引入 vuex

import store from './store' //注册store

Vue.use(Vuex); //使用 vuex

export default new Vuex.Store({

    state: {

        // 初始化状态

        count: 0,

        someLists:[]

    },

    mutations: {

        // 处理状态

        increment(state, payload) {

            state.count += payload.step || 1;

        }

    },

    actions: {

        // 提交改变后的状态

        increment(context, param) {

            context.state.count += param.step;

            context.commit('increment', context.state.count)//提交改变后的state.count值

        },

        incrementStep({state, commit, rootState}) {

            if (rootState.count < 100) {

                store.dispatch('increment', {//调用increment()方法

                    step: 10

                })

            }

        }

    },

    getters: {

        //处理列表项

        someLists: state =>param=> {

            return state.someLists.filter(() => param.done)

        }

    }

})

使用时,eg:

main.js:

import Vue from 'vue'

import App from './App.vue'

import router from './router'

import store from './store' //引入状态管理 store

Vue.config.productionTip = false

new Vue({

  router,

  store,//注册store(这可以把 store 的实例注入所有的子组件)

  render: h => h(App)

}).$mount('#app')

views/home.vue:

<template>

  <div class="home">

    <!--在前端HTML页面中使用 count-->

    <HelloWorld :msg="count"/>

    <!--表单处理 双向绑定 count-->

    <input :value="count" @input="incrementStep">

  </div>

</template>

<script>

    import HelloWorld from '@/components/HelloWorld.vue'

    import {mapActions, mapState,mapGetters} from 'vuex' //注册 action 和 state

    export default {

        name: 'home',

        computed: {

            //在这里映射 store.state.count,使用方法和 computed 里的其他属性一样

            ...mapState([

                'count'

            ]),

            count () {

                return store.state.count

            }

        },

        created() {

            this.incrementStep();

        },

        methods: {

            //在这里引入 action 里的方法,使用方法和 methods 里的其他方法一样

            ...mapActions([

                'incrementStep'

            ]),

            // 使用对象展开运算符将 getter 混入 computed 对象中

            ...mapGetters([

                'someLists'

                // ...

            ])

        },

        components: {

            HelloWorld

        }

    }

</script>
前端MVC Vue2学习总结(九)——Vuex状态管理插件的更多相关文章
- 前端MVC Vue2学习总结(八)——Vue Router路由、Vuex状态管理、Element-UI
一.Vue Router路由 二.Vuex状态管理 三.Element-UI Element-UI是饿了么前端团队推出的一款基于Vue.js 2.0 的桌面端UI框架,手机端有对应框架是 Mint U ...
- 前端技术之:如何在vuex状态管理action异步调用结束后执行UI中的方法
一.问题的起源 最近在做vue.js项目时,遇到了vuex状态管理action与vue.js方法互相通信.互操作的问题.场景如下图所示: 二.第一种解决方法 例如,我们在页面初始化的时候,需要从服务端 ...
- 前端MVC Vue2学习总结(一)——MVC与vue2概要、模板、数据绑定与综合示例
一.前端MVC概要 1.1.库与框架的区别 框架是一个软件的半成品,在全局范围内给了大的约束.库是工具,在单点上给我们提供功能.框架是依赖库的.Vue是框架而jQuery则是库. 1.2.AMD与CM ...
- 前端MVC Vue2学习总结(二)——Vue的实例、生命周期与Vue脚手架(vue-cli)
一.Vue的实例 1.1.创建一个 Vue 的实例 每个 Vue 应用都是通过 Vue 函数创建一个新的 Vue 实例开始的: var vm = new Vue({ // 选项 }) 虽然没有完全遵循 ...
- 前端MVC Vue2学习总结(七)——ES6与Module模块化、Vue-cli脚手架搭建、开发、发布项目与综合示例
使用vue-cli可以规范项目,提高开发效率,但是使用vue-cli时需要一些ECMAScript6的知识,特别是ES6中的模块管理内容,本章先介绍ES6中的基础与模块化的内容再使用vue-cli开发 ...
- 前端MVC Vue2学习总结(五)——表单输入绑定、组件
一.表单输入绑定 1.1.基础用法 你可以用 v-model 指令在表单控件元素上创建双向数据绑定.它会根据控件类型自动选取正确的方法来更新元素.尽管有些神奇,但 v-model 本质上不过是语法糖, ...
- 前端MVC Vue2学习总结(六)——axios与跨域HTTP请求、Lodash工具库
一.axios Vue更新到2.0之后宣告不再对vue-resource更新,推荐使用axios,axios是一个用于客户端与服务器通信的组件,axios 是一个基于Promise 用于浏览器和 no ...
- 前端MVC Vue2学习总结(三)——模板语法、过滤器、计算属性、观察者、Class 与 Style 绑定
Vue.js 使用了基于 HTML 的模版语法,允许开发者声明式地将 DOM 绑定至底层 Vue 实例的数据.所有 Vue.js 的模板都是合法的 HTML ,所以能被遵循规范的浏览器和 HTML 解 ...
- 前端MVC Vue2学习总结(四)——条件渲染、列表渲染、事件处理器
一.条件渲染 1.1.v-if 在字符串模板中,如 Handlebars ,我们得像这样写一个条件块: <!-- Handlebars 模板 --> {{#if ok}} <h1&g ...
随机推荐
- Swift 编程思想 Part 4:map all the things!
Swift 编程思想 Part 4:map all the things! 2015-10-22 837 文章目录 1. 数组 vs. 可选类型 2. 作用在可选类型上的 map() 3. 回到我们 ...
- JS设置组合快捷键
为提升用户体验,想要在web页面中通过组合快捷键调出用户帮助页面,具体实现思路是监听keyup事件,在相应的处理函数中进行逻辑编写,代码如下 $(document).keyup(function (e ...
- python 删除大表数据
#!/usr/bin/env python # encoding: utf-8 #@author: 东哥加油! #@file: del_tb_bigtable_statistic.py #@time: ...
- centos7下添加开机启动
在/etc/systemd/system下创建weblogic .Service touch weblogic.Service 添加启动权限 chmod +x weblogic.Service 编辑w ...
- 文件的软硬链接& 文件编辑vi和vim
目录 文件的软硬链接 1.软链接 2.硬链接 文件编辑vi和vim 须先安装vim命令的软件包yum install -y vim 三种模式: 1.普通模式 2.编辑模式 3.末行模式 文件的软硬链接 ...
- PAT Basic 1052
1052 卖个萌 萌萌哒表情符号通常由“手”.“眼”.“口”三个主要部分组成.简单起见,我们假设一个表情符号是按下列格式输出的: [左手]([左眼][口][右眼])[右手] 现给出可选用的符号集合,请 ...
- TOJ 5065: 最长连续子序列
5065: 最长连续子序列 Time Limit(Common/Java):1000MS/3000MS Memory Limit:65536KByteTotal Submit: 140 ...
- (绝对有用)iOS获取UUID,并使用keychain存储
原文链接 http://blog.sina.com.cn/s/blog_5971cdd00102vqgy.html UDID被弃用,使用UUID来作为设备的唯一标识.获取到UUID后,如果用NSUse ...
- PAT天梯赛练习题——L3-008. 喊山(邻接表+BFS)
L3-008. 喊山 时间限制 150 ms 内存限制 65536 kB 代码长度限制 8000 B 判题程序 Standard 作者 陈越 喊山,是人双手围在嘴边成喇叭状,对着远方高山发出“喂—喂喂 ...
- [UOJ#122][NOI2013]树的计数
[UOJ#122][NOI2013]树的计数 试题描述 我们知道一棵有根树可以进行深度优先遍历(DFS)以及广度优先遍历(BFS)来生成这棵树的 DFS 序以及 BFS 序.两棵不同的树的 DFS 序 ...