iOS开发基础知识
1:App跳转至系统Settings
跳转在IOS8以上跟以下是有区别的,如果是IOS8以上可以如下设置:
NSURL *url = [NSURL URLWithString:UIApplicationOpenSettingsURLString];

if ([[UIApplication sharedApplication] canOpenURL:url]) {

   [[UIApplication sharedApplication] openURL:url];

}
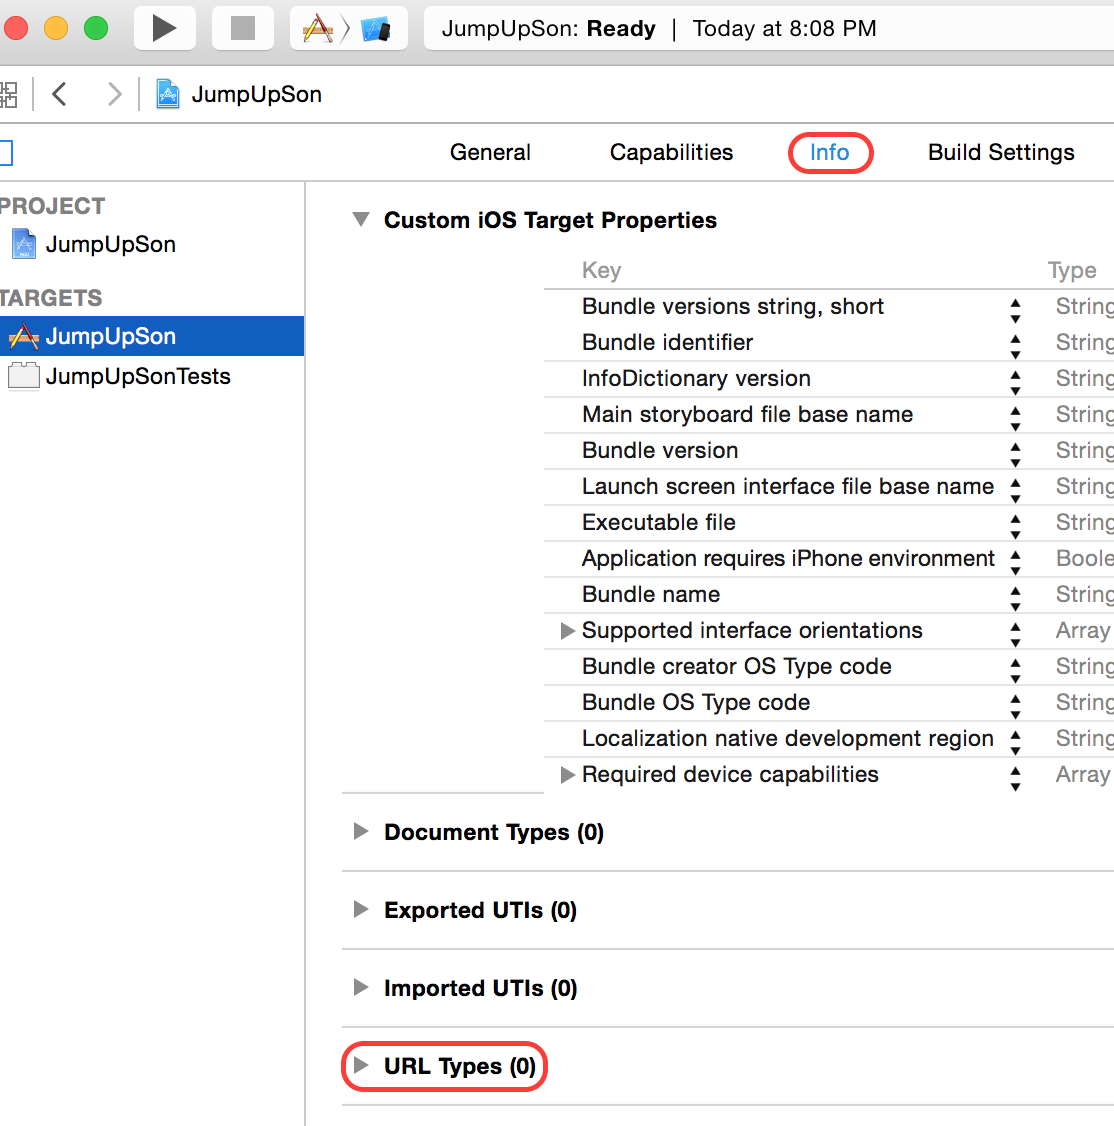
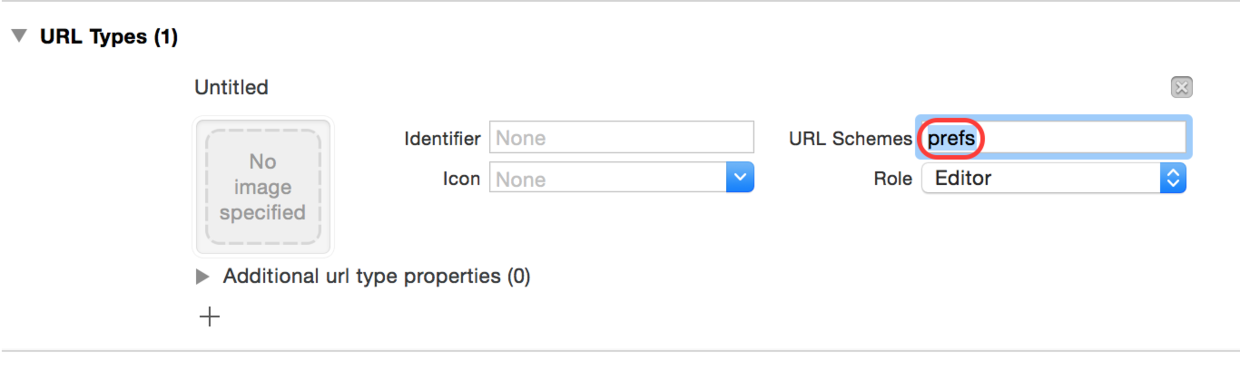
如果要兼容IOS7则要设置在URL Types中添加一个新项只填写prefs,然后设置一下上面那个URLWithString,对应的字符串如下:

About — prefs:root=General&path=About

Accessibility — prefs:root=General&path=ACCESSIBILITY

Airplane Mode On — prefs:root=AIRPLANE_MODE

Auto-Lock — prefs:root=General&path=AUTOLOCK

Brightness — prefs:root=Brightness

Bluetooth — prefs:root=General&path=Bluetooth

Date & Time — prefs:root=General&path=DATE_AND_TIME

FaceTime — prefs:root=FACETIME

General — prefs:root=General

Keyboard — prefs:root=General&path=Keyboard

iCloud — prefs:root=CASTLE

iCloud Storage & Backup — prefs:root=CASTLE&path=STORAGE_AND_BACKUP

International — prefs:root=General&path=INTERNATIONAL

Location Services — prefs:root=LOCATION_SERVICES

Music — prefs:root=MUSIC

Music Equalizer — prefs:root=MUSIC&path=EQ

Music Volume Limit — prefs:root=MUSIC&path=VolumeLimit

Network — prefs:root=General&path=Network

Nike + iPod — prefs:root=NIKE_PLUS_IPOD

Notes — prefs:root=NOTES

Notification — prefs:root=NOTIFICATIONS_ID

Phone — prefs:root=Phone

Photos — prefs:root=Photos

Profile — prefs:root=General&path=ManagedConfigurationList

Reset — prefs:root=General&path=Reset

Safari — prefs:root=Safari

Siri — prefs:root=General&path=Assistant

Sounds — prefs:root=Sounds

Software Update — prefs:root=General&path=SOFTWARE_UPDATE_LINK

Store — prefs:root=STORE

Twitter — prefs:root=TWITTER

Usage — prefs:root=General&path=USAGE

VPN — prefs:root=General&path=Network/VPN

Wallpaper — prefs:root=Wallpaper

Wi-Fi — prefs:root=WIFI

Setting —prefs:root=INTERNET_TETHERING
然后如下代码:
[[UIApplication sharedApplication] openURL:[NSURL URLWithString:@"prefs:root=WIFI"]];
一段实例代码:
    NSURL *url;

    if (isIOS8) {

        url = [NSURL URLWithString:UIApplicationOpenSettingsURLString];

    }

    else

    {

        url=[NSURL URLWithString:@"prefs:root=LOCATION_SERVICES"];

    }

    if ([[UIApplication sharedApplication] canOpenURL:url]) {

        [[UIApplication sharedApplication] openURL:url];

    }
2:iOS 获得手机当前语言,运用语言包跟地理名字运用
NSUserDefaults *defaults = [NSUserDefaults standardUserDefaults];

NSArray *allLanguage = [defaults objectForKey:@"AppleLanguages"];

NSString *currentLanguage = [allLanguage objectAtIndex:0];

NSLog(@"The current language is : %@", currentLanguage);
iOS 9 之前:以上返回结果:语言字符串代码。例如:"zh-Hans";iOS 9:以上返回结果:语言字符串代码 + 地区代码。例如:"zh-Hans-US"
简体中文:zh-Hans;繁体中文:zh-Hant;香港中文:zh-HK;澳门中文:zh-MO;台湾中文:zh-TW;新加坡中文:zh-SG
iphone 上的系统语言如果设为中文,则placemarks中打印出来的内容为中文城市名打印结果为 "北京市",iphone 上的系统语言如果设为英文,则placemarks中打印出的内容为英文城市名打印结果为"beijing”,所以在获取地理名字时要做一个强制转换语言,让它可以兼容不管是什么语言都可以获取;下面一段时把中文强制转成英语,最后再转返手机默认的语言;
/**

 *  通过实现代理方法,来获取到位置数据

 */

-(void)locationManager:(CLLocationManager *)manager didUpdateLocations:(NSArray<CLLocation *> *)locations{

    // course 方向(0°到359.9°,0°代表正北)

    // speed 速度 m/s

    // CLLocation 这个类封装了经纬度,海拔,移动方向,速度和位置等相关的信息

    CLLocation *location = [locations lastObject];

    // 地理反编码

    // 1. 提供一个经纬度的坐标数据创建一个CLLocation对象(coorfinate : 坐标)

    CLLocation *locationForRecode = [[CLLocation alloc] initWithLatitude:location.coordinate.latitude longitude:location.coordinate.longitude];

    // 2. 创建地理反编码-反编码对象

    CLGeocoder *geoCoder = [[CLGeocoder alloc] init];

#warning keySteps :change System Language to English!!

    // 如果当前系统语言为中文 则:先将 系统语言强制转换成英文,,获取到地理位置信息后再转为默认值

    // 获取当前默认的系统语言 (先保存下来)

    NSMutableArray *userDefaultLanguages = [[NSUserDefaults standardUserDefaults] objectForKey:@"AppleLanguages"];

    // 强制 转化为英文 (因为在请求天气预报的城市名时,需要英文状态下的城市名,)

//    NSLog(@"%@",userDefaultLanguages);

//    系统默认语言 :zh-Hans-CN, en-CN

         // 将语言强制转化为 英文

    [[NSUserDefaults standardUserDefaults] setObject:[NSArray arrayWithObjects:@"en-CN", nil] forKey:@"AppleLanguages"];

    // 3. 利用编码反编码对象,进行编码反编码操作

    [geoCoder reverseGeocodeLocation:locationForRecode completionHandler:^(NSArray<CLPlacemark *> * _Nullable placemarks, NSError * _Nullable error) {

        if (error) {

            // 反编码出错 打印错误信息

            NSLog(@"地理编码出错:%@",error);

        }else{

            // 反编码成功,打印位置信息

            //            NSLog(@"%@",[placemarks lastObject].locality);

            NSString *cityName = [placemarks lastObject].locality;

            NSLog(@"placemarks==>>%@",placemarks);

            NSLog(@"%s,%@",__FUNCTION__,cityName);

            // 调用 block

            self.passCityNameToWeatherBlock(cityName);

            // 当 block 将英文城市名传出去后,立即 Device 语言 还原为默认的语言

            [[NSUserDefaults standardUserDefaults] setObject:userDefaultLanguages forKey:@"AppleLanguages"];

        }

    }];

}
3:设置navigationBar统一样式技巧总结
自定义一个WZYNavigationController继承于UINavigationController
#import "WZYNavigationController.h"

@interface WZYNavigationController ()

@end

@implementation WZYNavigationController

// 当类被加载到内存的时候调用

+ (void)load

{

}

// 当类第一次使用时调用

// 我们要在这个方法中设置指定当前自定义的控制器的导航条的样式

+ (void)initialize

{

    /** 如果当前的navigationBar属于WZYNavigationController的,那么我们利用appearanceWhenContainedInInstancesOfClasses方法

        来获取该类型的bar,然后统一设置属性。

        注意后面参数是一个 “类的数组”

     */

    UINavigationBar *navigationBar = [UINavigationBar appearanceWhenContainedInInstancesOfClasses:@[[WZYNavigationController class]]];

    // bgImage

    [navigationBar setBackgroundImage:[UIImage imageNamed:@"navBg"] forBarMetrics:UIBarMetricsDefault];

    // 字体属性

    NSMutableDictionary *dictAttr = [NSMutableDictionary dictionary];

    dictAttr[NSFontAttributeName] = [UIFont systemFontOfSize:20];

    dictAttr[NSForegroundColorAttributeName] = [UIColor whiteColor];

    [navigationBar setTitleTextAttributes:dictAttr];

    //更改导航条主题颜色

    navigationBar.tintColor = [UIColor whiteColor];

    //调整返回按钮当中标题的位置.(我们只要返回按钮的那个图片,但是不要上面的文字,移走文字就好了)

    UIBarButtonItem *item = [UIBarButtonItem appearance];

    [item setBackButtonTitlePositionAdjustment:UIOffsetMake(0, -64) forBarMetrics:UIBarMetricsDefault];

}

// 对于只修改nav的根控制器的某些样式,我们需要获取到nav的根控制器,但是上面的方法是类方法,拿不到rootVC,所以说要在pushViewController 中获取我们需要的控制器。

// 由于根控制器本质上也是由nav push而来的,所以说该方法能获得所有push的控制器

- (void)pushViewController:(UIViewController *)viewController animated:(BOOL)animated

{

    if (self.childViewControllers.count == 0) { // 判断是根控制器么,只有根控制器才需要设置menuIcon,其余push的控制器不需要

        UIImage *leftBarBtnImage = [UIImage imageWithOriginalImageName:@"menuIcon"];

        viewController.navigationItem.leftBarButtonItem = [[UIBarButtonItem alloc] initWithImage:leftBarBtnImage style:0 target:self action:@selector(menuClick)];

    }

    // 设置完样式之后再push(先push再设置还有什么鸟用?!)

    [super pushViewController:viewController animated:animated];

}

// leftBarBtn的监听方法,点击之后应跳转到leftView

// 为了拿到leftView,需要通知

- (void)menuClick

{

    // 发送一个通知

    [[NSNotificationCenter defaultCenter] postNotificationName:WZYLeftViewDidOpenDragNotification object:nil];

}

@end
4:[NSBundle mainBundle] pathForResource: ofType: 获取不到数据
从bundle中获取数据,明明把数据添加到项目中了,但就是不对。
NSString *newDataName = [[NSBundle mainBundle] pathForResource:dataName ofType:format]; 为空
解决方法:
当时添加是直接拖拽过去,没有真正加入到bundle中,需要在项目设置中,build phases-》copy bundle resources 下面添加自己的数据就可以了。
iOS开发基础知识的更多相关文章
- IOS开发基础知识碎片-导航
1:IOS开发基础知识--碎片1 a:NSString与NSInteger的互换 b:Objective-c中集合里面不能存放基础类型,比如int string float等,只能把它们转化成对象才可 ...
- iOS开发——总结篇&IOS开发基础知识
IOS开发基础知识 1:Objective-C语法之动态类型(isKindOfClass, isMemberOfClass,id) 对象在运行时获取其类型的能力称为内省.内省可以有多种方法实现. 判断 ...
- IOS开发基础知识--碎片33
1:AFNetworking状态栏网络请求效果 直接在AppDelegate里面didFinishLaunchingWithOptions进行设置 [[AFNetworkActivityIndicat ...
- IOS开发基础知识--碎片42
1:报thread 1:exc_bad_access(code=1,address=0x70********) 闪退 这种错误通常是内存管理的问题,一般是访问了已经释放的对象导致的,可以开启僵尸对象( ...
- IOS开发基础知识--碎片50
1:Masonry 2个或2个以上的控件等间隔排序 /** * 多个控件固定间隔的等间隔排列,变化的是控件的长度或者宽度值 * * @param axisType 轴线方向 * @param fi ...
- IOS开发基础知识--碎片3
十二:判断设备 //设备名称 return [UIDevice currentDevice].name; //设备型号,只可得到是何设备,无法得到是第几代设备 return [UIDevice cur ...
- IOS开发基础知识--碎片11
1:AFNetwork判断网络状态 #import “AFNetworkActivityIndicatorManager.h" - (BOOL)application:(UIApplicat ...
- IOS开发基础知识--碎片14
1:ZIP文件压缩跟解压,使用ZipArchive 创建/添加一个zip包 ZipArchive* zipFile = [[ZipArchive alloc] init]; //次数得zipfilen ...
- IOS开发基础知识--碎片16
1:Objective-C语法之动态类型(isKindOfClass, isMemberOfClass,id) 对象在运行时获取其类型的能力称为内省.内省可以有多种方法实现. 判断对象类型 -(BOO ...
- IOS开发基础知识--碎片19
1:键盘事件顺序 UIKeyboardWillShowNotification // 键盘显示之前 UIKeyboardDidShowNotification // 键盘显示完成后 UIKeyboar ...
随机推荐
- RxJava入门之路(一)
RxJava接触过蛮长时间了,但是让我说个所以然来还是说不出来,归根结底还是还是理解不够深刻,趁着年底这个时候争取写个系列出来给自己的学习做个记录 注意区分RxJava1.0和2.0的区别,以下默认是 ...
- 基于FBX SDK的FBX模型解析与加载 -(三)
http://blog.csdn.net/bugrunner/article/details/7229416 6. 加载Camera和Light 在FBX模型中除了几何数据外较为常用的信息可能就是Ca ...
- bzoj 2599: [IOI2011]Race【点分治】
点分治,用一个mn[v]数组记录当前root下长为v的链的最小深度,每次新加一个儿子的时候都在原来儿子更新过的mn数组里更新ans(也就是查一下mn[m-dis[p]]+de[p]) 这里注意更新和初 ...
- JVM的参数详解
今天就整理下JVM的参数!相对而已JVM有很多参数,但对于一般开发人员执行知道和堆栈大小,GC.远程调试的参数即可. JVM Parameters 首先需要说明的是JVM的参数形式: -X 开头的参数 ...
- spark 机器学习 朴素贝叶斯 原理(一)
朴素贝叶斯算法仍然是流行的挖掘算法之一,该算法是有监督的学习算法,解决的是分类问题,如客户是否流失.是否值得投资.信用等级评定等多分类问题.该算法的优点在于简单易懂.学习效率高.在某些领域的分类问题中 ...
- PJzhang:贷款逾期与失信被执行人
猫宁!!! 最近看到一家网贷机构在APP上的温馨提示,提到了网贷逾期与个人征信的关系以及向客户发放贷款的7项基本原则. 如下: 贷款申请及逾期告知 尊敬的客户,感谢您选择####股份有限公司为您提供贷 ...
- Centos 配置 Mysql 主从双向同步
配置之前,请先阅读mysql主从复制: Mysql-主从复制 原: 主从环境: 主服务器:192.168.153.130 从服务器:192.168.153.131 1.从数据库创建同步用户,将主数据 ...
- UltraEdit配置C++开发环境
1.下载UltraEdit软件安装 2.下载MinGW库安装 3.在系统设置环境变量,在path里加上你的MinGW\bin目录即可. 4.进入UltraEdit软件进行如下配置: 菜单栏---高级- ...
- 2017百度之星资格赛 1003:度度熊与邪恶大魔王(DP)
.navbar-nav > li.active > a { background-image: none; background-color: #058; } .navbar-invers ...
- Java异常概念