小程序自定义tabBar,动态控制tabBar
最近做项目的时候,突然来了个小特殊的需求,根据客户的类型来动态显示底部的tabBar菜单。当时我就有点小懵逼了,这个不是小程序自带的组件么?还要做成动态?这就有点尴尬了.....
不过也只是一时尴尬而已,然后我就展开了搜索之旅.....然后发现,官方的组件确实没办法做动态,那咋办,如果真的有这个需求那也是得去处理滴呀~然后也看了有一些做到这效果的方法,那就试一下呗。。其实就是自定义个tabBar的模板,以下是实现:
首先,既然是说自定义组件,那是用到template了。那先在Page里新建个template的文件夹,以便放tabBar的组件。

<template name="tabBar">

  <view class="tab-bar" style="color: {{tabBar.color}}; background: {{tarBar.backgroundColor}}; {{tabBar.position=='top'? 'top: 0' : 'bottom: 0'}}; {{tabBar.borderStyle? (tabBar.position=='top'? 'border-bottom: solid 1px '+tabBar.borderStyle + ';' : 'border-top: solid 1px '+tabBar.borderStyle + ';') : ''}}">

  <block wx:for="{{tabBar.list}}" wx:key="pagePath">

    <navigator url="{{item.pagePath}}" open-type="redirect" class="{{item.clas}}" style="{{item.active? 'color: '+(item.selectedColor? item.selectedColor : tabBar.selectedColor) : ''}}">

      <image src="{{item.selectedIconPath}}" wx:if="{{item.active}}" class="img"></image>

      <image src="{{item.iconPath}}" wx:if="{{!item.active}}" class="img"></image>

      <text class='tabbar_text'>{{item.text}}</text>

    </navigator>

    </block>

    <view class="clear"></view>

  </view>

</template>
下面是tabBar所需要用到的样式,我这里就直接写在全局app.wxss了。
.menu-item{

  width: 32%;

  float: left;

  text-align: center;

  padding-top: 8px;

}

.menu-item2{

  width: 24%;

  float: left;

  text-align: center;

  padding-top: 8px;

}

.img{

  width: 30rpx;

  height: 30rpx;

  display: block;

  margin:auto;

}

.clear{

  clear: both;

}

.tab-bar{

  position: fixed;

  width: 100%;

  padding: 0px 2%;

}

.tabbar_text{

  font-size: 28rpx

}
然后接下来是js的部分,由于是底部的导航,那肯定是不止一个页面用到的,那这里就可以写在全局的app.js里面方便使用。这里我写了两种tabBar的模板,分别对应来显示
//app.js

App({

  onLaunch: function () {

    // // 展示本地存储能力

    // var logs = wx.getStorageSync('logs') || []

    // logs.unshift(Date.now())

    // wx.setStorageSync('logs', logs)

  },

  //第一种状态的底部

  editTabBar: function () {

    var _curPageArr = getCurrentPages();

    var _curPage = _curPageArr[_curPageArr.length - 1];

    var _pagePath = _curPage.__route__;

    if (_pagePath.indexOf('/') != 0) {

      _pagePath = '/' + _pagePath;

    }

    var tabBar = this.globalData.tabBar;

    for (var i = 0; i < tabBar.list.length; i++) {

      tabBar.list[i].active = false;

      if (tabBar.list[i].pagePath == _pagePath) {

        tabBar.list[i].active = true;//根据页面地址设置当前页面状态

      }

    }

    _curPage.setData({

      tabBar: tabBar

    });

  },

  //第二种状态的底部

  editTabBar2: function () {

    var _curPageArr = getCurrentPages();

    var _curPage = _curPageArr[_curPageArr.length - 1];

    var _pagePath = _curPage.__route__;

    if (_pagePath.indexOf('/') != 0) {

      _pagePath = '/' + _pagePath;

    }

    var tabBar = this.globalData.tabBar2;

    for (var i = 0; i < tabBar.list.length; i++) {

      tabBar.list[i].active = false;

      if (tabBar.list[i].pagePath == _pagePath) {

        tabBar.list[i].active = true;//根据页面地址设置当前页面状态

      }

    }

    _curPage.setData({

      tabBar: tabBar

    });

  },

  globalData: {

    userInfo: null,

    pop:2,

    num:0,

    tabBar: {

      "color": "#9E9E9E",

      "selectedColor": "#f00",

      "backgroundColor": "#fff",

      "borderStyle": "#ccc",

      "list": [

        {

          "pagePath": "/pages/index/index",

          "text": "首页",

          "iconPath": "/img/home.png",

          "selectedIconPath": "/img/home_on.png",

          "clas": "menu-item",

          "selectedColor": "#4665f9",

          active: true

        },

        {

          "pagePath": "/pages/log/index",

          "text": "日志",

          "iconPath": "/img/home.png",

          "selectedIconPath": "/img/home_on.png",

          "selectedColor": "#4665f9",

          "clas": "menu-item",

          active: false

        },

        {

          "pagePath": "/pages/my/index",

          "text": "我的",

          "iconPath": "/img/home.png",

          "selectedIconPath": "/img/home_on.png",

          "selectedColor": "#4665f9",

          "clas": "menu-item",

          active: false

        }

      ],

      "position": "bottom"

    },

    tabBar2: {

      "color": "#9E9E9E",

      "selectedColor": "#f00",

      "backgroundColor": "#fff",

      "borderStyle": "#ccc",

      "list": [

        {

          "pagePath": "/pages/index/index",

          "text": "首页",

          "iconPath": "/img/home.png",

          "selectedIconPath": "/img/home_on.png",

          "clas": "menu-item2",

          "selectedColor": "#4665f9",

          active: true

        },

        {

          "pagePath": "/pages/log/index",

          "text": "日志",

          "iconPath": "/img/home.png",

          "selectedIconPath": "/img/home_on.png",

          "selectedColor": "#4665f9",

          "clas": "menu-item2",

          active: false

        },

        {

          "pagePath": "/pages/my/index",

          "text": "我的",

          "iconPath": "/img/home.png",

          "selectedIconPath": "/img/home_on.png",

          "selectedColor": "#4665f9",

          "clas": "menu-item2",

          active: false

        },

        {

          "pagePath": "/pages/new/index",

          "text": "新的",

          "iconPath": "/img/home.png",

          "selectedIconPath": "/img/home_on.png",

          "selectedColor": "#4665f9",

          "clas": "menu-item2",

          active: false

        }

      ],

      "position": "bottom"

    }

  }

})
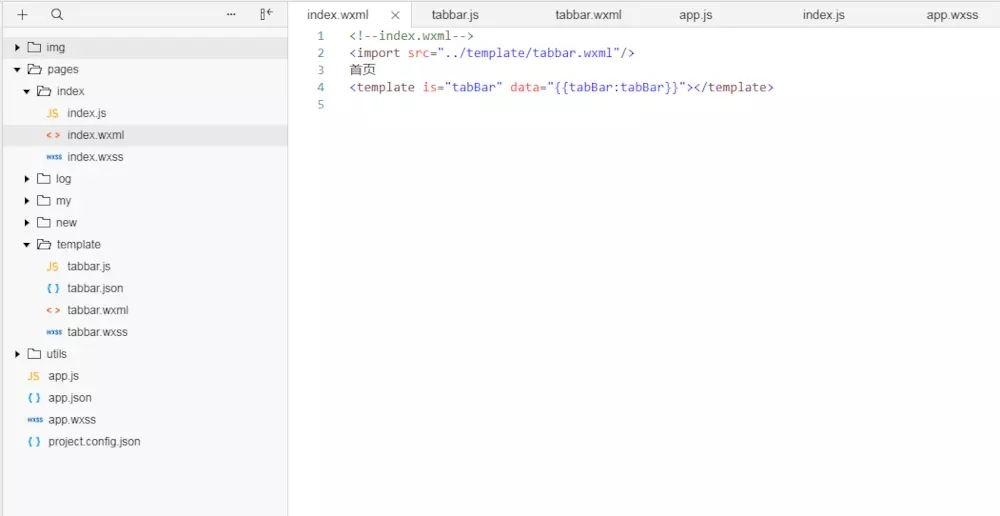
然后在需要用到这个组件的页面上直接调用。比如这里的index页面。
<!--index.wxml-->

<import src="../template/tabbar.wxml"/>

首页

<template is="tabBar" data="{{tabBar:tabBar}}"></template>
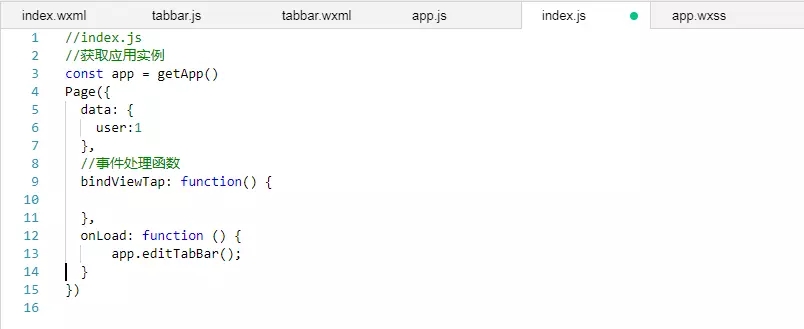
然后去index.js里面调用tabBar
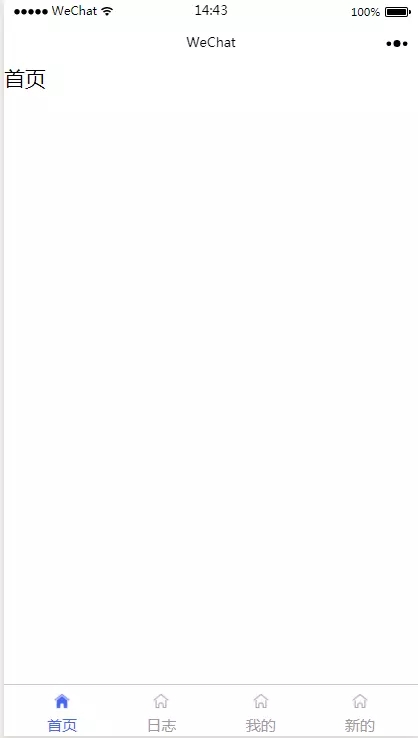
然后下面是效果图。
链接:https://www.jianshu.com/p/55d54564ec95
小程序自定义tabBar,动态控制tabBar的更多相关文章
- 微信小程序自定义 tabbar
一定的需求情况下,无法使用小程序原生的 tabbar 的时候,需要自行实现一个和 tabbar 功能一模一样的自制组件. 查阅了海量的博客和文档之后,亲自踩坑.总结了三种在不使用微信小程序原生 tab ...
- 小程序自定义tabbar
代码片段: wechatide://minicode/IUoCyemJ7D3d GitHub: https://github.com/WozHuang/Miniprogram-Demo/tree/ma ...
- 微信小程序自定义tabbar的实现
微信小程序自定义tabbar的实现 目的:当采用微信的自定义tabbar组件的时候,切换的时候会出现闪屏的效果:当使用微信默认的tabbar的时候,限制了tabbar的数量以及灵活配置. 方案:自己动 ...
- 微信小程序 自定义tabbar实例
在小程序的开发文档中,对tabbar是这样说明的: 如果小程序是一个多 tab 应用(客户端窗口的底部或顶部有 tab 栏可以切换页面),可以通过 tabBar 配置项指定 tab 栏的表现,以及 t ...
- 百度智能小程序弹窗组件wcPop|智能小程序自定义model弹窗模板
百度智能小程序自定义弹窗组件wcPop|百度小程序model对话框|智能小程序弹窗界面模板 最近百度也推出了自己的智能小程序,如是就赶紧去试了下,官方提供的api还不是狠完整.而且官方提供的弹窗组件也 ...
- 微信小程序自定义音频组件,自定义滚动条,单曲循环,循环播放
小程序自定义音频组件,带滚动条 摘要:首先自定义音频组件,是因为产品有这样的需求,需要如下样式的 而微信小程序API给我们提供的就是这样的 而且产品需要小程序有后台播放功能,所以我们不考虑小程序的 a ...
- 微信小程序——自定义导航栏
微信头部导航栏可能通过json配置: 但是有时候我们项目需求可能需要自定义头部导航栏,如下图所示: 现在具体说一下实现步骤及方法: 步骤: 1.在 app.json 里面把 "navigat ...
- 支付宝小程序自定义弹窗插件|支付宝dialog插件|model插件
支付宝小程序自定义弹窗组件wcPop|小程序自定义对话框|actionSheet弹窗模板 支付宝小程序官方提供的alert提示框.dialog对话框.model弹窗功能比较有限,有些都不能随意自定义修 ...
- 微信小程序自定义弹窗wcPop插件|仿微信弹窗样式
微信小程序自定义组件弹窗wcPop|小程序消息提示框|toast自定义模板弹窗 平时在开发小程序的时候,弹窗应用场景还是蛮广泛的,但是微信官方提供的弹窗比较有局限性,不能自定义修改.这个时候首先想到的 ...
- 微信小程序自定义数据分析试水
昨晚收到小程序自定义分析的内测邀请,简单试用了一下.说明挺长的,大概是这个意思: 一.定义一系列事件,对其进行统计 事件可以对页面中的这些事件进行追踪 click enterPage leavePag ...
随机推荐
- python 信息同时输出到控制台与文件
python编程中,往往需要将结果用print等输出,如果希望输出既可以显示到IDE的屏幕上,也能存到文件中(如txt)中,该怎么办呢? 方法1 可通过日志logging模块输出信息到文件或屏幕.但可 ...
- CobaltStrike3.12/13 破解
更新3.13破解版 链接: https://pan.baidu.com/s/14e0tpVPzUhiAhYU2_jvBag 提取码: d9uf MacOS客户端: 链接: https://pan.ba ...
- Linux 下MQ的安装和配置亲测
开篇之前奉上几条黄金链接: MQ参考文档 http://publib.boulder.ibm.com/infocenter/wmqv7/v7r0m0/index.jsp?topic=%2Fcom.ib ...
- JavaScript之JS的数据类型
前言 JavaScript一共有6中数据类型: 基本数据类型(5):字符串(String).数字(Number).布尔(Boolean).数组(Array).空(Null).未定义(Undefined ...
- ubuntu更改镜像源
参考 https://blog.csdn.net/weixin_41762173/article/details/79480832 建议使用ustc.edu的源,其他例如清华的,阿里的连sublime ...
- nodejs在windows下的安装配置(使用NVM的方式)
NVM的安装 1.下载安装包,https://github.com/coreybutler/nvm-windows/releases 2.下载完成后点击nvm-setup,按步骤安装,注意路径中不能带 ...
- 0710 mux协议的作用(ppp拨号时如何和gprs进行at指令交互)
ppp拨号使gprs上网的同时如何和gprs模块进行at指令的交互,这是一个问题. 在linux中,ppp拨号上网是内核中支持的,只需要在内核配置中选上. ppp拨号的方式使gprs进行上网与at指令 ...
- 高仿QQ、微信效果的图片浏览器(支持原图和缩略图、多种手势、CocoaPods)
感谢原文作者的分享 本文转载至 http://my.oschina.net/u/2406027/blog/735738 PYPhotoBrowser GitHub地址:https://github.c ...
- Cocos2dx项目在各种IDE中新建类之后的可行编译方式
注:这里说可行,但是并不是最好的,只是可以完成编译. 1.linux+code::blocks下的cocos2dx项目新建一个类TestScene.h 新建的TestScene.h和TestScene ...
- linux内存和swap
https://www.cnblogs.com/Zfc-Cjk/archive/2018/02/13/8447270.html