opencv学习之路(26)、轮廓查找与绘制(五)——最小外接矩形
一、简介

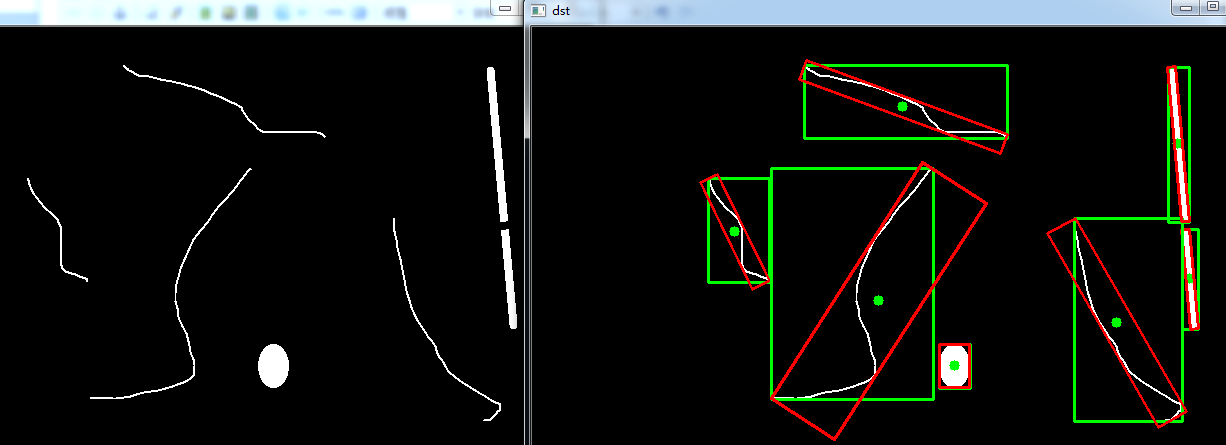
二、轮廓最小外接矩形的绘制
 #include "opencv2/opencv.hpp"

 using namespace cv;

 void main()

 {

     //轮廓最小外接矩形的绘制

     Mat srcImg = imread("E://00.png");

     Mat dstImg = srcImg.clone();

     cvtColor(srcImg, srcImg, CV_BGR2GRAY);

     threshold(srcImg, srcImg, , , CV_THRESH_BINARY); //二值化

     imshow("threshold", srcImg);

     vector<vector<Point>> contours;

     vector<Vec4i> hierarcy;

     findContours(srcImg, contours, hierarcy, CV_RETR_EXTERNAL, CV_CHAIN_APPROX_NONE);

     vector<Rect> boundRect(contours.size());  //定义外接矩形集合

     vector<RotatedRect> box(contours.size()); //定义最小外接矩形集合

     Point2f rect[];

     for(int i=; i<contours.size(); i++)

     {

         box[i] = minAreaRect(Mat(contours[i]));  //计算每个轮廓最小外接矩形

         boundRect[i] = boundingRect(Mat(contours[i]));

         circle(dstImg, Point(box[i].center.x, box[i].center.y), , Scalar(, , ), -, );  //绘制最小外接矩形的中心点

         box[i].points(rect);  //把最小外接矩形四个端点复制给rect数组

         rectangle(dstImg, Point(boundRect[i].x, boundRect[i].y), Point(boundRect[i].x + boundRect[i].width, boundRect[i].y + boundRect[i].height), Scalar(, , ), , );

         for(int j=; j<; j++)

         {

             line(dstImg, rect[j], rect[(j+)%], Scalar(, , ), , );  //绘制最小外接矩形每条边

         }

     }

     imshow("dst", dstImg);

     waitKey();

 }
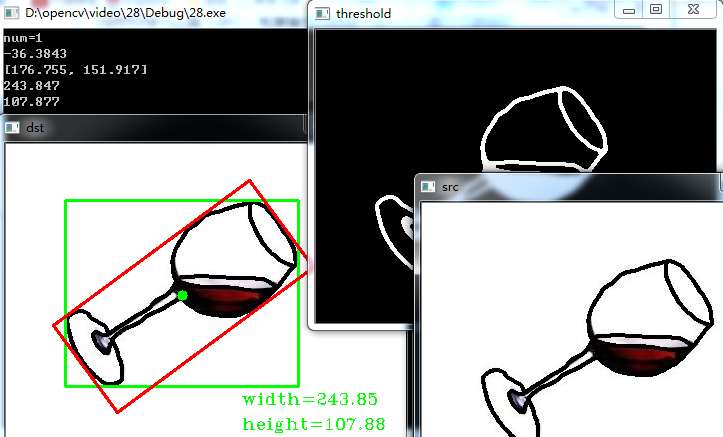
三、粗略计算物体像素长宽
 #include "opencv2/opencv.hpp"

 #include<iostream>

 using namespace std;

 using namespace cv;

 void main()

 {

     Mat srcImg = imread("E://cup.jpg");

     imshow("src", srcImg);

     Mat dstImg = srcImg.clone();

     medianBlur(srcImg, srcImg, );

     GaussianBlur(srcImg, srcImg, Size(, ), , );

     cvtColor(srcImg, srcImg, CV_BGR2GRAY);

     threshold(srcImg, srcImg, , , CV_THRESH_BINARY_INV); //INV是因为背景白色,物体黑色,需要反转一下

     imshow("threshold", srcImg);

     vector<vector<Point>> contours;

     vector<Vec4i> hierarcy;

     findContours(srcImg, contours, hierarcy, CV_RETR_EXTERNAL, CV_CHAIN_APPROX_NONE);

     cout<<"num="<<contours.size()<<endl;

     vector<Rect> boundRect(contours.size());

     vector<RotatedRect> box(contours.size());

     Point2f rect[];

     for(int i=; i<contours.size(); i++)

     {

         box[i] = minAreaRect(Mat(contours[i]));

         boundRect[i] = boundingRect(Mat(contours[i]));

         cout<<box[i].angle<<endl;

         cout<<box[i].center<<endl;

         cout<<box[i].size.width<<endl;

         cout<<box[i].size.height<<endl;

         circle(dstImg, Point(box[i].center.x, box[i].center.y), , Scalar(, , ), -, );

         //绘制外接矩形和    最小外接矩形(for循环)

         rectangle(dstImg, Point(boundRect[i].x, boundRect[i].y), Point(boundRect[i].x + boundRect[i].width, boundRect[i].y + boundRect[i].height), Scalar(, , ), , );

         box[i].points(rect);//把最小外接矩形四个端点复制给rect数组

         for(int j=; j<; j++)

         {

             line(dstImg, rect[j], rect[(j+)%], Scalar(, , ), , );

         }

         char width[], height[];

         sprintf(width, "width=%0.2f", box[i].size.width);

         sprintf(height, "height=%0.2f", box[i].size.height);

         putText(dstImg, width, Point(, ), CV_FONT_HERSHEY_COMPLEX_SMALL, 0.85, Scalar(, , ));

         putText(dstImg, height, Point(, ), CV_FONT_HERSHEY_COMPLEX_SMALL, 0.85, Scalar(, , ));

     }

     imshow("dst", dstImg);

     waitKey();

 }
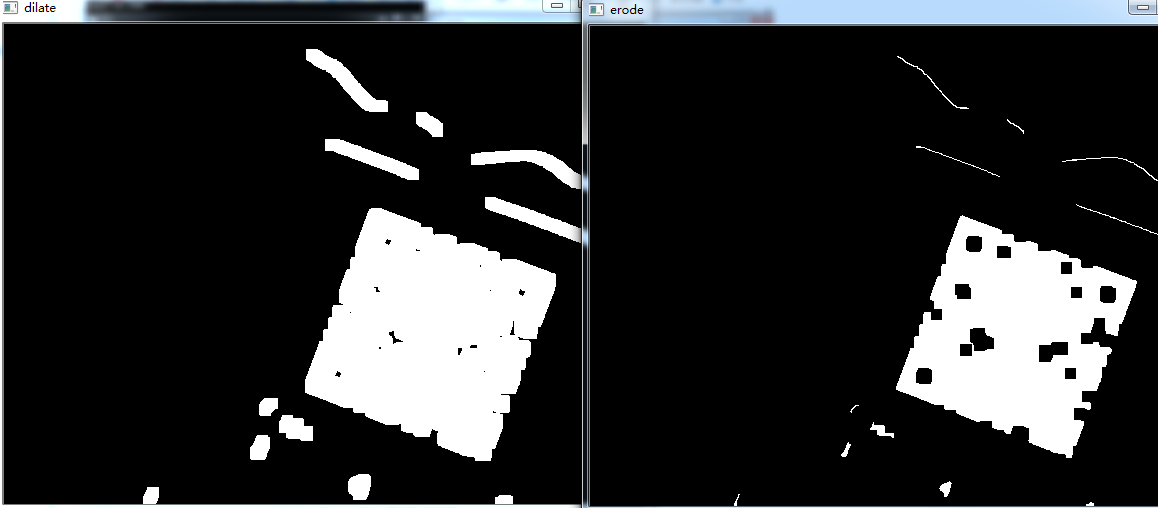
四、倾斜物体矫正提取
 #include "opencv2/opencv.hpp"

 #include<iostream>

 using namespace std;

 using namespace cv;

 void main()

 {

     Mat srcImg = imread("E://qrcode.jpg");

     imshow("src", srcImg);

     Mat dstImg = srcImg.clone();

     GaussianBlur(srcImg, srcImg, Size(, ), , );

     cvtColor(srcImg, srcImg, CV_BGR2GRAY);

     Canny(srcImg, srcImg, , );//因为原图比较复杂,所以需要将canny的值调大,去除不想要的成分

     //threshold(srcImg, srcImg, 100, 255, CV_THRESH_BINARY_INV); //二值化也可以实现canny效果,不过在本例中杂絮较多

     imshow("canny", srcImg);

     Mat element = getStructuringElement(MORPH_RECT, Size(, ), Point(-, -)); //定义结构元素

     dilate(srcImg, srcImg, element); //膨胀

     imshow("dilate", srcImg);

     erode(srcImg, srcImg, element);

     imshow("erode", srcImg);

     vector<vector<Point>> contours;

     vector<Vec4i> hierarcy;

     findContours(srcImg, contours, hierarcy, CV_RETR_TREE, CV_CHAIN_APPROX_NONE);

     vector<Rect> boundRect(contours.size());

     vector<RotatedRect> box(contours.size());

     Point2f rect[];

     for(int i=; i<contours.size(); i++)

     {

         box[i] = minAreaRect(Mat(contours[i]));

         boundRect[i] = boundingRect(Mat(contours[i]));

         if(box[i].size.width <  || box[i].size.height<)//筛选

             continue;

         rectangle(dstImg, Point(boundRect[i].x, boundRect[i].y), Point(boundRect[i].x + boundRect[i].width, boundRect[i].y + boundRect[i].height), Scalar(, , ), , );

         circle(dstImg, Point(box[i].center.x, box[i].center.y), , Scalar(, , ), -, );

         box[i].points(rect);

         for(int j=; j<; j++)

         {

             line(dstImg, rect[j], rect[(j+)%], Scalar(, , ), , );

         }

         float angle;

         cout<<"angle="<<box[i].angle<<endl;

         angle = box[i].angle;

         char width[], height[];

         sprintf(width, "width=%0.2f", box[i].size.width);

         sprintf(height, "height=%0.2f", box[i].size.height);

         putText(dstImg, width, Point(, ), CV_FONT_HERSHEY_COMPLEX_SMALL, 0.85, Scalar(, , ));

         putText(dstImg, height, Point(, ), CV_FONT_HERSHEY_COMPLEX_SMALL, 0.85, Scalar(, , ));

         imshow("temp", dstImg);

         //利用仿射变换进行旋转        另一种方法,透视变换

         if (< abs(angle) && abs(angle)<=)

             angle = angle;//负数,顺时针旋转

         else if (< abs(angle) && abs(angle)<)

             angle =  -  abs(angle);//正数,逆时针旋转

         Point2f center = box[i].center;  //定义旋转中心坐标

         double angle0 = angle;

         double scale = ;

         Mat roateM = getRotationMatrix2D(center, angle0, scale);  //获得旋转矩阵,顺时针为负,逆时针为正

         warpAffine(dstImg, dstImg, roateM, dstImg.size()); //仿射变换

         //保存二维码

         int x0=, y0=, w0=, h0=;

         x0 = boundRect[i].x;

         y0 = boundRect[i].y;

         w0 = boundRect[i].width;

         h0 = boundRect[i].height;

         Mat ROI = dstImg(Rect(x0, y0, w0, h0));

         imwrite("F://1.jpg", ROI);

     }

     imshow("dst", dstImg);

     waitKey();

 }


opencv学习之路(26)、轮廓查找与绘制(五)——最小外接矩形的更多相关文章
- Opencv绘制最小外接矩形、最小外接圆
Opencv中求点集的最小外结矩使用方法minAreaRect,求点集的最小外接圆使用方法minEnclosingCircle. minAreaRect方法原型: RotatedRect minAre ...
- Opencv 最小外接矩形合并拼接
前一篇画出了最小外接矩形,但是有时候画出来的矩形由于中间像素干扰或者是其他原因矩形框并不是真正想要的 如图1是一个信号的雨图,被矩形框分割成了多个小框: 需要合并矩形框达到的效果: 主要思想: 扫描两 ...
- Opencv 图片边缘检测和最小外接矩形
#include "core/core.hpp" #include "highgui/highgui.hpp" #include "imgproc/i ...
- opencv学习之路(25)、轮廓查找与绘制(四)——正外接矩形
一.简介 二.外接矩形的查找绘制 #include "opencv2/opencv.hpp" using namespace cv; void main() { //外接矩形的查找 ...
- opencv学习之路(23)、轮廓查找与绘制(二)——访问轮廓每个点
一.简介 二.画出每个轮廓的每个点 #include "opencv2/opencv.hpp" using namespace cv; void main() { Mat src= ...
- opencv学习之路(22)、轮廓查找与绘制(一)
一.简介 图2 二.代码 #include"opencv2/opencv.hpp" #include<iostream> using namespace std; us ...
- opencv学习之路(29)、轮廓查找与绘制(八)——轮廓特征属性及应用
一.简介 HSV颜色空间(hue色调,saturation饱和度,value亮度) 二.HSV滑动条 #include "opencv2/opencv.hpp" #include ...
- opencv学习之路(37)、运动物体检测(二)
一.运动物体轮廓椭圆拟合及中心 #include "opencv2/opencv.hpp" #include<iostream> using namespace std ...
- opencv学习之路(36)、运动物体检测(一)
一.简介 二.背景减法 图片说明 #include "opencv2/opencv.hpp"using namespace cv; void main() { Mat img1 = ...
随机推荐
- Vue2.0 脚手架代码详解
参考作者:https://www.jianshu.com/p/2b661d01eaf8 只是为了方便个人学习. 来看一下脚手架创建后的项目目录 说明:在*.vue文件,template标签里写htm ...
- java课程课后作业04之动手动脑
一.多层的异常捕获-1 先贴出代码: public class CatchWho { public static void main(String[] args) { try { try { thro ...
- mybatis14--注解的配置
去掉对应的mapper映射文件 在dao文件中增加注解 public interface StudentDao { /** * 新增学生信息 */ @Insert(value="insert ...
- 七牛免费SSL证书申请全流程
购买证书 在七牛ssl 首页点击购买 购买限免证书 补全订单信息 免费证书,随意填写,问题不大 购买成功,查看订单详情,获取 TXT 值信息 添加 DNS TXT 验证 根据上一步,查看证书订单详情, ...
- 剪格子---(dfs回溯)
如图p1.jpg所示,3 x 3 的格子中填写了一些整数. 我们沿着图中的红色线剪开,得到两个部分,每个部分的数字和都是60. 本题的要求就是请你编程判定:对给定的m x n 的格子中的整数,是否可以 ...
- http proxy模块参数
http proxy模块参数 nginx功能的代理功能是是通过http proxy模块来实现的.默认在安装Nginx是已经安装了http proxy模块,可以直接使用. http模块相关参数 说明 p ...
- 微信小程序中显示与隐藏(hidden)
1.wx.wxml页面部分 <view bindtap='click'>点击</view> //这是显示隐藏的部分 <view hidden="{{hidden ...
- Intellij IDEA快捷键与使用技巧一览表
Intellij IDEA快捷键 Ctrl+Shift + Enter,语句完成 "!",否定完成,输入表达式时按 "!"键 Ctrl+E,最近的文件 Ctrl ...
- C/S和B/S的应用的区别
C/S: C是指Client,S是指Server.C/S模式就是指客户端/服务器模式.通过它可以充分利用两端硬件环境的优势,将任务合理分配到Client端和Server端来实现,降低了系统的通讯开销. ...
- 海思编解码芯片添加64M nor flash
uboot和内核都必须修改. struct spi_info hisfc350_spi_info_table[] : 在结构体里面添加自己的flash节点,我这里用的是MX66LS51235E { & ...