IOS应用沙盒文件操作
iOS沙盒机制
iOS应用程序只能在为该改程序创建的文件系统中读取文件,不可以去其它地方访问,此区域被成为沙盒,所以所有的非代码文件都要保存在此,例如图像,图标,声音,映像,属性列表,文本文件等。
1.1、每个应用程序都有自己的存储空间
1.2、应用程序不能翻过自己的围墙去访问别的存储空间的内容
1.3、应用程序请求的数据都要通过权限检测,假如不符合条件的话,不会被放行。
通过这张图只能从表层上理解sandbox是一种安全体系,应用程序的所有操作都要通过这个体系来执行,其中核心内容是:sandbox对应用程序执行各种操作的权限限制。


 //获得document文件路径,名字方便记忆

 +(NSString *)documentsPath {

     NSArray *paths = NSSearchPathForDirectoriesInDomains(NSDocumentDirectory, NSUserDomainMask, YES);

     return [paths objectAtIndex:];

 }

 //获取Cache目录

 +(NSString *)cachePath {

     NSArray *paths = NSSearchPathForDirectoriesInDomains(NSCachesDirectory, NSUserDomainMask, YES);

     return [paths objectAtIndex:];

 }

 //获取Library目录

 +(NSString *)libraryPath{

     NSArray *paths = NSSearchPathForDirectoriesInDomains(NSLibraryDirectory, NSUserDomainMask, YES);

     return [paths objectAtIndex:];

 }

 //获取tmp目录

 +(NSString *)tmpPath{

     NSString *tmpDir = NSTemporaryDirectory();

     return tmpDir;

 }

 +(NSString *)homePath{

     NSString *paths = NSHomeDirectory();

     return paths;

 }

 //获得document文件路径,名字方便记忆

 +(NSString *) DocumentPath:(NSString *)filename {

     NSString *documentsPath = [self documentsPath];

     //NSLog(@"documentsPath=%@",documentsPath);

     return [documentsPath stringByAppendingPathComponent:filename];

 }

 //====================================================================================//

 //获得document文件路径

 +(NSString *)fullpathOfFilename:(NSString *)filename {

     NSString *documentsPath = [self documentsPath];

     // NSLog(@"documentsPath=%@",documentsPath);

     return [documentsPath stringByAppendingPathComponent:filename];//这里就是 documentsPath + filePath

 }

 //写入文件沙盒位置NSDictionary

 +(void)saveNSDictionaryForDocument:(NSDictionary *)list  FileUrl:(NSString*) FileUrl  {

     NSString *f = [self fullpathOfFilename:FileUrl];//调用了前面一个方法

     [list writeToFile:f atomically:YES];

 }

 /*

  * resourcePath: /Users/HeYang/Library/Developer/CoreSimulator/Devices/-

  * -A089E19C-0F9D-4D69-AA33-D253157E4B94/data/Containers/Bundle/Application/088B4C6E-A765-4CFE-AD9B-2F12E9E0AB28/OCUITest.app

  */

  //====================================================================================//

 //NSDictionary对象写入文件存放到工程位置

 +(void)saveNSDictionaryForProduct:(NSDictionary *)list FileUrl:(NSString*) FileUrl{

     NSString *ProductPath =[[NSBundle mainBundle] resourcePath];

     NSString *f=[ProductPath stringByAppendingPathComponent:FileUrl];//这里就是 resourcePath + filePath

     [list writeToFile:f atomically:YES];

 }

 //Array写入文件  -> 工程

 +(void)saveOrderArrayListProduct:(NSMutableArray *)list FileUrl:(NSString*)FileUrl {

     NSString *ProductPath =[[NSBundle mainBundle] resourcePath];

     NSString *f=[ProductPath stringByAppendingPathComponent:FileUrl];

     [list writeToFile:f atomically:YES];

 }

 //Array对象 写入文件 -> 沙盒

 +(void)saveOrderArrayList:(NSMutableArray *)list  FileUrl:(NSString*) FileUrl{

     NSString *f = [self fullpathOfFilename:FileUrl];

     [list writeToFile:f atomically:YES];

 }

 //加载文件沙盒的文件 ->NSDictionary

 +(NSDictionary *)loadNSDictionaryForDocument:(NSString*)FileUrl {

     NSString *f = [self fullpathOfFilename:FileUrl];

     NSDictionary *list = [[NSDictionary alloc] initWithContentsOfFile:f];

     return [list autorelease];

 }

 //加载文件工程位置的文件 ->NSDictionary

 +(NSDictionary *)loadNSDictionaryForProduct:(NSString*)FileUrl {

     NSString *f = [self ProductPath:FileUrl];

     NSDictionary *list =[NSDictionary dictionaryWithContentsOfFile:f];

     return list;

 }

 //加载文件沙盒的文件 -> NSArray

 +(NSArray *)loadArrayList:(NSString*) FileUrl {

     NSString *f = [self fullpathOfFilename:FileUrl];

     NSArray *list = [NSArray arrayWithContentsOfFile:f];

     return list;

 }

 //加载文件工程位置的文件 -> NSArray

 +(NSArray *)loadArrayListProduct:(NSString*) FileUrl {

     NSString *f = [self ProductPath:FileUrl];

     NSArray *list = [NSArray arrayWithContentsOfFile:f];

     return list;

 }

 //====================================================================================//

 //获得document文件路径

 +(NSString *)fullpathOfFilename:(NSString *)filename {

     NSString *documentsPath = [self documentsPath];

     // NSLog(@"documentsPath=%@",documentsPath);

     return [documentsPath stringByAppendingPathComponent:filename];//这里就是 documentsPath + filePath

 }

 //拷贝文件到沙盒

 +(int) CopyFileToDocument:(NSString*)FileName{

     NSString *appFileName =[self fullpathOfFilename:FileName];

     NSFileManager *fm = [NSFileManagerdefaultManager];

     //判断沙盒下是否存在

     BOOL isExist = [fm fileExistsAtPath:appFileName];

     if (!isExist)   //不存在,把工程的文件复制document目录下

     {

         //获取工程中文件

         NSString *backupDbPath = [[NSBundle mainBundle]

                                   pathForResource:FileName

                                   ofType:@""];

         //这一步实现数据库的添加,

         // 通过NSFileManager 对象的复制属性,把工程中数据库的路径复制到应用程序的路径上

         BOOL cp = [fm copyItemAtPath:backupDbPath toPath:appFileName error:nil];

         return cp;

     } else {

         return  -; //已经存在

     }

 }

 //====================================================================================//

 //判断文件是否存在

 +(BOOL) FileIsExists:(NSString*)checkFile{

     if([[NSFileManager defaultManager] fileExistsAtPath:checkFile])

     {

         return true;

     }

     return  false;

 }

 //读取工程文件

 +(NSString *) ProductPath:(NSString*)filename{

     NSString *path = [[NSBundle mainBundle] pathForResource:filename ofType:@""];

     return  path;

 }

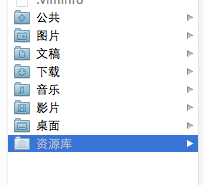
打开模拟器沙盒目录
下面看看模拟器的沙盒文件夹在mac电脑上的什么位置。
文件都在个人用户名文件夹下的一个隐藏文件夹里,中文叫资源库,他的目录其实是Library。
方法1、可以设置显示隐藏文件,然后在Finder下直接打开。设置查看隐藏文件的方法如下:打开终端,输入命名
显示Mac隐藏文件的命令:defaults write com.apple.finder AppleShowAllFiles -bool true
隐藏Mac隐藏文件的命令:defaults write com.apple.finder AppleShowAllFiles -bool false
输完单击Enter键,退出终端,重新启动Finder就可以了
重启Finder:鼠标单击窗口左上角的苹果标志-->强制退出-->Finder-->
现在能看到资源库文件夹了。
打开资源库后找到/Application Support/iPhone Simulator/文件夹。这里面就是模拟器的各个程序的沙盒目录了。
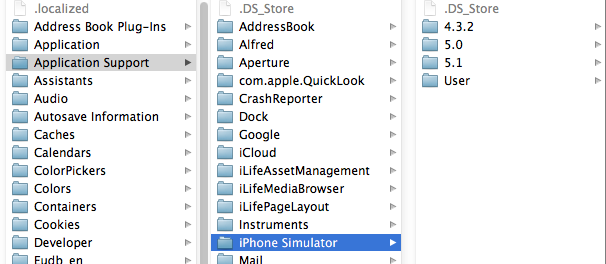
方法2、这种方法更方便,在Finder上点->前往->前往文件夹,输入/Users/username/Library/Application Support/iPhone Simulator/ 前往。
username这里写你的用户名。
IOS应用沙盒文件操作的更多相关文章
- iOS关于沙盒文件拷贝manager.copyItem的一个坑
记录一下: 沙盒文件操作,当需要拷贝文件时,我们可以使用如下类似方式: // 文件拷贝 func copyFile(from:String,to:String)->Bool{ if !manag ...
- 【iOS系列】-iOS查看沙盒文件图文教程(真机+模拟器)
[iOS系列]-iOS查看沙盒文件图文教程(真机+模拟器) 1:模拟器 1.1 方法1: 程序中打印一下的地址,能直接前往沙盒路径. NSString *path = [NSSearchPathFor ...
- 【转】【iOS系列】-iOS查看沙盒文件图文教程(真机+模拟器)
原文网址:http://www.cnblogs.com/fengtengfei/p/5090276.html 1:模拟器 1.1 方法1: 程序中打印一下的地址,能直接前往沙盒路径. NSString ...
- iOS 沙盒文件操作
//获得document +(NSString *)documentsPath { NSArray *paths = NSSearchPathForDirectoriesInDomains(NSDoc ...
- iOS 获取沙盒文件路径及 写入/删除 沙盒文件
出于安全考虑,iOS系统的沙盒机制规定每个应用都只能访问当前沙盒目录下面的文件(也有例外,比如系统通讯录能在用户授权的情况下被第三方应用访问),这个规则把iOS系统的封闭性展现的淋漓尽致. 一.沙盒中 ...
- iOS_SN_沙盒文件操作及位置
转载:http://blog.csdn.net/hello_hwc/article/details/44916909 沙盒的结构如下所示 一 访问Bundle 注意Bundle只读,不能写入 创建一个 ...
- iOS开发——数据持久化Swift篇&(二)沙盒文件
沙盒文件 //******************** 5.2 文件操作 func use_FileOperations() { //1.获取程序的Home目录 let homeDirectory = ...
- 关于ios项目沙盒中的文件和Xcode项目创建的文件
//1.1获取在Xcode项目打开的情况下创建的Plist文件 NSString *path = [[NSBundle mainBundle]pathForResource:@"Profes ...
- iOS 开发查看应用的沙盒文件
在iOS开发中,常常需要将一些信息保存到本地,比如说用户的一些搜索历史等.那么,如何查看所保存的文件呢? 这里介绍两种途径来查看应用的沙盒文件. 方法一:通过Xcode来查看,步骤如下: (1): X ...
随机推荐
- 转iOS中delegate、protocol的关系
iOS中delegate.protocol的关系 分类: iOS Development2014-02-12 10:47 277人阅读 评论(0) 收藏 举报 delegateiosprocotolc ...
- 前端模块化:RequireJS
前言 前端模块化能解决什么问题? 模块的版本管理 提高可维护性 -- 通过模块化,可以让每个文件职责单一,非常有利于代码的维护 按需加载 -- 提高显示效率 更好的依赖处理 -- 传统的开发模式,如果 ...
- Linux bash - 常用操作命令
一.终端基础 本文摘录一些本人在学习Linux(CentOS 6.6) bash命令,并且会不定期保持更新. 在此先介绍一下Linux shell终端的常规命令输入格式,如下图: 上图中root是用户 ...
- Teehan & Lax 发布 iOS 7 GUI PSD 模板,免费下载
在 iOS 7 发布不久,Teehan & Lax 就发布了 iOS 7 GUI PSD 模板.该网站分享众多 PSD 模板素材,这些精美的 PSD 界面模板在制作界面原型非常有用,能够帮助设 ...
- ListBox实现拖拽排序功能
1.拖拽需要实现的事件包括: PreviewMouseLeftButtonDown LBoxSort_OnDrop 具体实现如下: private void LBoxSort_OnPreviewMou ...
- Linq专题之匿名对象
匿名对象是c#3.0的一个新的机制,使用new关键字和一个对象的初始化器,就能创建一个匿名对象.顾名思义,创建的时候这个对象是一个匿名类型的对象,没有具体的类型.说到匿名对象,那么我们前面讲过的var ...
- 基于Lumisoft.NET组件的SMTP账号登陆检测
在邮件处理的方面,Lumisoft.NET可以说是非常不错的一个选择,我在前面几篇文章中都介绍过这个组件. 基于Lumisoft.NET组件开发碰到乱码等一些问题的解决 基于Lumisoft.NET组 ...
- 【C#】OOP之继承那点事
前言: 继承这点事,说多不多,说少不少,这里只描述了一些我认为的基础篇,望各位大神指教.本节参照了C#高级编程和Think in java对继承的描述,我个人认为OOP只是思想,故看明白一个就说通的, ...
- 小型app开发的思路
前提: 1. 性能不是最重要: 2. 人手少: 3. 速度要快: 结论: 1. 混合式 2. 减少app的复杂程度 3. 追求性能 (博客,尽量让自己每天写一点,短一点都可以)
- Linux Shell系列教程之(十七) Shell文件包含
本文是Linux Shell系列教程的第(十七)篇,更多Linux Shell教程请看:Linux Shell系列教程 通过文件包含,可以引用其他文件的内容,也可以将复杂内容分开,使程序结构更加清晰. ...