Linux巩固记录(9) keepalived+nginx搭建高可用负载分发环境
环境准备(继续服用hadoop节点)
slave1 192.168.2.201(CentOs 7)
slave2 192.168.2.202(CentOs 7)
slave1 和 slave2 上都安装nginx+keepalived
web 192.168.2.100 再iis上启动了9011/9012/9013三个端口的web应用
------------------------------------------------------------------------------------------------------
1.首先在slave节点上安装nginx(slave节点安装相同,需要修改的地方我会注释出来) 或者通过 rpm -Uvh http://nginx.org/packages/centos/7/noarch/RPMS/nginx-release-centos-7-0.el7.ngx.noarch.rpm 后yum -y install nginx进行安装,免除编译
- #安装编译nginx需要的相关依赖
- yum -y install pcre-devel openssl-devel perl-ExtUtils-Embed
- cd /usr/local/src
- #获取nginx
- wget http://nginx.org/download/nginx-1.5.3.tar.gz
- #解压
- tar -zxvf nginx-1.5.3.tar.gz
- cd nginx-1.5.3
#创建www组下www用户
useradd -s /sbin/nologin -M www
- #配置路径及参数(注意最后那部分标红色的参数)
./configure --prefix=/usr/local/nginx --user=www --group=www --with-http_ssl_module --with-http_gzip_static_module --without-http_uwsgi_module --without-http_scgi_module --without-http_upstream_ip_hash_module --with-http_perl_module --with-pcre --with-ld-opt="-Wl,-E"- #编译及安装
make && make install
- #测试用默认配置文件是否成功
- [root@slave1 nginx-1.5.3]# /usr/local/nginx/sbin/nginx -t
- nginx: the configuration file /usr/local/nginx/conf/nginx.conf syntax is ok
- nginx: configuration file /usr/local/nginx/conf/nginx.conf test is successful
- #修改nginx配置文件
- vi /usr/local/nginx/conf/nginx.conf
- user www www;
- worker_processes 8;
- error_log logs/error.log;
- pid logs/nginx.pid;
- events {
- worker_connections 1024;
- }
- http {
- include mime.types;
- default_type application/octet-stream;
- sendfile on;
- tcp_nopush on;
- keepalive_timeout 65;
- gzip on;
- upstream web_server_pool {
- #ip_hash; #如果需要保持session一致,需要开启这个选项,可以保证同一台机器每次访问都分配到同一服务器
- server 192.168.2.100:9011 weight=4 max_fails=2 fail_timeout=30s;
- server 192.168.2.100:9012 weight=4 max_fails=2 fail_timeout=30s;
- server 192.168.2.100:9013 weight=4 max_fails=2 fail_timeout=30s;
- }
- server {
- listen 80;
- server_name slave1; # node2 改为slave2 或者ip地址
- location / {
- root html;
- index index.html index.htm;
- proxy_pass http://web_server_pool;
- proxy_set_header Host $host;
- proxy_set_header X-Real-IP $remote_addr;
- proxy_set_header X-Forwarded-For $remote_addr;
- }
- error_page 500 502 503 504 /50x.html;
- location = /50x.html {
- root html;
- }
- }
- }
- #启动nginx
- /usr/local/nginx/sbin/nginx #默认会加载其上级目录conf中的nginx.conf
- #如果加载其他路径的配置文件按照如下方式进行
- /usr/local/nginx/sbin/nginx -c /usr/local/nginx/conf/nginx.conf
- #检查运行情况
- [root@slave1 nginx-1.5.3]# ps -ef | grep nginx
- root 5112 1 0 21:34 ? 00:00:00 nginx: master process /usr/local/nginx/sbin/nginx -c /usr/local/nginx/conf/nginx.conf
- www 5113 5112 0 21:34 ? 00:00:00 nginx: worker process
- www 5114 5112 0 21:34 ? 00:00:00 nginx: worker process
- www 5115 5112 0 21:34 ? 00:00:00 nginx: worker process
- www 5116 5112 0 21:34 ? 00:00:00 nginx: worker process
- www 5117 5112 0 21:34 ? 00:00:00 nginx: worker process
- www 5118 5112 0 21:34 ? 00:00:00 nginx: worker process
- www 5119 5112 0 21:34 ? 00:00:00 nginx: worker process
- www 5120 5112 0 21:34 ? 00:00:00 nginx: worker process
- root 5317 2537 0 21:53 pts/0 00:00:00 grep --color=auto nginx
输入slave1的IP地址 http://192.168.2.201/ 进行访问,结果如下(默认为轮训,请多次刷新浏览器)

salve2方法类似,注意配置文件中红色部分,修改为salve2即可
===========================================================================================================================================================================================================
2.安装keepalived
- yum -y install keepalived
顺便提下: 最初我采用和nginx一样的下载源码编译方式安装,一直没通过,甚至还修改了Makefile也不行,C语言丢了好多年了,就没继续折腾了
- #编辑配置文件
- vi /etc/keepalived/keepalived.conf
- global_defs {
- notification_email { #指定keepalived在发生事情的时候,发送邮件告知,可以有多个地址,每行一个。
- changw.xiao@qq.com
- }
- notification_email_from changw.xiao@qq.com #指定发件人
- smtp_server smtp.qq.com #发送email的smtp地址
- smtp_connect_timeout 30 #超时时间
- router_id NODEA #运行keepalived的机器的一个标识,多个节点标识可以相同,也可以不同
- vrrp_skip_check_adv_addr
- vrrp_strict #严格执行VRRP协议规范,此模式不支持节点单播
- vrrp_garp_interval 0
- vrrp_gna_interval 0
- }
- vrrp_script chk_http_port {
- script "/usr/local/chk_nginx_pid.sh" #这用于keepalived检测nginx是否还在运行
- interval 2
- weight 2
- }
- vrrp_instance VI_1 {
- state MASTER #主节点用master,其他都用backup
- interface ens33 #网卡名称
- virtual_router_id 50 #所有节点参数要一致
- priority 100 #权重,值越大,优先分派
- advert_int 1
- authentication {
- auth_type PASS
- auth_pass 1111
- }
- track_script {
- chk_http_port
- }
- virtual_ipaddress {
- 192.168.2.199/24 #虚拟ip,暴露给调用方使用的,调用方就通过这个ip获取服务,不会关心nginx和具体服务地址
- }
- }
同时我把backup节点配置信息也一并贴出来
- global_defs {
- router_id NODEB
- }
- vrrp_script chk_http_port {
- script "/usr/local/chk_nginx_pid.sh"
- interval 2
- weight 2
- }
- vrrp_instance VI_1 {
- state BACKUP
- interface ens33
- virtual_router_id 50
- priority
- advert_int 1
- authentication {
- auth_type PASS
- auth_pass 1111
- }
- track_script {
- chk_http_port
- }
- virtual_ipaddress {
- 192.168.2.199/24
- }
- }
backup节点配置文件中少了邮件通知配置,不过邮件通知配置是错误的,没生效,具体日后研究了贴配置
配置文件中有一个shell脚本用于检测nginx是否启动
- vi /usr/local/chk_nginx_pid.sh
- #!/bin/bash
- if [ "$(ps -ef | grep "nginx: master process"| grep -v grep )" == "" ]
- then
- systemclt start nginx.service #尝试重启(通过编译方式安装的貌似不生效)
- sleep 5
- if [ "$(ps -ef | grep "nginx: master process"| grep -v grep )" == "" ]
- then
- killall keepalived #关掉keepalived,以便进行切换VIP指向
- fi
- fi
记得修改shell权限
- chmod 775 /usr/local/chk_nginx_pid.sh
启动keepalived
- keepalived -D -f /etc/keepalived/keepalived.conf
- [root@slave1 nginx-1.5.3]# ps -ef |grep keepalived
- root 5635 1 0 22:20 ? 00:00:00 keepalived -D -f /etc/keepalived/keepalived.conf
- root 5636 5635 0 22:20 ? 00:00:00 keepalived -D -f /etc/keepalived/keepalived.conf
- root 5637 5635 0 22:20 ? 00:00:00 keepalived -D -f /etc/keepalived/keepalived.conf
- root 5972 5637 0 22:22 ? 00:00:00 keepalived -D -f /etc/keepalived/keepalived.conf
- root 5980 2537 0 22:22 pts/0 00:00:00 grep --color=auto keepalived
- [root@slave1 nginx-1.5.3]#
同样的方式在salve2上配置,注意配置文件红色标记的地方
在浏览器输入虚拟ip 192.168.2.199 进行访问

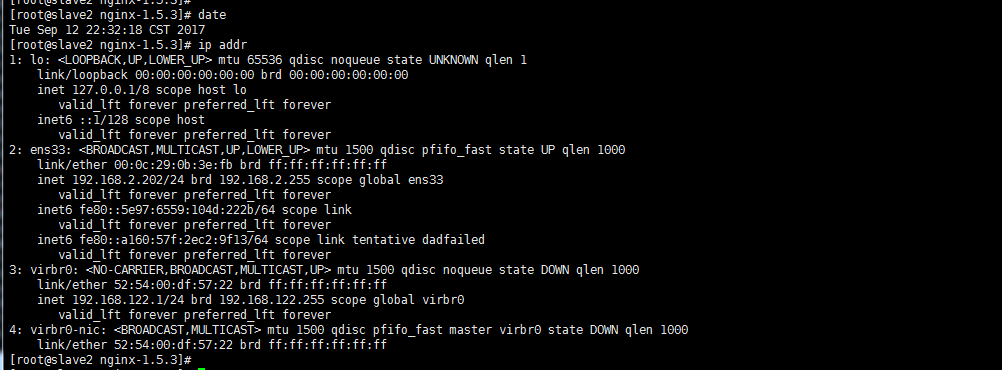
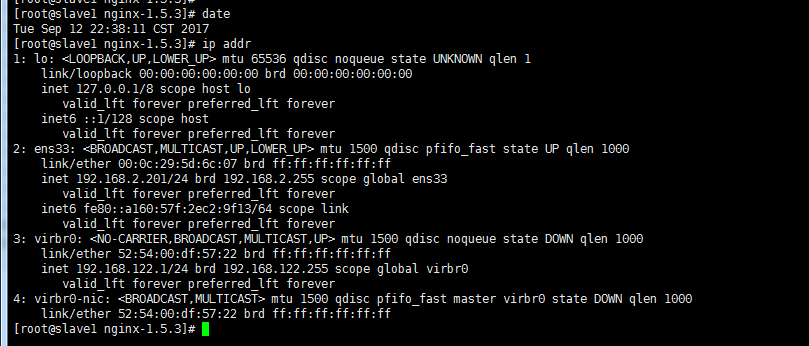
此时通过ip addr 命令进行ip查询
slave1

slave2

keepalived + nginx就是为了实现高可用,如果任意一台nginx或者keepalived挂掉之后,只要环境中还有一台机器正在执行,用户都应该能对应用进行访问
下面模拟环境发生故障
根据keepalived里面配置的检测nginx的脚本,如果检测到nginx挂掉后,应该会尝试重启,如果重启不成功,就会关掉该服务器上对应的keepalived,这样就会进行VIP切换
1.由于现在slave1为VIP指向地址,现在关闭掉slave1上的nginx
- [root@slave1 nginx-1.5.3]# date
- Tue Sep 12 22:36:30 CST 2017
- [root@slave1 nginx-1.5.3]# ps -ef | grep nginx
- root 5371 1 0 21:59 ? 00:00:00 nginx: master process /usr/local/nginx/sbin/nginx -c /usr/local/nginx/conf/nginx.conf
- www 5372 5371 0 21:59 ? 00:00:00 nginx: worker process
- www 5373 5371 0 21:59 ? 00:00:00 nginx: worker process
- www 5374 5371 0 21:59 ? 00:00:00 nginx: worker process
- www 5375 5371 0 21:59 ? 00:00:00 nginx: worker process
- www 5376 5371 0 21:59 ? 00:00:00 nginx: worker process
- www 5377 5371 0 21:59 ? 00:00:00 nginx: worker process
- www 5378 5371 0 21:59 ? 00:00:00 nginx: worker process
- www 5379 5371 0 21:59 ? 00:00:00 nginx: worker process
- root 9142 9141 0 22:36 ? 00:00:00 sh -c /usr/local/chk_nginx_pid.sh
- root 9143 9142 0 22:36 ? 00:00:00 vi /usr/local/chk_nginx_pid.sh
- root 9149 2537 0 22:36 pts/0 00:00:00 grep --color=auto nginx
- [root@slave1 nginx-1.5.3]# kill -quit 5371
- [root@slave1 nginx-1.5.3]#
在查看slave1上的ip信息(没有了199)

再查看slave2上的ip信息

再通过 http://192.168.2.199/ 进行访问,你会发现,访问一切正常,符合预期
===============================================================================================================
按照同样方式,可以部署任意多个backup节点, 如果是线上高并发环境,最好在不同机房,不同线路上均部署上,并且根据设备好坏配置对应的优先级


Linux巩固记录(9) keepalived+nginx搭建高可用负载分发环境的更多相关文章
- Nginx+Keepalived(双机热备)搭建高可用负载均衡环境(HA)
原文:https://my.oschina.net/xshuai/blog/917097 摘要: Nginx+Keepalived搭建高可用负载均衡环境(HA) http://blog.csdn.ne ...
- Nginx+Keepalived(双机热备)搭建高可用负载均衡环境(HA)-转帖篇
原文:https://my.oschina.net/xshuai/blog/917097 摘要: Nginx+Keepalived搭建高可用负载均衡环境(HA) http://blog.csdn.ne ...
- [转]搭建Keepalived+Nginx+Tomcat高可用负载均衡架构
[原文]https://www.toutiao.com/i6591714650205716996/ 一.概述 初期的互联网企业由于业务量较小,所以一般单机部署,实现单点访问即可满足业务的需求,这也是最 ...
- 【Linux运维-集群技术进阶】Nginx+Keepalived+Tomcat搭建高可用/负载均衡/动静分离的Webserver集群
额.博客名字有点长.. . 前言 最终到这篇文章了,心情是有点激动的. 由于这篇文章会集中曾经博客讲到的全部Nginx功能点.包含主要的负载均衡,还有动静分离技术再加上这篇文章的重点.通过Keepal ...
- Keepalived+HAProxy 搭建高可用负载均衡
转载自:https://mp.weixin.qq.com/s/VebiWftaRa26x1aA21Jqww 1. 概述 软件负载均衡技术是指可以为多个后端服务器节点提供前端IP流量分发调度服务的软件技 ...
- Keepalived+lvs 搭建高可用负载均衡
本站点停止更新,请访问:blog.coocap.com 不了解负载均衡高可用的童鞋,强烈建议先看keepalived+nginx高可用负载均衡: 传送门(求粉):http://www.cnblogs. ...
- Keepalived+Nginx实现高可用负载均衡集群
一 环境介绍 1.操作系统CentOS Linux release 7.2.1511 (Core) 2.服务keepalived+nginx双主高可用负载均衡集群及LAMP应用keepalived-1 ...
- Keepalived + Nginx + Tomcat 高可用负载均衡架构
环境: 1.centos7.3 2.虚拟ip:192.168.217.200 3.192.168.217.11.192.168.217.12上分别部署Nginx Keepalived Tomcat并进 ...
- KeepAlived+Nginx实现高可用负载
一.环境及安装版本: centos6.5.Nginx1.4.7.keepalived1.3.2 虚拟IP 真是IP Nginx端口 主从分配 10.0.90.215 10.0.90.217 80 MA ...
随机推荐
- centos7 安装网卡
1.虚拟机测试,先开启命令行 su systemctl set-default multi-user.target reboot 2.编辑网卡 虚拟机网络设置成桥接模式 vi /etc/sysconf ...
- Linux硬件信息命令大全
硬件信息 在linux系统中,有很多命令可以用于查询主机的硬件信息,有些命令仅仅针对于特定的硬件部件,比如cpu,内存等,而有些命令可以查询很多的硬件信息. 这篇帖子简单地带大家了解一下最常用的查询各 ...
- Le Chapitre V
Chaque jour j'apprennais quelque chose sur la planète, sur le départ, sur le voyage. Ca venait tout ...
- AngularJS实战之路由ui-view
1. 路由(ui-router) 1.1. 环境 1) angular.min.js 2) angular-ui-router-0.2.10.js 3) 确保确保包含ui.router为模块依赖关系. ...
- 编译时:virtual memory exhausted: Cannot allocate memory,常见于VPS
原文链接:http://blog.csdn.net/taiyang1987912/article/details/41695895 一.问题 当安装虚拟机时系统时没有设置swap大小或设置内存太小,编 ...
- Word图片上传控件-eWebEditor9x整合教程-Xproer.WordPaster
示例下载(JSP):eWebEditor9x, 示例下载(.NET):eWebEditor9x, 1.1. 集成到eWebEditor9x 主要步骤如下: 1.增加WordPaster文件夹 ...
- Redis集群master选举时长测试
在一台物理机上启动6个Redis实例,组成3主3从集群,端口号依次为:1379 ~ 1384,端口号1379.1380和1384三个为master,端口1379的进程ID为17620.现将进程1762 ...
- WinSockets编程(六)select模式
select模式的思想 创建FD_SET fd_all,并初始化FD_ZERO(&fd_all); Step1 初始时: Step2 加入一个套接字之后,比如FD_SET(sServer ...
- 知识点:定义input type=file 样式的方法(转)
——“当我们想要用css美化表单的时候,有两个控件就会和前段人员作对,一个是是大名鼎鼎的select,另一个就是我现在要说说的 input type=file” 为什么要美化file控件?试想一下,别 ...
- Java理论学时第三节。课后作业。
如果一个类中既有初始化块,又有构造方法,同时还设定了字段的初始值,谁说了算? 运行结果. 根据我的总结,它们三个的优先级是:构造方法 > 字段初始值 > 初始化块. 当多个类之间有继承关系 ...
