Centos7安装gitlab11 学习笔记之基础概念、部署安装、权限管理、issue管理
一、基础介绍
1、简介
一个基于GIT的源码托管解决方案
基于rubyonrails开发
集成了nginx postgreSQL redis sidekiq等组件
2、安装要求
2g内存以上,有点占内存,我的2g内存创建项目适合就报503错误,调大一点就正常了
这里使用centos7 64位
3、默认用户
root/5iveL!fe,正常部署好登陆回要求改密码
4、常用命令
gitlab-ctl status
gitlab-ctl start
gitlab-ctl stop
gitlab-ctl restart
gitlab-ctl tail nginx 查看日志
5、组件
nginx 静态web
gitlab-shell 用于处理git命令和修改
gitlab-workhorse 轻量级的反向代理服务器
logrotate 日志文件管理工具
postgresql 数据库
redis 缓存数据库
sidekiq 用于在后台执行队列任务(异步执行)、
unicorn gitlab rails 应用是托管在这个服务器上面的
6、目录
/var/opt/gitlab/git-data/repositories/root:库默认存储目录
/opt/gitlab:应用代码和相应的依赖程序
/var/opt/gitlab:gitlab-ctl reconfigure命令编译后的应用数据和配置文件,不需要认为修改配置
/etc/gilab:配置文件目录
/var/log/gitlab:此目录下存放了gitlab各个组件产生的日志
/var/opt/gilab/backups/:备份文件生成的目录
7、变更主配置文件
gitlab-ctl reconfigure 重置配置文件
gitlab-ctl show-config 验证配置文件
gitlab-ctl restart 重启gitlab服务
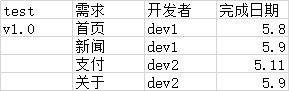
8、指定一个开发需求
二、安装gitlab
1、安装依赖
yum install curl policycoreutils openssh-server openssh-clients postfix
systemctl enable sshd
systemctl start sshd
systemctl enable postfix
systemctl start postfix
2、rpm安装
wget https://mirrors.tuna.tsinghua.edu.cn/gitlab-ce/yum/el7/gitlab-ce-11.10.4-ce.0.el7.x86_64.rpm
yum install gitlab
rpm -ivh gitlab-ce-11.10.4-ce.0.el7.x86_64.rpm
 [root@web1 ~]# rpm -ivh gitlab-ce-11.10.-ce..el7.x86_64.rpm

 warning: gitlab-ce-11.10.-ce..el7.x86_64.rpm: Header V4 RSA/SHA1 Signature, key ID f27eab47: NOKEY

 Preparing...                          ################################# [%]

 Updating / installing...

    :gitlab-ce-11.10.-ce..el7       ################################# [%]

 It looks like GitLab has not been configured yet; skipping the upgrade script.

        *.                  *.

       ***                 ***

      *****               *****

     .******             *******

     ********            ********

    ,,,,,,,,,***********,,,,,,,,,

   ,,,,,,,,,,,*********,,,,,,,,,,,

   .,,,,,,,,,,,*******,,,,,,,,,,,,

       ,,,,,,,,,*****,,,,,,,,,.

          ,,,,,,,****,,,,,,

             .,,,***,,,,

                 ,*,.

      _______ __  __          __

     / ____(_) /_/ /   ____ _/ /_

    / / __/ / __/ /   / __ `/ __ \

   / /_/ / / /_/ /___/ /_/ / /_/ /

   \____/_/\__/_____/\__,_/_.___/

 Thank you for installing GitLab!

 GitLab was unable to detect a valid hostname for your instance.

 Please configure a URL for your GitLab instance by setting `external_url`

 configuration in /etc/gitlab/gitlab.rb file.

 Then, you can start your GitLab instance by running the following command:

   sudo gitlab-ctl reconfigure

 For a comprehensive list of configuration options please see the Omnibus GitLab readme

 https://gitlab.com/gitlab-org/omnibus-gitlab/blob/master/README.md

 [root@web1 ~]#
也可以yum方式安装,添加以下源即可
 或者添加yum源

 [root@web1 yum.repos.d]# vim gitlab-ce.repo

 [gitlab-ce]

 name=gitlab-ce

 baseurl=http://mirrors.tuna.tsinghua.edu.cn/gitlab-ce/yum/el$releasever

 gpgcheck=

 enabled=

 ~
3、修改配置文件
vim /etc/gilab/gitlab.rb
external_url 'http://192.168.216.51'
4、重置配置文件,gitlab就生效了
gitlab-ctl reconfigure
5、测试
流程:修改密码>root用户登陆>登陆进入界面


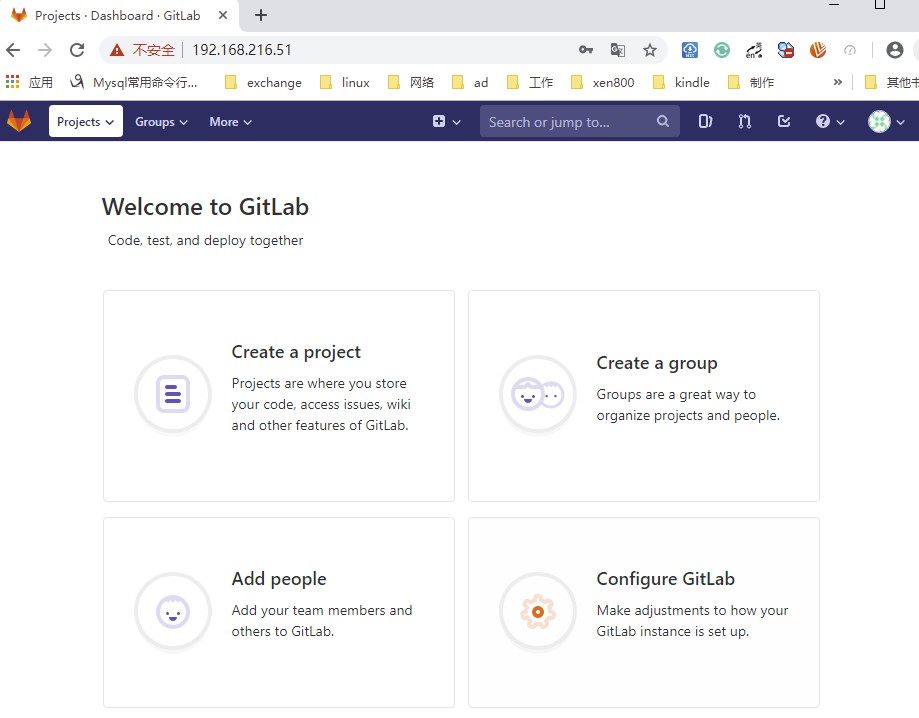
现在已经登陆进来了
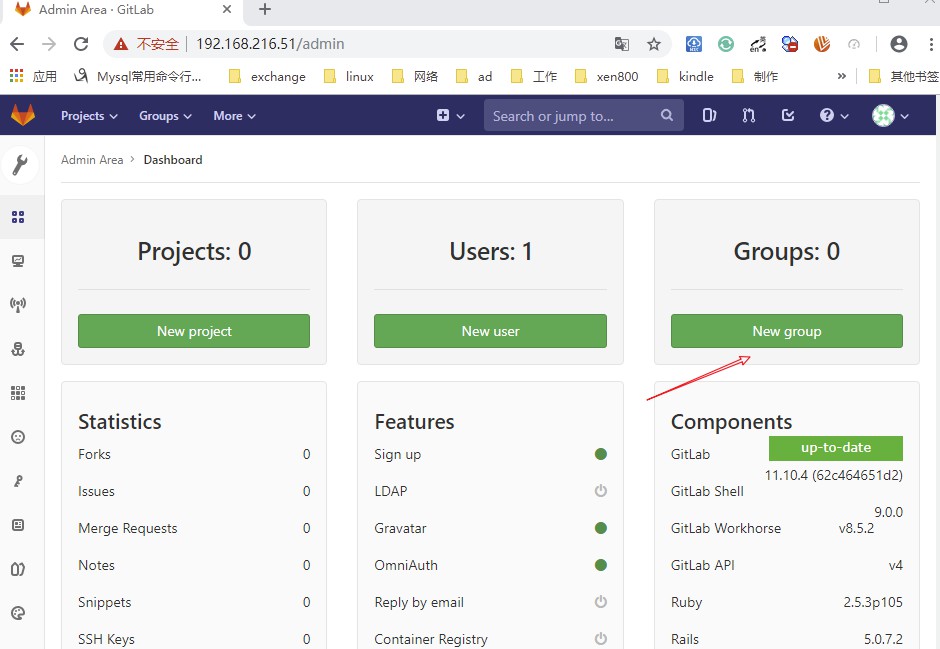
三、Gitlab的权限管理
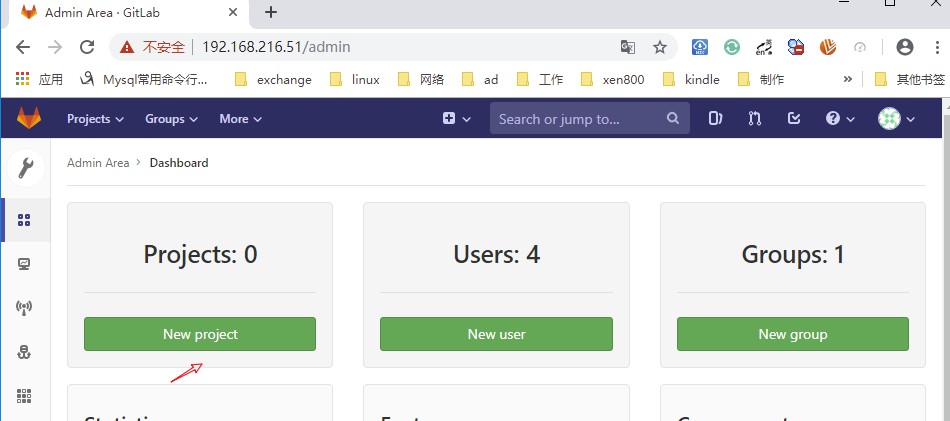
首先创建对象流程
创建组
创建用户
创建项目
授权项目用户
1、创建一个组
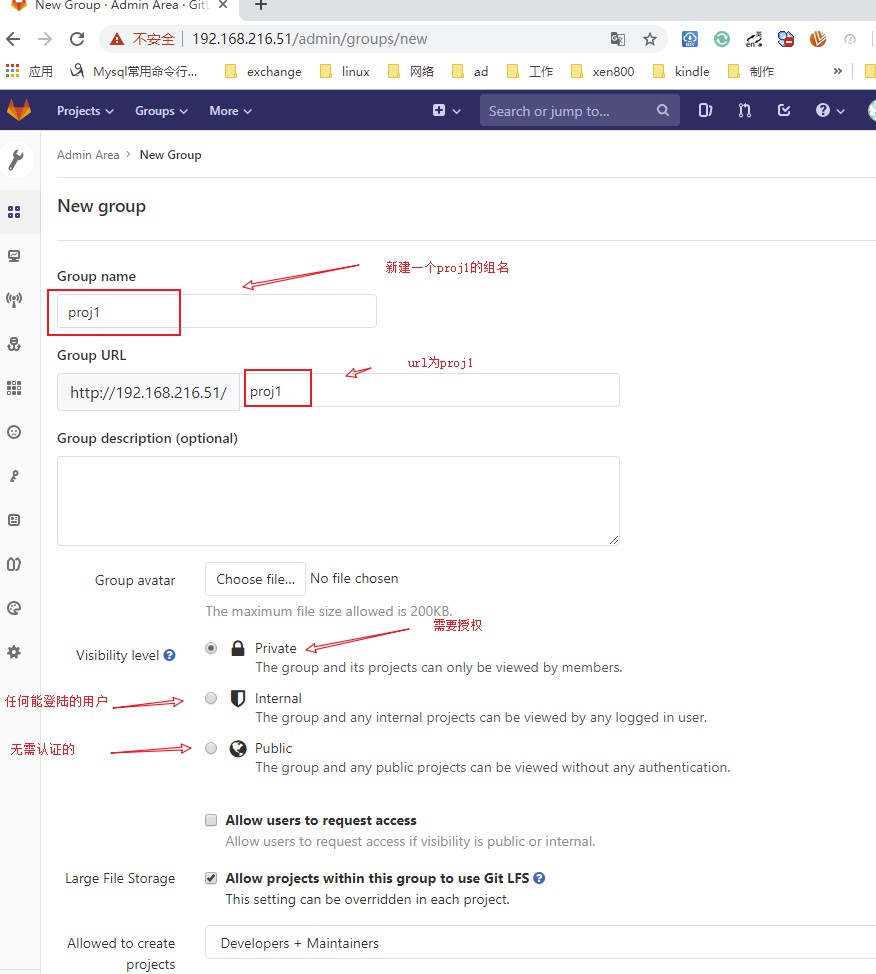
点击create
下面向组里面添加成员,这里还没有创建用户,开始创建用户
2、创建三个用户
点击create创建,以此类推创建三个
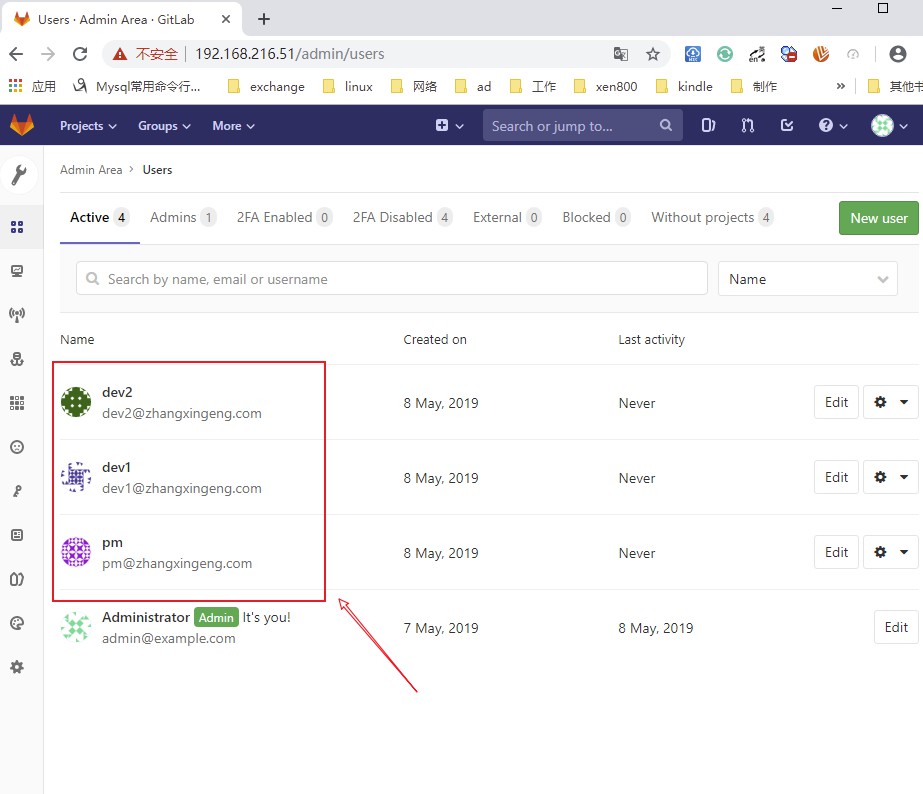
创建完用户和组就可以创建项目了
pm 项目管理
dev1 开发者
dev2 开发者
3、创建一个项目
新建了一个proj1/test的库

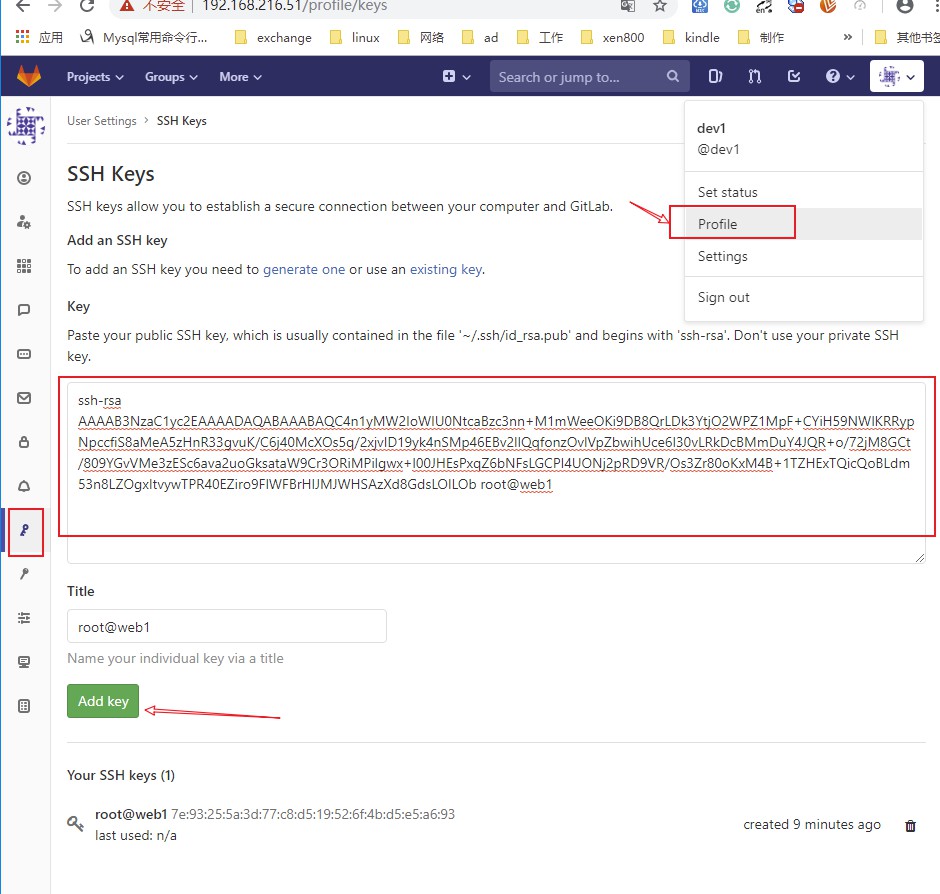
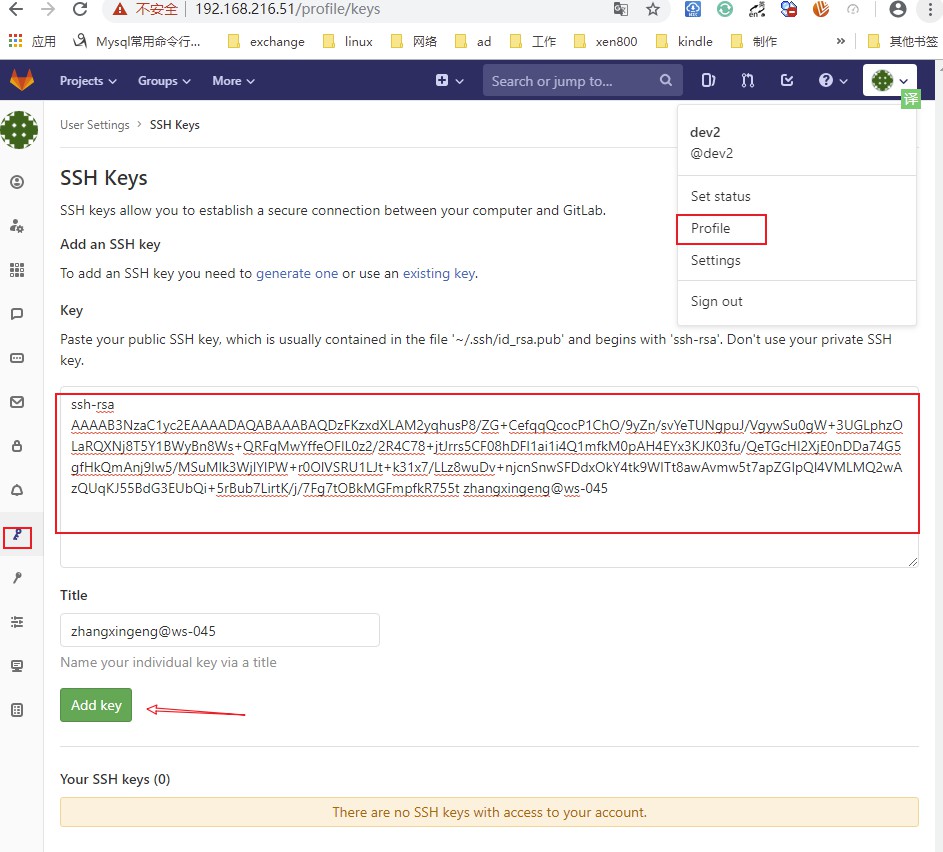
4、添加ssh keys
SSH KEY
个人SSH KEY:创建ssh key >将公钥导入用户ssh key
Deploy KEY:创建deploy key >将deploy key 导入gitlab并在项目中允许
1)个人 SSH KEY
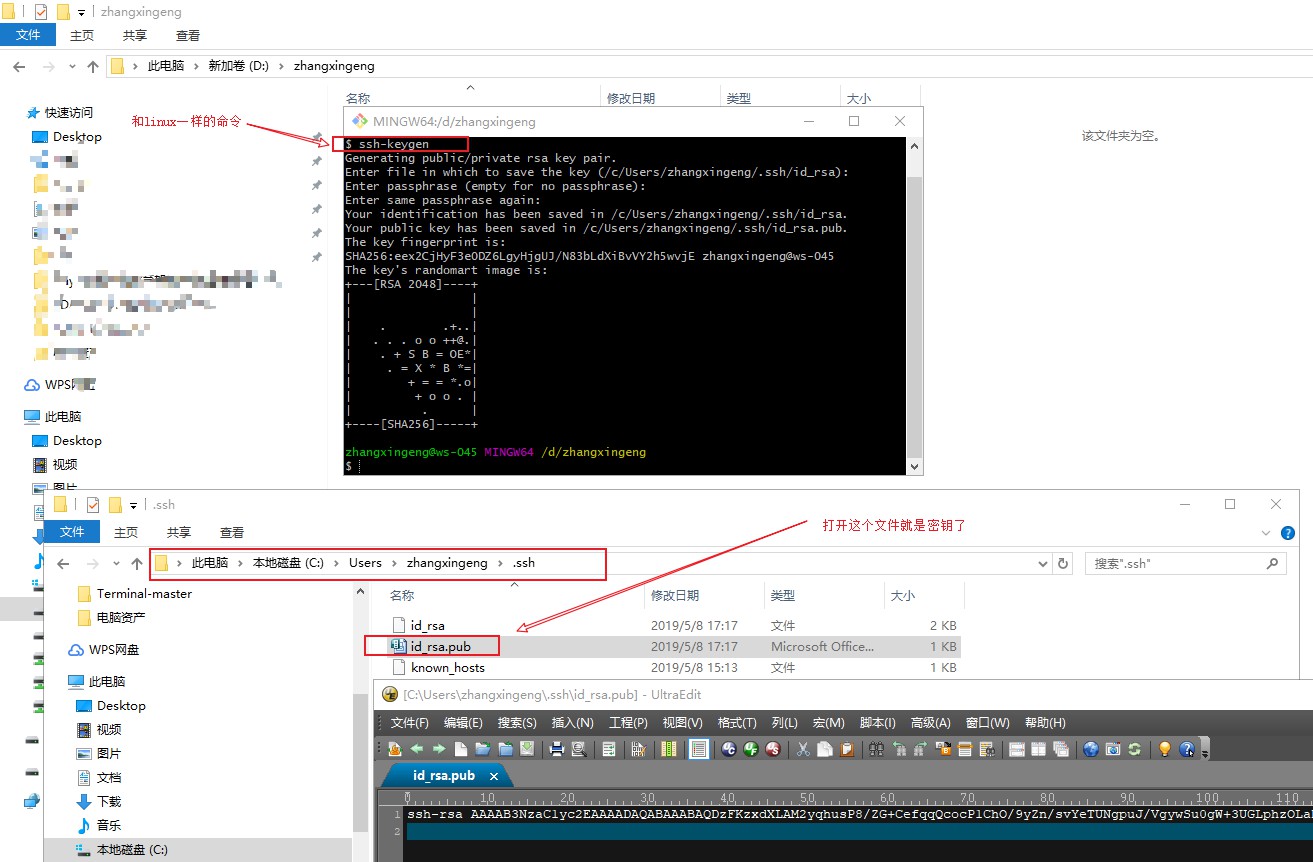
复制公钥,粘贴到,user setting>SSH Keys
 [root@web1 ~]# cd /root/.ssh/

 [root@web1 .ssh]# ll

 total

 -rw-r--r--  root root  Apr  : known_hosts

 [root@web1 .ssh]# ssh-keygen

 Generating public/private rsa key pair.

 Enter file in which to save the key (/root/.ssh/id_rsa):

 Enter passphrase (empty for no passphrase):

 Enter same passphrase again:

 Your identification has been saved in /root/.ssh/id_rsa.

 Your public key has been saved in /root/.ssh/id_rsa.pub.

 The key fingerprint is:

 SHA256:+QcJvTcCplOp7IlgcFpKVKIS5SsRfkKbQntbQ9eMPBE root@web1

 The key's randomart image is:

 +---[RSA ]----+

 |o*o. ..E*        |

 |*+= . .+ =       |

 |*B+o o  B .      |

 |+B+.o..= + o     |

 |+ +.  = S = o    |

 | o . o o . + .   |

 |    . o   . .    |

 |           .     |

 |                 |

 +----[SHA256]-----+

 [root@web1 .ssh]# ll

 total

 -rw-------  root root  May   : id_rsa

 -rw-r--r--  root root   May   : id_rsa.pub

 -rw-r--r--  root root   Apr  : known_hosts

 [root@web1 .ssh]# cat id_rsa.pub

 ssh-rsa AAAAB3NzaC1yc2EAAAADAQABAAABAQC4n1yMW2IoWIU0NtcaBzc3nn+M1mWeeOKi9DB8QrLDk3YtjO2WPZ1MpF+CYiH59NWlKRRypNpccfiS8aMeA5zHnR33gvuK/C6j40McXOs5q/2xjvlD19yk4nSMp46EBv2lIQqfonzOvlVpZbwihUce6I30vLRkDcBMmDuY4JQR+o/72jM8GCt/809YGvVMe3zESc6ava2uoGksataW9Cr3ORiMPilgwx+l00JHEsPxqZ6bNFsLGCPI4UONj2pRD9VR/Os3Zr80oKxM4B+1TZHExTQicQoBLdm53n8LZOgxItvywTPR40EZiro9FlWFBrHlJMJWHSAzXd8GdsLOILOb root@web1

 [root@web1 .ssh]#
首先需要两个开发者设置密码,登陆进去设置ssh key

设置好密码分别登陆
linux 系统为dev1
windows为dev2
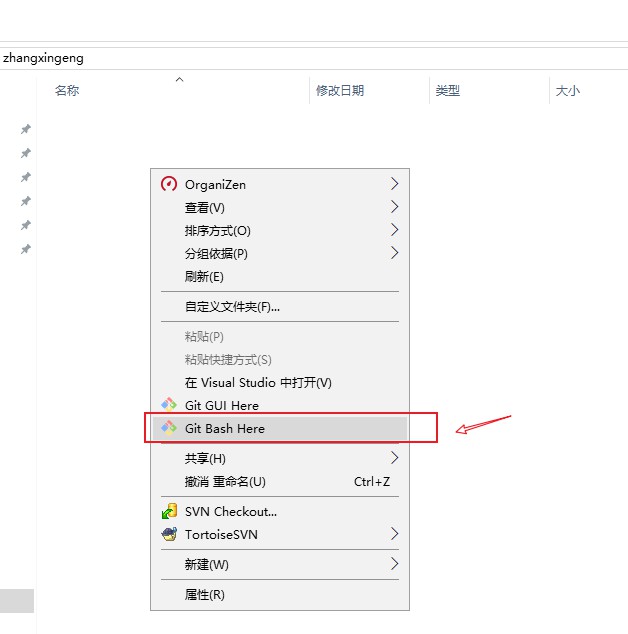
window,安装git
下载地址:https://gitforwindows.org/
设置目录,选一个目录右键Git bash here
5、测试效果
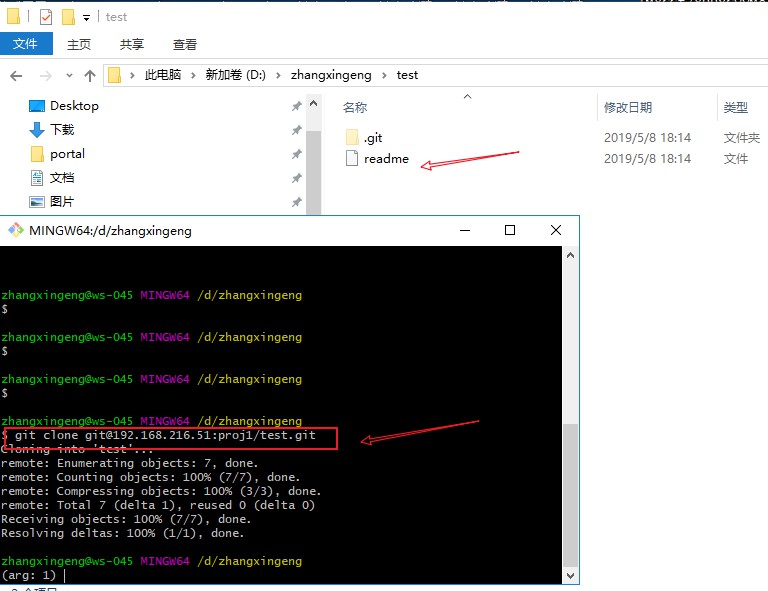
测试以下,已经打通权限了,提示似乎是个空库
linux测试
 [root@web1 .ssh]# git clone git@192.168.216.51:proj1/test.git

 Cloning into 'test'...

 The authenticity of host '192.168.216.51 (192.168.216.51)' can't be established.

 ECDSA key fingerprint is SHA256:kvAeuWOn6RFSXvl5qFIszQEx9gLizuZER+I4VJkpAso.

 ECDSA key fingerprint is MD5:b7:ef:e0:3c:8f:::c2:5c:9a:2e:fc:4d:e2::.

 Are you sure you want to continue connecting (yes/no)? yes

 Warning: Permanently added '192.168.216.51' (ECDSA) to the list of known hosts.

8 warning: You appear to have cloned an empty repository.
windows测试
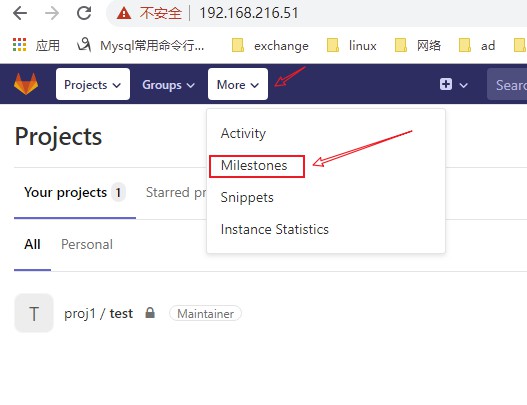
四、Gitlab的issue管理
创建milestone
创建issue
创建分支
合并分支
Todos
Fix #issue_id
Close #issue_id
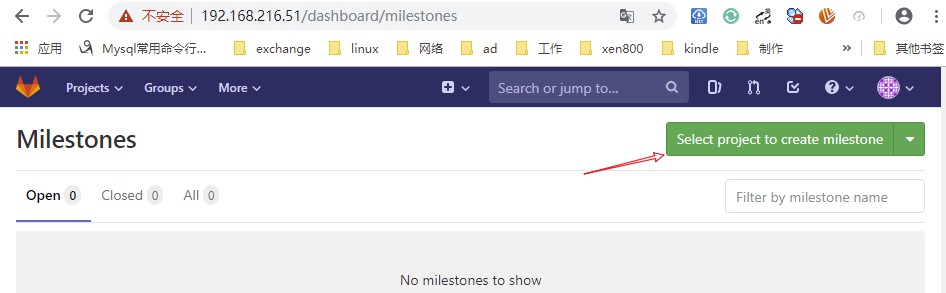
1、第一步创建Milestone
图示如下:

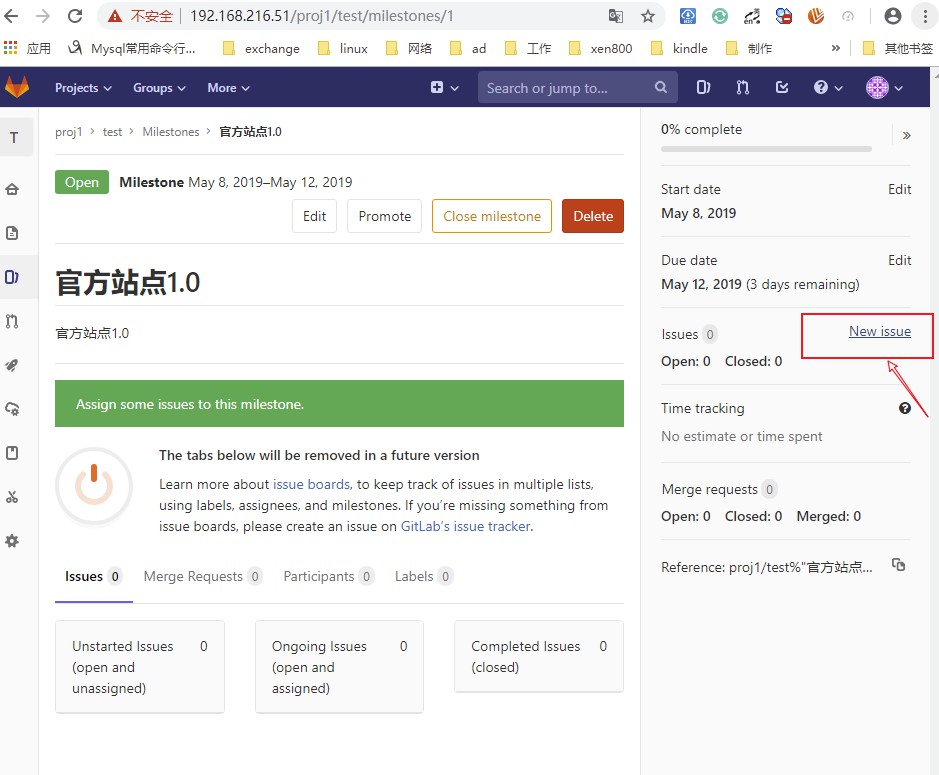
2、创建issue
如下图示:
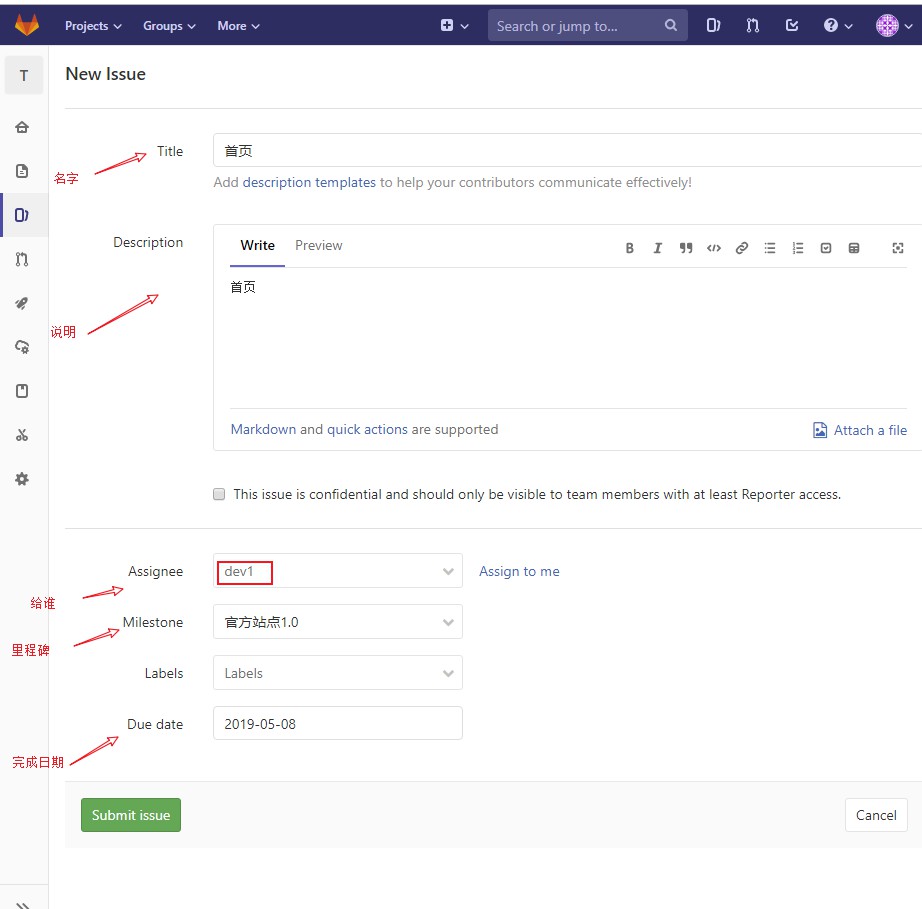

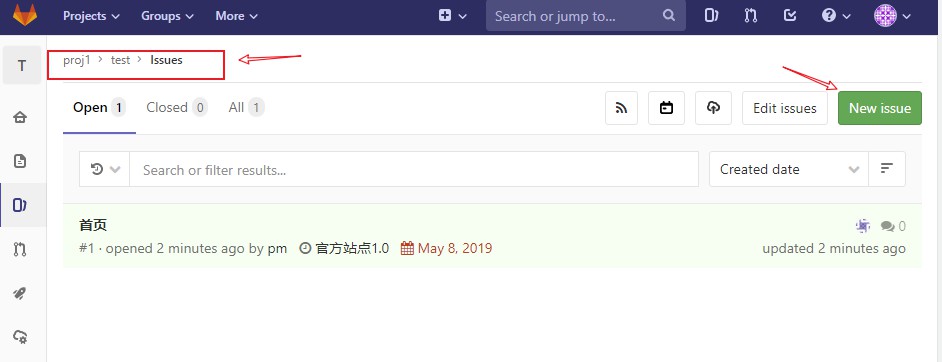
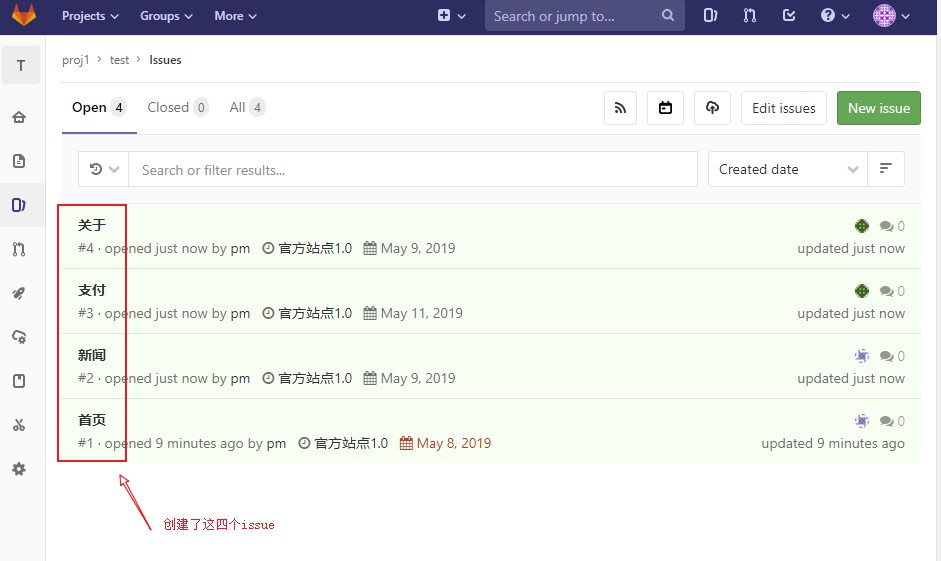
以此类推,创建一共四个issue
3、dev1 创建分支,开发首页
 [root@web1 test]# ll

 total

 -rw-r--r--  root root   May   : .html

 -rw-r--r--  root root  May   : .html

 -rw-r--r--  root root  May   : index.html

 -rw-r--r--  root root  May   : news.html

 drwxr-xr-x  root root  May   : test

 [root@web1 test]# cd test

 [root@web1 test]# ll

 total

 -rw-r--r--  root root  May   : readme

 [root@web1 test]# git checkout -b shouye

 Switched to a new branch 'shouye'

 [root@web1 test]# git status

 # On branch shouye

 nothing to commit, working directory clean

 [root@web1 test]# echo "<h1>welcom to web1</h1>" >index.html

 [root@web1 test]# ll

 total

 -rw-r--r--  root root  May   : index.html

 -rw-r--r--  root root   May   : readme [root@web1 test]# git add .

 [root@web1 test]# git commit -m "shouye"

 [shouye 0a6efde] shouye

   file changed,  insertion(+)

  create mode  index.html

 [root@web1 test]# git push origin shouye

 Counting objects: , done.

 Delta compression using up to  threads.

 Compressing objects: % (/), done.

 Writing objects: % (/),  bytes |  bytes/s, done.

 Total  (delta ), reused  (delta )

 remote:

 remote: To create a merge request for shouye, visit:

 remote:   http://192.168.216.51/proj1/test/merge_requests/new?merge_request%5Bsource_branch%5D=shouye

 remote:

 To git@192.168.216.51:proj1/test.git

  * [new branch]      shouye -> shouye

 [root@web1 test]#
dev1登陆gitlab web界面,点击repository,可以看到一个push上来的代码文件

4、合并到主干
dev1登陆gitlab web界面
点击repository--》create merge request--》填写相关信息交给pm处理--》点击sumbmit merge request
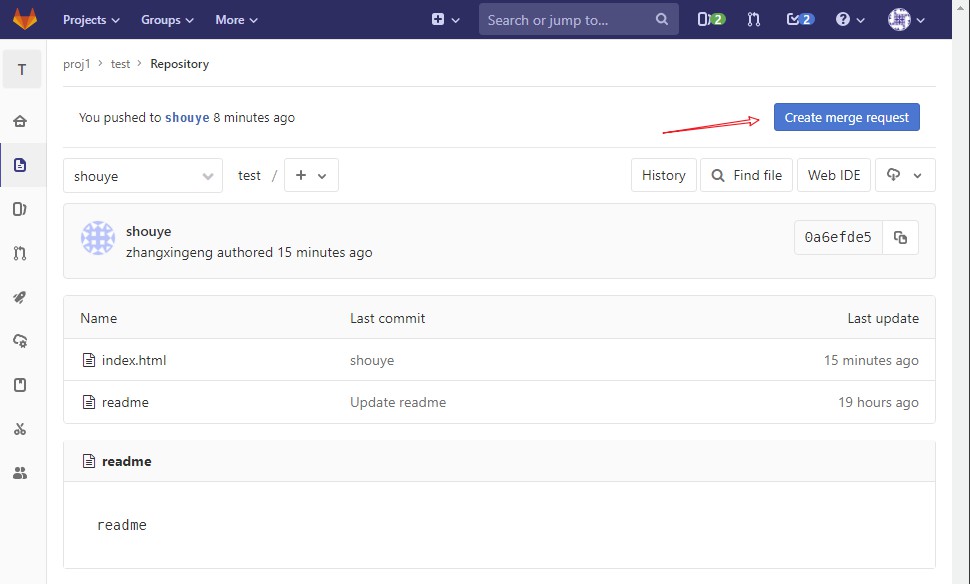
填上相关信息,这个合并需要pm来做,dev1提交申请

提交后的状态如下:

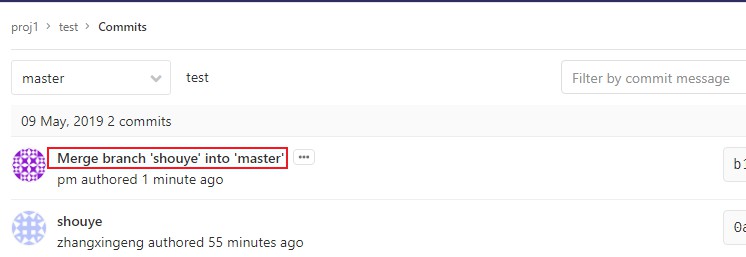
pm登陆gitlab web界面
可以看到一个merge requests--》点击旁边的todos---》检查代码确认---》点击merge

限制可以看到是open状态,检查没有问题就点merge


点击branches 可以看到merged
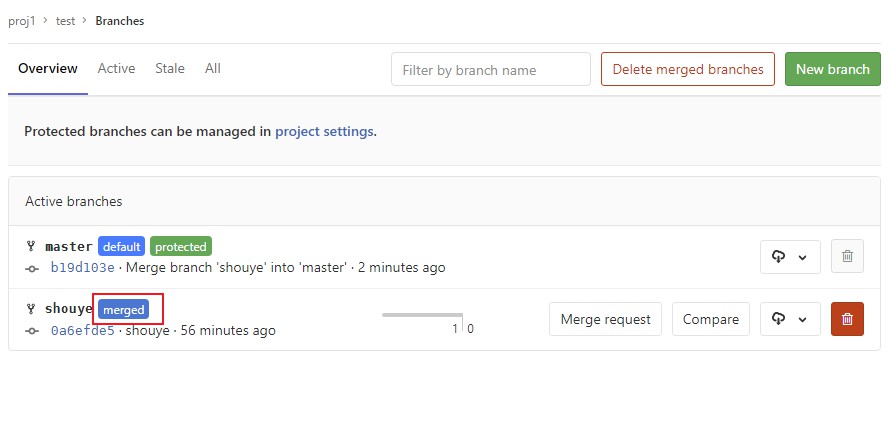
切换dev1账户,查看并点击done完成

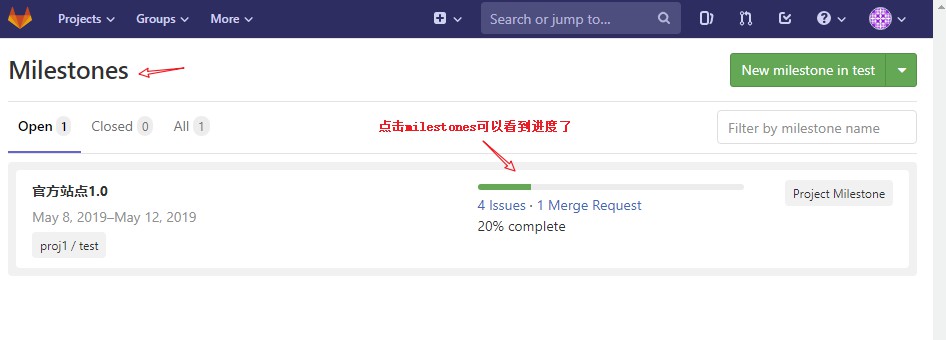
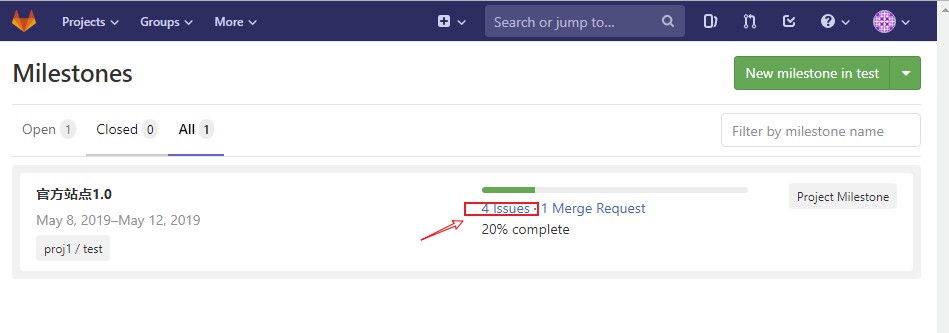
切换pm,点击milestones可以看到整个进度
接着点击下面issues看看
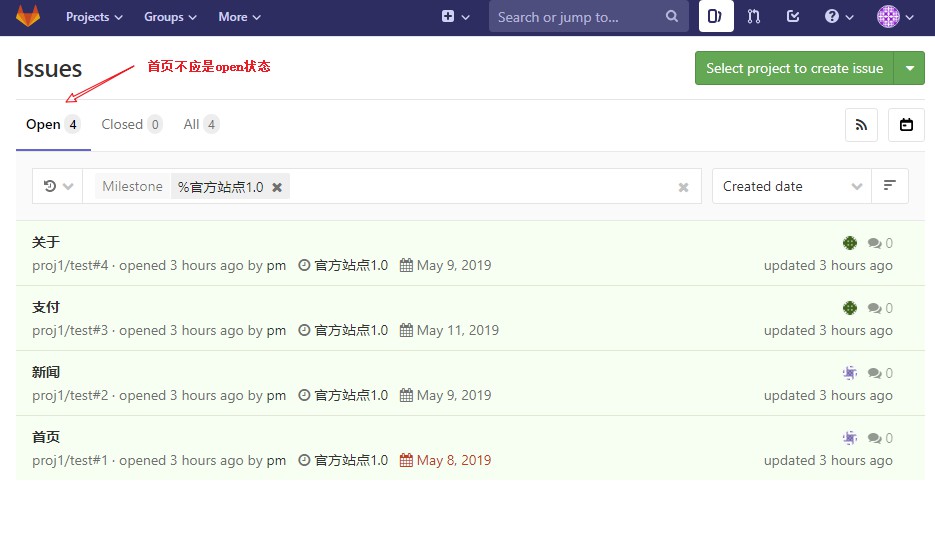
还是open状态,不应该啊,应该完成的就不是open状态
接下来需要点击这个完成的issue,然后点击close issue 就可以了

每次完成还需要点close有点麻烦,接下来看看如何解决
切换到主干pull以下,然后可以后面可以试试dev1 切换到master能不能上传,这里就不演示了,是不能上传的,因为dev1的权限是开发者
 [root@web1 test]# git checkout master

 Switched to branch 'master'

 [root@web1 test]# ll

 total

 -rw-r--r--  root root  May   : readme

 [root@web1 test]# git pull

 remote: Enumerating objects: , done.

 remote: Counting objects: % (/), done.

 remote: Total  (delta ), reused  (delta )

 Unpacking objects: % (/), done.

 From 192.168.216.51:proj1/test

    7ec452a..b19d103  master     -> origin/master

 Updating 7ec452a..b19d103

 Fast-forward

  index.html |  +

   file changed,  insertion(+)

  create mode  index.html

 [root@web1 test]# ll

 total

 -rw-r--r--  root root  May   : index.html

 -rw-r--r--  root root   May   : readme

 [root@web1 test]#
创建第2个分支新闻,news,并上传
 [root@web1 test]# git checkout -b news

 Switched to a new branch 'news'

 [root@web1 test]# echo "news " >news.html

 [root@web1 test]# git add .

 [root@web1 test]# git commit -m "close #2"

 [news ] close #

   file changed,  insertion(+)

  create mode  news.html

 [root@web1 test]# git push origin news

 Counting objects: , done.

 Delta compression using up to  threads.

 Compressing objects: % (/), done.

 Writing objects: % (/),  bytes |  bytes/s, done.

 Total  (delta ), reused  (delta )

 remote:

 remote: To create a merge request for news, visit:

 remote:   http://192.168.216.51/proj1/test/merge_requests/new?merge_request%5Bsource_branch%5D=news

 remote:

 To git@192.168.216.51:proj1/test.git

  * [new branch]      news -> news

 [root@web1 test]#
注意:
git commit -m "close #2"的意义在于添加标签close #2 上一部最后需要点击close issue,这里添加close标签就不用点了,会自动生效。
gitlab 上面的操作和第一个分支首页一样,只是最后不需要在去点close,这是因为添加了close #2 的注释
转载请注明出处:https://www.cnblogs.com/zhangxingeng/p/10826886.html
Centos7安装gitlab11 学习笔记之基础概念、部署安装、权限管理、issue管理的更多相关文章
- Docker:学习笔记(1)——基础概念
Docker:学习笔记(1)——基础概念 Docker是什么 软件开发后,我们需要在测试电脑.客户电脑.服务器安装运行,用户计算机的环境各不相同,所以需要进行各自的环境配置,耗时耗力.为了解决这个问题 ...
- 【miscellaneous】 GStreamer应用开发手册学习笔记之基础概念介绍
第3章. 基础概念介绍 本章将介绍GStreamer的基本概念. 理解这些概念对于你后续的学习非常重要,因为后续深入的讲解我们都假定你已经完全理解了这些概念. 3.1. 元件(Elements) 元件 ...
- OpenFlow Switch学习笔记(一)——基础概念
OpenFlow Switch v1.4.0规范是在2013年10月14号发布,规范涵盖了OpenFlow Switch各个组件的功能定义.Controller与Switch之间的通信协议Open F ...
- Elasticserach学习笔记-01基础概念
本文系本人根据官方文档的翻译,能力有限.水平一般,如果对想学习Elasticsearch的朋友有帮助,将是本人的莫大荣幸. 原文出处:https://www.elastic.co/guide/en/e ...
- Docker学习笔记_04 Rancher的部署安装(编排选用K8S)
原文地址:http://dbase.cc/2018/01/12/docker/04_rancher的部署安装/ 为什么要使用Rancher Rancher是一个开源的企业级容器管理平台.通过Ranch ...
- Centos7安装gitlab11 学习笔记之备份恢复及邮箱配置
一.备份 修改配置文件 vim /etc/gitlab/gitlab.rb 默认路径为 # gitlab_rails['backup_path'] = "/var/opt/gitlab/ba ...
- JAVA学习笔记之基础概念(一)
一.Java 简介: Java 是由 Sun Microsystems 公司于 1995 年 5 月推出的 Java 面向对象程序设计语言和 Java 平台的总称. 由 James Gosling和同 ...
- ELK-6.5.3学习笔记–elk基础环境安装
本文预计阅读时间 13 分钟 文章目录[隐藏] 1,准备工作. 2,安装elasticsearch. 3,安装logstash. 4,安装kibana 以往都是纸上谈兵,毕竟事情也都由部门其他小伙伴承 ...
- Python学习笔记之基础篇(-)python介绍与安装
Python学习笔记之基础篇(-)初识python Python的理念:崇尚优美.清晰.简单,是一个优秀并广泛使用的语言. python的历史: 1989年,为了打发圣诞节假期,作者Guido开始写P ...
随机推荐
- JAVA的选择结构
1.基本选择结构if 案例:如果Java考试成绩大于98分则奖励MP4 public class Demo02 { public static void main ...
- BZOJ 4300: 绝世好题 二进制
对于每一个数字拆位,然后维护一个大小为 30 左右的桶即可. code: #include <bits/stdc++.h> #define N 100006 #define setIO(s ...
- CF358D Dima and Hares dp
状态的定义挺奇特的~ 发现最终每一个物品一定都会被选走. 令 $f[i][0/1]$ 表示 $a[i]$ 在 $a[i-1]$ 前/后选时 $1$~$(i-1)$ 的最优解. 因为一个数字的价值只由其 ...
- js判断当前时区【TimeZone】是否是夏令时
var d1 = new Date(2009, 0, 1); var d2 = new Date(2009, 6, 1); if (d1.getTimezoneOffset() != d2.getTi ...
- P2891 [USACO07OPEN]吃饭Dining
漂亮小姐姐点击就送:https://www.luogu.org/problemnew/show/P2891 题目描述 Cows are such finicky eaters. Each cow ha ...
- Java的 「 “ 结构体 ”」 与 「 “ 自定义排序 ” 」
Java里面的结构体可以靠class来实现,如果相对结构体进行排序,需要写一个接口,class 自定义的名字 implements Comparator<结构体(自己定义的class类的名字)& ...
- FOI 冬令营 Day6
目录 T1.堆(heap) 传送门 Code T2.密文(secret) 传送门 Code T3.树(tree) 传送门 Code 别问Day5到底去哪里了,咕咕咕 T1.堆(heap) 传送门 Co ...
- selenium鼠标下滑操作
# coding = utf-8 import time from selenium import webdriver from selenium.webdriver.common.by import ...
- 手动制作BIOS和EFI多启动U盘
原文链接:https://www.lainme.com/doku.php/blog/2017/07/%E5%88%B6%E4%BD%9Cbios%E5%92%8Cefi%E5%A4%9A%E5%90% ...
- 【Python代码】随机抽取文件名列表NameList中的Name作为训练集
#!/usr/bin/env python #coding=utf-8 #随机抽取一部分图片作为测试集 import random NameList=[]#存储所有图片名字 ''' NameListP ...