linux 设备驱动与应用程序异步通知
一、异步通知机制简介
异步通知机制的意思:一旦设备准备就绪,可以主动的通知应用程序进行相应的操作,从而使得应用程序不必去查询设备的状态。
异步通知比较准确的称谓是"信号驱动的异步IO",因此其实现也是通过发送、接收信号的方式。
1.1 信号接收:
// 信号接收函数原型

void (*signal(int signum,void (*handler)(int)))(int); // 函数名:signal

                                                                     // 函数参数:int signum

                                                                     //  void (*handler)(int)

typedef void(*sighandler_t)(int);

sighandler_t signal(int signum,sighandler_t handler);
第一个参数指定信号的值, 第二个参数指定信号的处理函数。若第二个参数为SIG_IGN,表示对该信号忽略(有两个信号不能被忽略SIGSTOP和SIGKILL)
若第二个参数为SIG_DEF,表示进程接收到该信号后执行默认的处理函数、
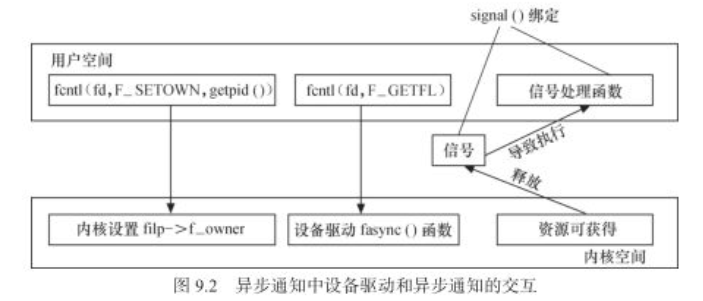
在信号接收端即应用程序中需要完成的工作:
(1)设置设备文件的拥有者为本进程,这样从设备发出的信号才能被本进程接收到
(2)设置设备文件支持fasync,即异步通知模式
(3)通过signal函数连接信号和信号处理函数
1.2 信号发送:
在设备驱动与应用程序的异步通知交互中,由设备驱动释放信号,因此需要在设备驱动中需要明确:将信号发给哪一个进程,如何发送信号到应用程序。
因此在驱动程序中涉及到3项工作:
(1)设置filp->f_owner为对应进程ID ,以支持应用程序中的工作1
(2)调用驱动程序中的fasync()函数,以支持应用程序中的工作2
(3)当设备资源可以获得的时候,调用kill_fasync()函数发出相应的信号
二、应用程序
int fd;

void my_fun(int signum)                // 信号处理函数

{

    int press_cnt[];

        int i;

    printf("my_fun\n");

    read(fd, press_cnt, sizeof(press_cnt));

    for (i = ; i < sizeof(press_cnt)/sizeof(press_cnt[]); i++)

    {

        if (press_cnt[i])

        printf("K%d has been pressed %d times!\n", i+, press_cnt[i]);

    }

}

int main(int argc, char **argv)

{

    int flags;

    signal(SIGIO, my_fun);              // 注册信号处理函数

    fd = open("/dev/tiny6410_button", O_RDWR);

    if (fd < )

    {

        printf("Can't open /dev/buttons\n");

        return -;

    }

    else

        printf("tiny6410_button open successfully!\n");

    fcntl(fd, F_SETOWN, getpid());      // 设置设备文件的拥有者为本进程

    flags = fcntl(fd, F_GETFL);         // 读取设备文件的标志符

    fcntl(fd, F_SETFL, flags|FASYNC);   // 设置设备文件的标志符使设备文件支持异步通知模式

    while () {

        sleep();

    }

    close(fd);

    return ;

}
三、驱动程序
static struct fasync_struct* button_async;  // 定义异步驱动结构体

static irqreturn_t buttons_interrupt(int irq, void *dev_id)

{

    ......

    kill_fasync(&button_async, SIGIO, POLL_IN);     // 当有中断发生的时候会发送SIGIO信号到应用程序

    ......

}

int tiny6410_button_fasync (int fd, struct file *file, int on)

{

    return fasync_helper(fd, file, on, &button_async);  //

}

static struct file_operations tiny6410_button_fops = {

    ......

    .fasync   =   tiny6410_button_fasync,

    ......

};
四、fcntl(...)函数的系统调用过程
SYSCALL_DEFINE3(fcntl, unsigned int, fd, unsigned int, cmd, unsigned long, arg)
do_fcntl(fd, cmd, arg, filp);
static long do_fcntl(int fd, unsigned int cmd, unsigned long arg,

        struct file *filp)

{

    long err = -EINVAL;

    switch (cmd) {

        ......

    case F_GETFL:                     //  得到设置的文件标志flag

        err = filp->f_flags;          //  flags = fcntl(fd, F_GETFL)

        break;

    case F_SETFL:                     //  设置文件标志flag

        err = setfl(fd, filp, arg);   //  fcntl(fd, F_SETFL, flags|FASYNC);--->setfl(fd, filp, flags|FASYNC)

        break;

    case F_SETOWN:                    //  设置将接收SIGIO和SIGURG信号的进程id或者进程组ID,进程组ID通过提供提供一个负值的arg来说明arg的绝对值是一个进程组id,负责arg被认为是进程id

        err = f_setown(filp, arg, ); //  fcntl(fd, F_SETOWN, getpid());--->f-setown(filp, pid, 1)

        break;

        ......

    default:

        break;

    }

    return err;

}
4.1 f_setown函数
int f_setown(struct file *filp, unsigned long arg, int force)

{

    enum pid_type type;

    struct pid *pid;

    int who = arg;

    int result;

    type = PIDTYPE_PID;

    if (who < ) {                          // arg < 0 说明传来的 |arg|为组ID

        type = PIDTYPE_PGID;                // arg > 0 说明传来的arg为进程ID

        who = -who;

    }

    rcu_read_lock();

    pid = find_vpid(who);                         //根据传来的arg(pid),找到pid结构体

    result = __f_setown(filp, pid, type, force);  // 根据应用程序的pid结构体、pid的类型、force 的值(force=1),来设置该文件所属的pid

    rcu_read_unlock();

    return result;

}
在f_setown函数中,先根据传入的pid的值找到pid结构体。这里边区分了进程ID还是进程组ID,如过传来的是进程ID,那么arg>0 ,进程ID为arg, pid类型为 PIDTYPE_PID
如果传来的是进程组ID,那么arg<0,进程组ID为|arg|,pid类型为 PIDTYPE_PGID
其次,执行__f_setown,来设置filp->f_owner下边有关pid的参数
4.2 setfl(...)函数
static int setfl(int fd, struct file * filp, unsigned long arg)

{

    struct inode * inode = filp->f_path.dentry->d_inode;

    int error = ;

     ......

    if (((arg ^ filp->f_flags) & FASYNC) && filp->f_op &&

            filp->f_op->fasync) {

        error = filp->f_op->fasync(fd, filp, (arg & FASYNC) != );  //当FASYNC位有变化时会执行到这里,并且当filp->f_op->fasync为真时,会调用到驱动程序的fasync函数

        if (error < )                            // 在本例程中就会调用到 tiny6410_button_fasync(...)函数调用fasync_helper(...) 函数

            goto out;                                               // --->tiny6410_button_fasync(fd, filp, 1)  开启fasync

        if (error > )                                              // --->fasync_helper(fd, filp, 1, &button_async)

            error = ;

    }

    spin_lock(&filp->f_lock);

    filp->f_flags = (arg & SETFL_MASK) | (filp->f_flags & ~SETFL_MASK);

    spin_unlock(&filp->f_lock);

 out:

    return error;

}
可以看到用户程序调用fcntl(fd, F_SETFL, flags|FASYNC),当fasync位有变化时,会调用驱动程序的fasync函数,从而调用fasync_helper(...)函数
五、fasync_helper(...)函数
int fasync_helper(int fd, struct file * filp, int on, struct fasync_struct **fapp)

{

    if (!on)

        return fasync_remove_entry(filp, fapp);

    return fasync_add_entry(fd, filp, fapp);// fasync_add_entry(fd, filp, &button_async

}

static int fasync_add_entry(int fd, struct file *filp, struct fasync_struct **fapp)

{

    struct fasync_struct *new;

    new = fasync_alloc();

    if (!new)

        return -ENOMEM;

    if (fasync_insert_entry(fd, filp, fapp, new)) {

        fasync_free(new);

        return ;

    }

    return ;

}

//  fd文件描述符  filp文件描述结构体指针  fapp:fasync机构体的二级指针   new:新分配的fasync结构体的指针

struct fasync_struct *fasync_insert_entry(int fd, struct file *filp, struct fasync_struct **fapp, struct fasync_struct *new)

{

    struct fasync_struct *fa, **fp;

    spin_lock(&filp->f_lock);

    spin_lock(&fasync_lock);

    for (fp = fapp; (fa = *fp) != NULL; fp = &fa->fa_next) {  //这里fp = fapp   fa = *fp = null   因为定义的struct fasync_struct  * button_fasync = NULL

        if (fa->fa_file != filp)                  //故for循环中的内容是不会执行的

            continue;

        spin_lock_irq(&fa->fa_lock);

        fa->fa_fd = fd;

        spin_unlock_irq(&fa->fa_lock);

        goto out;

    }

    spin_lock_init(&new->fa_lock);

    new->magic = FASYNC_MAGIC;                               // 这里给新分配的fasync_struct 结构体赋值

    new->fa_file = filp;

    new->fa_fd = fd;

    new->fa_next = *fapp;

    rcu_assign_pointer(*fapp, new);

    filp->f_flags |= FASYNC;

out:

    spin_unlock(&fasync_lock);

    spin_unlock(&filp->f_lock);

    return fa;

}
linux 设备驱动与应用程序异步通知的更多相关文章
- Linux设备驱动Hello World程序介绍
自古以来,学习一门新编程语言的第一步就是写一个打印“hello world”的程序(可以看<hello world 集中营>这个帖子供罗列了300个“hello world”程序例子)在本 ...
- Linux设备驱动中的异步通知与异步I/O
异步通知概念: 异步通知的意识是,一旦设备就绪,则主动通知应用程序,这样应用程序根本就不需要查询设备状态,这一点非常类似于硬件上的“中断”概念,比较准确的称谓是“信号驱动的异步IO”,信号是在软件层次 ...
- linux设备驱动归纳总结(三):7.异步通知fasync【转】
本文转载自:http://blog.chinaunix.net/uid-25014876-id-62725.html linux设备驱动归纳总结(三):7.异步通知fasync xxxxxxxxxxx ...
- 【Linux开发】linux设备驱动归纳总结(三):7.异步通知fasync
linux设备驱动归纳总结(三):7.异步通知fasync xxxxxxxxxxxxxxxxxxxxxxxxxxxxxxxxxxxxxxxxxxxxxxxxxxxxxxxxxxxxxxxxxxxxxx ...
- linux设备驱动归纳总结(十二):简单的数码相框【转】
本文转载自:http://blog.chinaunix.net/uid-25014876-id-116926.html linux设备驱动归纳总结(十二):简单的数码相框 xxxxxxxxxxxxxx ...
- Linux 设备驱动 Edition 3
原文网址:http://oss.org.cn/kernel-book/ldd3/index.html Linux 设备驱动 Edition 3 By Jonathan Corbet, Alessand ...
- 《Linux设备驱动开发详解(第2版)》配套视频登录51cto教育频道
http://edu.51cto.com/course/course_id-379-page-1.html http://edu.51cto.com/course/course_id-379-page ...
- Linux设备驱动中的阻塞和非阻塞I/O
[基本概念] 1.阻塞 阻塞操作是指在执行设备操作时,托不能获得资源,则挂起进程直到满足操作所需的条件后再进行操作.被挂起的进程进入休眠状态(不占用cpu资源),从调度器的运行队列转移到等待队列,直到 ...
- linux 设备驱动概述
linux 设备驱动概述 目前,Linux软件工程师大致可分为两个层次: (1)Linux应用软件工程师(Application Software Engineer): 主要利用C库函数和 ...
随机推荐
- Spring Aop(四)——基于Aspectj注解的Advice介绍
转发地址:https://www.iteye.com/blog/elim-2395315 4 基于Aspectj注解的Advice介绍 之前介绍过,Advice一共有五种类型,分别是before.af ...
- dp[2019.5.25]
1.实例计算(写出计算过程): 1)对维数为序列<5, 10, 3, 12, 5, 50, 6>的各矩阵,找出其矩阵链乘积的一个最优加全部括号. 这是一个矩阵连乘问题,基本知识可以参考: ...
- 15-1 shell脚本进阶
shell脚本进阶 循环 循环执行 将某代码段重复运行多次 重复运行多少次 循环次数事先已知 循环次数事先未知 有进入条件和退出条件 for, while, until for循环 for VAR i ...
- AWS物联网解决方案之:如何将设备安全地接入AWS IoT
1 简介 AWS IoT解决方案是一个全托管的云平台,使互联设备可以轻松安全地与云应用程序及其他设备交互.AWS IoT可以支持数十亿太设备和数万亿条消息,并且可以对这些消息进行处理并将其安全可靠地路 ...
- 修改profile导致bash不能用的补救方法
输入这条命令:export PATH=/usr/bin:/usr/sbin:/bin:/sbin:/usr/X11R6/bin 由于shell命令基本都在/usr/bin,/usr/sbin,/bin ...
- JavaSE基础(七)--Java流程控制语句之switch case 语句
Java switch case 语句 switch case 语句判断一个变量与一系列值中某个值是否相等,每个值称为一个分支. 语法 switch case 语句语法格式如下: switch(exp ...
- sysbench配置使用
unzip sysbench-0.5.zipcd sysbench-0.5 #####sysbench下载:https://codeload.github.com/akopytov/sysbench/ ...
- 【LOJ】#2239. 「CQOI2014」危桥
LOJ#2239. 「CQOI2014」危桥 就是先把每条边正着连一条容量为2的边,反着连一条容量为2的边 显然如果只有一个人走的话,答案就是一个源点往起点连一条容量为次数×2的边,终点往汇点连一个次 ...
- Windows Eclipse Scala的入门HelloWorld
[学习笔记] Windows Eclipse Scala的入门HelloWorld 有关带scala版本的eclipse4.7的下载, 你可以直接去: http://scala-ide.org/dow ...
- ORC相关的库介绍和应用
将图像翻译成文字一般被称为光学文字识别(Optical Character Recognition,OCR) OCR库:Pillow.Tesseract.NumPy Pillow Pillow可以对图 ...