ubuntu18.04server系统(cuda11.1)环境下进行mindspore_gpu_1.5版本源码编译
注意:
经过多次尝试发现mindspore_gpu的源码编译必须有sudo权限,否则就会报错。
软硬件环境:
操作系统:Ubuntu18.04.6 (全新系统)
CPU:i7 9700k
GPU: RTX 2060SUPER
相关链接:
https://www.cnblogs.com/devilmaycry812839668/p/15059089.html
https://www.mindspore.cn/news/newschildren?id=401
=====================================================
1. GCC的安装:
下载gcc 7.3.0版本安装包,执行以下命令:
wget http://ftp.gnu.org/gnu/gcc/gcc-7.3.0/gcc-7.3.0.tar.gz
执行tar -xzf gcc-7.3.0.tar.gz解压源码包。
执行cd gcc-7.3.0,进入到源码包目录。
继续下面操作前清空系统内的环境变量:
export LIBRARY_PATH=

export LD_LIBRARY_PATH=

export C_INCLUDE_PATH=

export CPLUS_INCLUDE_PATH=
运行以下命令,进行安装前的配置。
安装依赖环境:
./contrib/download_prerequisites
配置环境:
./configure --enable-bootstrap -enable-threads=posix --enable-checking=release --enable-languages=c,c++ --disable-multilib
编译安装:
make -j8 && sudo make install
2. m4下载并安装
wget https://ftp.gnu.org/gnu/m4/m4-1.4.19.tar.gz
解压:
tar -zxvf m4-1.4.19.tar.gz
配置:
./configure
编译安装
make &&sudo make install
3. 安装gmp 6.1.2
下载gmp 6.1.2源码包:
wget https://gmplib.org/download/gmp/gmp-6.1.2.tar.xz
解压到当前文件夹:
tar -xvf gmp-6.1.2.tar.xz
配置:
./configure --enable-cxx
编译安装:
make && sudo make install
4. openssl 下载并安装:
wget https://www.openssl.org/source/openssl-1.1.1l.tar.gz
解压:
tar -zxvf openssl-1.1.1l.tar.gz
配置:
./config
编译并安装:
make -j8&& sudo make install
配置系统环境: 修改 .bashrc 文件,添加内容:
# openssl
export OPENSSL_ROOT_DIR=/usr/local/lib64
重新载入 .bashrc 文件:
source ~/.bashrc
5. CMAKE的下载并安装
wget https://github.com/Kitware/CMake/releases/download/v3.21.4/cmake-3.21.4.tar.gz
解压:
tar -zxvf cmake-3.21.4.tar.gz
配置:
./configure
编译并安装:
make -j8&& sudo make install
配置系统环境: 修改 .bashrc 文件,添加内容:(为cmake指定调用何处的gcc与g++,否则可能会调用系统中以前版本的gcc与g++)
# CC

export CC=/usr/local/bin/gcc

export CXX=/usr/local/bin/g++
重新载入 .bashrc 文件:
source ~/.bashrc
6. patch 的下载并安装:
wget https://ftp.gnu.org/gnu/patch/patch-2.7.6.tar.gz
解压:
tar -zxvf patch-2.7.6.tar.gz
配置:
./configure
编译并安装:
make -j8&&sudo make install
7. Autoconf下载并安装:
wget https://ftp.gnu.org/gnu/autoconf/autoconf-2.71.tar.gz
解压:
tar -zxvf autoconf-2.71.tar.gz
配置:
./configure
编译并安装:
make -j8&&sudo make install
8. libtool 下载并安装:
wget https://ftpmirror.gnu.org/libtool/libtool-2.4.6.tar.gz
解压:
tar -zxvf libtool-2.4.6.tar.gz
配置:
./configure
编译并安装:
make -j8&&sudo make install
9. automake下载并安装
wget https://ftp.gnu.org/gnu/automake/automake-1.16.5.tar.gz
解压:
tar -zxvf automake-1.16.5.tar.gz
配置:
./configure
编译并安装:
make -j8&&sudo make install
10. flex下载并安装
wget https://github.com/westes/flex/files/981163/flex-2.6.4.tar.gz
解压:
tar -zxvf flex-2.6.4.tar.gz
配置:
./configure
编译并安装:
make -j8&&sudo make install
11. NUMA 下载并安装
wget https://github.com/numactl/numactl/releases/download/v2.0.14/numactl-2.0.14.tar.gz
解压:
tar -zxvf numactl-2.0.14.tar.gz
配置:
./configure
编译并安装:
make -j8&&sudo make install
12. cuda 和 cudnn下载并安装
cuda下载地址:
https://developer.nvidia.com/cuda-11.1.1-download-archive
cudnn下载地址:
https://developer.nvidia.com/rdp/cudnn-archive#a-collapse821-113
cuda安装:
sudo sh ./cuda_11.1.1_455.32.00_linux.run --toolkit --silent
cudnn安装:
解压:
tar -zxvf cudnn-11.3-linux-x64-v8.2.1.32.tgz
复制文件:
sudo cp cuda/include/* /usr/local/cuda-11.1/include
sudo cp cuda/lib64/* /usr/local/cuda-11.1/lib64
配置环境变量:
修改 .bashrc 文件
# cuda && cudnn

export PATH=/usr/local/cuda-11.1/bin:$PATH

export LD_LIBRARY_PATH=/usr/local/cuda-11.1/lib64:$LD_LIBRARY_PATH
重新载入 .bashrc 文件:
source ~/.bashrc
13. nccl的下载并安装:
NCCL的下载地址:
https://developer.nvidia.com/nccl/nccl-download
(注意:下载需要进行会员注册,这里推荐使用微信或QQ登录)
配套CUDA 11.1NCCL 2.7.8版本
安装对应版本的nccl之前请注意:
参考nccl 安装官方手册:
https://docs.nvidia.com/deeplearning/nccl/install-guide/index.html#debian
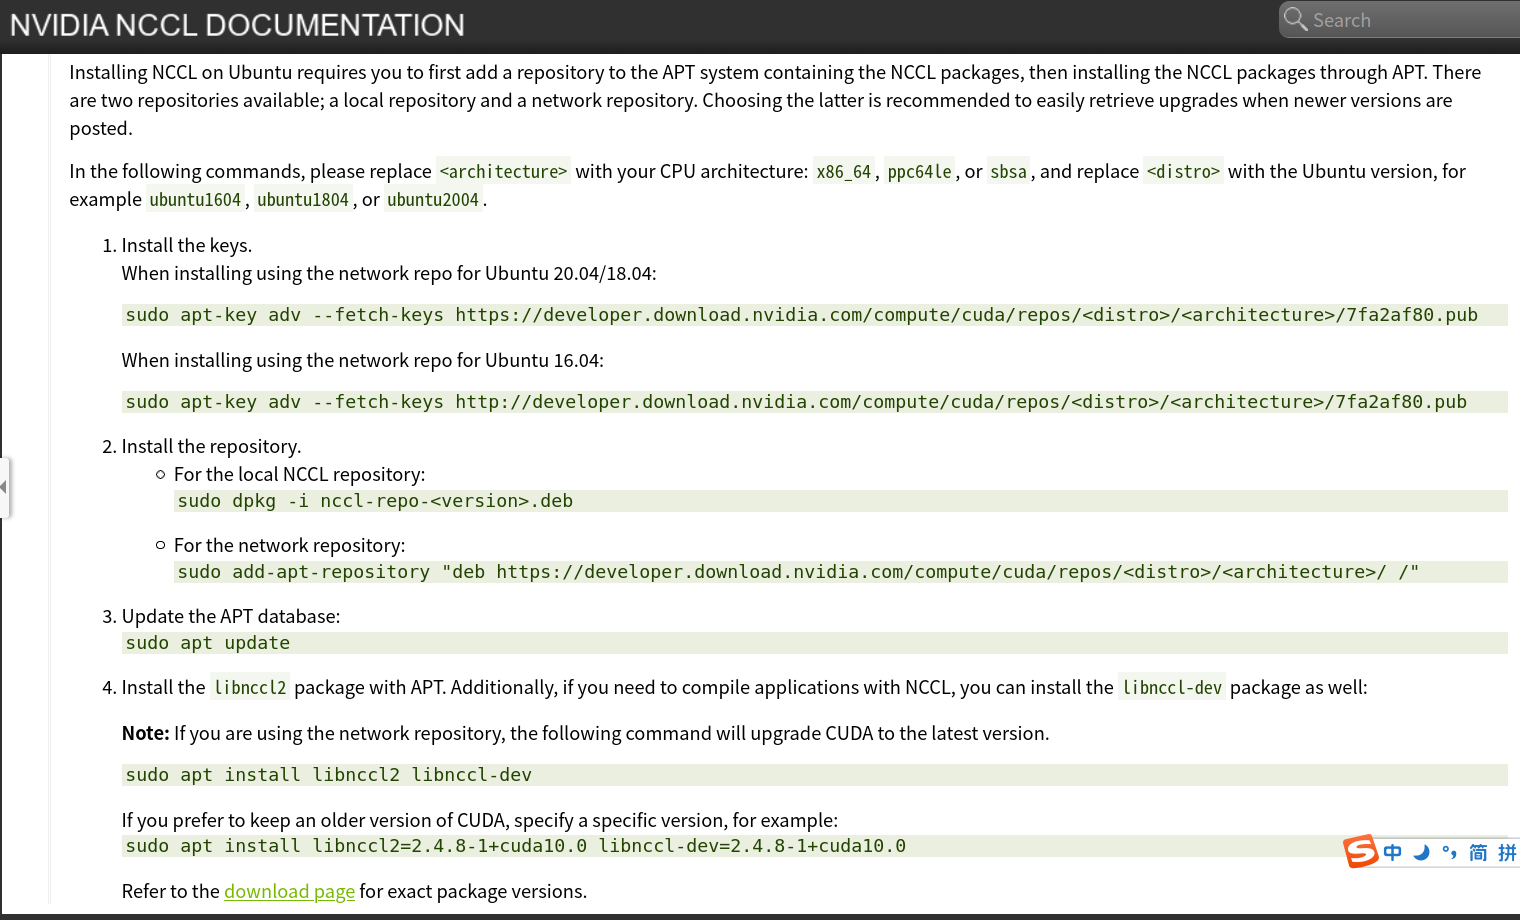
正确的 nccl 安装步骤 ( 本地安装 ):
1. In the following commands, please replace<architecture>with your CPU architecture:x86_64,ppc64le, orsbsa, and replace<distro>with the Ubuntu version, for exampleubuntu1604,ubuntu1804, or ubuntu2004.
根据刚才给出的软硬件平台, <architecture> 为 x86_64 , <distro> 为ubuntu1804 。
于是需执行命令:
sudo apt-key adv --fetch-keys https://developer.download.nvidia.com/compute/cuda/repos/ubuntu1804/x86_64/7fa2af80.pub
2. 下载安装包:

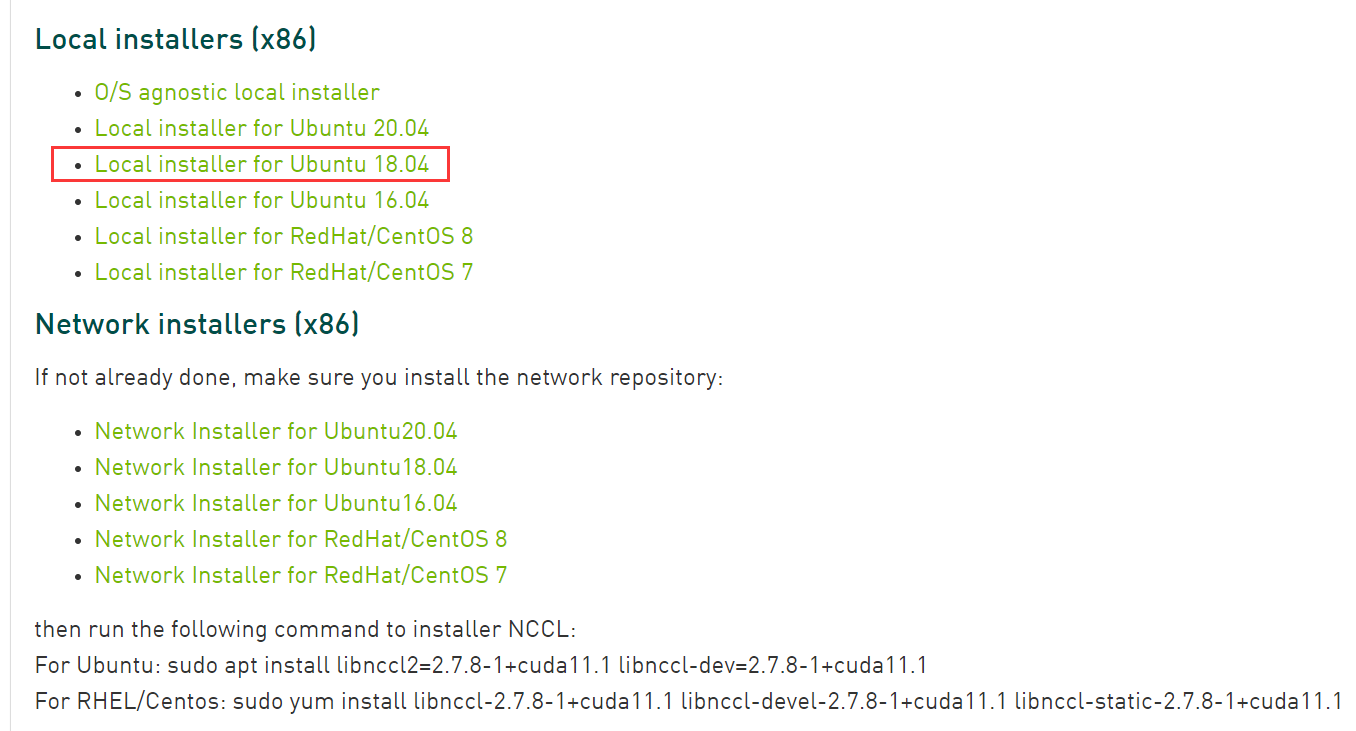
下载地址:
安装刚才下载的 deb 文件:
sudo dpkg -i nccl-repo-ubuntu1804-2.7.8-ga-cuda11.1_1-1_amd64.deb
更新 apt:
sudo apt update
14. python环境配置:
使用conda环境:
conda create -n mindspore python=3.9.0
conda activate mindspore
pip install wheel
15. 下载源码并编译
git clone https://gitee.com/mindspore/mindspore.git -b r1.5
编译:
bash build.sh -e gpu
报错:


================================================

Open MPI autogen: completed successfully.  w00t!

================================================

checking for perl... perl

============================================================================

== Configuring Open MPI

============================================================================

*** Startup tests

checking build system type... x86_64-pc-linux-gnu

checking host system type... x86_64-pc-linux-gnu

checking target system type... x86_64-pc-linux-gnu

checking for gcc... /usr/local/bin/gcc

checking whether the C compiler works... yes

checking for C compiler default output file name... a.out

checking for suffix of executables...

checking whether we are cross compiling... no

checking for suffix of object files... o

checking whether the compiler supports GNU C... yes

checking whether /usr/local/bin/gcc accepts -g... yes

checking for /usr/local/bin/gcc option to enable C11 features... none needed

checking whether /usr/local/bin/gcc understands -c and -o together... yes

checking for stdio.h... yes

checking for stdlib.h... yes

checking for string.h... yes

checking for inttypes.h... yes

checking for stdint.h... yes

checking for strings.h... yes

checking for sys/stat.h... yes

checking for sys/types.h... yes

checking for unistd.h... yes

checking for wchar.h... yes

checking for minix/config.h... no

checking whether it is safe to define __EXTENSIONS__... yes

checking whether _XOPEN_SOURCE should be defined... no

checking for a BSD-compatible install... /usr/bin/install -c

checking whether build environment is sane... yes

checking for a race-free mkdir -p... /bin/mkdir -p

checking for gawk... no

checking for mawk... mawk

checking whether make sets $(MAKE)... yes

checking whether make supports the include directive... yes (GNU style)

checking whether make supports nested variables... yes

checking whether UID '1000' is supported by ustar format... yes

checking whether GID '1000' is supported by ustar format... yes

checking how to create a ustar tar archive... gnutar

checking dependency style of /usr/local/bin/gcc... gcc3

checking whether make supports nested variables... (cached) yes

*** Checking versions

checking for repo version... date2021-10-29

checking Open MPI version... 4.0.3rc4

checking Open MPI release date... Unreleased developer copy

checking Open MPI repository version... date2021-10-29

checking for repo version... date2021-10-29

checking Open MPI Run-Time Environment version... 4.0.3rc4

checking Open MPI Run-Time Environment release date... Unreleased developer copy

checking Open MPI Run-Time Environment repository version... date2021-10-29

checking for repo version... date2021-10-29

checking Open SHMEM version... 4.0.3rc4

checking Open SHMEM release date... Unreleased developer copy

checking Open SHMEM repository version... date2021-10-29

checking for repo version... date2021-10-29

checking Open Portable Access Layer version... 4.0.3rc4

checking Open Portable Access Layer release date... Unreleased developer copy

checking Open Portable Access Layer repository version... date2021-10-29

checking for bootstrap Autoconf version... 2.71

checking for bootstrap Automake version... 1.16

checking for boostrap Libtool version... 2.4.6

*** Initialization, setup

configure: builddir: /home/devil/mindspore_home/mindspore/build/mindspore/_deps/ompi-src

configure: srcdir: /home/devil/mindspore_home/mindspore/build/mindspore/_deps/ompi-src

installing to directory "/home/devil/mindspore_home/mindspore/build/mindspore/.mslib/ompi_5c3adb5c7f9f2bec8b2c191ebfa149e3"

*** OPAL Configuration options

checking if want to run code coverage... no

checking if want to compile with branch probabilities... no

checking if want to debug memory usage... no

checking if want to profile memory usage... no

checking if want developer-level compiler pickyness... no

checking if want developer-level debugging code... no

checking if want to developer-level timing framework... no

checking if want to install project-internal header files... no

checking if want pretty-print stacktrace... yes

checking if want pty support... yes

checking if want weak symbol support... yes

checking if want dlopen support... yes

checking for default value of mca_base_component_show_load_errors... enabled by default

checking if want heterogeneous support... no

checking if word-sized integers must be word-size aligned... no

checking if want IPv6 support... no

checking if want package/brand string... Open MPI devil@NVME Distribution

checking if want ident string... 4.0.3rc4

checking if want to use an alternative checksum algo for messages... no

checking maximum length of processor name... 256

checking maximum length of error string... 256

checking maximum length of object name... 64

checking maximum length of info key... 36

checking maximum length of info val... 256

checking maximum length of port name... 1024

checking maximum length of datarep string... 128

checking if want getpwuid support... yes

checking for zlib in... (default search paths)

checking for zlib.h... no

checking will zlib support be built... no

checking __NetBSD__... no

checking __FreeBSD__... no

checking __OpenBSD__... no

checking __DragonFly__... no

checking __386BSD__... no

checking __bsdi__... no

checking __APPLE__... no

checking __linux__... yes

checking __sun__... no

checking __sun... no

checking for netdb.h... yes

checking for netinet/in.h... yes

checking for netinet/tcp.h... yes

checking for struct sockaddr_in... yes

checking if --with-cuda is set... not set (--with-cuda=)

./configure: line 13028: syntax error near unexpected token `)'

./configure: line 13028: `    )'

CMake Error at cmake/utils.cmake:179 (message):

  error! when ./configure;CXXFLAGS=-D_FORTIFY_SOURCE=2

  -O2;--prefix=/home/devil/mindspore_home/mindspore/build/mindspore/.mslib/ompi_5c3adb5c7f9f2bec8b2c191ebfa149e3

  in /home/devil/mindspore_home/mindspore/build/mindspore/_deps/ompi-src

Call Stack (most recent call first):

  cmake/utils.cmake:393 (__exec_cmd)

  cmake/external_libs/ompi.cmake:10 (mindspore_add_pkg)

  cmake/mind_expression.cmake:42 (include)

  CMakeLists.txt:54 (include)

-- Configuring incomplete, errors occurred!

See also "/home/devil/mindspore_home/mindspore/build/mindspore/CMakeFiles/CMakeOutput.log".

See also "/home/devil/mindspore_home/mindspore/build/mindspore/CMakeFiles/CMakeError.log".
修改方法:
vim cmake/external_libs/ompi.cmake
if(ENABLE_GITEE)

    set(REQ_URL "https://gitee.com/mirrors/ompi/repository/archive/v4.0.3.tar.gz")

    set(MD5 "77865fe49f85c6294416007c5633a448")

else()

    set(REQ_URL "https://github.com/open-mpi/ompi/archive/v4.0.3.tar.gz")

    set(MD5 "86cb724e8fe71741ad3be4e7927928a2")

endif()

set(ompi_CXXFLAGS "-D_FORTIFY_SOURCE=2 -O2")

mindspore_add_pkg(ompi

        VER 4.0.3

        LIBS mpi

        URL ${REQ_URL}

        MD5 ${MD5}

        PRE_CONFIGURE_COMMAND ./autogen.pl

        CONFIGURE_COMMAND ./configure)

include_directories(${ompi_INC})

add_library(mindspore::ompi ALIAS ompi::mpi)
修改为:
if(ENABLE_GITEE)

    set(REQ_URL "https://download.open-mpi.org/release/open-mpi/v4.0/openmpi-4.0.3.tar.gz")

    set(MD5 "f4be54a4358a536ec2cdc694c7200f0b")

else()

    set(REQ_URL "https://download.open-mpi.org/release/open-mpi/v4.0/openmpi-4.0.3.tar.gz")

    set(MD5 "f4be54a4358a536ec2cdc694c7200f0b")

endif()

set(ompi_CXXFLAGS "-D_FORTIFY_SOURCE=2 -O2")

mindspore_add_pkg(ompi

        VER 4.0.3

        LIBS mpi

        URL ${REQ_URL}

        MD5 ${MD5}

        PRE_CONFIGURE_COMMAND ./configure

        CONFIGURE_COMMAND ./configure)

include_directories(${ompi_INC})

add_library(mindspore::ompi ALIAS ompi::mpi)
再次执行编译命令:
bash build.sh -e gpu
成功编译:
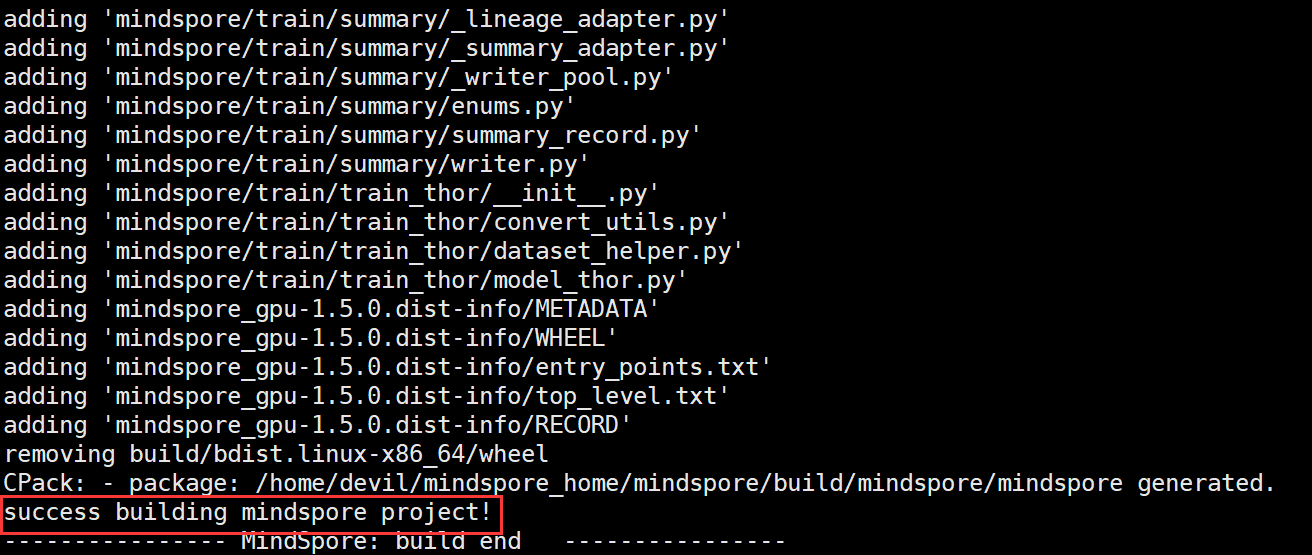
编译完成后生成的MindSpore WHL安装包路径为:
build/package/mindspore_gpu-1.5.0-cp39-cp39-linux_x86_64.whl
将我们编译好的文件拷贝出来,在我们激活的Python环境下进行安装即可:
pip install mindspore_gpu-1.5.0-cp39-cp39-linux_x86_64.whl
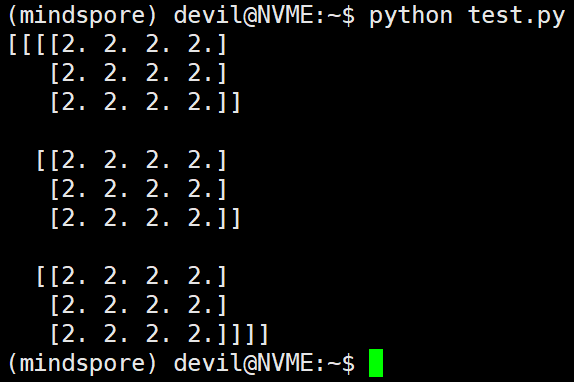
运行官网中的测试代码:
import numpy as np

from mindspore import Tensor

import mindspore.ops as ops

import mindspore.context as context

context.set_context(device_target="GPU")

x = Tensor(np.ones([1,3,3,4]).astype(np.float32))

y = Tensor(np.ones([1,3,3,4]).astype(np.float32))

print(ops.tensor_add(x, y))
成功运行:
=====================================================
特别说明:
本文操作是在使用FQ软件的情况下进行的,因为Github时而连接不通只好翻一下来解决。另外,本文编译是在i7-9700K版本CPU在4.9Ghz频率下进行的,如果CPU不给力可能需要较长时间来进行编译。最重要的一点是由于mindspore源码中编译配置文件存在已久的问题一直没有解决,所以在进行编译之前一定要对默认的编译配置文件进行修改,具体见上面第15步操作。
=====================================================
1. openssl下载并安装:
https://www.openssl.org/source/openssl-1.1.1l.tar.gz
解压:
tar -zxvf openssl-1.1.1l.tar.gz
配置:
./config --prefix=/home/xxxxxx/openssl_1.1.1
编译并安装:
make -j8&& make install
修改系统环境变量:
修改home路径下的.bashrc文件:
# openssl

export OPENSSL_ROOT_DIR=/home/xxxxxx/openssl_1.1.1
重新载入 .bashrc 文件:
source ~/.bashrc
2. cmake下载并安装:
https://github.com/Kitware/CMake/releases/download/v3.22.0-rc1/cmake-3.22.0-rc1.tar.gz
解压:
tar -zxvf cmake-3.22.0-rc1.tar.gz
配置:
./configure --prefix=/home/xxxxxx/cmake_3.22
编译并安装:
make -j8&& make install
重新载入 .bashrc 文件:
source ~/.bashrc
3. patch 的下载并安装:
wget https://ftp.gnu.org/gnu/patch/patch-2.7.6.tar.gz
解压:
tar -zxvf patch-2.7.6.tar.gz
配置:
./configure --prefix=/home/xxxxxx/patch_2.7.6
编译并安装:
make -j8&& make install
配置系统环境:
修改 ~/.bashrc 文件,添加内容:
# patch

export PATH=/home/xxxxxx/patch_2.7.6/bin:$PATH
重新载入 .bashrc 文件:
source ~/.bashrc
4. m4下载并安装:
https://ftp.gnu.org/gnu/m4/m4-1.4.19.tar.gz
解压:
tar -zxvf m4-1.4.19.tar.gz
配置:
./configure --prefix=/home/xxxxxx/m4_1.4.19
编译并安装:
make -j8&& make install
配置系统环境变量:
修改 .bashrc 文件,添加内容:
# m4

export PATH=/home/xxxxxx/m4_1.4.19/bin:$PATH
重新载入 .bashrc 文件:
source ~/.bashrc
5. gmp 6.2.1下载并安装
https://gmplib.org/download/gmp/gmp-6.2.1.tar.xz
解压:
tar -xvf gmp-6.2.1.tar.xz
配置:
./configure --prefix=/home/xxxxxx/gmp_6.2.1/ --enable-cxx
编译并安装:
make -j8&& make install
配置系统环境变量:
修改 .bashrc 文件,添加内容:
# gmp

export LIBRARY_PATH=/home/xxxxxx/gmp_6.2.1/lib:$LIBRARY_PATH

export LD_LIBRARY_PATH=/home/xxxxxx/gmp_6.2.1/lib:$LD_LIBRARY_PATH

export C_INCLUDE_PATH=/home/xxxxxx/gmp_6.2.1/include:$C_INCLUDE_PATH

export CPLUS_INCLUDE_PATH=$C_INCLUDE_PATH:$CPLUS_INCLUDE_PATH
重新载入 .bashrc 文件:
source ~/.bashrc
测试 gmp 是否安装并配置成功:(声明:测试部分内容源于:https://blog.csdn.net/just_h/article/details/82667787)
代码:
# test.cpp 文件
#include <gmpxx.h>

#include <iostream>

#include <stdio.h>

using namespace std;

int main()

{

        mpz_t a,b,c;

        mpz_init(a);

        mpz_init(b);

        mpz_init(c);

        gmp_scanf("%Zd%Zd",a,b);

        mpz_add(c,a,b);

        gmp_printf("c= %Zd\n",c);

        return 0;

}
编译:
g++ test.cpp -o test -lgmp
运行:

6. Autoconf下载并安装:
https://ftp.gnu.org/gnu/autoconf/autoconf-2.71.tar.gz
解压:
tar -zxvf autoconf-2.71.tar.gz
配置:
./configure --prefix=/home/xxxxxx/autoconf_2.71
编译并安装:
make -j8&& make install
配置系统环境:
修改 ~/.bashrc 文件,添加内容:
# autoconf

export PATH=/home/xxxxxx/autoconf_2.71/bin:$PATH
重新载入 .bashrc 文件:
source ~/.bashrc
7. libtool 下载并安装:
https://ftpmirror.gnu.org/libtool/libtool-2.4.6.tar.gz
解压:
tar -zxvf libtool-2.4.6.tar.gz
配置:
./configure --prefix=/home/xxxxxx/libtool_2.4.6
编译并安装:
make -j8&& make install
配置系统环境:
修改 ~/.bashrc 文件,添加内容:
# libtool

export PATH=/home/xxxxxx/libtool_2.4.6/bin:$PATH
重新载入 .bashrc 文件:
source ~/.bashrc
8. automake下载并安装
https://ftp.gnu.org/gnu/automake/automake-1.16.5.tar.gz
解压:
tar -zxvf automake-1.16.5.tar.gz
配置:
./configure --prefix=/home/xxxxxx/automake_1.16.5
编译并安装:
make -j8&& make install
配置系统环境:
修改 ~/.bashrc 文件,添加内容:
# automake

export PATH=/home/xxxxxx/automake_1.16.5/bin:$PATH
重新载入 .bashrc 文件:
source ~/.bashrc
9. flex下载并安装
https://github.com/westes/flex/files/981163/flex-2.6.4.tar.gz
解压:
tar -zxvf flex-2.6.4.tar.gz
配置:(参考:https://blog.csdn.net/weixin_39921087/article/details/110659552)
./configure --prefix=/home/xxxxxx/flex_2.6.4 CFLAGS=-D_GNU_SOURCE
编译并安装:
make -j8&& make install
修改系统环境,修改 .bashrc文件,添加内容:
# flex

export PATH=/home/xxxxxx/flex_2.6.4/bin:$PATH

export LIBRARY_PATH=/home/xxxxxx/flex_2.6.4/lib:$LIBRARY_PATH

export LD_LIBRARY_PATH=/home/xxxxxx/flex_2.6.4/lib:$LD_LIBRARY_PATH

export C_INCLUDE_PATH=/home/xxxxxx/flex_2.6.4/include:$C_INCLUDE_PATH

export CPLUS_INCLUDE_PATH=$C_INCLUDE_PATH:$CPLUS_INCLUDE_PATH
重新载入 .bashrc 文件:
source ~/.bashrc
10. NUMA 下载并安装
https://github.com/numactl/numactl/releases/download/v2.0.14/numactl-2.0.14.tar.gz
解压:
tar -zxvf numactl-2.0.14.tar.gz
配置:
./configure --prefix=/home/xxxxxx/numactl_2.0.14
编译并安装:
make -j8&& make install
修改系统环境,修改 .bashrc文件,添加内容:
# numa

export PATH=/home/xxxxxx/numactl_2.0.14/bin:$PATH

export LIBRARY_PATH=/home/xxxxxx/numactl_2.0.14/lib:$LIBRARY_PATH

export LD_LIBRARY_PATH=/home/xxxxxx/numactl_2.0.14/lib:$LD_LIBRARY_PATH

export C_INCLUDE_PATH=/home/xxxxxx/numactl_2.0.14/include:$C_INCLUDE_PATH

export CPLUS_INCLUDE_PATH=$C_INCLUDE_PATH:$CPLUS_INCLUDE_PATH
重新载入 .bashrc 文件:
source ~/.bashrc
ubuntu18.04server系统(cuda11.1)环境下进行mindspore_gpu_1.5版本源码编译的更多相关文章
- iOS系统提供开发环境下命令行编译工具:xcodebuild
iOS系统提供开发环境下命令行编译工具:xcodebuild[3] xcodebuild 在介绍xcodebuild之前,需要先弄清楚一些在XCode环境下的一些概念[4]: Workspace:简单 ...
- Win7系统64位环境下使用Apache——安装Apache2.4时报错“Invalid command Order”问题的解决
之前在文章Win7系统64位环境下使用Apache--Apache2.4整合Tomcat与mod_jk提到了安装Apache2.4时有可能报错: Invalid command 'Order', pe ...
- Win7系统64位环境下使用Apache——Apache2.4整合Tomcat与mod_jk
转载请注明出处:http://blog.csdn.net/dongdong9223/article/details/70398091 本文出自[我是干勾鱼的博客] 之前的几篇文章: Win7系统64位 ...
- Win7系统64位环境下使用Apache——下载mod_jk
转载请注明出处:http://blog.csdn.net/dongdong9223/article/details/70313329 本文出自[我是干勾鱼的博客] 之前在几篇文章: Win7系统64位 ...
- Win7系统64位环境下使用Apache——Apache2.4版本安装及卸载
转载请注明出处:http://blog.csdn.net/dongdong9223/article/details/70255992 本文出自[我是干勾鱼的博客] 之前在Win7系统64位环境下使用A ...
- Ubuntu 14.04 LTS 下 android 2.3.5 源码编译过程
Ubuntu 14.04 LTS 下 android 2.3.5 源码编译过程 在新的Ubuntu 64位系统下去编译早期的安卓源码是会出现很多问题的,因为64位系统在安装完成后,很多32位的兼容 ...
- 麒麟系统开发笔记(三):从Qt源码编译安装之编译安装Qt5.12
前言 上一篇,是使用Qt提供的安装包安装的,有些场景需要使用到从源码编译的Qt,所以本篇如何在银河麒麟系统V4上编译Qt5.12源码. 银河麒麟V4版本 系统版本: Qt源码下载 ...
- Ubuntu 环境 TensorFlow (最新版1.4) 源码编译、安装
Ubuntu 环境 TensorFlow 源码编译安装 基于(Ubuntu 14.04LTS/Ubuntu 16.04LTS/) 一.编译环境 1) 安装 pip sudo apt-get insta ...
- Spark环境搭建(六)-----------sprk源码编译
想要搭建自己的Hadoop和spark集群,尤其是在生产环境中,下载官网提供的安装包远远不够的,必须要自己源码编译spark才行. 环境准备: 1,Maven环境搭建,版本Apache Maven 3 ...
- Linux下安装mysql(yum和源码编译两种方式)
这里介绍Linux下两种安装mysql的方式:yum安装和源码编译安装. 1. yum安装 (1)首先查看centos自带的mysql是否被安装: # yum list installed |grep ...
随机推荐
- 动态生成的 select option 无法选中,设置值
使用jQuery的 .val('22') 给select 设置值时不生效. 原因:select是动态生成的,在DOM还没生成完之前就调用了.val('22'). 解决方法:动态生成的ajax请求改成同 ...
- FlashDuty Changelog 2023-10-30 | 告警路由与 Slack 应用
FlashDuty:一站式告警响应平台,前往此地址免费体验! 告警路由 什么是告警路由? FlashDuty已经与Zabbix.Prometheus等监控系统实现无缝集成,通过一个简单的webhook ...
- 【前端求助帖】关于使用element-plus select 模板嵌套popover中使用select选择后,上一个select自动关闭的问题
主页代码如下 项目使用的是Vue3+vite, 下载后,直接pnpm i安装依赖, pnpm dev 就是可以跑起来 <el-button type="warning" ...
- gson转换对象对字段别名处理@SerializedName注解demo
/** * */ package json; import java.util.Date; import java.util.Objects; import com.autoyol.platformf ...
- 部署jar项目服务命令
部署jar项目服务命令首先使用jenkins打包jar history | grep java 查看ps aux | grep 服务关键字关闭进程,否则启动的时候报错:java.net.BindExc ...
- Golang基于Mysql分布式锁实现集群主备
背景 集群中如果需要主备,可以基于Redis.zk的分布式锁等实现,本文将介绍如何利用Mysql分布式锁进行实现. 原理 数据库中包含数据字段(此处为Master的主机名).版本号和上一次更新时间. ...
- python 第一次主要是if while 奇偶数的练习
例如输出1-10的数字,但是7除外. a=1 while a < 11: if a == 7: pass else: print(a) a=a+1 输出1-100所以的偶数 a=1 while ...
- 『vulnhub系列』HMS-1
『vulnhub系列』HMS?-1 下载地址: https://www.vulnhub.com/entry/hms-1,728/ 信息搜集: 使用nmap进行存活主机探测,发现开启了21端口(ftp) ...
- 3.8折年终钜惠,RK3568J国产工业评估板
3.8折年终钜惠,RK3568J国产工业评估板活动火热进行中,错过等一年! -核心板国产化率100%,提供报告-瑞芯微四核ARM Cortex-A55@1.8GHz-4K视频解码.1080P视频编码. ...
- 详解Web应用安全系列(7)使用具有已知漏洞的组件
使用具有已知漏洞的组件,这种安全漏洞普遍存在,基于组件开发的模式使得多数开发团队根本不了解其应用或API中使用的组件,更谈不上及时更新这些组件了. 下面就分别以.NET和Java各分享一个案例. .N ...