Python3 简单验证码识别思路及实例
1、介绍
在爬虫中经常会遇到验证码识别的问题,现在的验证码大多分计算验证码、滑块验证码、识图验证码、语音验证码等四种。本文就是识图验证码,识别的是简单的验证码,要想让识别率更高,
识别的更加准确就需要花很多的精力去训练自己的字体库。
识别验证码通常是这几个步骤:
1、灰度处理
2、二值化
3、去除边框(如果有的话)
4、降噪
5、切割字符或者倾斜度矫正
6、训练字体库
7、识别
这6个步骤中前三个步骤是基本的,4或者5可根据实际情况选择是否需要。
经常用的库有pytesseract(识别库)、OpenCV(高级图像处理库)、imagehash(图片哈希值库)、numpy(开源的、高性能的Python数值计算库)、 PIL的 Image,
ImageDraw,ImageFile等。
2、实例
以某网站登录的验证码识别为例:具体过程和上述的步骤稍有不同。

首先分析一下,验证码是由4个从0到9等10个数字组成的,那么从0到9这个10个数字没有数字只有第一、第二、第三和第四等4个位置。那么计算下来共有40个数字位置,如下:


那么接下来就要对验证码图片进行降噪、分隔得到上面的图片。以这40个图片集作为基础。
对要验证的验证码图片进行降噪、分隔后获取四个类似上面的数字图片、通过和上面的比对就可以知道该验证码是什么了。
以上面验证码2837为例:
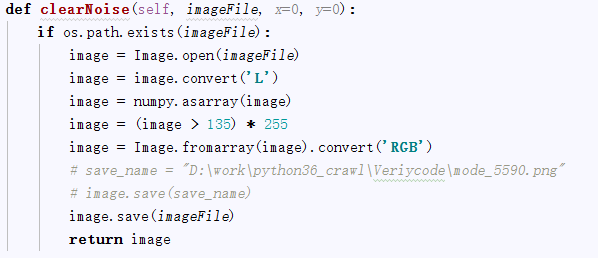
1、图片降噪

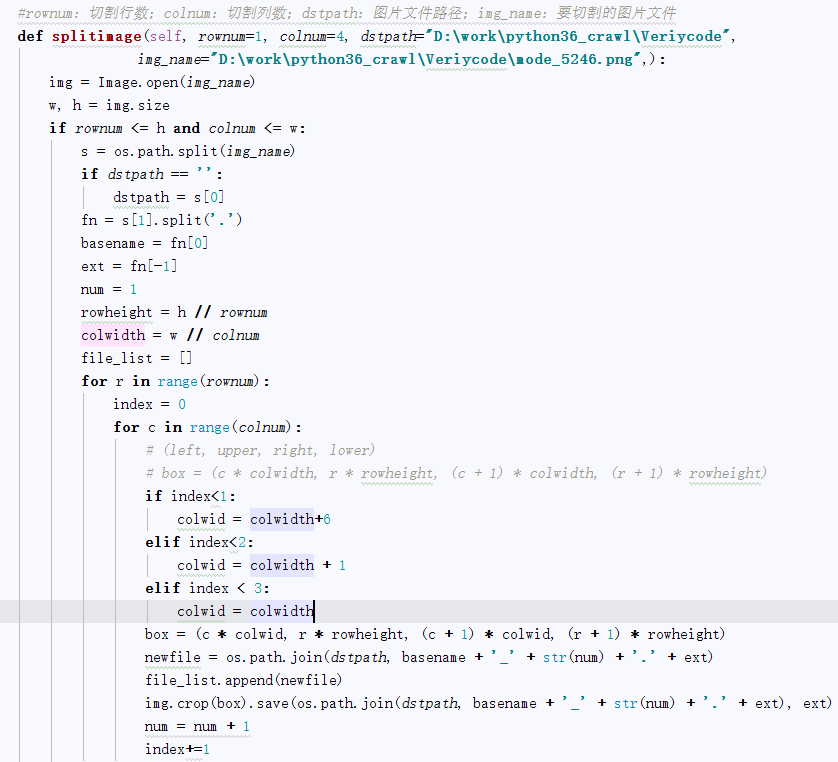
2、图片分隔

3、图片比对
通过比验证码降噪、分隔后的四个数字图片,和上面的40个数字图片进行哈希值比对,设置一个误差,max_dif: 允许最大hash差值, 越小越精确,最小为0

这样四个数字图片通过比较后获取对应是数字,连起来,就是要获取的验证码。
完整代码如下:
- #coding=utf-8
- import os
- import re
- from selenium import webdriver
- from selenium.webdriver.common.keys import Keys
- import time
- from selenium.webdriver.common.action_chains import ActionChains
- import collections
- import mongoDbBase
- import numpy
- import imagehash
- from PIL import Image,ImageFile
- import datetime
- class finalNews_IE:
- def __init__(self,strdate,logonUrl,firstUrl,keyword_list,exportPath,codepath,codedir):
- self.iniDriver()
- self.db = mongoDbBase.mongoDbBase()
- self.date = strdate
- self.firstUrl = firstUrl
- self.logonUrl = logonUrl
- self.keyword_list = keyword_list
- self.exportPath = exportPath
- self.codedir = codedir
- self.hash_code_dict ={}
- for f in range(0,10):
- for l in range(1,5):
- file = os.path.join(codedir, "codeLibrary\code" + str(f) + '_'+str(l) + ".png")
- # print(file)
- hash = self.get_ImageHash(file)
- self.hash_code_dict[hash]= str(f)
- def iniDriver(self):
- # 通过配置文件获取IEDriverServer.exe路径
- IEDriverServer = "C:\Program Files\Internet Explorer\IEDriverServer.exe"
- os.environ["webdriver.ie.driver"] = IEDriverServer
- self.driver = webdriver.Ie(IEDriverServer)
- def WriteData(self, message, fileName):
- fileName = os.path.join(os.getcwd(), self.exportPath + '/' + fileName)
- with open(fileName, 'a') as f:
- f.write(message)
- # 获取图片文件的hash值
- def get_ImageHash(self,imagefile):
- hash = None
- if os.path.exists(imagefile):
- with open(imagefile, 'rb') as fp:
- hash = imagehash.average_hash(Image.open(fp))
- return hash
- # 点降噪
- def clearNoise(self, imageFile, x=0, y=0):
- if os.path.exists(imageFile):
- image = Image.open(imageFile)
- image = image.convert('L')
- image = numpy.asarray(image)
- image = (image > 135) * 255
- image = Image.fromarray(image).convert('RGB')
- # save_name = "D:\work\python36_crawl\Veriycode\mode_5590.png"
- # image.save(save_name)
- image.save(imageFile)
- return image
- #切割验证码
- # rownum:切割行数;colnum:切割列数;dstpath:图片文件路径;img_name:要切割的图片文件
- def splitimage(self, imagePath,imageFile,rownum=1, colnum=4):
- img = Image.open(imageFile)
- w, h = img.size
- if rownum <= h and colnum <= w:
- print('Original image info: %sx%s, %s, %s' % (w, h, img.format, img.mode))
- print('开始处理图片切割, 请稍候...')
- s = os.path.split(imageFile)
- if imagePath == '':
- dstpath = s[0]
- fn = s[1].split('.')
- basename = fn[0]
- ext = fn[-1]
- num = 1
- rowheight = h // rownum
- colwidth = w // colnum
- file_list =[]
- for r in range(rownum):
- index = 0
- for c in range(colnum):
- # (left, upper, right, lower)
- # box = (c * colwidth, r * rowheight, (c + 1) * colwidth, (r + 1) * rowheight)
- if index < 1:
- colwid = colwidth + 6
- elif index < 2:
- colwid = colwidth + 1
- elif index < 3:
- colwid = colwidth
- box = (c * colwid, r * rowheight, (c + 1) * colwid, (r + 1) * rowheight)
- newfile = os.path.join(imagePath, basename + '_' + str(num) + '.' + ext)
- file_list.append(newfile)
- img.crop(box).save(newfile, ext)
- num = num + 1
- index += 1
- return file_list
- def compare_image_with_hash(self, image_hash1,image_hash2, max_dif=0):
- """
- max_dif: 允许最大hash差值, 越小越精确,最小为0
- 推荐使用
- """
- dif = image_hash1 - image_hash2
- # print(dif)
- if dif < 0:
- dif = -dif
- if dif <= max_dif:
- return True
- else:
- return False
- # 截取验证码图片
- def savePicture(self):
- self.driver.get(self.logonUrl)
- self.driver.maximize_window()
- time.sleep(1)
- self.driver.save_screenshot(self.codedir +"\Temp.png")
- checkcode = self.driver.find_element_by_id("checkcode")
- location = checkcode.location # 获取验证码x,y轴坐标
- size = checkcode.size # 获取验证码的长宽
- rangle = (int(location['x']), int(location['y']), int(location['x'] + size['width']),
- int(location['y'] + size['height'])) # 写成我们需要截取的位置坐标
- i = Image.open(self.codedir +"\Temp.png") # 打开截图
- result = i.crop(rangle) # 使用Image的crop函数,从截图中再次截取我们需要的区域
- filename = datetime.datetime.now().strftime("%M%S")
- filename =self.codedir +"\Temp_code.png"
- result.save(filename)
- self.clearNoise(filename)
- file_list = self.splitimage(self.codedir,filename)
- verycode =''
- for f in file_list:
- imageHash = self.get_ImageHash(f)
- for h,code in self.hash_code_dict.items():
- flag = self.compare_image_with_hash(imageHash,h,0)
- if flag:
- # print(code)
- verycode+=code
- break
- print(verycode)
- self.driver.close()
- def longon(self):
- self.driver.get(self.logonUrl)
- self.driver.maximize_window()
- time.sleep(1)
- self.savePicture()
- accname = self.driver.find_element_by_id("username")
- # accname = self.driver.find_element_by_id("//input[@id='username']")
- accname.send_keys('ctrchina')
- accpwd = self.driver.find_element_by_id("password")
- # accpwd.send_keys('123456')
- code = self.getVerycode()
- checkcode = self.driver.find_element_by_name("checkcode")
- checkcode.send_keys(code)
- submit = self.driver.find_element_by_name("button")
- submit.click()
Python3 简单验证码识别思路及实例的更多相关文章
- 简单验证码识别(matlab)
简单验证码识别(matlab) 验证码识别, matlab 昨天晚上一个朋友给我发了一些验证码的图片,希望能有一个自动识别的程序. 1474529971027.jpg 我看了看这些样本,发现都是很规则 ...
- 开发工具类API调用的代码示例合集:六位图片验证码生成、四位图片验证码生成、简单验证码识别等
以下示例代码适用于 www.apishop.net 网站下的API,使用本文提及的接口调用代码示例前,您需要先申请相应的API服务. 六位图片验证码生成:包括纯数字.小写字母.大写字母.大小写混合.数 ...
- HNUSTOJ-1696 简单验证码识别(模拟)
1696: 简单验证码识别 时间限制: 2 Sec 内存限制: 128 MB 提交: 148 解决: 44 [提交][状态][讨论版] 题目描述 验证码是Web系统中一种防止暴力破解的重要手段.其 ...
- 基于TensorFlow的简单验证码识别
TensorFlow 可以用来实现验证码识别的过程,这里识别的验证码是图形验证码,首先用标注好的数据来训练一个模型,然后再用模型来实现这个验证码的识别. 生成验证码 首先生成验证码,这里使用 Pyth ...
- windows下简单验证码识别——完美验证码识别系统
此文已由作者徐迪授权网易云社区发布. 欢迎访问网易云社区,了解更多网易技术产品运营经验. 讲到验证码识别,大家第一个可能想到tesseract.诚然,对于OCR而言,tesseract确实很强大,自带 ...
- python简单验证码识别
在学习python通过接口自动登录网站时,用户名密码.cookies.headers都好解决但是在碰到验证码这个时就有点棘手了:于是通过网上看贴,看官网完成了对简单验证码的识别,如果是复杂的请看大神的 ...
- python3.7验证码识别MuggleOCR,为什么总是报错
先来看看MuggleOCR简介(白嫖)这是一个为麻瓜设计的本地OCR模块只需要简单几步操作即可拥有两大通用识别模块,让你在工作中畅通无阻. 这套模型是基于 https://github.com/ker ...
- python3图片验证码识别
http://my.cnki.net/elibregister/CheckCode.aspx每次刷新该网页可以得到新的验证码进行测试 以我本次查看的验证码图片为例,右键保存图片为image.jpg 下 ...
- 简单验证码识别 tessnet2
今天突然间对识别验证码感兴趣,于是网上搜了一下 最简单的是引用tessnet2.dll,然后通过它来识别,代码如下 private void button1_Click(object sender, ...
随机推荐
- java集合系列之LinkList
概要 第1部分 LinkedList介绍第2部分 LinkedList数据结构第3部分 LinkedList源码解析(基于JDK1.6.0_45) 第5部分 LinkedList示例 转载请注明出处 ...
- bzoj 1171 并查集优化顺序枚举 | 线段树套单调队列
详见vfleaking在discuss里的题解. 收获: 当我们要顺序枚举一个序列,并且跳过某些元素,那么我们可以用并查集将要跳过的元素合并到一起,这样当一长串元素需要跳过时,可以O(1)跳过. 暴力 ...
- 喵哈哈村的魔法考试 Round #2 (Div.2) 题解
喵哈哈村的魔法考试 Round #2 (Div.2) 题解 A.喵哈哈村的战争 题解: 这道题就是for一遍,统计每个村子的战斗力的和,然后统计哪个村子的战斗力和大一点就好了. 唯一的坑点,就是这道题 ...
- What is OpenOCD?
About OpenOCD was created by Dominic Rath as part of a 2005 diploma thesis written at the University ...
- git 拉取和获取 pull 和 fetch 区别
使用Git 直接提交的话 直接 push 获取最新版本 有两种 拉取 和 获取 pull 和 fetch git pull 从远程拉取最新版本 到本地 自动合并 merge ...
- 虫趣:BAD POOL CALLER (par1: 0x20)
[作者:张佩] [原文:http://www.yiiyee.cn/Blog/0x19-1/] 内核在管理内存的时候,为了提高内存使用效率,对于小片内存的申请(小于一个PAGE大小),都是通过内存池来操 ...
- STM32F103 TIM3定时器初始化程序
//TIM3 分频 #define TIM3_DIV1 (1-1) #define TIM3_DIV18 (18-1) #define TIM3_DIV72 (72-1) //************ ...
- android在代码中四种设置控件背景颜色的方法(包含RGB)
转载请注明出处: http://blog.csdn.net/fth826595345/article/details/9208771 TextView tText=(TextView) findVi ...
- Revit API移动风管
移动风管曲线就可以移动风管 , , ));//向上移动3 ts.Commit(); return Result.Succeeded; } } url:http: ...
- PostgreSQL学习手册(目录)
原文地址:http://www.cnblogs.com/stephen-liu74/archive/2012/06/08/2315679.html 事实上之前有很长一段时间都在纠结是否有必要好好学习它 ...