1.9TF的过拟合-dropout
不带dropout程序并通过tensorboard查看loss的图像
"""

Please note, this code is only for python 3+. If you are using python 2+, please modify the code accordingly.

"""

from __future__ import print_function

import tensorflow as tf

from sklearn.datasets import load_digits

from sklearn.cross_validation import train_test_split

from sklearn.preprocessing import LabelBinarizer

# load data

digits = load_digits()

X = digits.data

y = digits.target

y = LabelBinarizer().fit_transform(y)

X_train, X_test, y_train, y_test = train_test_split(X, y, test_size=.3)

def add_layer(inputs, in_size, out_size, layer_name, activation_function=None, ):

    # add one more layer and return the output of this layer

    Weights = tf.Variable(tf.random_normal([in_size, out_size]))

    biases = tf.Variable(tf.zeros([1, out_size]) + 0.1, )

    Wx_plus_b = tf.matmul(inputs, Weights) + biases

    # here to dropout

    if activation_function is None:

        outputs = Wx_plus_b

    else:

        outputs = activation_function(Wx_plus_b, )

    tf.summary.histogram(layer_name + '/outputs', outputs)

    return outputs

# define placeholder for inputs to network

xs = tf.placeholder(tf.float32, [None, 64])  # 8x8

ys = tf.placeholder(tf.float32, [None, 10])

# add output layer

l1 = add_layer(xs, 64, 50, 'l1', activation_function=tf.nn.tanh)

prediction = add_layer(l1, 50, 10, 'l2', activation_function=tf.nn.softmax)

# the loss between prediction and real data

cross_entropy = tf.reduce_mean(-tf.reduce_sum(ys * tf.log(prediction),

                                              reduction_indices=[1]))  # loss

tf.summary.scalar('loss', cross_entropy)

train_step = tf.train.GradientDescentOptimizer(0.5).minimize(cross_entropy)

sess = tf.Session()

merged = tf.summary.merge_all()

# summary writer goes in here

train_writer = tf.summary.FileWriter("logs/train", sess.graph)

test_writer = tf.summary.FileWriter("logs/test", sess.graph)

# tf.initialize_all_variables() no long valid from

# 2017-03-02 if using tensorflow >= 0.12

if int((tf.__version__).split('.')[1]) < 12 and int((tf.__version__).split('.')[0]) < 1:

    init = tf.initialize_all_variables()

else:

    init = tf.global_variables_initializer()

sess.run(init)

for i in range(500):

    # here to determine the keeping probability

    sess.run(train_step, feed_dict={xs: X_train, ys: y_train})

    if i % 50 == 0:

        # record loss

        train_result = sess.run(merged, feed_dict={xs: X_train, ys: y_train})

        test_result = sess.run(merged, feed_dict={xs: X_test, ys: y_test})

        train_writer.add_summary(train_result, i)

        test_writer.add_summary(test_result, i)
执行完之后在执行目录之下有一个log目录生成了对应的tensorboard显示文件
使用 tensorboard --logdir="logs/" --port=8011 即可在浏览器访问
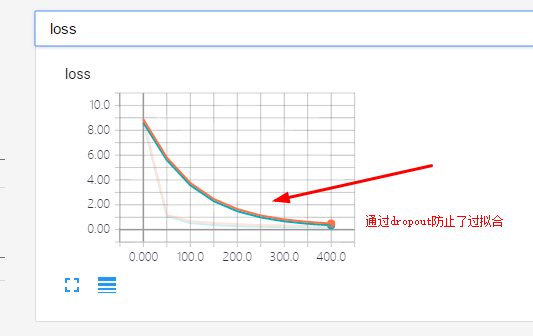
带有dropout的程序并通过tensoeboard生成loss图像观察
"""

Please note, this code is only for python 3+. If you are using python 2+, please modify the code accordingly.

"""

from __future__ import print_function

import tensorflow as tf

from sklearn.datasets import load_digits

from sklearn.cross_validation import train_test_split

from sklearn.preprocessing import LabelBinarizer

# load data

digits = load_digits()

X = digits.data

y = digits.target

y = LabelBinarizer().fit_transform(y)

X_train, X_test, y_train, y_test = train_test_split(X, y, test_size=.3)

def add_layer(inputs, in_size, out_size, layer_name, activation_function=None, ):

    # add one more layer and return the output of this layer

    Weights = tf.Variable(tf.random_normal([in_size, out_size]))

    biases = tf.Variable(tf.zeros([1, out_size]) + 0.1, )

    Wx_plus_b = tf.matmul(inputs, Weights) + biases

    # here to dropout

    Wx_plus_b = tf.nn.dropout(Wx_plus_b, keep_prob)

    if activation_function is None:

        outputs = Wx_plus_b

    else:

        outputs = activation_function(Wx_plus_b, )

    tf.summary.histogram(layer_name + '/outputs', outputs)

    return outputs

# define placeholder for inputs to network

keep_prob = tf.placeholder(tf.float32)  #dropout

xs = tf.placeholder(tf.float32, [None, 64])  # 8x8

ys = tf.placeholder(tf.float32, [None, 10])

# add output layer

l1 = add_layer(xs, 64, 50, 'l1', activation_function=tf.nn.tanh)

prediction = add_layer(l1, 50, 10, 'l2', activation_function=tf.nn.softmax)

# the loss between prediction and real data

cross_entropy = tf.reduce_mean(-tf.reduce_sum(ys * tf.log(prediction),

                                              reduction_indices=[1]))  # loss

tf.summary.scalar('loss', cross_entropy)

train_step = tf.train.GradientDescentOptimizer(0.5).minimize(cross_entropy)

sess = tf.Session()

merged = tf.summary.merge_all()

# summary writer goes in here

train_writer = tf.summary.FileWriter("logs/train", sess.graph)

test_writer = tf.summary.FileWriter("logs/test", sess.graph)

# tf.initialize_all_variables() no long valid from

# 2017-03-02 if using tensorflow >= 0.12

if int((tf.__version__).split('.')[1]) < 12 and int((tf.__version__).split('.')[0]) < 1:

    init = tf.initialize_all_variables()

else:

    init = tf.global_variables_initializer()

sess.run(init)

for i in range(500):

    # here to determine the keeping probability

    sess.run(train_step, feed_dict={xs: X_train, ys: y_train, keep_prob: 0.5})

    if i % 50 == 0:

        # record loss

        train_result = sess.run(merged, feed_dict={xs: X_train, ys: y_train, keep_prob: 1})

        test_result = sess.run(merged, feed_dict={xs: X_test, ys: y_test, keep_prob: 1})

        train_writer.add_summary(train_result, i)

        test_writer.add_summary(test_result, i)
图片显示:
1.9TF的过拟合-dropout的更多相关文章
- 理解dropout——本质是通过阻止特征检测器的共同作用来防止过拟合 Dropout是指在模型训练时随机让网络某些隐含层节点的权重不工作,不工作的那些节点可以暂时认为不是网络结构的一部分,但是它的权重得保留下来(只是暂时不更新而已),因为下次样本输入时它可能又得工作了
理解dropout from:http://blog.csdn.net/stdcoutzyx/article/details/49022443 http://www.cnblogs.com/torna ...
- [CS231n-CNN] Training Neural Networks Part 1 : parameter updates, ensembles, dropout
课程主页:http://cs231n.stanford.edu/ ___________________________________________________________________ ...
- [DeeplearningAI笔记]改善深层神经网络1.4_1.8深度学习实用层面_正则化Regularization与改善过拟合
觉得有用的话,欢迎一起讨论相互学习~Follow Me 1.4 正则化(regularization) 如果你的神经网络出现了过拟合(训练集与验证集得到的结果方差较大),最先想到的方法就是正则化(re ...
- Dropout原理分析
工作流程 dropout用于解决过拟合,通过在每个batch中删除某些节点(cell)进行训练,从而提高模型训练的效果. 通过随机化一个伯努利分布,然后于输入y进行乘法,将对应位置的cell置零.然后 ...
- Python机器学习笔记:不得不了解的机器学习面试知识点(1)
机器学习岗位的面试中通常会对一些常见的机器学习算法和思想进行提问,在平时的学习过程中可能对算法的理论,注意点,区别会有一定的认识,但是这些知识可能不系统,在回答的时候未必能在短时间内答出自己的认识,因 ...
- 深度学习(六)keras常用函数学习
原文作者:aircraft 原文链接:https://www.cnblogs.com/DOMLX/p/9769301.html Keras是什么? Keras:基于Theano和TensorFlow的 ...
- 截图:【炼数成金】深度学习框架Tensorflow学习与应用
创建图.启动图 Shift+Tab Tab 变量介绍: F etch Feed 简单的模型构造 :线性回归 MNIST数据集 Softmax函数 非线性回归神经网络 MINIST数据集分类器简单版 ...
- Tensorflow 之模型内容可视化
TensorFlow模型保存和提取方法 1. tensorflow实现 卷积神经网络CNN:Tensorflow实现(以及对卷积特征的可视化) # 卷积网络的训练数据为MNIST(28*28灰度单色图 ...
- CNN卷积神经网络的构建
1.卷积神经网络由输入层,卷积层,激活函数,池化层,全连接层组成. input(输入层)--conv(卷积层)--relu(激活函数)--pool(池化层)--fc(全连接层) 2.卷积层: 主要用来 ...
随机推荐
- 10 -- 深入使用Spring -- 5... 实现任务的自动调度
10.5 实现任务的自动调度 10.5.1 使用Quartz 10.5.2 在Spring中使用Quartz
- Linux关闭Tomcat为什么要用Kill,而不是shutdown.sh
Linux关闭Tomcat为什么要用Kill,而不是shutdown.sh >>>>>>>>>>>>>>>&g ...
- Django SimpleCMDB 使用序列化
如下,前面我们是使用 urllib 方法来转换并传递数据的: [root@localhost ~]$ tail /data/script/getHostInfo.py if __name__ == ' ...
- 使用 urllib 发送请求
urllib.request.urlopen(url, data=None, timeout=n) 用于发送HTTP请求并得到响应内容 In []: import urllib.request In ...
- Myecplise反编译工具安装
我使用的是Myecplise8.5 下载jad.exe文件jad158g.win.zip:http://varaneckas.com/jad/ 下载jadeclipse插件 net.sf.jadcli ...
- NUC972配置为支持NFS
系统平台:virtualbox3.2.10+ubuntu10.10 安装nfs: #sudo apt-get install nfs-kernel-server ubuntu10.10中的已经是最新版 ...
- AutoLayout深入浅出五[UITableView动态高度]
本文转载至 http://grayluo.github.io//WeiFocusIo/autolayout/2015/02/01/autolayout5/ 我们经常会遇到UITableViewCell ...
- c语言中的内存分配malloc、alloca、calloc、malloc、free、realloc、sbr
C语言跟内存分配方式 (1) 从静态存储区域分配.内存在程序编译的时候就已经分配好,这块内存在程序的整个运行期间都存在.例如全局变量,static变量. (2) 在栈上创建.在执行函数时,函数内局部变 ...
- 基础知识《十二》一篇文章理解Cookie和Session
理解Cookie和Session机制 会话(Session)跟踪是Web程序中常用的技术,用来跟踪用户的整个会话.常用的会话跟踪技术是Cookie与Session.Cookie通过在客户端记录信息确定 ...
- springbatch---->springbatch的使用(六)
前面的例子step都是线性的流程,这里我们提供一个非线性的流程,也就是根据不同的状态做不同的流程step处理.万一有天悔恨变得太现实太世故太麻木,说不定能从回忆中重拾随兴飞翔. step非线性的流程 ...