SpringBoot集成Mybatis并具有分页功能PageHelper
SpringBoot集成Mybatis并具有分页功能PageHelper
- SET FOREIGN_KEY_CHECKS=0;
- -- ----------------------------
- -- Table structure for user
- -- ----------------------------
- DROP TABLE IF EXISTS `user`;
- CREATE TABLE `user` (
- `test_id` bigint(20) NOT NULL COMMENT '主键ID',
- `tenant_id` bigint(20) NOT NULL COMMENT '租户ID',
- `name` varchar(30) DEFAULT NULL COMMENT '名称',
- `age` int(11) DEFAULT NULL COMMENT '年龄',
- `test_type` int(11) DEFAULT NULL COMMENT '测试下划线字段命名类型',
- `test_date` datetime DEFAULT NULL COMMENT '日期',
- `role` bigint(20) DEFAULT NULL COMMENT '测试',
- `phone` varchar(11) DEFAULT NULL COMMENT '手机号码',
- PRIMARY KEY (`test_id`)
- ) ENGINE=InnoDB DEFAULT CHARSET=utf8;
- -- ----------------------------
- -- Records of user
- -- ----------------------------
- INSERT INTO `user` VALUES ('0', '1', '雷锋', '1', '1', '2017-01-01 01:01:01', '1', '10010');
- INSERT INTO `user` VALUES ('1', '1', '三毛', '2', '1', '2017-02-02 01:01:01', '1', '10086');
- INSERT INTO `user` VALUES ('2', '1', '小马', '1', '1', '2017-03-03 01:01:01', '1', '10000');
- INSERT INTO `user` VALUES ('3', '2', '麻花藤', '1', '1', '2017-03-03 01:01:01', '1', '10000');
- INSERT INTO `user` VALUES ('4', '2', '东狗', '2', '1', '2017-03-03 01:01:01', '1', '10086');
- INSERT INTO `user` VALUES ('5', '1', '王五', '2', '1', '2017-03-03 01:01:01', '1', '10010');
- INSERT INTO `user` VALUES ('6', '1', '小小三毛', '2', '1', '2017-02-02 01:01:01', '1', '10086');

- <dependency>
- <groupId>com.github.pagehelper</groupId>
- <artifactId>pagehelper-spring-boot-starter</artifactId>
- <version>1.2.3</version>
- </dependency>
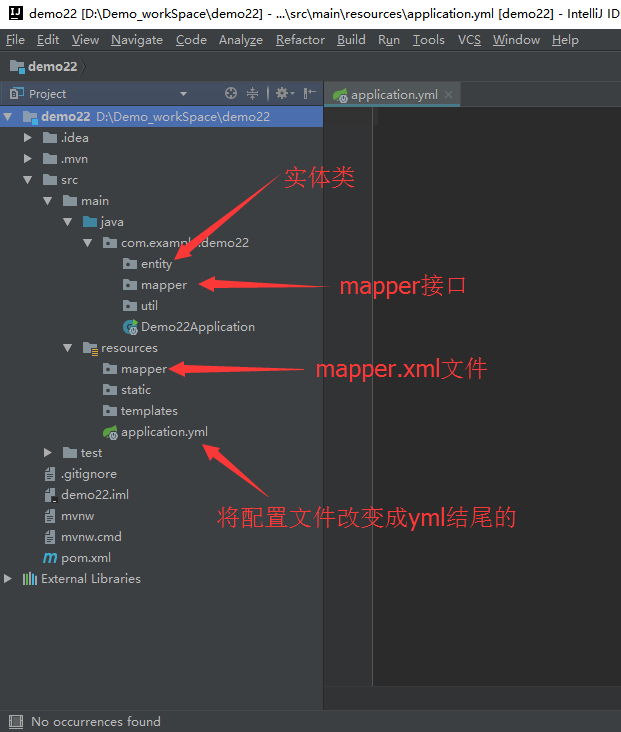
- package com.example.demo.entity;
- import lombok.Data;
- import java.util.Date;
- @Data
- public class User {
- private Integer testId;
- private Integer tenantId;
- private String name;
- private Integer age;
- private Integer testType;
- private Date testDate;
- private Integer role;
- private String phone;
- @Override
- public String toString() {
- return "User{" +
- "testId=" + testId +
- ", tenantId=" + tenantId +
- ", name='" + name + '\'' +
- ", age=" + age +
- ", testType=" + testType +
- ", testDate=" + testDate +
- ", role=" + role +
- ", phone='" + phone + '\'' +
- '}';
- }
- }
- #运行的端口
- server:
- port: 8088
- #数据库连接池
- spring:
- datasource:
- driver-class-name: com.mysql.jdbc.Driver
- username: root
- password: 521521
- url: jdbc:mysql://localhost:3306/springmvc?characterEncoding=utf-8&useSSL=false
- #让mybatis知道mapper在哪里
- mybatis:
- mapper-locations: classpath:mapper/*.xml
- #分页的配置
- pagehelper:
- offset-as-page-num: true
- row-bounds-with-count: true
- reasonable: true
- package com.example.demo.mapper;
- import com.example.demo.entity.User;
- import org.apache.ibatis.annotations.Mapper;
- import org.springframework.stereotype.Component;
- import java.util.List;
- @Mapper
- @Component
- public interface UserDao {
- List<User> findAll();
- }
- <?xml version="1.0" encoding="UTF-8" ?>
- <!DOCTYPE mapper PUBLIC "-//mybatis.org//DTD Mapper 3.0//EN" "http://mybatis.org/dtd/mybatis-3-mapper.dtd" >
- <mapper namespace="com.example.demo.mapper.UserDao">
- <select id="findAll" resultType="com.example.demo.entity.User">
- SELECT
- u.test_id AS testId,
- u.age,
- u.name,
- u.phone,
- u.role,
- u.tenant_id AS tenantId,
- u.test_date AS testDate
- FROM user u
- </select>
- </mapper>
- package com.example.demo.mapper;
- import com.example.demo.entity.User;
- import com.github.pagehelper.PageHelper;
- import org.junit.Test;
- import org.junit.runner.RunWith;
- import org.springframework.beans.factory.annotation.Autowired;
- import org.springframework.boot.test.context.SpringBootTest;
- import org.springframework.test.context.junit4.SpringRunner;
- import java.util.List;
- @RunWith(SpringRunner.class)
- @SpringBootTest
- public class UserDaoTest {
- @Autowired
- private UserDao userDao;
- @Test
- public void findAll() {
- PageHelper.startPage(4, 2);
- List<User> all = userDao.findAll();
- for (User user : all) {
- System.out.println(user);
- }
- }
- }
SpringBoot集成Mybatis并具有分页功能PageHelper的更多相关文章
- BindingException: Invalid bound statement (not found)问题排查:SpringBoot集成Mybatis重点分析
重构代码,方法抛出异常:BindingException: Invalid bound statement (not found) 提示信息很明显:mybatis没有提供某方法 先不解释问题原因和排查 ...
- 0120 springboot集成Mybatis和代码生成器
在日常开发中,数据持久技术使用的架子使用频率最高的有3个,即spring-jdbc , spring-jpa, spring-mybatis.详情可以看我之前的一篇文章spring操作数据库的3个架子 ...
- SpringBoot集成MyBatis底层原理及简易实现
MyBatis是可以说是目前最主流的Spring持久层框架了,本文主要探讨SpringBoot集成MyBatis的底层原理.完整代码可移步Github. 如何使用MyBatis 一般情况下,我们在Sp ...
- springboot集成mybatis(逆向工程),热部署以及整合Swagger2
本文是作者原创,版权归作者所有.若要转载,请注明出处. springboot集成mybatis和mybatis-generator插件 1.新建Springboot项目(略) 2.导入相关依赖 < ...
- springboot集成mybatis(二)
上篇文章<springboot集成mybatis(一)>介绍了SpringBoot集成MyBatis注解版.本文还是使用上篇中的案例,咱们换个姿势来一遍^_^ 二.MyBatis配置版(X ...
- springboot集成mybatis(一)
MyBatis简介 MyBatis本是apache的一个开源项目iBatis, 2010年这个项目由apache software foundation迁移到了google code,并且改名为MyB ...
- Mybatis Generator实现分页功能
Mybatis Generator实现分页功能 分类: IBATIS2013-07-17 17:03 882人阅读 评论(1) 收藏 举报 mybatisibatisgeneratorpage分页 众 ...
- SpringBoot 集成Mybatis 连接Mysql数据库
记录SpringBoot 集成Mybatis 连接数据库 防止后面忘记 1.添加Mybatis和Mysql依赖 <dependency> <groupId>org.mybati ...
- SpringBoot Mybatis整合(注解版),SpringBoot集成Mybatis(注解版)
SpringBoot Mybatis整合(注解版),SpringBoot集成Mybatis(注解版) ================================ ©Copyright 蕃薯耀 2 ...
随机推荐
- Java获取正在执行的函数名
利用StackTrace堆栈轨迹获取某个时间的调用堆栈状态. package com.dsp.demo; public class TechDemo { public static void main ...
- 转载:帮你提升 Python 的 27 种编程语言
帮你提升 Python 的 27 种编程语言: 出处:http://www.oschina.net/translate/languages-to-improve-your-python
- VueJs中 Class 与 Style 绑定
绑定 HTML Class 尽管可以用 Mustache 标签绑定 class,比如 class="{{ className }}",但是我们不推荐这种写法和 v-bind:cla ...
- Hadoop学习笔记——WordCount
1.在IDEA下新建工程,选择from Mevan GroupId:WordCount ArtifactId:com.hadoop.1st Project name:WordCount 2.pom.x ...
- 写一个方法,用一个for循环打印九九乘法表
public class MultiplicationTable { /** * @description 写一个方法,用一个for循环打印九九乘法表 * @author wangkun * ...
- sparkSQL实际应用
提交代码包 /usr/local/spark/bin$ spark-submit --class "getkv" /data/chun/sparktes.jar 1.查询KV im ...
- 解决:ADODB.Stream 错误 '800a0bbc' 写入文件失败
重装更改目录为e盘后,上传文件出现问题.解决方法: 调用adodb.stream的savetofile方法时发生错误, ADODB.Stream 错误 800a0bbc 写入文件失败.(msxml3. ...
- SharePoint PowerShell使用Export-SPWeb和Import-SPWeb指令来导出和导入网站
导出网站,例如: Export-SPWeb -Identity http://win2012sp2013:1000/Hopewell_Portal/ -Path "C:\KenmuTemp\ ...
- UNIX环境编程学习笔记(24)——信号处理进阶学习之信号集和进程信号屏蔽字
lienhua342014-11-03 1 信号传递过程 信号源为目标进程产生了一个信号,然后由内核来决定是否要将该信号传递给目标进程.从信号产生到传递给目标进程的流程图如图 1 所示, 图 1: 信 ...
- SQLServer查看存储过程的方法
使用 sp_helptext 查看存储过程的定义 在对象资源管理器中,连接到 数据库引擎实例,再展开该实例. 在工具栏上,单击“新建查询”. 在查询窗口中,输入下列语句.更改数据库名称和存储过程名称以 ...