Java基础——NIO(二)非阻塞式网络通信与NIO2新增类库
一、NIO非阻塞式网络通信
1.阻塞与非阻塞的概念
- 传统的 IO 流都是阻塞式的。也就是说,当一个线程调用 read() 或 write()
- 时,该线程被阻塞,直到有一些数据被读取或写入,该线程在此期间不
- 能执行其他任务。因此,在完成网络通信进行 IO 操作时,由于线程会
- 阻塞,所以服务器端必须为每个客户端都提供一个独立的线程进行处理,
- 当服务器端需要处理大量客户端时,性能急剧下降。
- Java NIO 是非阻塞模式的。当线程从某通道进行读写数据时,若没有数
- 据可用时,该线程可以进行其他任务。线程通常将非阻塞 IO 的空闲时
- 间用于在其他通道上执行 IO 操作,所以单独的线程可以管理多个输入
- 和输出通道。因此,NIO 可以让服务器端使用一个或有限几个线程来同
- 时处理连接到服务器端的所有客户端。
2.选择器
大致的图解如下:

// 通道注册到选择器上之后,选择器将会对通道进行监控,直到通道传输完全准备就绪了,才分配给服务端一个或多个线程进行处理
3.使用NIO完成非阻塞式网络通信
非阻塞核心有三个:(只能用于网络通信)
通道(channel) 缓冲区(buffer) 选择器(selector)
NIO完成的网络通信:
- // 客户端
- @Test
- public void client() {
- SocketChannel sChannel = null;
- FileChannel inChannel = null;
- try {
- // 获取通道(采用1.7之后的open方式)
- sChannel = SocketChannel.open(new InetSocketAddress("127.0.0.1", 9898));
- // 分配缓冲区
- ByteBuffer byteBuffer = ByteBuffer.allocate(1024);
- // 读取本地文件(使用FileChannel),发送到服务端
- inChannel = FileChannel.open(Paths.get("D:\\test\\1.jpg"), StandardOpenOption.READ);
- while ((inChannel.read(byteBuffer)) != -1) {
- // 通过socketChannel写入数据
- byteBuffer.flip();// 切换读模式
- sChannel.write(byteBuffer);
- byteBuffer.clear();// 清空缓冲区
- }
- } catch (IOException e) {
- e.printStackTrace();
- } finally {
- // 务必进行通道的关闭
- if (inChannel != null) {
- try {
- inChannel.close();
- } catch (IOException e) {
- e.printStackTrace();
- }
- }
- if (sChannel != null) {
- try {
- sChannel.close();
- } catch (IOException e) {
- e.printStackTrace();
- }
- }
- }
- }
- // 服务端
- @Test
- public void server() {
- ServerSocketChannel ssChannel = null;
- FileChannel outChannel = null;
- SocketChannel sChannel = null;
- try {
- // 开启通道
- ssChannel = ServerSocketChannel.open();
- // 绑定端口
- ssChannel.bind(new InetSocketAddress(9898));
- // 获取客户端连接的通道
- sChannel = ssChannel.accept();
- outChannel = FileChannel.open(Paths.get("D:\\test\\2.jpg"), StandardOpenOption.CREATE, StandardOpenOption.WRITE) ;
- // 接收客户端数据,保存到本地
- ByteBuffer byteBuffer = ByteBuffer.allocate(1024);
- while ((sChannel.read(byteBuffer)) != -1){
- // 通道读写操作
- byteBuffer.flip();
- outChannel.write(byteBuffer);
- byteBuffer.clear();
- }
- } catch (IOException e) {
- e.printStackTrace();
- } finally {
- if (outChannel != null) {
- try {
- outChannel.close();
- } catch (IOException e) {
- e.printStackTrace();
- }
- }
- if (sChannel != null) {
- try {
- sChannel.close();
- } catch (IOException e) {
- e.printStackTrace();
- }
- }
- if (ssChannel != null) {
- try {
- ssChannel.close();
- } catch (IOException e) {
- e.printStackTrace();
- }
- }
- }
- }
阻塞式NIO网络通信:
- @Test
- public void client() {
- SocketChannel sChannel = null;
- FileChannel inChannel = null;
- try {
- // 方式与阻塞式基本类似
- sChannel = SocketChannel.open(new InetSocketAddress("127.0.0.1", 9898));
- ByteBuffer byteBuffer = ByteBuffer.allocate(1024);
- inChannel = FileChannel.open(Paths.get("D:\\test\\2.jpg"), StandardOpenOption.READ);
- while ((inChannel.read(byteBuffer)) != -1) {
- byteBuffer.flip();
- sChannel.write(byteBuffer);
- byteBuffer.clear();
- }
- // 接收服务端的反馈
- int len;
- while ((len = sChannel.read(byteBuffer)) != -1) {
- byteBuffer.flip();
- System.out.println(new String(byteBuffer.array(), 0, len));
- byteBuffer.clear();
- }
- } catch (IOException e) {
- e.printStackTrace();
- } finally {
- // 流的关闭
- if (inChannel != null) {
- try {
- inChannel.close();
- } catch (IOException e) {
- e.printStackTrace();
- }
- }
- if (sChannel != null) {
- try {
- sChannel.close();
- } catch (IOException e) {
- e.printStackTrace();
- }
- }
- }
- }
- @Test
- public void server() {
- ServerSocketChannel ssChannel = null;
- SocketChannel sChannel = null;
- FileChannel outChannel = null;
- try {
- ssChannel = ServerSocketChannel.open();
- // 绑定客户端连接
- ssChannel.bind(new InetSocketAddress(9898));
- // 获取连接
- sChannel = ssChannel.accept();
- ByteBuffer byteBuffer = ByteBuffer.allocate(1024);
- outChannel = FileChannel.open(Paths.get("D:\\test\\3.jpg"), StandardOpenOption.CREATE, StandardOpenOption.WRITE);
- while ((sChannel.read(byteBuffer)) != -1) {
- // 保存到本地
- byteBuffer.flip();
- outChannel.write(byteBuffer);
- byteBuffer.clear();
- }
- // 发送反馈
- String str = "服务端接收成功!";
- byteBuffer.put(str.getBytes());
- byteBuffer.flip();
- sChannel.write(byteBuffer);
- } catch (IOException e) {
- e.printStackTrace();
- } finally {
- if (outChannel != null) {
- try {
- outChannel.close();
- } catch (IOException e) {
- e.printStackTrace();
- }
- }
- if (sChannel != null) {
- try {
- sChannel.close();
- } catch (IOException e) {
- e.printStackTrace();
- }
- }
- if (ssChannel != null) {
- try {
- ssChannel.close();
- } catch (IOException e) {
- e.printStackTrace();
- }
- }
- }
- }
结果:无法接收有效结束的反馈,不知道客户端是否发送完成

目前可以通过显式的将客户端接收反馈之前发送状态设置为shutdowm:
- sChannel.shutdownOutput();
- @Test
- public void client() {
- SocketChannel sChannel = null;
- FileChannel inChannel = null;
- try {
- // 方式与阻塞式基本类似
- sChannel = SocketChannel.open(new InetSocketAddress("127.0.0.1", 9898));
- ByteBuffer byteBuffer = ByteBuffer.allocate(1024);
- inChannel = FileChannel.open(Paths.get("D:\\test\\2.jpg"), StandardOpenOption.READ);
- while ((inChannel.read(byteBuffer)) != -1) {
- byteBuffer.flip();
- sChannel.write(byteBuffer);
- byteBuffer.clear();
- }
- sChannel.shutdownOutput();
- // 接收服务端的反馈
- int len;
- while ((len = sChannel.read(byteBuffer)) != -1) {
- byteBuffer.flip();
- System.out.println(new String(byteBuffer.array(), 0, len));
- byteBuffer.clear();
- }
- } catch (IOException e) {
- e.printStackTrace();
- } finally {
- // 流的关闭
- if (inChannel != null) {
- try {
- inChannel.close();
- } catch (IOException e) {
- e.printStackTrace();
- }
- }
- if (sChannel != null) {
- try {
- sChannel.close();
- } catch (IOException e) {
- e.printStackTrace();
- }
- }
- }
- }
- @Test
- public void server() {
- ServerSocketChannel ssChannel = null;
- SocketChannel sChannel = null;
- FileChannel outChannel = null;
- try {
- ssChannel = ServerSocketChannel.open();
- // 绑定客户端连接
- ssChannel.bind(new InetSocketAddress(9898));
- // 获取连接
- sChannel = ssChannel.accept();
- ByteBuffer byteBuffer = ByteBuffer.allocate(1024);
- outChannel = FileChannel.open(Paths.get("D:\\test\\3.jpg"), StandardOpenOption.CREATE, StandardOpenOption.WRITE);
- while ((sChannel.read(byteBuffer)) != -1) {
- // 保存到本地
- byteBuffer.flip();
- outChannel.write(byteBuffer);
- byteBuffer.clear();
- }
- // 发送反馈
- String str = "服务端接收成功!";
- byteBuffer.put(str.getBytes());
- byteBuffer.flip();
- sChannel.write(byteBuffer);
- } catch (IOException e) {
- e.printStackTrace();
- } finally {
- if (outChannel != null) {
- try {
- outChannel.close();
- } catch (IOException e) {
- e.printStackTrace();
- }
- }
- if (sChannel != null) {
- try {
- sChannel.close();
- } catch (IOException e) {
- e.printStackTrace();
- }
- }
- if (ssChannel != null) {
- try {
- ssChannel.close();
- } catch (IOException e) {
- e.printStackTrace();
- }
- }
- }
- }
非阻塞式网络通信
- // 客户端
- @Test
- public void client() {
- SocketChannel sChannel = null;
- try {
- // 开启通道
- sChannel = SocketChannel.open(new InetSocketAddress("127.0.0.1", 9898));
- // 切换成非阻塞模式
- sChannel.configureBlocking(false);
- // 分配缓冲区
- ByteBuffer byteBuffer = ByteBuffer.allocate(1024);
- // 发送数据给服务端(发送时间),数据是存放在缓冲区中
- byteBuffer.put(LocalDateTime.now().toString().getBytes());
- // 将缓冲区传送给服务端
- byteBuffer.flip();
- sChannel.write(byteBuffer);
- byteBuffer.clear();
- } catch (IOException e) {
- e.printStackTrace();
- } finally {
- if (sChannel != null) {
- try {
- sChannel.close();
- } catch (IOException e) {
- e.printStackTrace();
- }
- }
- }
- }
- // 服务端
- @Test
- public void server() {
- ServerSocketChannel ssChannel = null;
- SocketChannel sChannel = null;
- try {
- // 开启通道
- ssChannel = ServerSocketChannel.open();
- // 切换非阻塞模式
- ssChannel.configureBlocking(false);
- // 绑定连接
- ssChannel.bind(new InetSocketAddress(9898));
- // 获取选择器,同样的open方法
- Selector selector = Selector.open();
- // 将通道注册到选择器上,后一个参数表示选择键,也就是监控通道的什么状态
- ssChannel.register(selector, SelectionKey.OP_ACCEPT);// 监听接收
- // 通过选择器轮巡式选择已经“准备就绪“的事件
- while (selector.select() > 0) {
- // 获取当前选择器中所有注册的选择键
- Iterator<SelectionKey> iterator = selector.selectedKeys().iterator();
- // 迭代器迭代
- while (iterator.hasNext()) {
- // 获取准备就绪的事件
- SelectionKey selectionKey = iterator.next();
- // 判断就绪的事件
- if (selectionKey.isAcceptable()) {
- // 若接收就绪,则获取客户端连接
- sChannel = ssChannel.accept();
- // 切换为非阻塞模式
- sChannel.configureBlocking(false);
- // 将该通道注册到选择器上,监控读就绪状态
- sChannel.register(selector, SelectionKey.OP_READ);
- } else if (selectionKey.isReadable()) {
- // 获取选择器上读就绪状态的通道(需要强转)
- sChannel = (SocketChannel) selectionKey.channel();
- // 读取数据
- ByteBuffer byteBuffer = ByteBuffer.allocate(1024);
- int len;
- while ((len = sChannel.read(byteBuffer)) > 0) {
- byteBuffer.flip();
- System.out.println(new String(byteBuffer.array(), 0, len));
- byteBuffer.clear();
- }
- }
- // 取消选择键(防止出现传输完成了应该重置而还显示完成的情况)
- iterator.remove();
- }
- }
- } catch (IOException e) {
- e.printStackTrace();
- }
- }
结果:可以轮巡接收客户端返回的时间
// UDP的DataGramChannel类似,暂不展开
- package com.atguigu.nio;
- import java.io.IOException;
- import java.net.InetSocketAddress;
- import java.nio.ByteBuffer;
- import java.nio.channels.DatagramChannel;
- import java.nio.channels.SelectionKey;
- import java.nio.channels.Selector;
- import java.util.Date;
- import java.util.Iterator;
- import java.util.Scanner;
- import org.junit.Test;
- public class TestNonBlockingNIO2 {
- @Test
- public void send() throws IOException{
- DatagramChannel dc = DatagramChannel.open();
- dc.configureBlocking(false);
- ByteBuffer buf = ByteBuffer.allocate(1024);
- Scanner scan = new Scanner(System.in);
- while(scan.hasNext()){
- String str = scan.next();
- buf.put((new Date().toString() + ":\n" + str).getBytes());
- buf.flip();
- dc.send(buf, new InetSocketAddress("127.0.0.1", 9898));
- buf.clear();
- }
- dc.close();
- }
- @Test
- public void receive() throws IOException{
- DatagramChannel dc = DatagramChannel.open();
- dc.configureBlocking(false);
- dc.bind(new InetSocketAddress(9898));
- Selector selector = Selector.open();
- dc.register(selector, SelectionKey.OP_READ);
- while(selector.select() > 0){
- Iterator<SelectionKey> it = selector.selectedKeys().iterator();
- while(it.hasNext()){
- SelectionKey sk = it.next();
- if(sk.isReadable()){
- ByteBuffer buf = ByteBuffer.allocate(1024);
- dc.receive(buf);
- buf.flip();
- System.out.println(new String(buf.array(), 0, buf.limit()));
- buf.clear();
- }
- }
- it.remove();
- }
- }
- }
注册选择器时的选择键:多个请使用或 | 连接
- 读 : SelectionKey.OP_READ (1)
- 写 : SelectionKey.OP_WRITE (4)
- 连接 : SelectionKey.OP_CONNECT (8)
- 接收 : SelectionKey.OP_ACCEPT (16)
4.管道

示例:
- @Test
- public void test1() {
- Pipe pipe = null;
- Pipe.SinkChannel sinkChannel = null;
- Pipe.SourceChannel sourceChannel = null;
- try {
- // 获取管道,经典的open方法获取
- pipe = Pipe.open();
- // 将缓冲区数据写入管道
- ByteBuffer byteBuffer = ByteBuffer.allocate(1024);
- byteBuffer.put("通过单向管道发送数据".getBytes());
- sinkChannel = pipe.sink();
- byteBuffer.flip();
- sinkChannel.write(byteBuffer);
- // 读取缓冲区中的数据
- sourceChannel = pipe.source();
- int len;
- byteBuffer.flip();
- len = sourceChannel.read(byteBuffer);
- System.out.println(new String(byteBuffer.array(), 0, len));
- } catch (IOException e) {
- e.printStackTrace();
- } finally {
- if (sinkChannel != null) {
- try {
- sinkChannel.close();
- } catch (IOException e) {
- e.printStackTrace();
- }
- }
- if (sourceChannel != null) {
- try {
- sourceChannel.close();
- } catch (IOException e) {
- e.printStackTrace();
- }
- }
- }
- }
//实际使用时可以两个线程公用一个pipe进行数据的传输
二、NIO2——Path Paths Files
JDK7新增Path接口,Paths工具类,Files工具类。 这些接口和工具类对NIO中的功能进行了高度封装,大大简化了文件系统的IO编程。
在传统java.io中, 文件和目录都被抽象成File对象, 即 File file = new File(".");
NIO.2中则引入接口Path代表与平台无关的路径,文件和目录都用Path对象表示。比起传统File类,它更高效,更方便。
作为与平台无关的系统访问支持;它的出现,就是为了替代 java.io.File
Paths工具类——提供获取Path的两个静态方法:

- @Test
- public void test1() {
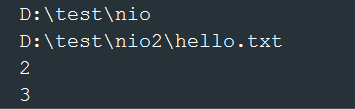
- Path path1 = Paths.get("D:\\test\\nio");
- Path path2 = Paths.get("D:\\test", "nio2", "hello.txt");
- System.out.println(path1);
- System.out.println(path2);
- }

//实现了 toString方法,直接输出即可看到根据当前平台产生的路径
Path接口
getNameCount()——返回路径中的节点数量
- @Test
- public void test1() {
- Path path1 = Paths.get("D:\\test\\nio");
- Path path2 = Paths.get("D:\\test", "nio2", "hello.txt");
- System.out.println(path1);
- System.out.println(path2);
- System.out.println(path1.getNameCount());
- System.out.println(path2.getNameCount());
- }
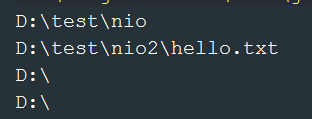
getRoot()——返回根节点,win中是盘符 C D,Linux中是 /,返回的新的Path只包含根节点
- @Test
- public void test1() {
- Path path1 = Paths.get("D:\\test\\nio");
- Path path2 = Paths.get("D:\\test", "nio2", "hello.txt");
- System.out.println(path1);
- System.out.println(path2);
- System.out.println(path1.getRoot());
- System.out.println(path2.getRoot());
- }
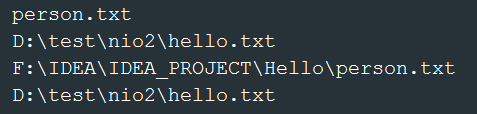
toAbsolutePath()——返回绝对路径,若Path初始化时为绝对路径,则返回原路径;若是相对路径,则返回与上级路径合成的绝对路径
- @Test
- public void test1() {
- Path path1 = Paths.get("person.txt");
- Path path2 = Paths.get("D:\\test", "nio2", "hello.txt");
- System.out.println(path1);
- System.out.println(path2);
- System.out.println(path1.toAbsolutePath());
- System.out.println(path2.toAbsolutePath());
- }
更多常见方法:
- boolean endsWith(String path) : 判断是否以 path 路径结束
- boolean startsWith(String path) : 判断是否以 path 路径开始
- boolean isAbsolute() : 判断是否是绝对路径
- Path getFileName() : 返回与调用 Path 对象关联的文件名
- Path getName(int idx) : 返回的指定索引位置 idx 的路径名称
- int getNameCount() : 返回Path 根目录后面元素的数量
- Path getParent() :返回Path对象包含整个路径,不包含 Path 对象指定的文件路径
- Path getRoot() :返回调用 Path 对象的根路径
- Path resolve(Path p) :将相对路径解析为绝对路径
- Path toAbsolutePath() : 作为绝对路径返回调用 Path 对象
- String toString() : 返回调用 Path 对象的字符串表示形式
深入讲解参见:http://blog.csdn.net/lirx_tech/article/details/51416672
Files工具类——完善的OS文件系统支持
copy——复制文件
- @Test
- public void test1() {
- Path src = Paths.get("D:\\test\\1.jpg");
- Path dst = Paths.get("D:\\test", "2.jpg");
- try {
- Files.copy(src, dst, StandardCopyOption.REPLACE_EXISTING);
- } catch (IOException e) {
- e.printStackTrace();
- }
- }
- }
BufferedWriter——写入字符串
- @Test
- public void test1() {
- Path src = Paths.get("D:\\test\\hello.txt");
- BufferedWriter writer = null;
- try {
- writer = Files.newBufferedWriter(src, StandardCharsets.UTF_8, StandardOpenOption.APPEND);
- writer.write("Hello Files!");
- } catch (IOException e) {
- e.printStackTrace();
- } finally {
- if (writer != null) {
- try {
- writer.close();
- } catch (IOException e) {
- e.printStackTrace();
- }
- }
- }
- }
其它诸如返回文件的大小,删除一个文件,以及与File的转换等等请参见以下随笔、常用方法列表或API:
几个示例:http://www.cnblogs.com/digdeep/p/4478734.html
常用方法:
- Path copy(Path src, Path dest, CopyOption … how) : 文件的复制
- Path createDirectory(Path path, FileAttribute<?> … attr) : 创建一个目录
- Path createFile(Path path, FileAttribute<?> … arr) : 创建一个文件
- void delete(Path path) : 删除一个文件
- Path move(Path src, Path dest, CopyOption…how) : 将 src 移动到 dest 位置
- long size(Path path) : 返回 path 指定文件的大小
- Files常用方法:用于判断
- boolean exists(Path path, LinkOption … opts) : 判断文件是否存在
- boolean isDirectory(Path path, LinkOption … opts) : 判断是否是目录
- boolean isExecutable(Path path) : 判断是否是可执行文件
- boolean isHidden(Path path) : 判断是否是隐藏文件
- boolean isReadable(Path path) : 判断文件是否可读
- boolean isWritable(Path path) : 判断文件是否可写
- boolean notExists(Path path, LinkOption … opts) : 判断文件是否不存在
- public static <A extends BasicFileAttributes> A readAttributes(Path path,Class<A> type,LinkOption...
- options) : 获取与 path 指定的文件相关联的属性。
- Files常用方法:用于操作内容
- SeekableByteChannel newByteChannel(Path path, OpenOption…how) : 获取与指定文件的连接,
- how 指定打开方式。
- DirectoryStream newDirectoryStream(Path path) : 打开 path 指定的目录
- InputStream newInputStream(Path path, OpenOption…how):获取 InputStream 对象
- OutputStream newOutputStream(Path path, OpenOption…how) : 获取 OutputStream 对象
Java基础——NIO(二)非阻塞式网络通信与NIO2新增类库的更多相关文章
- JAVA NIO学习三:NIO 的非阻塞式网络通信
紧接着上一章,我们继续来研究NIO,上一章中我们讲了NIO 中最常见的操作即文件通道的操作,但实际上NIO的主要用途还是在于网络通信,那么这个时候就会涉及到选择器,这一章我们就会对其进行讲解操作. 一 ...
- 4.NIO的非阻塞式网络通信
/*阻塞 和 非阻塞 是对于 网络通信而言的*/ /*原先IO通信在进行一些读写操作 或者 等待 客户机连接 这种,是阻塞的,必须要等到有数据被处理,当前线程才被释放*/ /*NIO 通信 是将这个阻 ...
- NIO 的非阻塞式网络通信
1.阻塞与非阻塞 ① 传统的 IO 流都是阻塞式的.也就是说,当一个线程调用 read() 或 write()时, 该线程被阻塞,直到有一些数据被读取或写入,该线程在此期间不能执行其他任务. 因 ...
- JAVA NIO学习记录2-非阻塞式网络通信
一.阻塞与非阻塞 传统的IO 流都是阻塞式的.也就是说,当一个线程调用read() 或write() 时,该线程被阻塞,直到有一些数据被读取或写入,该线程在此期间不能执行其他任务.因此,在完成网络通信 ...
- Java IO(3)非阻塞式输入输出(NIO)
在上篇<Java IO(2)阻塞式输入输出(BIO)>的末尾谈到了什么是阻塞式输入输出,通过Socket编程对其有了大致了解.现在再重新回顾梳理一下,对于只有一个“客户端”和一个“服务器端 ...
- JAVA基础知识之网络编程——-基于NIO的非阻塞Socket通信
阻塞IO与非阻塞IO 通常情况下的Socket都是阻塞式的, 程序的输入输出都会让当前线程进入阻塞状态, 因此服务器需要为每一个客户端都创建一个线程. 从JAVA1.4开始引入了NIO API, NI ...
- Java基础知识强化之多线程笔记07:同步、异步、阻塞式、非阻塞式 的联系与区别
1. 同步: 所谓同步,就是在发出一个功能调用时,在没有得到结果之前,该调用就不返回.但是一旦调用返回,就必须先得到返回值了. 换句话话说,调用者主动等待这个"调用"的结果. 对于 ...
- NIO非阻塞式编程
/** * NIO非阻塞式编程<p> * 服务端和客户端各自维护一个管理通道的对象,我们称之为selector,该对象能检测一个或多个通道 (channel) 上的事件. * 我们以服务端 ...
- Socket-IO 系列(三)基于 NIO 的同步非阻塞式编程
Socket-IO 系列(三)基于 NIO 的同步非阻塞式编程 缓冲区(Buffer) 用于存储数据 通道(Channel) 用于传输数据 多路复用器(Selector) 用于轮询 Channel 状 ...
随机推荐
- ADF系列-3.VO的查询
一·VO的计数查询 VO的计数查询有四种方式: 1.ViewObjectImpl::getRowCount() 这个方法从数据库中提取所有行,然后对每一行计数, 得到总行数.如果行数很大,这会影响性能 ...
- [USACO5.2]Snail Trails
嘟嘟嘟 一道很水的爆搜题,然后我调了近40分钟…… 错误:输入数据最好用cin,因为数字可能不止一位,所以用scanf后,单纯的c[0]为字母,c[1]数字………………………… #include< ...
- [19/04/02-星期二] IO技术_字符流分类总结(含字符转换流InputStreamReader/ OutputStreamWriter,实现字节转字符)
一.概念 ------->1.BufferedReader/BufferedWriter [参考19.03.31文章] *Reader/Writer-------->2.InputStre ...
- C#string byte[] base64位互相转换
byte表示字节,byte[]则表示存放一系列字节的数组 1个字符=2个字节(byte) 1个字节=8个比特(bit) 网速上所说的1M其实是指1兆的小b,1M= 1024b/8 = 128kb 下面 ...
- 关于JWT.NET
1.JWT的概念: JWT全称是Json Web Token,是一种用于双方之间传递安全信息的简洁的.URL安全的表述性声明规范.JWT作为一个开放的标准( RFC 7519 ),定义了一种简洁的,自 ...
- 二十五、详述 IntelliJ IDEA 提交代码前的 Code Analysis 机制
在我们用 IntelliJ IDEA 向 SVN 或者 Git 提交代码的时候,IntelliJ IDEA 提供了一个自动分析代码的功能,即Perform code analysis: 如上图所示,当 ...
- PAT——1001. 害死人不偿命的(3n+1)猜想
卡拉兹(Callatz)猜想: 对任何一个自然数n,如果它是偶数,那么把它砍掉一半:如果它是奇数,那么把(3n+1)砍掉一半.这样一直反复砍下去,最后一定在某一步得到n=1.卡拉兹在1950年的世界数 ...
- VS2008 工具栏CMFCToolBar的使用总结(转)
(一)自定义工具栏 自定义工具栏,分两种情况:一是直接添加工具栏,并自己绘制图标:二是,添加工具栏,然后与BMP关联,与VC6.0中的自定义彩色工具栏类似. 1. 自绘工具栏 1)添加Toolbar ...
- CodeForces - 616C(很有意思的bfs,set,map的使用)
传送门: http://codeforces.com/problemset/problem/616/C C. The Labyrinth time limit per test 1 second me ...
- 第28章 LTDC—液晶显示中英文
本章参考资料:<STM32F76xxx参考手册>.<STM32F7xx规格书>.库帮助文档<STM32F779xx_User_Manual.chm>. 关于开发板配 ...