day45:JS中的json&JS的BOM操作和DOM操作
目录
补充:CSS中的弹性盒子
弹性盒子的作用:和line-height一样,可以将内容进行垂直居中显示,并且在使用效果上比line-height更好用
/* css效果 */

.c1{

    height: 100px;

    width: 400px;

    border: 1px solid red;

    /* 弹性盒子做垂直居中效果 */

    display: flex;

    align-items: center;

}
<!-- html部分 -->

<div class="c1">

    <span>xx</span>

    <a href="">kk</a>

    <img src="mi-logo.png" alt="" style="background-color: red">

</div>
实现效果如下图所示
JS中json的序列化
d = {"name":"libolun",age:18}

var d_json = JSON.stringify(d);  // 序列化 相当于python中的dumps

var c = JSON.parse(d_json);     // 反序列化 相当于python中的loads
JS中的BOM操作
location操作
location.href;  // 获取当前页面的地址

location.href = 'http://www.baidu.com'; // 跳转到这个网址上

location.reload();  // 刷新当前页面
计时器
var t = setTimeout(function(){console.log('xxx')},3000); // 设置定时器 3000ms后执行function 就一次

clearTimeout(t); // 清除定时器Timeout

var t = setInterval(function(){console.log('xxx')},2000);// 设置定时器 2000ms后执行function 循环

clearInterval(t); // 清除定时器Interval
计时器的示例
<!DOCTYPE html>

<html lang="en">

<head>

    <meta charset="UTF-8">

    <title>Title</title>

    <style>

        .c1{

            background-color: red;

            height: 100px;

            width: 100px;

        }

        /* 相同的属性会覆盖 */

        .c2{

            background-color: blue;

        }

    </style>

</head>

<body>

<div class="c1" id="d1"></div>

</body>

<script>

    var t = setInterval(function ()

         var dEle =  document.getElementById('d1');// 获取的是id为d1的那个div语句

         dEle.classList.toggle('c2');  // 将div中class切换成c2

        /* 如果此时检测div中的类是c1 那么就切换成c2

        如果此时检测div中的类是c2 那么就删除类c2 切换成c1*/

    },100)

</script>

</html>
JS中的DOM操作
DOM:文档对象模型 -- 操作html
创建标签
var dEle = document.createElement('a'); // dEle的值是<a></a>
查找标签
直接查找选择器
1.元素选择器
var h = document.getElementsByTagName('h1');// h是个数组:HTMLCollection [h1]

var h = document.getElementsByTagName('h1')[0]; // 索引取值获取标签对象h1
2.类值选择器
var s = document.getElementsByClassName('c1'); // 结果也是数组:HTMLCollection[div.c1]

var s = document.getElementsByClassName('c1')[1]; // 索引取值获取到c1类所对应的标签对象div
3.id选择器
var a = document.getElementById('xx'); // 因为id不能重复,所以直接获取到对应id的标签对象
间接查找选择器
var div1 = document.getElementsByClassName('c1')[0];

div1.nextElementSibling; // 找下一个兄弟标签对象

div1.nextElementSibling.style.color = 'red';  // 找下一个兄弟标签,并改了色

div1.previousElementSibling;  // 找上一个兄弟标签对象

div1.firstElementChild;  // 找第一个儿子

div1.lastElementChild;  // 找最后一个儿子

div1.children;  // 找所有儿子,是一个数组

div1.parentElement;  // 找到自己的父级标签
文本操作
innerText
// 获取文本内容(只获取文本内容,不带标签)

/* 例如<span>111</span> :获取的就是111 */

var h = document.getElementsByTagName('h1')[0];

h.innerText;

// 设置文本内容

h.innerText = 'xxx' // 只能设置文本内容

h.innerText = '<a href="">百度</a>'  //不能生成标签效果
innerHTML
// 获取内容(连带着标签都获取)

var h = document.getElementsByTagName('h1')[0];

    h.innerHTML

// 设置文本内容

h.innerHTML = '<a href="">百度</a>';  // 能够生成标签效果
值操作
值操作语法:标签对象.value;
值操作的示例
用户在输入框输入内容,如果长度小于5 在输入框右边会有红字‘炒米饭’
<!DOCTYPE html>

<html lang="en">

<head>

    <meta charset="UTF-8">

    <title>Title</title>

</head>

<body>

用户名:<input type="text" id="username" onblur="f1(this);">

     <span id="error" style="color:Red;font-size: 12px;"></span>

</body>

<script>

    function f1(ths){

        // console.log(ths); ths是input标签对象

        var username = ths.value ;// 通过input标签对象获取到输入框中输入的内容

         // console.log(ths.value); ths.value是用户在输入框输入的内容“

         if (username.length < 5){ // 如果输入内容的长度小于5

            var spa = document.getElementById('error'); // 获取id为error的标签对象span

            spa.innerText = '炒米饭';// 将span里面的内容改为‘炒米饭’

}

    }

</script>

</html>
事件
什么是事件:捕获用户行为,触发相应的动作
常用的事件有哪些:
1.onblur 失去光标时触发的事件
2.onfocus 获取光标时触发的事件
3.onclick 左键单击事件
4.onchange 域内容发生变化时触发的事件
类值操作
var d = document.getElementById('d1');

d.classList; // 查看类值

d.classList.add('ppp'); // 添加类值

d.classList.remove('ppp'); // 删除类值

d.classList.toggle('pppp'); // 切换 有就删除 没有就添加
style样式操作示例
格式:标签对象.style.backgroundColor = 'blue';
<!DOCTYPE html>

<html lang="en">

<head>

    <meta charset="UTF-8">

    <title>Title</title>

    <style>

        .c1{

            background-color: red;

            height: 200px;

            width: 200px;

        }

        .c2{

            background-color: blue;

        }

        .c3{

            background-color: yellow;

        }

    </style>

</head>

<body>

<!-- 事件绑定:方式2(不常用 )-->

<input type="text" id="username" onblur="f1(this);" onfocus="f2(this);">

<span id="error" style="color:Red;font-size: 12px;"></span>

<div id="d1" class="c1  xx  oo"></div>

</body>

<script>

    // 输入框长度小于5  失去光标后  提示红字'黄焖鸡米饭'

    function f1(ths){

        var username = ths.value  ;

         if (username.length < 5){

            var spa = document.getElementById('error');

            spa.innerText = '黄焖鸡米饭';

}

    }

    // 获取光标时 取消红字显示 将input的下一个标签的内容设置为空

    function f2(ths){

          ths.nextElementSibling.innerText = '';

    }

    var d1 = document.getElementById('d1');

    // 事件绑定:方式1

    d1.onclick = function (){

         // this就是当前绑定事件的标签对象

         // css样式操作

         // this.style.backgroundColor = 'blue';

          // 当点击到d1这个id对应的标签(div)时,将d1对应标签的类c1替换成c2

         this.classList.toggle('c2');

         // 当点击到username这个id对应标签(input)时,将username对应标签的类替换成c3

         var u = document.getElementById('username');

         u.classList.toggle('c3')

    }

</script>

</html>
onchange事件示例
<!DOCTYPE html>

<html lang="en">

<head>

    <meta charset="UTF-8">

    <title>Title</title>

    <style>

        .c1{

            background-color: red;

            height: 200px;

            width: 200px;

        }

        .c2{

            background-color: blue;

        }

        .c3{

            background-color: yellow;

        }

    </style>

</head>

<body>

<input type="text" id="username" onblur="f1(this);" onfocus="f2(this);">

<span id="error" style="color:Red;font-size: 12px;"></span>

<div id="d1" class="c1  xx  oo"></div>

<!-- select下拉框 -->

<select name="" id="s1">

    <option value="1">xx1</option>

    <option value="2">xx2</option>

    <option value="3">xx3</option>

</select>

</body>

<script>

    function f1(ths){

        var username = ths.value  ;

        if (username.length < 5){

            var spa = document.getElementById('error');

            spa.innerText = '黄焖鸡米饭';

}

    }

    function f2(ths){

          ths.nextElementSibling.innerText = '';

    }

    var d1 = document.getElementById('d1');

    d1.onclick = function (){

         this.classList.toggle('c2');

         var u = document.getElementById('username');

         u.classList.toggle('c3')

    }

    // onchange事件

    var s = document.getElementById('s1');

    s.onchange = function (){ // 域内容发生变化,触发c2

         d1.classList.toggle('c2');

    }

</script>

</html>
用CSS实现小米商城导航栏+主内容部分
HTML部分
<!DOCTYPE html>
<html lang="en">
<head>
<meta charset="UTF-8">
<title>Title</title>
<link rel="stylesheet" href="xiaomi.css">
</head>
<body>
<div class="nav">
<div class="nav-content clearfix">
<div class="nav-left">
<a href="" class="nav-link">小米商城</a> <span class="shugang">|</span>
<a href="" class="nav-link">MIUI</a> <span class="shugang">|</span>
<a href="" class="nav-link">LoT</a> <span class="shugang">|</span>
<a href="" class="nav-link">云服务</a> <span class="shugang">|</span>
<a href="" class="nav-link">金融</a> <span class="shugang">|</span>
<a href="" class="nav-link">有品</a> <span class="shugang">|</span>
<a href="" class="nav-link">小爱开放平台</a> <span class="shugang">|</span>
<a href="" class="nav-link">企业团购</a> <span class="shugang">|</span>
<a href="" class="nav-link">资质证照</a> <span class="shugang">|</span>
<a href="" class="nav-link">协议规则</a> <span class="shugang">|</span>
<a href="" class="nav-link">智能生活</a> <span class="shugang">|</span>
<a href="" class="nav-link">Select Location</a>
</div>
<div class="cart-part">
<a href="" class="nav-link cart">购物车 (0)</a>
<div class="cart-list hide"></div>
</div>
<div class="nav-right">
<a href="" class="nav-link">登录</a> <span class="shugang">|</span>
<a href="" class="nav-link">注册</a> <span class="shugang">|</span>
<a href="" class="nav-link">消息通知</a>
</div>
</div>
</div>
<div class="main">
<div class="main-top clearfix">
<div class="main-top-logo">
<a href="" class="a-logo"></a>
</div>
<div class="main-top-nav">
<a href="">小米手机</a>
<a href="">Redmi 红米</a>
<a href="">电视</a>
<a href="">笔记本</a>
<a href="">家电</a>
<a href="">路由器</a>
<a href="">智能硬件</a>
<a href="">服务</a>
<a href="">社区</a>
</div>
<div class="main-top-search">
<input type="text" class="search-input"><input type="submit" class="search-button">
</div>
</div>
<div class="main-content clearfix">
<div class="main-content-left">
<ul>
<li>
<a href="">
<span>手机 手机卡</span>
<span class="dayuhao">></span>
</a>
</li>
<li>
<a href="">
<span>手机 手机卡</span>
<span class="dayuhao">></span>
</a>
</li>
<li>
<a href="">
<span>手机 手机卡</span>
<span class="dayuhao">></span>
</a>
</li>
<li>
<a href="">
<span>手机 手机卡</span>
<span class="dayuhao">></span>
</a>
</li>
<li>
<a href="">
<span>手机 手机卡</span>
<span class="dayuhao">></span>
</a>
</li>
<li>
<a href="">
<span>手机 手机卡</span>
<span class="dayuhao">></span>
</a>
</li>
<li>
<a href="">
<span>手机 手机卡</span>
<span class="dayuhao">></span>
</a>
</li>
<li>
<a href="">
<span>手机 手机卡</span>
<span class="dayuhao">></span>
</a>
</li>
<li>
<a href="">
<span>手机 手机卡</span>
<span class="dayuhao">></span>
</a>
</li>
<li>
<a href="">
<span>手机 手机卡</span>
<span class="dayuhao">></span>
</a>
</li>
</ul>
</div>
<div class="main-content-right">
<img src="1.PNG" alt="" style="width: 100%" >
</div>
</div>
</div> </body>
</html>
CSS部分
/* 清除左上的小空白 */

body{

    margin:;

    padding:;

}

/* 长方形黑框 */

.nav{

    height: 40px;

    background-color: #333333;

    line-height: 40px;

}

/* 防止父级标签塌陷 */

.clearfix:after{

    content: '';

    display: block;

    clear: both;

}

/* 让整个内容向右偏移5% 并且内容占90% 所以右边也占5% 保持左右对称 */

.nav-content{

    margin-left: 5%;

    width: 90%;

    position: relative;

}

/* 左部分内容和右部分内容浮动 离左右40px */

.nav-content .nav-left{

    float: left;

    height: 40px;

}

.nav-content .nav-right{

    float: right;

    height: 40px;

}

/* 设置内容里面所有a标签的样式 */

.nav-content a{

    color: #b0b0b0;

    text-decoration: none;

    font-size: 12px;

}

/* 设置所有竖杠的样式 */

.nav-content .shugang{

    color: #424242;

}

/* 购物车 (0)的位置 */

.cart-part{

    float: right;

}

/* 设置购物车小块块的样式 */

.cart-part .cart{

    display: inline-block;

    height: 40px;

    width: 120px;

    background-color: #424242;

    text-align: center;

}

/* 触碰购物车会出现一个下拉框 */

/* 原本display是none 当触碰购物车时会变为block状态*/

/* 在block块级标签状态下可与设置高度宽度等参数 */

.cart-part:hover .cart-list{

    display: block;

}

/* 触碰购物车下拉框的样式 */

.cart-list{

    height: 100px;

    width: 320px;

    position: absolute;

    right:;

    top: 40px;

    background-color: red;

}

/* 隐藏 */

.hide{

    display: none;

}

/* ---------------------------- */

/* 顶部区域 */

.main-top{

    height: 100px;

    margin-left: 5%;

    width: 90%;

    line-height: 100px;

}

/* 顶部区域左侧的区域 */

.main-top-logo{

    height: 100px;

    line-height: 100px;

    float: left;

}

/* 顶部区域左侧的小米logo样式 */

.a-logo{

    margin-top: 22px;

    display: inline-block;

    height: 55px;

    width: 55px;

    background: #ff6700 url('mi-logo.png') no-repeat 3px 3px;

}

/* 顶部区域中间的区域 */

.main-top-nav{

    float: left;

    margin-left: 180px;

}

/* 顶部区域中间区域的a标签样式 */

.main-top-nav a{

    color: #333;

    text-decoration: none;

    margin-left: 10px;

}

/* 顶部区域右边的搜索框区域 */

.main-top-search{

    float: right;

    height: 100px;

}

/* 右边的搜索框样式 */

.search-input{

    width: 246px;

    height: 46px;

    border: 1px solid #e0e0e0;

    border-right:;

}

/* 搜索框右边的搜索按钮的样式 */

.search-button{

    width: 50px;

    height: 50px;

    padding:;

    background-color: white;

    border: 1px solid #e0e0e0;

}

/* 当鼠标触碰查找按钮时  */

.search-button:hover{

    background-color: #ff6700;

}

/* 主内容区域  */

.main-content{

    margin-left: 5%;

    width: 90%;

}

/* 主内容左侧区域 */

.main-content-left{

    float: left;

    background-color: rgba(105,101,101,0.6);

    width: 20%;

}

/* 主内容右侧区域 */

.main-content-right{

    float: right;

    width: 80%;

}

/* 主内容左侧区域的ul竖行 */

.main-content-left ul{

    list-style: none; /* 取出列表每项的前面的点 '·' */

    padding:;

}

/* 主内容左侧区域ul下面的li(每项) */

.main-content-left ul li{

    height: 40px;

    width: 100%;

    line-height: 40px;

}

/* 每个li里面(每个点里面)都有一个a标签 这个是设置a标签样式 */

.main-content-left ul li a{

    text-decoration: none;

    color: #fff;

    font-size: 14px;

    display: inline-block;

    width: 80%;

    margin-left: 10%;

}

/* 每行内容都有一个大于号 让它在最右边 */

.main-content-left ul li a .dayuhao{

    float: right;

}

/* 触碰每一个小项时,颜色会变成橙色 */

.main-content-left ul li:hover{

    background-color: #ff6700;

}
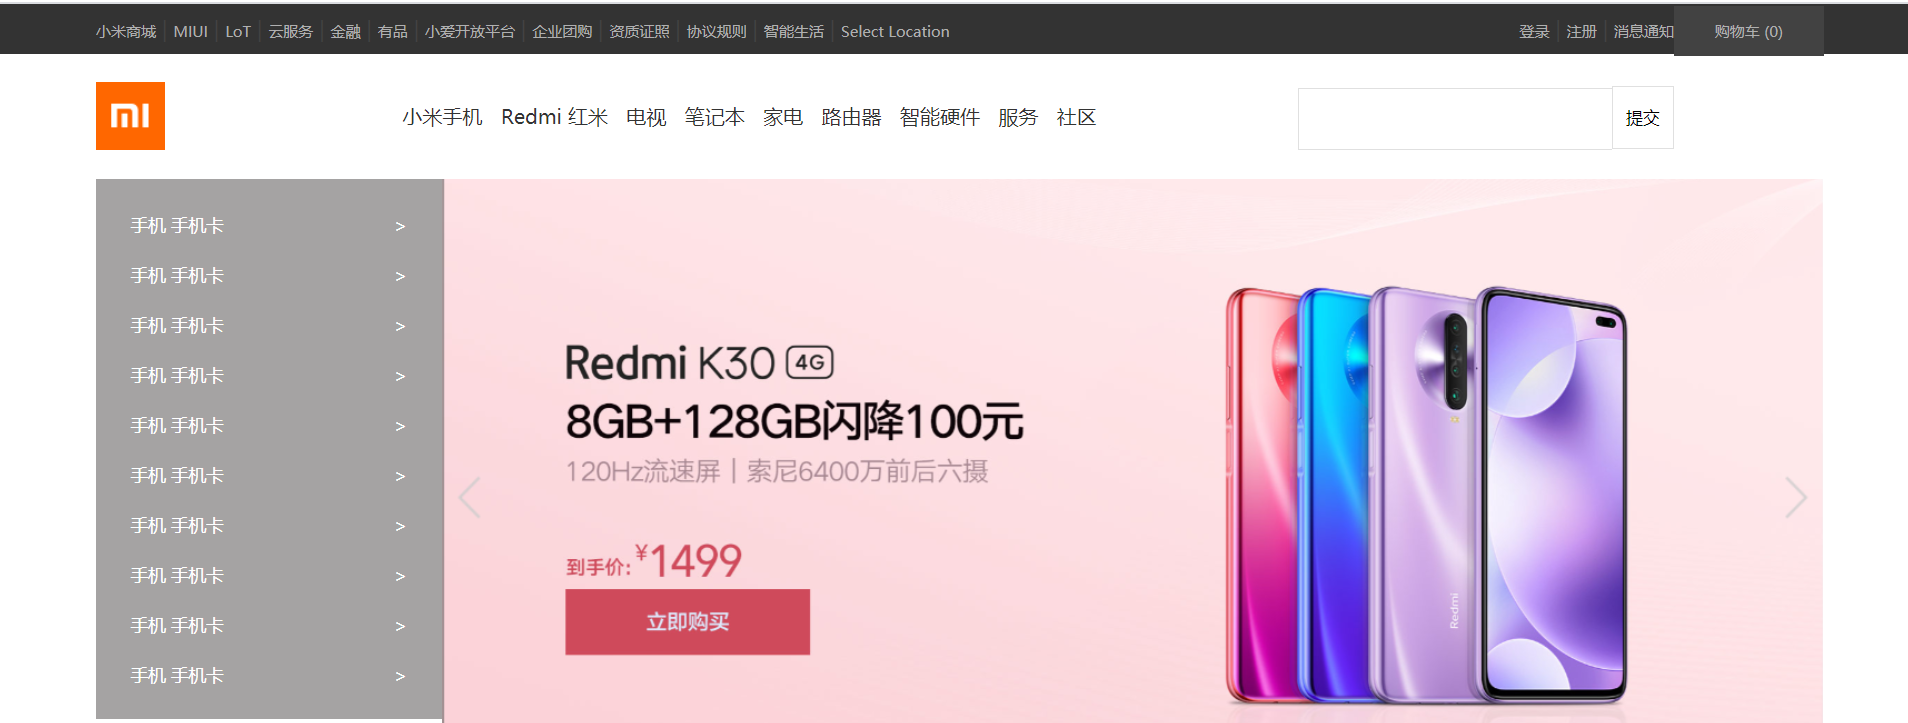
最终实现效果图
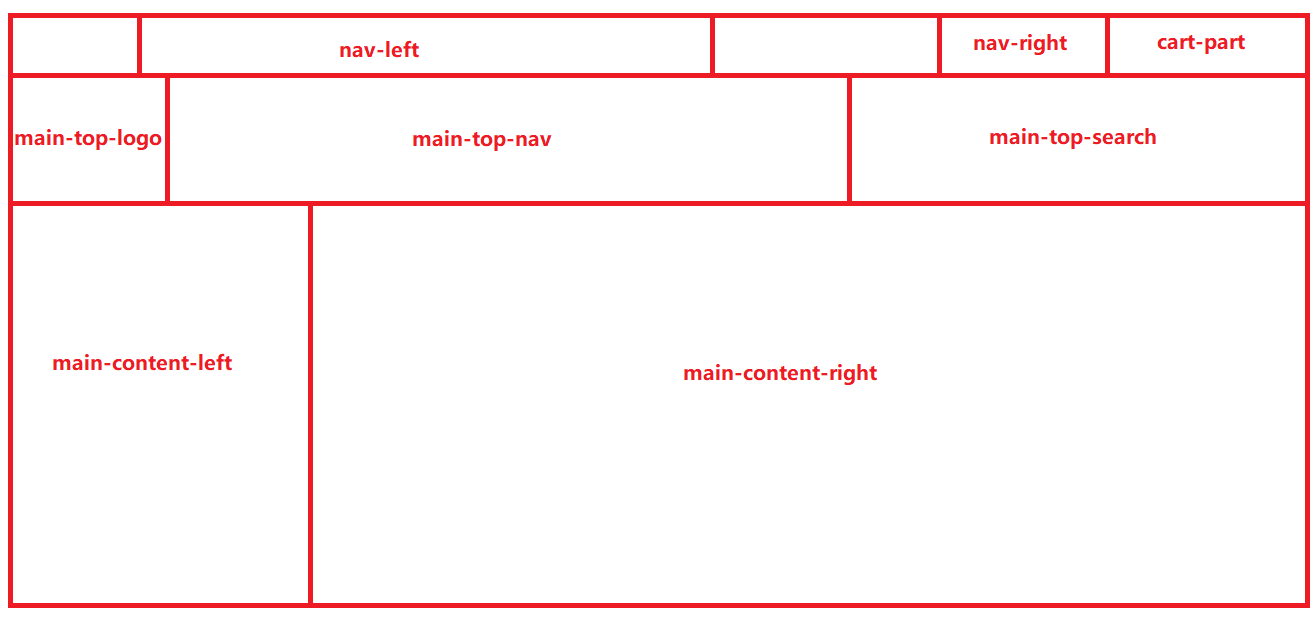
划分区域
day45:JS中的json&JS的BOM操作和DOM操作的更多相关文章
- MVC中处理Json和JS中处理Json对象
MVC中处理Json和JS中处理Json对象 ASP.NET MVC 很好的封装了Json,本文介绍MVC中处理Json和JS中处理Json对象,并提供详细的示例代码供参考. MVC中已经很好的封装了 ...
- js中的json对象详细介绍
JSON一种简单的数据格式,比xml更轻巧,在JavaScript中处理JSON数据不需要任何特殊的API或工具包,下面为大家详细介绍下js中的json对象, 1.JSON(JavaScript Ob ...
- 在js中使用json
在js中使用json var obj = { "1" : "value1", "2" : "value2" ...
- 在JavaScript中使用json.js:使得js数组转为JSON编码
在json的官网中下载json.js,然后在script中引入,以使用json.js提供的两个关键方法. 1.数组对象.toJSONString() 这个方法将返回一个JSON编码格式的字符串,用来表 ...
- js中 给json对象添加属性和json数组添加元素
js中 给json对象添加新的属性 比如现在有一个json对象为jsonObj,需要给这个对象添加新的属性newParam,同时给newParam赋值为pre.做法如下: var obj={ &quo ...
- js中的json操作
js中的json操作 JSON(JavaScript Object Notation) 是一种轻量级的数据交换格式,采用完全独立于语言的文本格式,是理想的数据交换格式.同时,JSON是 JavaScr ...
- 【微信小程序】在js中导入第三方js或自己写的js,使用外部js中的function的两种方法 import和require的区别使用方法 【外加:使用第三方js导出的默认function的调用方法】
如下 定义了一个外部js文件,其中有一个function import lunaCommon from '../lunaCommon.js'; var ctx = wx.getStorageSync( ...
- 【转】MVC中处理Json和JS中处理Json对象
事实上,MVC中已经很好的封装了Json,让我们很方便的进行操作,而不像JS中那么复杂了. MVC中: public JsonResult Test() { JsonResult json = new ...
- js中的json
1.什么是JSON? JSON 指的是 JavaScript 对象表示法(JavaScript Object Notation) JSON 是轻量级的文本数据交换格式 2.JSON语法是JavaScr ...
随机推荐
- CF习题集一
CF习题集一 一.CF915E Physical Education Lessons 题目描述 \(Alex\)高中毕业了,他现在是大学新生.虽然他学习编程,但他还是要上体育课,这对他来说完全是一个意 ...
- RabbitMq之消息确认
最近阅读了rabbitmq的官方文档,然后结合之前面试时被问到关于消息队列的问题来探索一下关于消息队列的消息确认机制. 其实消息确认就是消费者确认消息被消费了, 生产者确认消息已经发送到了消息队列中了 ...
- 老板让我从上千个Excel中筛选数据,利用Python分分钟解决!
大家好,又到了Python办公自动化系列. 今天分享一个真实的办公自动化需求,大家一定要仔细阅读需求说明,在理解需求之后即可体会Python的强大! 很多人学习python,不知道从何学起.很多人学习 ...
- kubeadm部署1.17.3[基于Ubuntu18.04]
基于 Ubuntu18.04 使用 kubeadm 部署Kubernetes 1.17.3 高可用集群 环境 所有节点初始化 # cat <<EOF>> /etc/hosts ...
- LDAP 使用记录
LDAP 命令记录 工作中用到了 LDAP,做一个简单记录. 概念性的东西不做阐述,只是记录常用命令,以便将来回顾. 想多做了解可以参考这个系列文章: https://blog.csdn.net/li ...
- Nginx安装与运行配置总结
Nginx安装与运行配置总结 1. 去官网下载对应的nginx包,推荐使用稳定版本 2. 上传nginx到linux系统 3. 安装依赖环境 (1)安装gcc环境 yun install gcc-c+ ...
- Homekit_温湿度传感器
本款产品为Homekit相关产品需要使用苹果手机进行操作,有兴趣的可以去以下链接购买: https://item.taobao.com/item.htm?spm=a1z10.1-c.w4004-112 ...
- Spring同时集成JPA与Mybatis
@ 目录 ORM Spring ORM Spring ORM 同时集成JPA与Mybatis 一.创建一个SpringBoot项目 二.建立用户信息登记表 三.Web应用项目集成mysql 四.添加S ...
- python处理转载博客html
前景 在转载别人博客的时候通常我们会通过复制html然后放到编辑器里面, 但是通常html里有很多杂七杂八的东西, 比如script, svg这些标签导致排版出现问题 例如由lu标签引起的 由svg标 ...
- MongoDB学习1:认识文档数据库MongoDB
1. 关于MongoDB 什么是MongoDB 一个以JSON为数据模型的文档数据库 为什么叫文档数据库 文档来自于"JSON Document",并非我们一般理解的pdf,wor ...