关联实现下-jsonpath取值(有难度!!耗时长)
re的使用参考:正则表达式基础及re模块:https://www.cnblogs.com/dream66/p/12953729.html
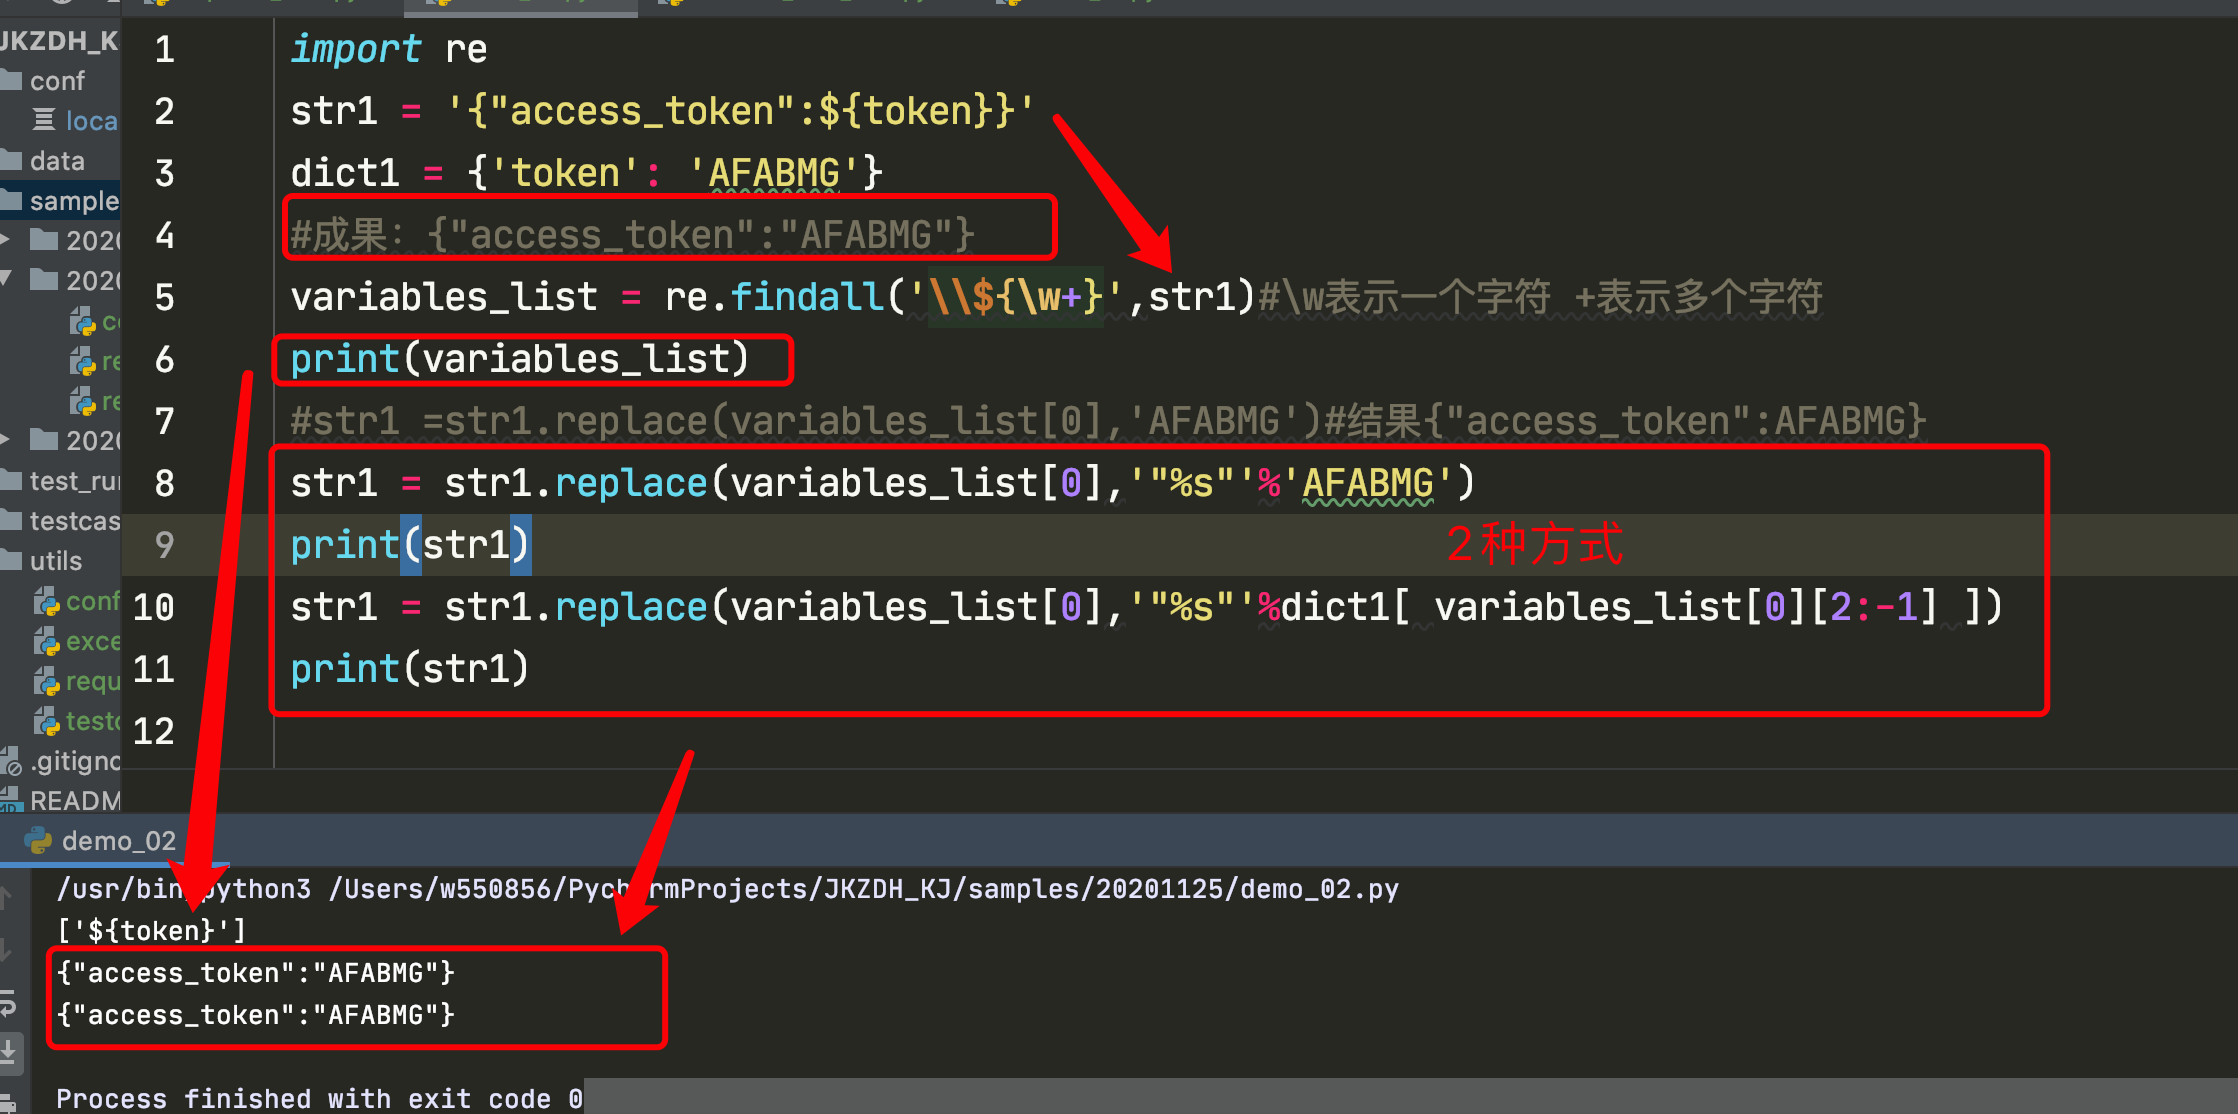
import re
str1 = '{"access_token":${token}}'
dict1 = {'token': 'AFABMG'}
#成果:{"access_token":"AFABMG"}
variables_list = re.findall('\\${\w+}',str1)#\w表示一个字符 +表示多个字符
print(variables_list)
#str1 =str1.replace(variables_list[0],'AFABMG')#结果{"access_token":AFABMG}
str1 = str1.replace(variables_list[0],'"%s"'%'AFABMG')
print(str1)
str1 = str1.replace(variables_list[0],'"%s"'%dict1[ variables_list[0][2:-1] ])
print(str1)
str1 = str1.replace(variables_list[0],'"%s"'%dict1[ variables_list[0][2:-1] ])#取出来的token刚好和str1里面的token一致
分解:
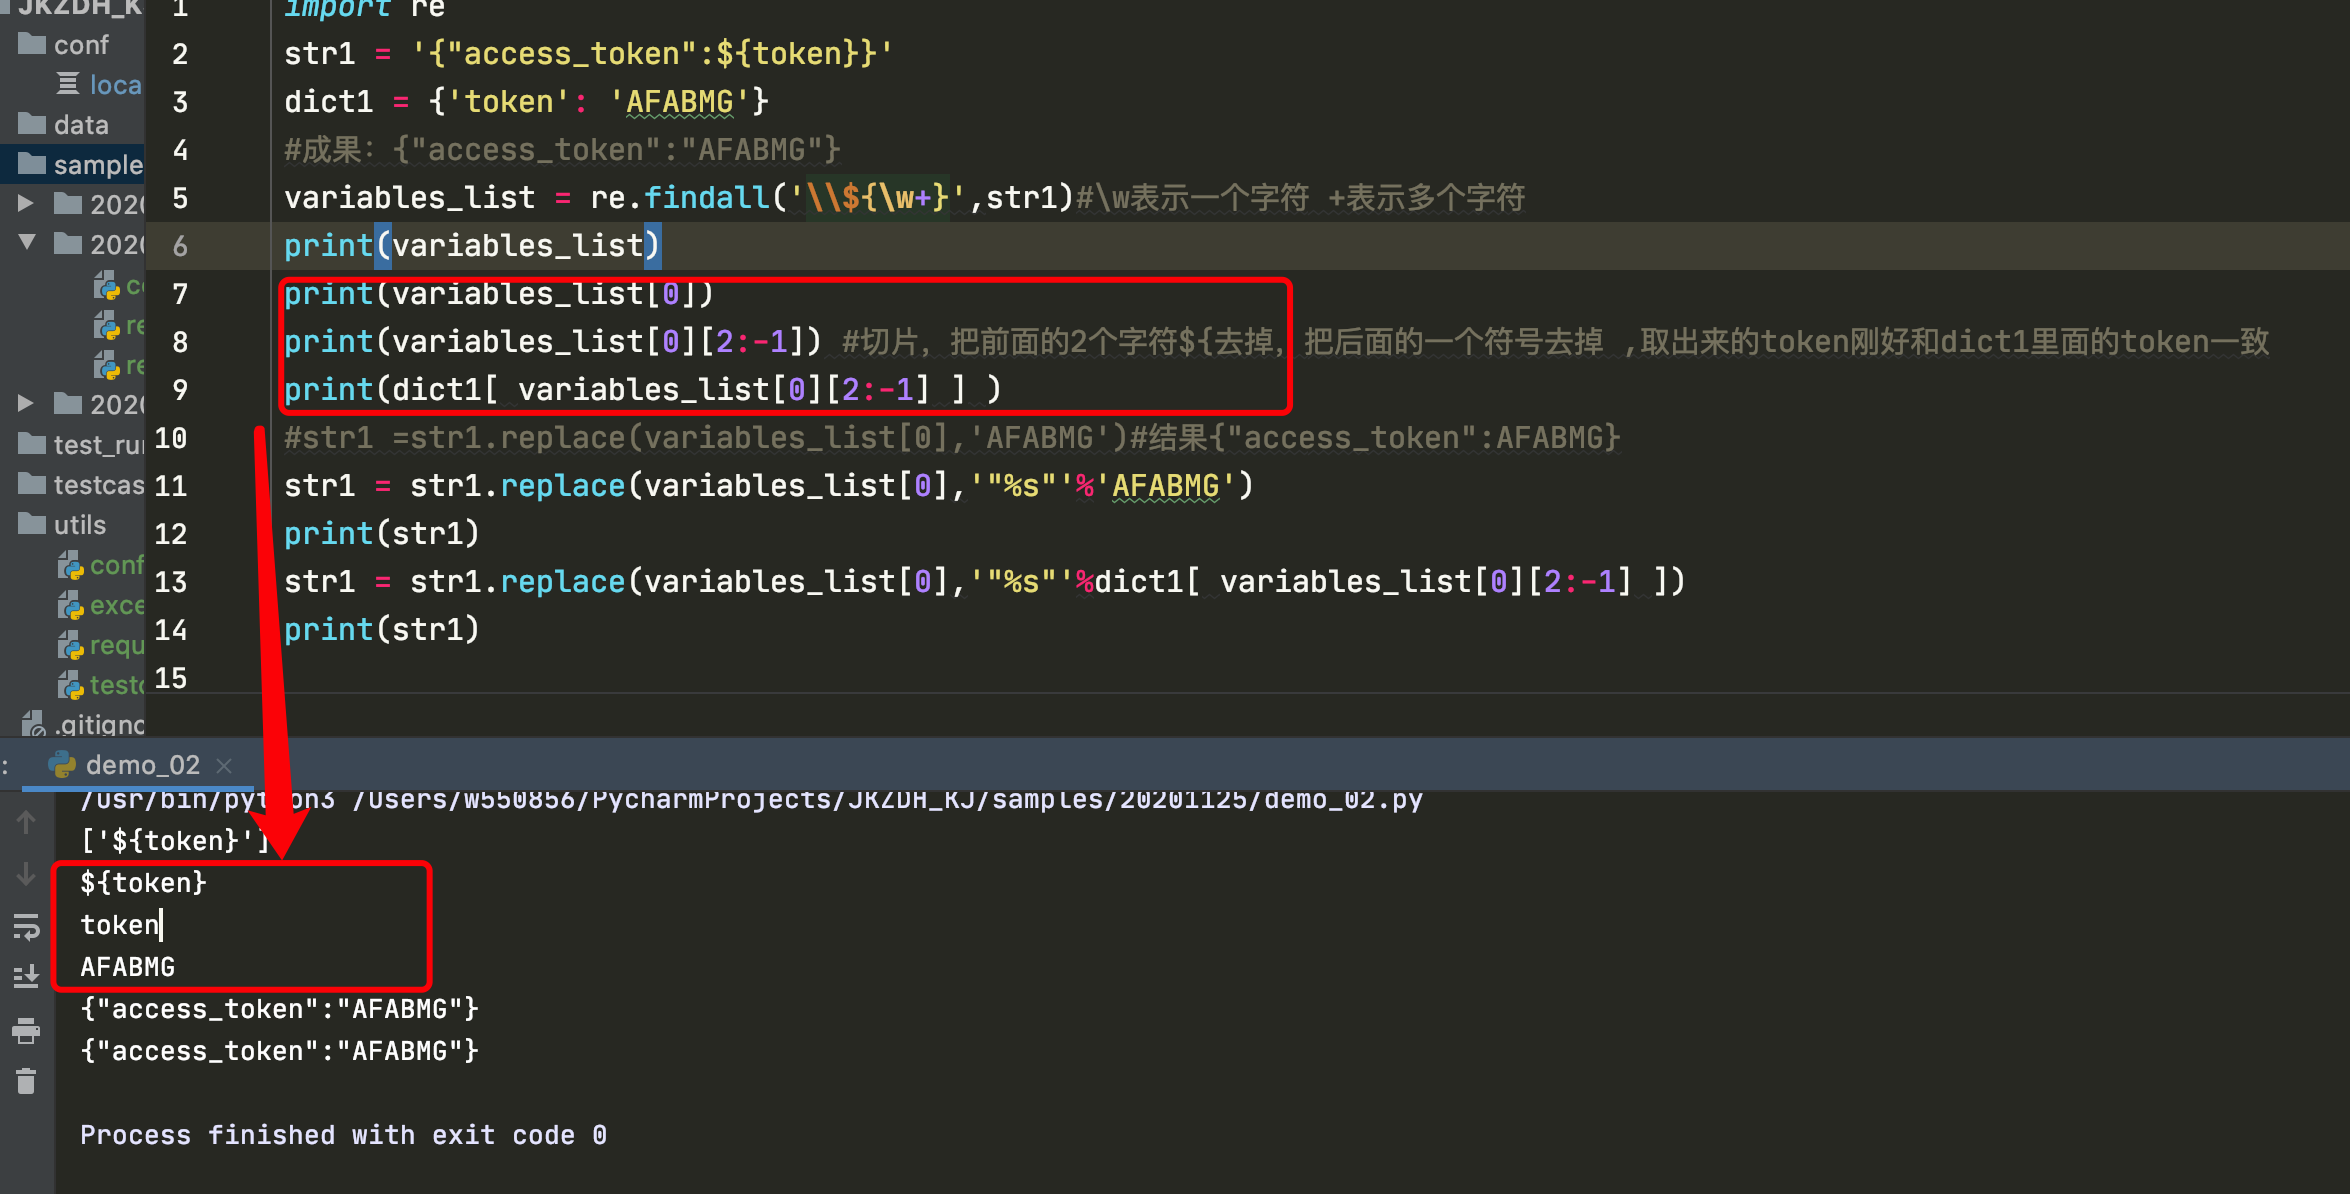
print(variables_list[0])
print(variables_list[0][2:-1]) #切片,把前面的2个字符${去掉,把后面的一个符号去掉 ,取出来的token刚好和dict1里面的token一致
print(dict1[ variables_list[0][2:-1] ] )

举例子samples/demo02.py
import re
import ast
import json
str1 = '{"access_token":${token}}'
dict1 = {'token': 'AFABMG'}
#成果:{"access_token":"AFABMG"}
variables_list = re.findall('\\${\w+}',str1)#\w表示一个字符 +表示多个字符
print(variables_list)
print(variables_list[0])
print(variables_list[0][2:-1]) #切片,把前面的2个字符${去掉,把后面的一个符号去掉 ,取出来的token刚好和dict1里面的token一致
print(dict1[ variables_list[0][2:-1] ] )
#str1 =str1.replace(variables_list[0],'AFABMG')#结果{"access_token":AFABMG}
str1 = str1.replace(variables_list[0],'"%s"'%'AFABMG')
print(str1)
str1 = str1.replace(variables_list[0],'"%s"'%dict1[ variables_list[0][2:-1] ])
print(str1)
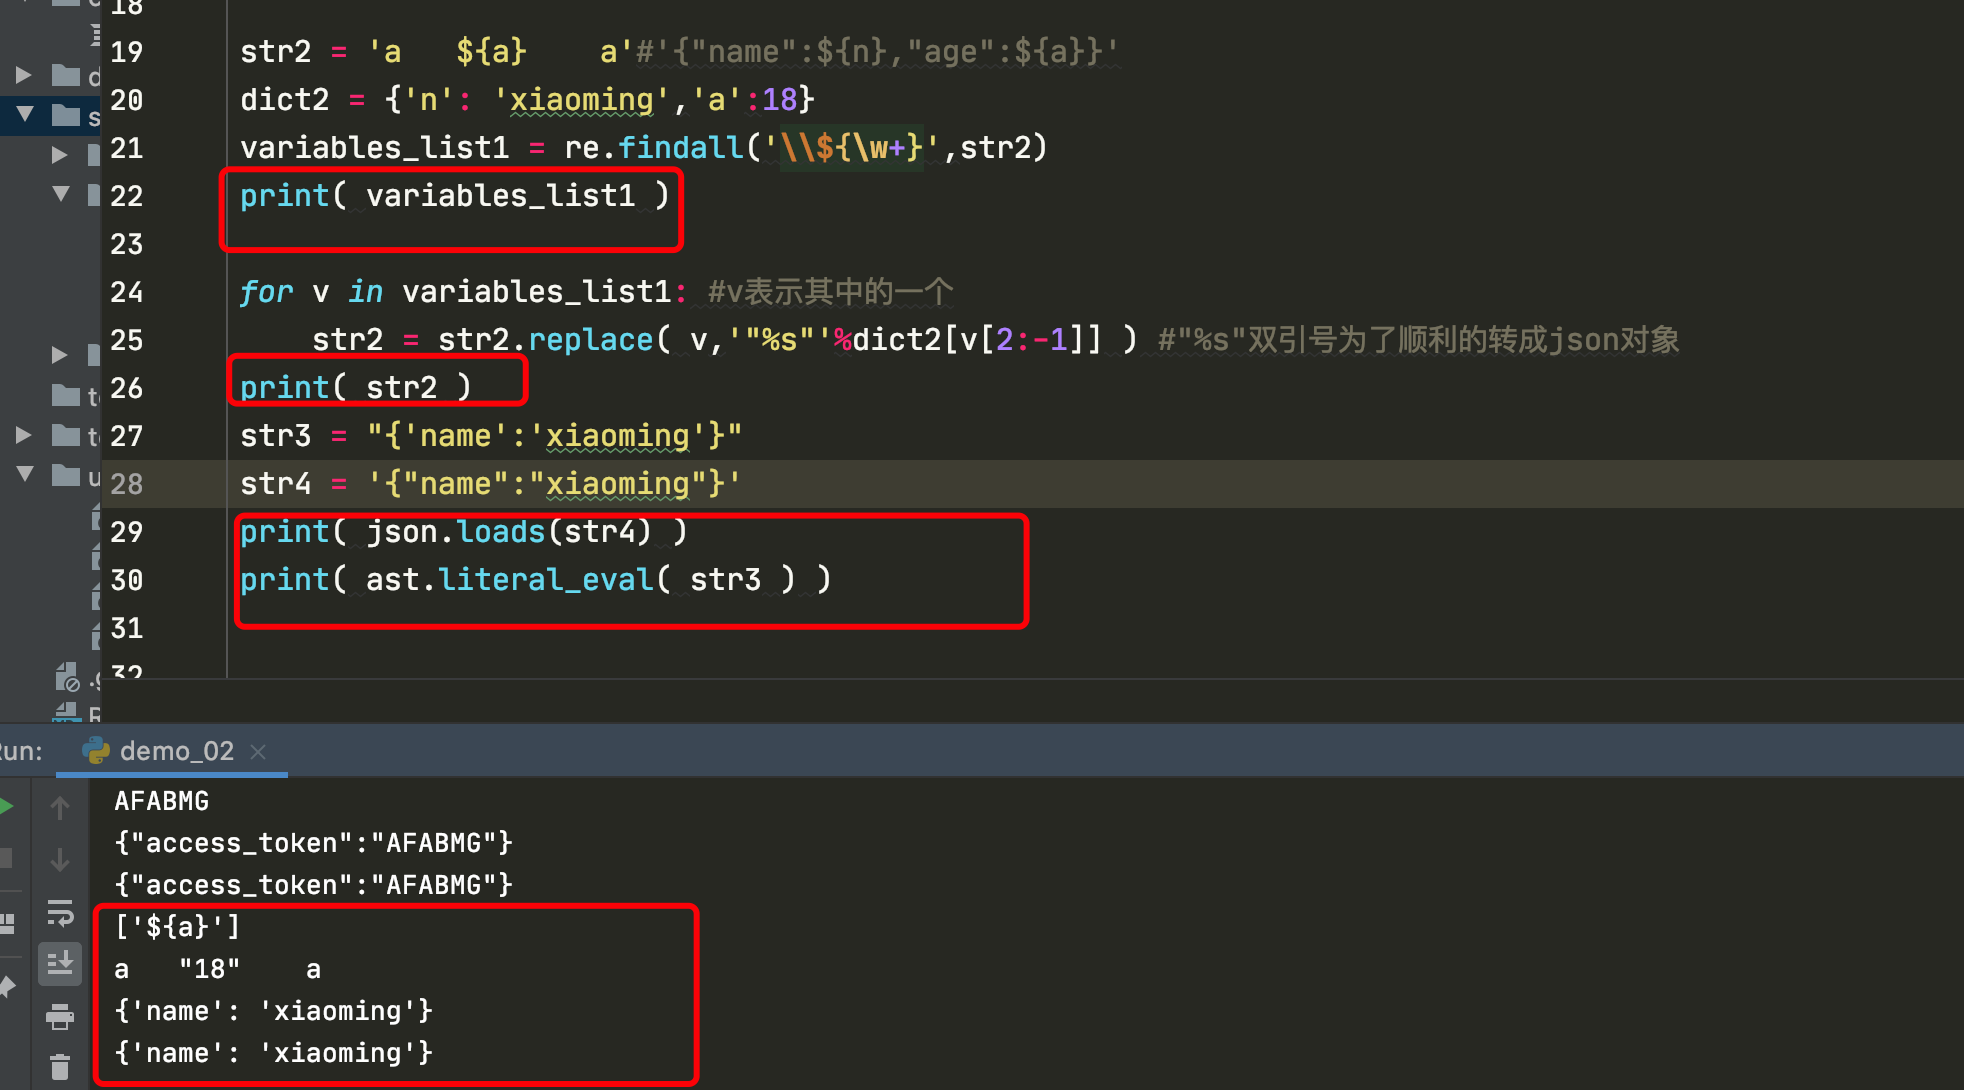
str2 = 'a ${a} a'#'{"name":${n},"age":${a}}'
dict2 = {'n': 'xiaoming','a':18}
variables_list1 = re.findall('\\${\w+}',str2)
print( variables_list1 )
for v in variables_list1: #v表示其中的一个
str2 = str2.replace( v,'"%s"'%dict2[v[2:-1]] ) #"%s"双引号为了顺利的转成json对象
print( str2 )
str3 = "{'name':'xiaoming'}"
str4 = '{"name":"xiaoming"}'
print( json.loads(str4) )
print( ast.literal_eval( str3 ) )

️️️️️️️️️️️️️️️️️️️️️️️️️️️️️️️
把v改成variables


对应post方法
post也要替换同步:
post_variable_list = re.findall('\\${\w+}', requests_info['请求参数(post)'])  #取tag_id
for variable in post_variable_list:
    requests_info['请求参数(post)'] = requests_info['请求参数(post)'].replace(variable,
                                                                      '"%s"' % self.tmp_variables[
                                                                          variable[2:-1]])


requests.py
# -*- coding: utf-8 -*-
#@File :requests_utils.py
#@Auth : wwd
#@Time : 2020/12/8 8:00 下午
import jsonpath
import requests
import json
from utils.config_utils import local_config
import re
class RequestsUtils:
def __init__(self):
self.hosts = local_config.HOSTS
self.session = requests.session()
self.tmp_variables={} #临时变量
def __get(self, requests_info):
url = self.hosts + requests_info['请求地址']# 取出下面字典中的请求地址。
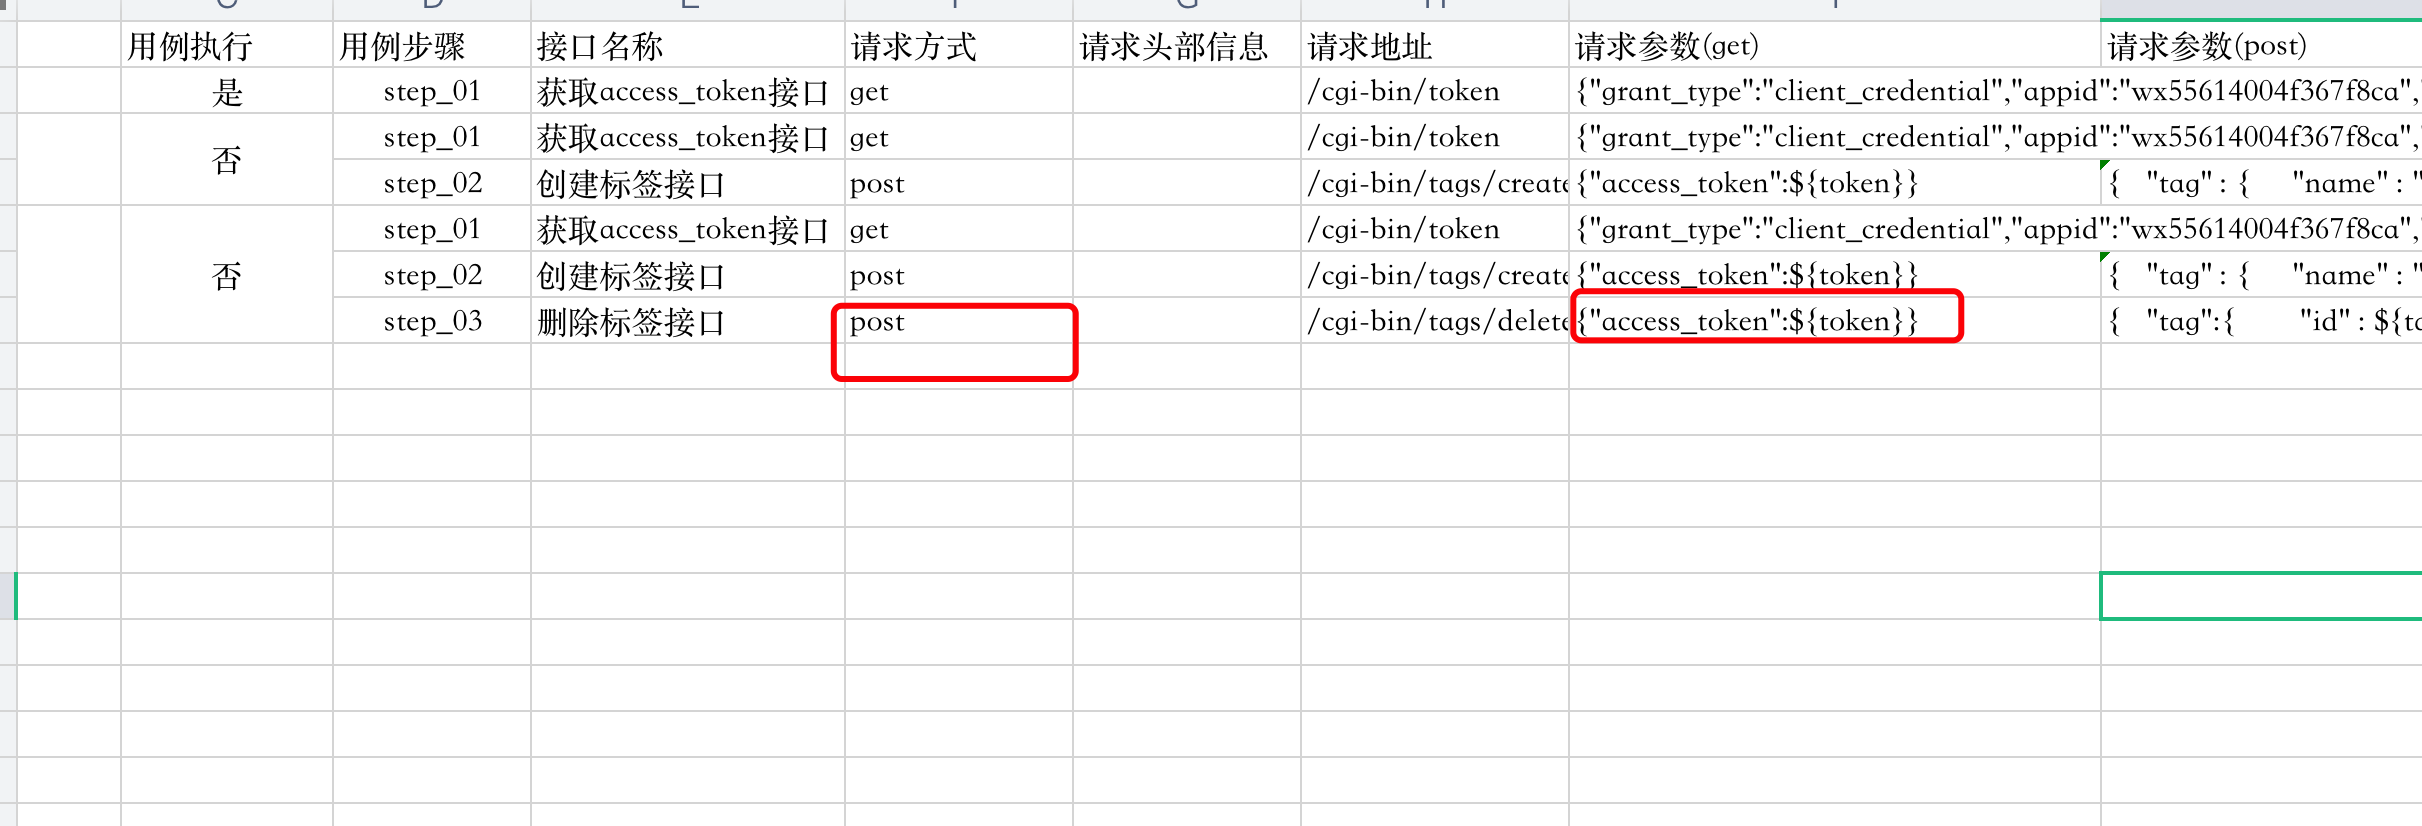
# {'测试用例编号': 'api_case_01', '测试用例名称': '获取access_token接口测试', '用例执行': '是', '用例步骤': 'step_01', '接口名称': '获取access_token接口', '请求方式': 'get', '请求头部信息': '', '请求地址': '/cgi-bin/token', '请求参数(get)': '{"grant_type":"client_credential","appid":"wx55614004f367f8ca","secret":"65515b46dd758dfdb09420bb7db2c67f"}', '请求参数(post)': '', '取值方式': '无', '取值代码': '', '取值变量': '', '断言类型': 'body_regexp', '期望结果': '"access_token":"(.+?)"'}
variable_list = re.findall('\\${\w+}', requests_info['请求参数(get)'])
for variable in variable_list:
requests_info['请求参数(get)'] = requests_info['请求参数(get)'].replace(variable,
'"%s"' % self.tmp_variables[variable[2:-1]])
response = self.session.get(url=url,
params=json.loads(requests_info['请求参数(get)']),
headers=requests_info['请求头部信息'])
if requests_info['取值方式'] == 'jsonpath取值':
value = jsonpath.jsonpath(response.json(), requests_info['取值代码'])[0]
self.tmp_variables[requests_info['取值变量']] = value
#取值变量就是token ,value就是用正则表达式真正提取出来的一个值,放在一个字典里面成为一个真正的键值对,变量名就是临时字典key的名字
result = {
'code':0,
'response_code':response.status_code,
'response_reason':response.reason,
'response_headers':response.headers,
'response_body':response.text
}
return result
def __post(self, requests_info):
url = self.hosts + requests_info['请求地址']
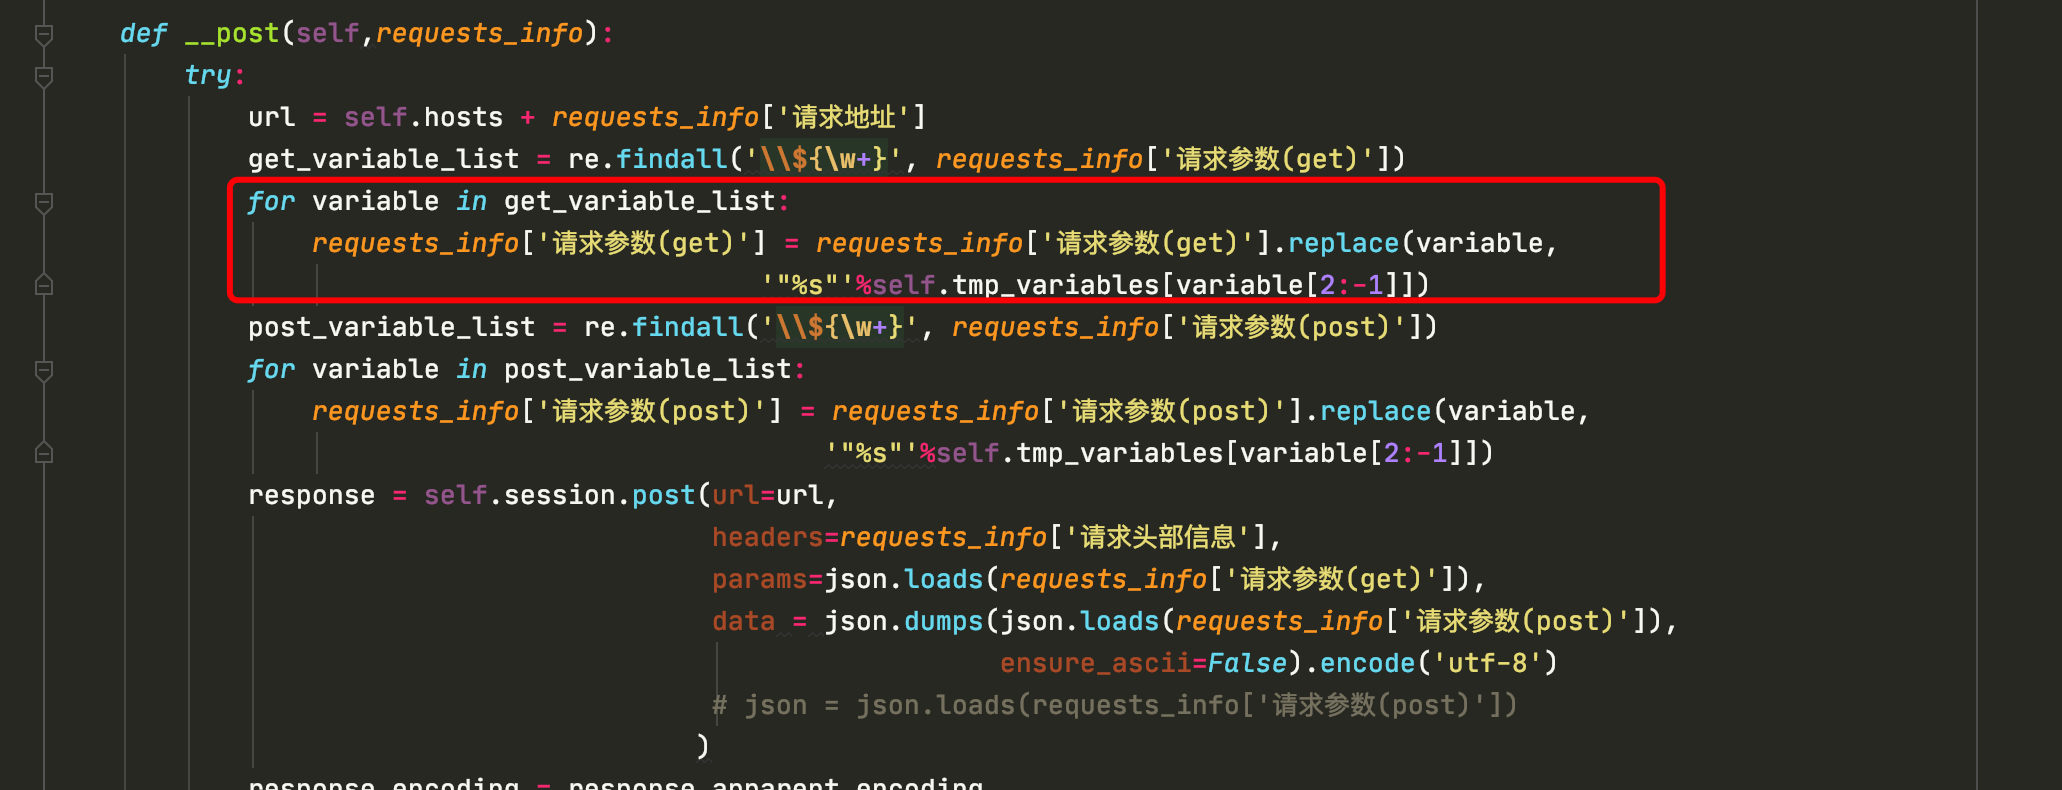
get_variable_list = re.findall('\\${\w+}', requests_info['请求参数(get)'])
for variable in get_variable_list:
requests_info['请求参数(get)'] = requests_info['请求参数(get)'].replace(variable,
'"%s"' % self.tmp_variables[variable[2:-1]])
post_variable_list = re.findall('\\${\w+}', requests_info['请求参数(post)']) #取tag_id
for variable in post_variable_list:
requests_info['请求参数(post)'] = requests_info['请求参数(post)'].replace(variable,
'"%s"' % self.tmp_variables[
variable[2:-1]])
response = self.session.post(url=url,
headers=requests_info['请求头部信息'],
params=json.loads(requests_info['请求参数(get)']),
json=json.loads(requests_info['请求参数(post)'])
)#参数名 =参数值
response.encoding = response.apparent_encoding#防止乱码
if requests_info['取值方式'] == 'jsonpath取值':
value = jsonpath.jsonpath(response.json(), requests_info['取值代码'])[0]
self.tmp_variables[requests_info['取值变量']] = value
result = {
'code': 0,
'response_code': response.status_code,
'response_reason': response.reason,
'response_headers': response.headers,
'response_body': response.text
}
return result
def request(self, step_info):
request_type = step_info['请求方式']
if request_type == "get":
result = self.__get(step_info)
elif request_type == "post":
result = self.__post(step_info)
else:
result = {'code': 1, 'result': '请求方式不支持'}
print(self.tmp_variables)
return result
def request_by_step(self, test_steps):
for test_step in test_steps:
result = self.request(test_step)
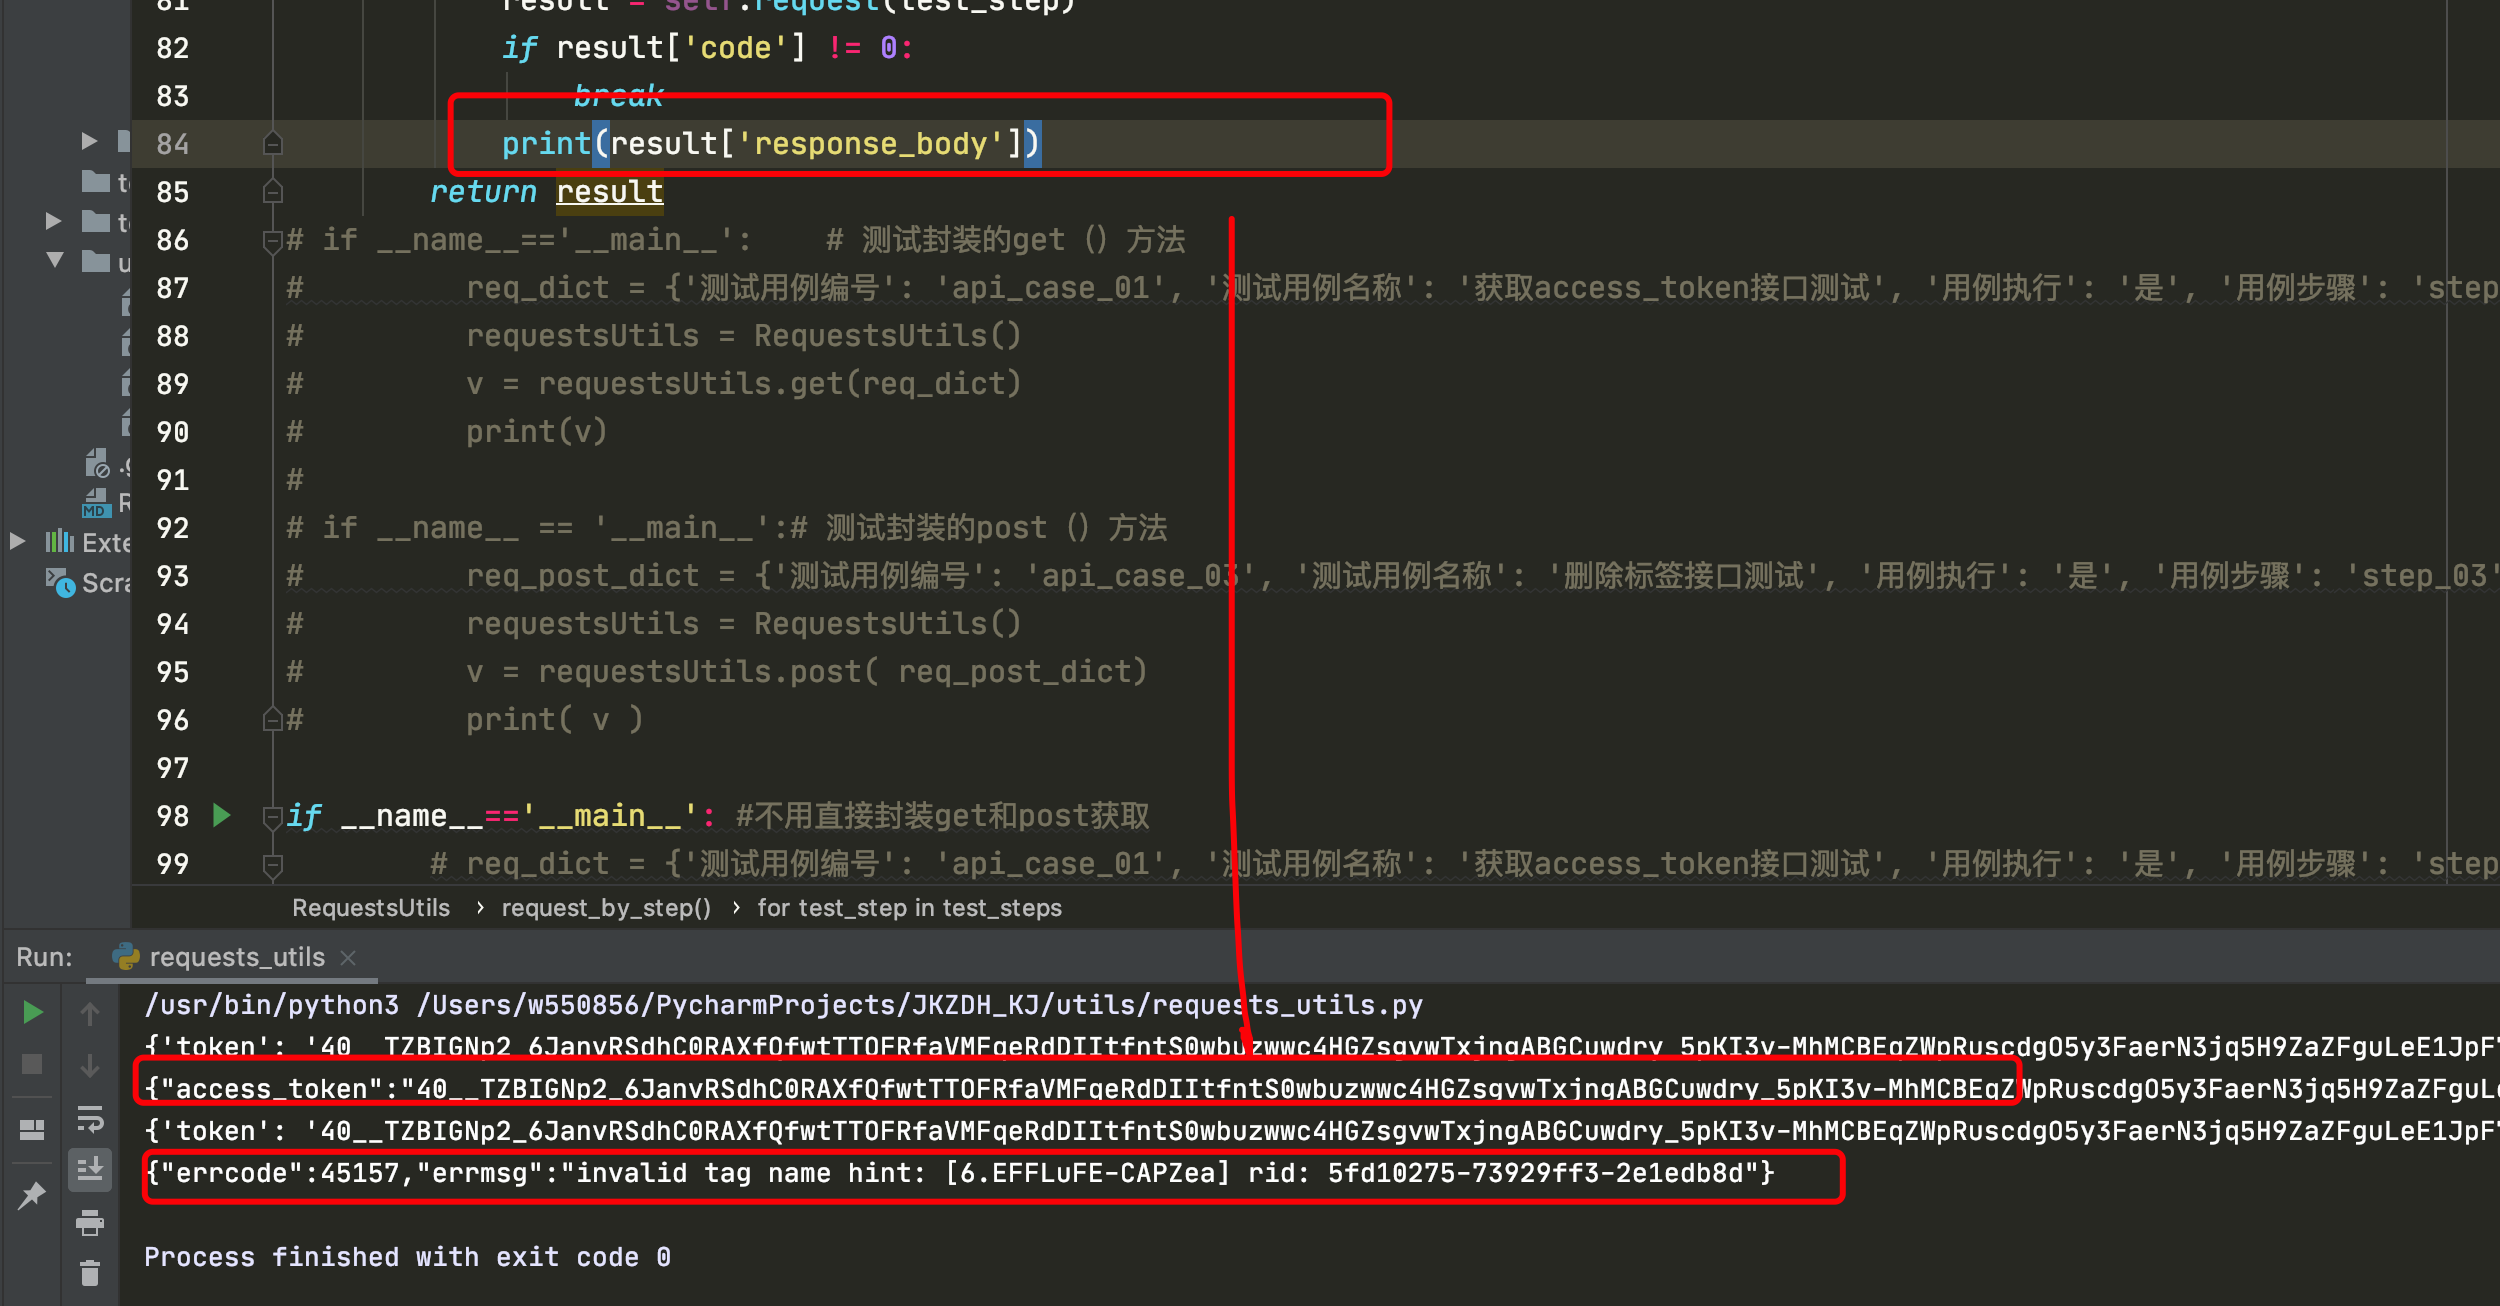
if result['code'] != 0:
break
print(result['response_body'])
return result
# if __name__=='__main__': # 测试封装的get()方法
# req_dict = {'测试用例编号': 'api_case_01', '测试用例名称': '获取access_token接口测试', '用例执行': '是', '用例步骤': 'step_01', '接口名称': '获取access_token接口', '请求方式': 'get', '请求头部信息': '', '请求地址': '/cgi-bin/token', '请求参数(get)': '{"grant_type":"client_credential","appid":"wx55614004f367f8ca","secret":"65515b46dd758dfdb09420bb7db2c67f"}', '请求参数(post)': '', '取值方式': '无', '取值代码': '', '取值变量': '', '断言类型': 'body_regexp', '期望结果': '"access_token":"(.+?)"'}
# requestsUtils = RequestsUtils()
# v = requestsUtils.get(req_dict)
# print(v)
#
# if __name__ == '__main__':# 测试封装的post()方法
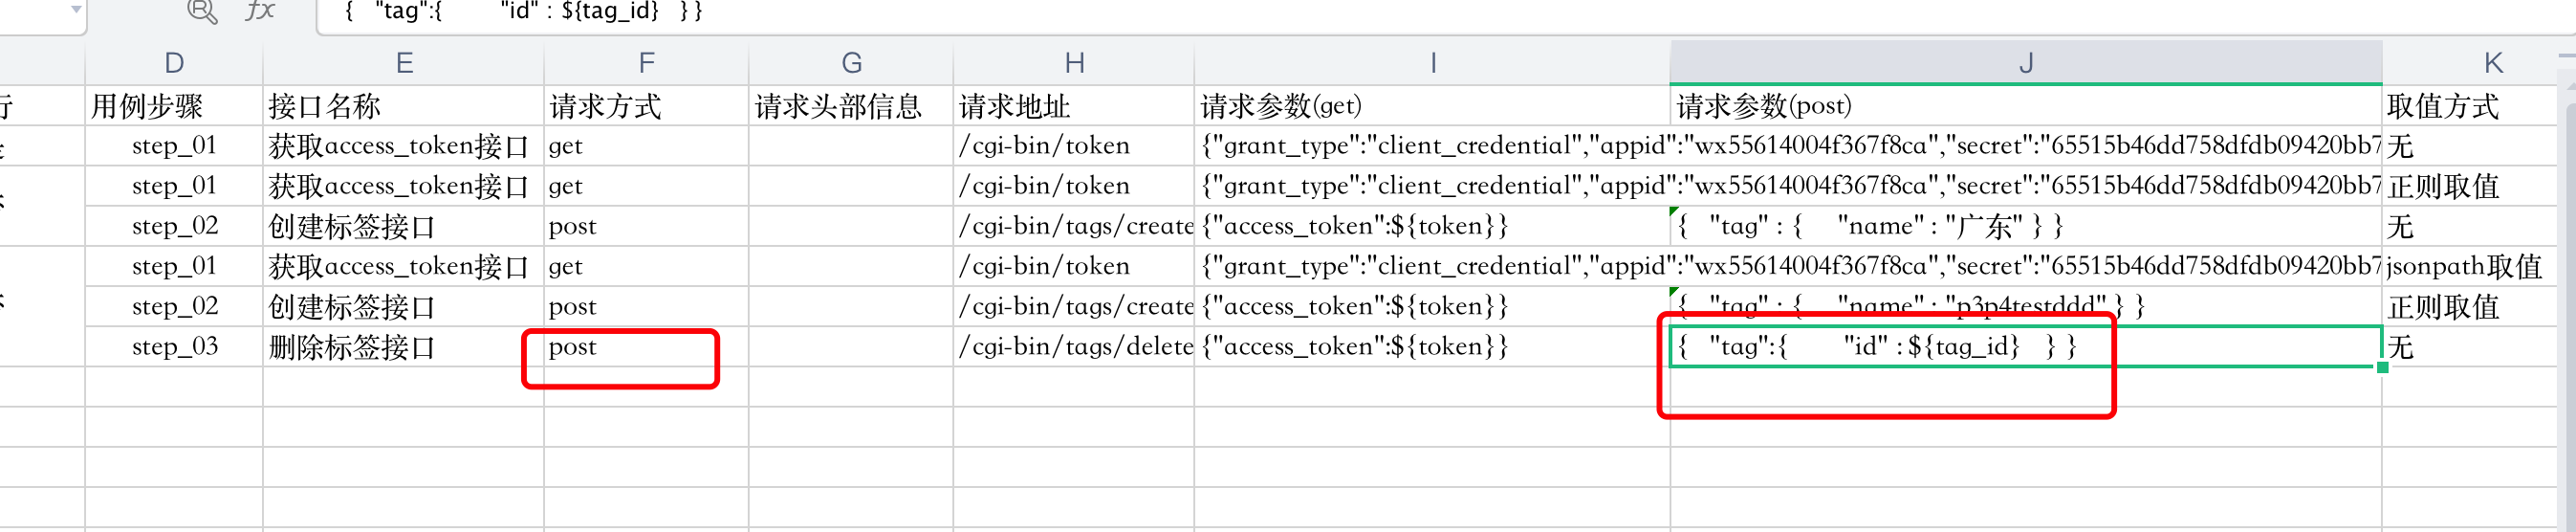
# req_post_dict = {'测试用例编号': 'api_case_03', '测试用例名称': '删除标签接口测试', '用例执行': '是', '用例步骤': 'step_03', '接口名称': '删除标签接口', '请求方式': 'post', '请求头部信息': '', '请求地址': '/cgi-bin/tags/delete', '请求参数(get)': '{"access_token":"39_ZlzNDPma7qLWpLJ4K0ir_cSahJ_fg9aevBpGvqRp9VNjqRE6hSkBOSUFla-mFjSGKyF-YFx28sM4Ch1rJISPGVSTahZ8l_xQ9M7CnAFoqUfibusAdeOI4lHEIzB6zhXJQHN5b9as9zhcGtSbBYKeAGAEBN"}', '请求参数(post)': '{ "tag":{ "id" : 456 } }'}
# requestsUtils = RequestsUtils()
# v = requestsUtils.post( req_post_dict)
# print( v )
if __name__=='__main__': #不用直接封装get和post获取
# req_dict = {'测试用例编号': 'api_case_01', '测试用例名称': '获取access_token接口测试', '用例执行': '是', '用例步骤': 'step_01', '接口名称': '获取access_token接口', '请求方式': 'get', '请求头部信息': '', '请求地址': '/cgi-bin/token', '请求参数(get)': '{"grant_type":"client_credential","appid":"wx55614004f367f8ca","secret":"65515b46dd758dfdb09420bb7db2c67f"}', '请求参数(post)': '', '取值方式': '无', '取值代码': '', '取值变量': '', '断言类型': 'body_regexp', '期望结果': '"access_token":"(.+?)"'}
# requestsUtils = RequestsUtils()
# v = requestsUtils.request(req_dict)
# print(v)
step_list = [{'测试用例编号': 'api_case_02', '测试用例名称': '创建标签接口测试', '用例执行': '是', '用例步骤': 'step_01', '接口名称': '获取access_token接口', '请求方式': 'get', '请求头部信息': '', '请求地址': '/cgi-bin/token', '请求参数(get)': '{"grant_type":"client_credential","appid":"wx55614004f367f8ca","secret":"65515b46dd758dfdb09420bb7db2c67f"}', '请求参数(post)': '', '取值方式': 'jsonpath取值', '取值代码': '$.access_token', '取值变量': 'token'}, {'测试用例编号': 'api_case_02', '测试用例名称': '创建标签接口测试', '用例执行': '是', '用例步骤': 'step_02', '接口名称': '创建标签接口', '请求方式': 'post', '请求头部信息': '', '请求地址': '/cgi-bin/tags/create', '请求参数(get)': '{"access_token":${token}}', '请求参数(post)': '{ "tag" : { "name" : "p3p4hehehe123" } } ', '取值方式': '无', '取值代码': '', '取值变量': ''}]
requestsUtils = RequestsUtils()
r = requestsUtils.request_by_step(step_list)
# print( r['response_body'] )
github源码地址:https://github.com/w550856163/JKZDH_KJ.git 版本tag:v1.1
1、利用jsonpath取出上一个接口的返回值存放到临时字典
2、利用re 和replace 完成 下一个接口的参数使用上一个接口的返回值作为参数值
关联实现下-jsonpath取值(有难度!!耗时长)的更多相关文章
- 关联实现上-jsonpath取值
举例子: demo01.py import jsonimport requestsimport jsonpathsession = requests.session()get_param_dict={ ...
- dateTimePicker编辑状态下,取值不正确的问题
当对dateTimePicker进行编辑,回车,调用函数处理dateTimePicker的value值时,其取值结果是你编辑之前的值,而不是你编辑后的值,虽然dateTimePicker.text的值 ...
- python_request 使用jsonpath取值结果,进行接口关联
一.jsonpath的安装 pip install jsonpath 二.使用举例 import jsonpath d1={"token":"hjshdsjhdsj ...
- layer ui 多选下拉取值(全)
https://maplemei.gitee.io/xm-select/#/basic/create layer ui
- 微信小程序传值取值的几种方法
一,列表index下的取值 实现方式是:data-index="{{index}}"挖坑及e.currentTarget.dataset.index来填坑即可 1.1生成值 < ...
- MySQL 自增字段取值
1 前言 本文来自回答思否网友的一个问题,这个网友新建了一张表,auto_increment_increment设为10,AUTO_INCREMENT主键起始值设为9, 当他插入数据的时候,发现主键值 ...
- Python_关于多线程下变量赋值取值的一点研究
关于多线程下变量赋值取值的一点研究 by:授客 QQ:1033553122 1.代码实践1 #!/usr/bin/env python # -*- coding:utf-8 -*- __author_ ...
- Jquery操作下拉框(DropDownList)实现取值赋值
Jquery操作下拉框(DropDownList)想必大家都有所接触吧,下面与大家分享下对DropDownList进行取值赋值的实现代码 1. 获取选中项: 获取选中项的Value值: $('sele ...
- Jquery操作下拉框(DropDownList)的取值赋值实现代码(王欢)
Jquery操作下拉框(DropDownList)的取值赋值实现代码(王欢) 1. 获取选中项: 获取选中项的Value值: $('select#sel option:selected').val() ...
随机推荐
- Linux文件权限问题
更改权限命令 chmod 常用参数 -R, --recursive change files and directories recursively (以递归的方式对目前目录下的所有档案与子目录进 ...
- nginx介绍1
1.1 nginx 是什么? 是一个高性能的web服务器和反向代理服务器 http://www.nginx.cn/ nginx中文手册 1.2 nginx的优点 1 支持高并发:能支持几万并发连接(特 ...
- python写几个排序算法
def maopao(data: list): """ 两两比较 :param data: :return: """ length = le ...
- Vue:对axios进行简单的二次封装
主要做3点: 1.配置一个请求地址前缀 2.请求拦截(在请求发出去之前拦截),给所有的请求都带上 token 3.拦截响应,遇到 token 不合法则报错 // 对 axios 的二次封装 impor ...
- Linux下双网卡绑定bond配置实例详解
本文源自:http://blog.itpub.net/31015730/viewspace-2150185/ 一.什么是bond? 网卡bond是通过多张网卡绑定为一个逻辑网卡,实现本地网卡冗余,带宽 ...
- IOS UITableView 加载未知宽高图片的解决方案
在开发中遇到了UITableView列表 UITableViewCell装载图片但不知Image的宽高 问题. 在解决该问题的时候,首先想到的是异步加载图片 采用第三方框架SDWebImage 实现对 ...
- Salesforce LWC学习(二十九) getRecordNotifyChange(LDS拓展增强篇)
本篇参考: https://developer.salesforce.com/docs/component-library/documentation/en/lwc/data_ui_api https ...
- 面试 21-面试题整理 by smyhvae
21-面试题整理 by smyhvae #JavaScript #存储相关:请描述以下cookie.localStorage.sessionStorage的区别 在H5之前,cookie一直都是本地存 ...
- js上 三、数据类型
3.1.什么是数据类型 a. 什么是数据类型? 想从生活中出发: 考验智商的时刻到了: 1(只)+1(只)=1(双) 3(天)+4(天)=1(周) 5(月)+7(月)=1(年) 4(时)+9(时)=1 ...
- react第X单元(redux)
第X单元(redux) #课程目标 理解redux解决的问题,理解redux的工作原理 熟练掌握redux的api 熟练掌握redux和react组件之间的通信(react-redux) 把redux ...