centos7安装nginx,以及使用node测试反向代理
1.添加nginx的安装源
vi /etc/yum.repos.d/nginx.repo
2.输入下面内容,并保存退出
[nginx]

name=nginx repo

baseurl=http://nginx.org/packages/mainline/centos/7/$basearch/

gpgcheck=0

enabled=1
这里是RHEL7
[nginx]

name=nginx repo

baseurl=http://nginx.org/packages/mainline/rhel/7/$basearch/

gpgcheck=0

enabled=1
3.安装
yum install nginx
4.启动
[root@freesaber tmp]# systemctl start nginx

[root@freesaber tmp]# systemctl status nginx

● nginx.service - nginx - high performance web server

   Loaded: loaded (/usr/lib/systemd/system/nginx.service; disabled; vendor preset: disabled)

   Active: active (running) since Thu 2019-03-28 16:16:38 CST; 7s ago

     Docs: http://nginx.org/en/docs/

  Process: 6538 ExecStart=/usr/sbin/nginx -c /etc/nginx/nginx.conf (code=exited, status=0/SUCCESS)

 Main PID: 6539 (nginx)

   CGroup: /system.slice/nginx.service

           ├─6539 nginx: master process /usr/sbin/nginx -c /etc/nginx/nginx.conf

           └─6540 nginx: worker process
下面安装node
1.安装nvm https://github.com/creationix/nvm
wget -qO- https://raw.githubusercontent.com/creationix/nvm/v0.34.0/install.sh | bash
2.进入nodejs官网,查看当前nodejs的版本

3.使用nvm安装node
nvm install 10.15.3
4.指定node的版本
[root@freesaber ~]# nvm use v10.15.3

Now using node v10.15.3 (npm v6.4.1)

[root@freesaber ~]# nvm alias default v10.15.3

default -> v10.15.3
5.查看版本
[root@freesaber ~]# node -v

v10.15.3

[root@freesaber ~]# npm -v

6.4.1
6.编写一段node.js脚本,并运行
vi app.js
const http = require('http')
http.createServer(function(req,res){
res.writeHead(200,{'Content-Type':'text/plan;charset=utf-8'});
res.end('来自8081端口的node响应')
}).listen(8081);
node app.js
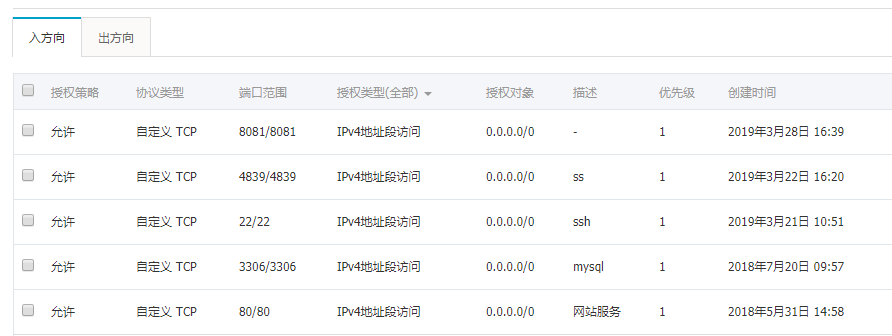
7.在阿里云的安全组中添加端口入规则
8.访问
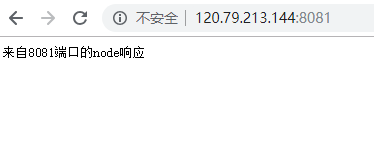
下面是我的两个域名,默认都是访问的服务器的80端口
http://www.freesaber.cn/

http://nodetree.freesaber.cn/
由于没有配置nginx访问这两个域名,都会得到同一个返回页面

下面将我的二级域名nodetree.freesaber.cn反向代理到我的8081端口,新开一个shell远程窗口,不要关闭node
1.nginx的目录结构和配置文件,我们新增的配置放在conf.d目录下
[root@freesaber nginx]# cd /etc/nginx

[root@freesaber nginx]# ll

total 40

drwxr-xr-x 2 root root 4096 Mar 28 16:14 conf.d

-rw-r--r-- 1 root root 1007 Mar 26 22:27 fastcgi_params

-rw-r--r-- 1 root root 2837 Mar 26 22:27 koi-utf

-rw-r--r-- 1 root root 2223 Mar 26 22:27 koi-win

-rw-r--r-- 1 root root 5231 Mar 26 22:27 mime.types

lrwxrwxrwx 1 root root   29 Mar 28 16:14 modules -> ../../usr/lib64/nginx/modules

-rw-r--r-- 1 root root  643 Mar 26 22:25 nginx.conf

-rw-r--r-- 1 root root  636 Mar 26 22:27 scgi_params

-rw-r--r-- 1 root root  664 Mar 26 22:27 uwsgi_params

-rw-r--r-- 1 root root 3610 Mar 26 22:27 win-utf
[root@freesaber nginx]# cat nginx.conf

user  nginx;

worker_processes  1;

error_log  /var/log/nginx/error.log warn;

pid        /var/run/nginx.pid;

events {

    worker_connections  1024;

}

http {

    include       /etc/nginx/mime.types;

    default_type  application/octet-stream;

    log_format  main  '$remote_addr - $remote_user [$time_local] "$request" '

                      '$status $body_bytes_sent "$http_referer" '

                      '"$http_user_agent" "$http_x_forwarded_for"';

    access_log  /var/log/nginx/access.log  main;

    sendfile        on;

    #tcp_nopush     on;

    keepalive_timeout  65;

    #gzip  on;

    include /etc/nginx/conf.d/*.conf;

}
2.复制一份默认的配置文件
[root@freesaber nginx]# cd /etc/nginx/conf.d

[root@freesaber conf.d]# ls

default.conf

[root@freesaber conf.d]# cp default.conf nodetree.conf

[root@freesaber conf.d]# ll

total 8

-rw-r--r-- 1 root root 1093 Mar 26 22:25 default.conf

-rw-r--r-- 1 root root 1093 Mar 28 16:58 nodetree.conf

[root@freesaber conf.d]#
3.修改内容新增的nodetree.conf,并保存退出
server {

    listen 80;

    server_name  nodetree.freesaber.cn;

    location / {

      # proxy_set_header X-Real-IP $remote_addr;

      # proxy_set_header X-Forward-For $proxy_add_x_forwarded_for;

      # proxy_set_header Host $http_host;

      # proxy_set_header X-Nginx-Proxy true;

      proxy_pass http://127.0.0.1:8081;
    # proxy_redirect off;
    }
}
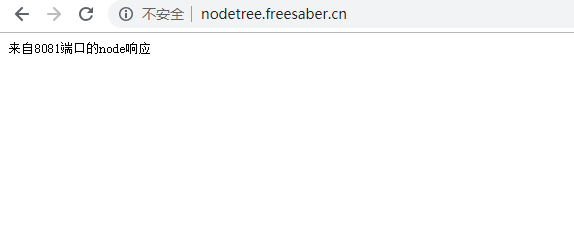
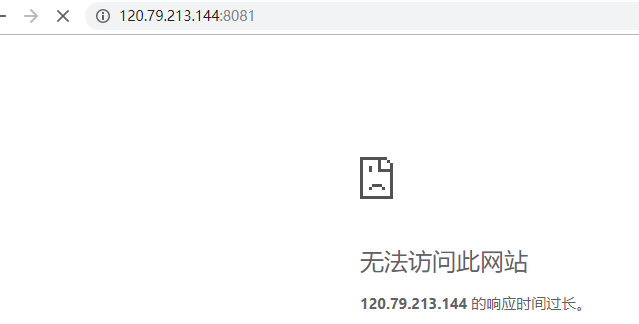
4.重启nginx,访问二级域名,这时请求被反向代理到了8081端口的node服务,而对外的服务都是nginx的80端口。其实这个时候,可以从阿里云的安全组中删除8081的入规则。因为nginx代理到本地的8081,而8081不会被外部访问。
补充docker:
https://www.runoob.com/docker/docker-install-nginx.html
其中第一次运行nignx是为了拿到默认配置文件,到指定目录(多拷贝一个conf.d)。需要添加一个反向代理的目录。
docker run -d -p 80:80 --name nginx-web -v ~/nginx/www:/usr/share/nginx/html -v ~/nginx/conf/nginx.conf:/etc/nginx/nginx.conf -v ~/nginx/logs:/var/log/nginx -v ~/nginx/conf.d:/etc/nginx/conf.d nginx
nginx使用容器部署,然后其他应用也使用ngxin部署后,反向代理的ip不能使用127.0.0.1。可以通过docker inspect来查看容器内部的ip地址,可以通过此ip地址+容器内的端口号进行代理。
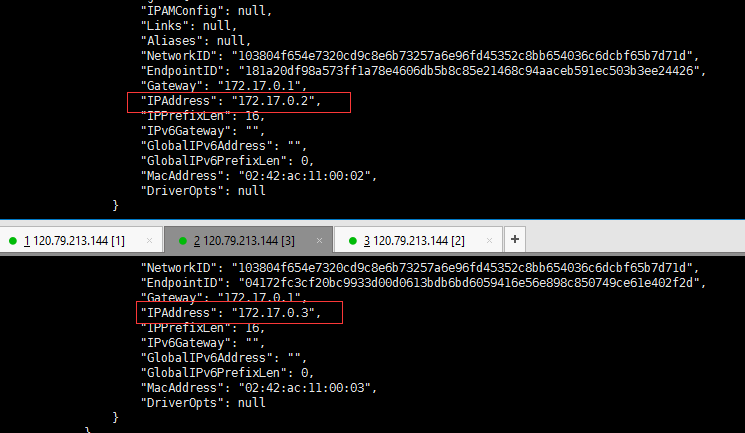
添加的反向代理conf
server {

    listen       80;

    server_name huangyielm.freesaber.cn;

    location / {

       proxy_pass http://172.17.0.2:8080;

      }

    error_page   500 502 503 504  /50x.html;

    location = /50x.html {

        root   /usr/share/nginx/html;

    }

}
centos7安装nginx,以及使用node测试反向代理的更多相关文章
- CentOS安装Nginx,并配置nodejs反向代理
安装介绍 安装位置:/usr/local/nginx nginx安装包下载地址:http://nginx.org/download/nginx-1.7.11.tar.gz 安装依赖软件 安装nginx ...
- 安装Nginx并为node.js设置反向代理
最近看了反向代理和正向代理的东西,想到自己的node.js服务器是运行在3333端口的,也没有为他设置反向代理,node.js项目的一些静态文件是完全可以部署在Nginx上,以减少对node.js的请 ...
- centos7安装Nginx 配置及反向代理
Nginx是俄罗斯人编写的十分轻量级的HTTP服务器,Nginx,它的发音为“engine X”,是一个高性能的HTTP和反向代理服务器,同时也是一个IMAP/POP3/SMTP 代理服务器.Ngin ...
- 【Nginx安装】CentOS7安装Nginx及配置
[Nginx安装]CentOS7安装Nginx及配置 2018年03月05日 11:07:21 阅读数:7073 Nginx是一款轻量级的网页服务器.反向代理服务器.相较于Apache.lighttp ...
- linux(centos7) 安装nginx
linux(centos7) 安装nginx 1.14(stable) 版本 Nginx配置文件常见结构的从外到内依次是「http」「server」「location」等等,缺省的继承关系是从外到内, ...
- linux centos7 安装常用软件java,node,mysql,Seafile
linux centos7 安装常用软件java,node,mysql,Seafile 安装压缩解压缩软件 yum install -y unzip zip 安装git yum install -y ...
- VMware虚拟机中的CentOS7安装Nginx后本机无法访问的解决办法
VMware虚拟机中的CentOS7安装Nginx后本机无法访问的解决办法 在linux上安装nginx 请参考:Linux Centos7 安装 nginx 在虚拟机centos7上安装nginx之 ...
- Nginx服务器部署 负载均衡 反向代理
Nginx服务器部署负载均衡反向代理 LVS Nginx HAProxy的优缺点 三种负载均衡器的优缺点说明如下: LVS的优点: 1.抗负载能力强.工作在第4层仅作分发之用,没有流量的产生,这个特点 ...
- nginx配置虚拟主机、反向代理和负载均衡
为了实现这个功能,需要修改nginx的配置文件,将nginx.conf清理一下,使结构更清晰. worker_processes ; events { worker_connections ; } h ...
随机推荐
- 2018-No.7-SicnuCtf
5月份的比赛现在才有时间在博客贴出来,这是我第二次出题了,第一次是上届的初赛,这次是决赛的题. 签到(base_or_base) 解压得到两个文件小明.zip和......txt,根据文件名提示猜测是 ...
- jupyter 中markdown使用
jupyter使用还是很方便的,尤其是喜欢MarkDown功能,在安装插件后可以非常清晰的看到整个文档的基本结构,下面介绍下MarkDownd的使用: 1.MarkDown必须是在命令模式是下使用的, ...
- java2周来的一些心得和体会
1.首先,在开发的一开始,可以将绝大多数rest可能提交过来字段先抽离出来,做成一个基础类. 然后再继承这个类,这样做的好处是业务就被分开了,谁也不会影响到谁. 2.在maven当中,需要修改自己的类 ...
- 西门子SCL读写DB数据
数据块间接寻址方式,仅供参考. STATUS_1:= DB11.DW[COUNTER]; //字节间接寻址STATUS_2:= DB12.DX[WNO, BITNO]; //位间接寻址,用户改变WNO ...
- JavaSE-运算符和流程控制
一.运算符 1.算术运算符: (1) 进行混合运算的时候:byte,short,char之间不会相互转换,都会自动提升为int类型 .其他类型进行混合运算的时候都是小的数据类型提升为大的:byte,s ...
- useful urls
数据挖掘技术: http://ddl.escience.cn/f/IwoF?rid=8188575 李航 统计学习方法: http://ddl.escience.cn/f/Iwn0
- 使用docker构建简约高效的镜像
背景介绍 最近在思考一个问题,我的golang运行到docker环境上的时候,需要安装很大依赖.思考发现我需要就是一个运行二进制的环境而已并不需要golang的编译器等等其他任何多余的. 当前的doc ...
- 那些年,很多人没看懂的Python内置函数
Python之所以特别的简单就是因为有很多的内置函数是在你的程序"运行之前"就已经帮你运行好了,所以,可以用这个的特性简化很多的步骤.这也是让Python语言变得特别的简单的原因之 ...
- 20164301 Exp3 免杀原理与实践
Exp3 免杀原理与实践 1. 实践内容 1.1 正确使用msf编码器,msfvenom生成如jar之类的其他文件,veil-evasion,加壳工具,使用shellcode编程 1.2 通过组合应 ...
- SpringMVC和Struts2区别比较
区别1: Struts2 的核心是基于一个Filter即StrutsPreparedAndExcuteFilterSpringMvc的核心是基于一个Servlet即DispatcherServlet( ...
