配置3层交换机VLAN间通信

SW2
Switch>en

Switch#conf t

Enter configuration commands, one per line.  End with CNTL/Z.

Switch(config)#hostname SW2

SW2(config)#vlan

SW2(config-vlan)#name caiwu

SW2(config-vlan)#vlan

SW2(config-vlan)#name it

SW2(config-vlan)#exit

SW2(config)#interface range fastEthernet /-

SW2(config-if-range)#switchport mode access

SW2(config-if-range)#switchport access vlan

SW2(config-if-range)#interface fastEthernet /

SW2(config-if)#switchport mode access

SW2(config-if)#switchport access vlan

SW2(config-if)#exit

SW2(config)#do show vlan br

VLAN Name                             Status    Ports

---- -------------------------------- --------- -------------------------------

    default                          active    Fa0/, Fa0/, Fa0/, Fa0/

                                                Fa0/, Fa0/, Fa0/, Fa0/

                                                Fa0/, Fa0/, Fa0/, Fa0/

                                                Fa0/, Fa0/, Fa0/, Fa0/

                                                Fa0/, Fa0/, Fa0/, Fa0/

                                                Fa0/, Gig0/, Gig0/

    caiwu                            active    Fa0/, Fa0/

    it                               active    Fa0/

 fddi-default                     active

 token-ring-default               active

 fddinet-default                  active

 trnet-default                    active

SW2(config)#interface gigabitEthernet /

SW2(config-if)#switchport mode trunk
SW1
Switch>en
Switch#conf t
Enter configuration commands, one per line. End with CNTL/Z. Switch(config)#hostname SW1
SW1(config)#vlan
SW1(config-vlan)#name caiwu
SW1(config-vlan)#vlan
SW1(config-vlan)#name it
SW1(config-vlan)#exit SW1(config)#interface gigabitEthernet / SW1(config-if)#switchport mode trunk
Command rejected: An interface whose trunk encapsulation is "Auto" can not be configured to "trunk" mode. #三层交换机要打trunj,需要开启dot1q协议
SW1(config-if)#switchport trunk encapsulation dot1q SW1(config-if)#switchport mode trunk SW1(config-if)# exit #进入VLAN2
SW1(config)#interface vlan %LINK--CHANGED: Interface Vlan2, changed state to up %LINEPROTO--UPDOWN: Line protocol on Interface Vlan2, changed state to up #配置VLAN2的网关
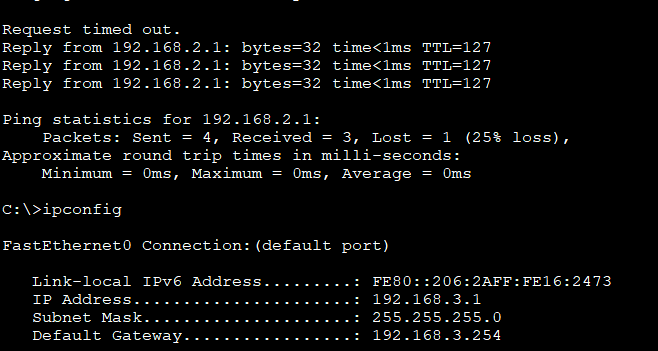
SW1(config-if)#ip add 192.168.2.254 255.255.255.0 SW1(config-if)#no shutdown SW1(config-if)#interface vlan %LINK--CHANGED: Interface Vlan3, changed state to up %LINEPROTO--UPDOWN: Line protocol on Interface Vlan3, changed state to up SW1(config-if)#ip add 192.168.2.254 255.255.255.0 SW1(config-if)#no shutdown SW1(config-if)#exit SW1#show ip interface brief
Interface IP-Address OK? Method Status Protocol
FastEthernet0/ unassigned YES unset down down
FastEthernet0/ unassigned YES unset down down
FastEthernet0/ unassigned YES unset down down
FastEthernet0/ unassigned YES unset down down
FastEthernet0/ unassigned YES unset down down
FastEthernet0/ unassigned YES unset down down
FastEthernet0/ unassigned YES unset down down
FastEthernet0/ unassigned YES unset down down
FastEthernet0/ unassigned YES unset down down
FastEthernet0/ unassigned YES unset down down
FastEthernet0/ unassigned YES unset down down
FastEthernet0/ unassigned YES unset down down
FastEthernet0/ unassigned YES unset down down
FastEthernet0/ unassigned YES unset down down
FastEthernet0/ unassigned YES unset down down
FastEthernet0/ unassigned YES unset down down
FastEthernet0/ unassigned YES unset down down
FastEthernet0/ unassigned YES unset down down
FastEthernet0/ unassigned YES unset down down
FastEthernet0/ unassigned YES unset down down
FastEthernet0/ unassigned YES unset down down
FastEthernet0/ unassigned YES unset down down
FastEthernet0/ unassigned YES unset down down
FastEthernet0/ unassigned YES unset down down
GigabitEthernet0/ unassigned YES unset up up
GigabitEthernet0/ unassigned YES unset down down
Vlan1 unassigned YES unset administratively down down
Vlan2 192.168.2.254 YES manual up up
Vlan3 192.168.3.254 YES manual up up
SW1# #开启三层交换的路由功能 SW1#conf t
Enter configuration commands, one per line. End with CNTL/Z. SW1(config)#ip routing
配置3层交换机VLAN间通信的更多相关文章
- Cisco基础(二):三层交换vlan间通信、多交换机vlan间通信、三层交换配置路由、RIP动态路由配置、三层交换配置RIP动态路由
一.三层交换vlan间通信 目标: VLAN实现了广播域的隔离,同时也将VLAN间的通信隔离了.三层交换技术使得VLAN间可以通信. 通过三层交换实现VLAN间通信 方案: 为了解决了传统路由器低速. ...
- 交换机基础配置之三层交换机实现vlan间通信
我们以上面的拓扑图做实验,要求为pc1,pc2,pc3配置为vlan10,pc4,pc5,pc6配置为vlan20,pc7,pc8,pc9配置为vlan30 server0和server1配置为vla ...
- 路由器基础配置之单臂路由实现vlan间通信
我们将以上面的拓扑图开始进行配置,目的为设置单臂路由实现vlan间通信,设置4个vlan,pc0,1,2为vlan10 pc3,4,5为vlan20:pc6,7,8为vlan30:server0,1为 ...
- OSPF与Vlan间通信综合实验小结与端口隔离
总结 本实验模拟实际工作环境的网络拓扑结构,至此终于理解了一部分的配置思路: 一.三层交换机连接路由器的端口配置 图中GE0/0/4应该是配置成access类型,这个时候应该是不带vlan标签的. ...
- 通过SVI实现VLAN间通信
两个不同网段的计算机与三层交换机直连,通过SVI实现VLAN间通信vlan 1 //几个不同网段就创建几个VLANvlan 2 int f0/1 //划分VLANswitchport mode acc ...
- 单臂路由实现不同vlan间通信
单臂路由实现不同vlan间通信 拓扑图 PC配置 PC1 :192.168.1.1 vlan10 192.168.1.254 PC2 :192.168.2.1 vlan20 192.168.2.254 ...
- 在配置和销售凭证 GET_CONFIG_MODE 间通信时内部出错
“在配置和销售凭证 GET_CONFIG_MODE 间通信时内部出错” 订单打开出现这种错误提示,多半是配置对象号问题. SAP NOTE 2019-09-27 901893901893 - Repo ...
- 不同vlan间通信的三种配置方式
1.单臂路由(图) 环境:一台路由器,一台二层交换机,两台pc机 二层交换机的配置 //创建vlan 和 vlan : Switch(config)#vlan Switch(config-vlan)# ...
- 路由器配置——单臂路由实现VLAN间通信
一.实验目的:用路由器使同和不同vlan可以通信 二.拓扑图如下: 三.具体步骤: (1)R1路由器配置: Router>en --进入特权模式Router#conf t --进入全局配置模 ...
随机推荐
- C# 异步(上)
新进阶的程序员可能对async.await用得比较多,却对之前的异步了解甚少.本人就是此类,因此打算回顾学习下异步的进化史. 本文主要是回顾async异步模式之前的异步,下篇文章再来重点分析async ...
- Previous operation has not finished;run 'cleanup' if it was interrupted;Please execute the 'Cleanup' command.
今天更新文件夹时svn报错如下 提示说让clean up,但是clean up又提示fail,让继续clean up,这样就陷入死循环了…… 搜了多种解决办法后找到原因:当时正在打开着svn的某个文件 ...
- Android Studio修改apk打包生成名称
在app的build.gradle文件的android{}括号里添加: android.applicationVariants.all { variant -> variant.outputs. ...
- Unity中用Mono插件解析xml文件
1.解压压缩包,把文件夹拖到脚本文件夹下 Mono是第三方基金会开发的开源的东西,通过Mono基础上开发的程序可以在各个系统下运行.开发语言是C#. 用插件解析比较高效,平台运行稳定.使用简单. Un ...
- C# 比较两文本相似度
这个比较文本用到的主要是余弦定理比较文本相似度,具体原理右转某度,主要适用场景是在考试系统中的简答题概述,可根据权重自动打分,感觉实用性蛮广的. 先说下思路: 文本分词,中文于英文不同,规范的英文每个 ...
- Class的 getSuperclass与getGenericSuperclass区别
一.getSuperclass 返回直接继承的父类(由于编译擦除,没有显示泛型参数) Class<? super T> getSuperclass() 返回表示此 ...
- 最佳sql server 分页查询
用关键字查询 并作为条件是最快的,比其他嵌套select性能都要好 select top 100 id , name from tablex where id >preid order by i ...
- Vmware网络不可达
1. ifconfig -a 查看当前的网卡 2. cd /etc/sysconfig/network-scripts/ 3. 打开对应网卡名称文件, 具体修改内容参考(https://www. ...
- RBAC角色权限设计
https://www.cnblogs.com/vinozly/p/4851364.html
- 如何将Excel转换成Markdown表格[转]
在这篇文章中,我将告诉你如何快速的将Excel转换为markdown表格,以及如何将Google Docs,Numbers,网页中的表格或其他类似Excel的程序数据转换为Markdown表格 你可能 ...