轻量级C#网络通信组件StriveEngine —— C/S通信开源demo(附源码)
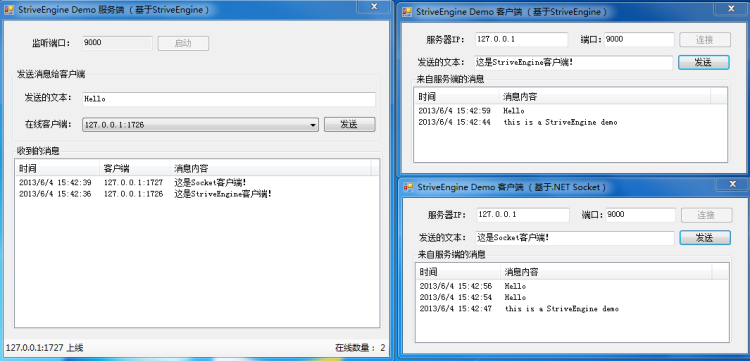
前段时间,有几个研究ESFramework网络通讯框架的朋友对我说,ESFramework有点庞大,对于他们目前的项目来说有点“杀鸡用牛刀”的意思,因为他们的项目不需要文件传送、不需要P2P、不存在好友关系、也不存在组广播、不需要服务器均衡、不需要跨服务器网络通讯、甚至都不需要使用UserID,只要一个客户端能与服务端进行简单的稳定高效的C#网络通信组件就可以了。于是,他们建议我,整一个轻量级的C#网络通信组件来满足类似他们这种项目的需求。我觉得这个建议是有道理的,于是,花了几天时间,我将ESFramework的内核抽离出来,经过修改封装后,形成了StriveEngineC#网络通信组件,其最大的特点就是稳定高效、易于使用。通过下面这个简单的demo,我们应该就能上手了。文末有demo源码下载,我们先上Demo截图:
1.StriveEngineC#网络通信组件Demo简介
该Demo总共包括三个项目:
1.StriveEngine.SimpleDemoServer:基于StriveEngine开发的服务端。
2.StriveEngine.SimpleDemoClient:基于StriveEngine开发的客户端。
3.StriveEngine.SimpleDemo:直接基于.NET的Socket开发的客户端,其目的是为了演示:在客户端不使用StriveEngine的情况下,如何与基于StriveEngine的服务端进行网络通讯。
StriveEngine 内置支持TCP/UDP、文本协议/二进制协议,该Demo我们使用TCP、文本格式的消息协议,消息的结束符为"\0"。
2.StriveEngineC#网络通信组件Demo服务端
    private ITcpServerEngine tcpServerEngine;

    private void button1_Click(object sender, EventArgs e)

    {

        try

        {

            //初始化并启动服务端引擎(TCP、文本协议)

            this.tcpServerEngine = NetworkEngineFactory.CreateTextTcpServerEngine(int.Parse(this.textBox_port.Text), new DefaultTextContractHelper("\0"));
        this.tcpServerEngine.ClientCountChanged += new CbDelegate<int>(tcpServerEngine_ClientCountChanged);

            this.tcpServerEngine.ClientConnected += new CbDelegate<System.Net.IPEndPoint>(tcpServerEngine_ClientConnected);

            this.tcpServerEngine.ClientDisconnected += new CbDelegate<System.Net.IPEndPoint>(tcpServerEngine_ClientDisconnected);

            this.tcpServerEngine.MessageReceived += new CbDelegate<IPEndPoint, byte[]>(tcpServerEngine_MessageReceived);

            this.tcpServerEngine.Initialize();

            this.button1.Enabled = false;

            this.textBox_port.ReadOnly = true;

            this.button2.Enabled = true;

        }

        catch (Exception ee)

        {

            MessageBox.Show(ee.Message);

        }

    }

    void tcpServerEngine_MessageReceived(IPEndPoint client, byte[] bMsg)

    {

        string msg = System.Text.Encoding.UTF8.GetString(bMsg); //消息使用UTF-8编码

        msg = msg.Substring(, msg.Length - ); //将结束标记"\0"剔除

        this.ShowClientMsg(client, msg);

    }

    void tcpServerEngine_ClientDisconnected(System.Net.IPEndPoint ipe)

    {

        string msg = string.Format("{0} 下线", ipe);

        this.ShowEvent(msg);

    }

    void tcpServerEngine_ClientConnected(System.Net.IPEndPoint ipe)

    {

        string msg = string.Format("{0} 上线" ,ipe);

        this.ShowEvent(msg);

    }

    void tcpServerEngine_ClientCountChanged(int count)

    {

        this.ShowConnectionCount(count);

    }

    private void ShowEvent(string msg)

    {

        if (this.InvokeRequired)

        {

            this.BeginInvoke(new CbDelegate<string>(this.ShowEvent), msg);

        }

        else

        {

            this.toolStripLabel_event.Text = msg;

        }

    }

    private void ShowClientMsg(IPEndPoint client, string msg)

    {

        if (this.InvokeRequired)

        {

            this.BeginInvoke(new CbDelegate<IPEndPoint,string>(this.ShowClientMsg),client, msg);

        }

        else

        {

            ListViewItem item = new ListViewItem(new string[] { DateTime.Now.ToString(), client.ToString(), msg });

            this.listView1.Items.Insert(, item);

        }

    }

    private void ShowConnectionCount(int clientCount)

    {

        if (this.InvokeRequired)

        {

            this.BeginInvoke(new CbDelegate<int>(this.ShowConnectionCount), clientCount);

        }

        else

        {

            this.toolStripLabel_clientCount.Text = "在线数量: " + clientCount.ToString();

        }

    }

    private void comboBox1_DropDown(object sender, EventArgs e)

    {

        List<IPEndPoint> list = this.tcpServerEngine.GetClientList();

        this.comboBox1.DataSource = list;

    }

    private void button2_Click(object sender, EventArgs e)

    {

        try

        {

            IPEndPoint client = (IPEndPoint)this.comboBox1.SelectedItem;

            if (client == null)

            {

                MessageBox.Show("没有选中任何在线客户端!");

                return;

            }

            if (!this.tcpServerEngine.IsClientOnline(client))

            {

                MessageBox.Show("目标客户端不在线!");

                return;

            }

            string msg = this.textBox_msg.Text + "\0";// "\0" 表示一个消息的结尾

            byte[] bMsg = System.Text.Encoding.UTF8.GetBytes(msg);//消息使用UTF-8编码

            this.tcpServerEngine.SendMessageToClient(client, bMsg);

        }

        catch (Exception ee)

        {

            MessageBox.Show(ee.Message);

        }

    }
关于服务端引擎的使用,主要就以下几点:
(1)首先调用NetworkEngineFactory的CreateTextTcpServerEngine方法创建引擎(服务端、TCP、Text协议)。
(2)根据需要,预定引擎实例的某些事件(如MessageReceived事件)。
(3)调用引擎实例的Initialize方法启动网络通讯引擎。
(4)调用服务端引擎的SendMessageToClient方法,发送消息给客户端。
3.StriveEngine C#网络通信组件Demo客户端
    private ITcpPassiveEngine tcpPassiveEngine;

    private void button3_Click(object sender, EventArgs e)

    {

        try

        {

            //初始化并启动客户端引擎(TCP、文本协议)

            this.tcpPassiveEngine = NetworkEngineFactory.CreateTextTcpPassiveEngine(this.textBox_IP.Text, int.Parse(this.textBox_port.Text), new DefaultTextContractHelper("\0"));

            this.tcpPassiveEngine.MessageReceived += new CbDelegate<System.Net.IPEndPoint, byte[]>(tcpPassiveEngine_MessageReceived);

            this.tcpPassiveEngine.AutoReconnect = true;//启动掉线自动重连

            this.tcpPassiveEngine.ConnectionInterrupted += new CbDelegate(tcpPassiveEngine_ConnectionInterrupted);

            this.tcpPassiveEngine.ConnectionRebuildSucceed += new CbDelegate(tcpPassiveEngine_ConnectionRebuildSucceed);

            this.tcpPassiveEngine.Initialize();

            this.button2.Enabled = true;

            this.button3.Enabled = false;

            MessageBox.Show("连接成功!");

        }

        catch (Exception ee)

        {

            MessageBox.Show(ee.Message);

        }

    }

    void tcpPassiveEngine_ConnectionRebuildSucceed()

    {

        if (this.InvokeRequired)

        {

            this.BeginInvoke(new CbDelegate(this.tcpPassiveEngine_ConnectionInterrupted));

        }

        else

        {

            this.button2.Enabled = true;

            MessageBox.Show("重连成功。");

        }

    }

    void tcpPassiveEngine_ConnectionInterrupted()

    {

        if (this.InvokeRequired)

        {

            this.BeginInvoke(new CbDelegate(this.tcpPassiveEngine_ConnectionInterrupted));

        }

        else

        {

            this.button2.Enabled = false;

            MessageBox.Show("您已经掉线。");

        }

    }

    void tcpPassiveEngine_MessageReceived(System.Net.IPEndPoint serverIPE, byte[] bMsg)

    {

        string msg = System.Text.Encoding.UTF8.GetString(bMsg); //消息使用UTF-8编码

        msg = msg.Substring(, msg.Length - ); //将结束标记"\0"剔除

        this.ShowMessage(msg);

    }

    private void ShowMessage(string msg)

    {

        if (this.InvokeRequired)

        {

            this.BeginInvoke(new CbDelegate<string>(this.ShowMessage), msg);

        }

        else

        {

            ListViewItem item = new ListViewItem(new string[] { DateTime.Now.ToString(), msg });

            this.listView1.Items.Insert(, item);

        }

    }

    private void button2_Click(object sender, EventArgs e)

    {

        string msg = this.textBox_msg.Text + "\0";// "\0" 表示一个消息的结尾

        byte[] bMsg = System.Text.Encoding.UTF8.GetBytes(msg);//消息使用UTF-8编码

        this.tcpPassiveEngine.SendMessageToServer(bMsg);

    }
关于客户端引擎的使用,与服务端类似:
(1)首先调用NetworkEngineFactory的CreateTextTcpPassiveEngine方法创建引擎(客户端、TCP、Text协议)。
(2)根据需要,预定引擎实例的某些事件(如MessageReceived、ConnectionInterrupted 事件)。
(3)根据需要,设置引擎实例的某些属性(如AutoReconnect属性)。
(4)调用引擎实例的Initialize方法启动网络通讯引擎。
(5)调用客户端引擎的SendMessageToServer方法,发送消息给服务端。
4.基于Socket的客户端
这个客户端直接基于.NET的Socket进行开发,其目演示了:在客户端不使用StriveEngineC#网络通信组件的情况下(比如客户端是异构系统),如何与基于StriveEngine的服务端进行网络通信。该客户端只是粗糙地实现了基本目的,很多细节问题都被忽略,像粘包问题、消息重组、掉线检测等等。而这些问题在实际的应用中,是必需要处理的。(StriveEngineC#网络通信组件中的客户端和服务端引擎都内置解决了这些问题)。
该客户端的代码就不贴了,大家可以在源码中看到。
5.StriveEngine C#网络通信组件Demo源码下载
附相关系列: C#网络通信组件二进制网络通讯demo源码及说明文档
C#网络通信组件打通B/S与C/S网络通讯demo源码与说明文档
版权声明:本文为博主原创文章,未经博主允许不得转载。
轻量级C#网络通信组件StriveEngine —— C/S通信开源demo(附源码)的更多相关文章
- C#轻量级通通讯组件StriveEngine —— C/S通信开源demo(2) —— 使用二进制协议 (附源码)
前段时间,有几个研究ESFramework通信框架的朋友对我说,ESFramework有点庞大,对于他们目前的项目来说有点“杀鸡用牛刀”的意思,因为他们的项目不需要文件传送.不需要P2P.不存在好友关 ...
- 日志组件Log2Net的介绍和使用(附源码开源地址)
Log2Net是一个用于收集日志到数据库或文件的组件,支持.NET和.NetCore平台. 此组件自动收集系统的运行日志(服务器运行情况.在线人数等).异常日志.程序员还可以添加自定义日志. 该组件支 ...
- 轻量级通信引擎StriveEngine —— C/S通信demo(2) —— 使用二进制协议 (附源码)
在网络上,交互的双方基于TCP或UDP进行通信,通信协议的格式通常分为两类:文本消息.二进制消息. 文本协议相对简单,通常使用一个特殊的标记符作为一个消息的结束. 二进制协议,通常是由消息头(Head ...
- 微服务8:通信之RPC实践篇(附源码)
★微服务系列 微服务1:微服务及其演进史 微服务2:微服务全景架构 微服务3:微服务拆分策略 微服务4:服务注册与发现 微服务5:服务注册与发现(实践篇) 微服务6:通信之网关 微服务7:通信之RPC ...
- C#进阶系列——一步一步封装自己的HtmlHelper组件:BootstrapHelper(三:附源码)
前言:之前的两篇封装了一些基础的表单组件,这篇继续来封装几个基于bootstrap的其他组件.和上篇不同的是,这篇的有几个组件需要某些js文件的支持. 本文原创地址:http://www.cnblog ...
- 介绍开源的.net通信框架NetworkComms框架 源码分析
原文网址: http://www.cnblogs.com/csdev Networkcomms 是一款C# 语言编写的TCP/UDP通信框架 作者是英国人 以前是收费的 售价249英镑 我曾经花了 ...
- 轻量级通信引擎StriveEngine —— C/S通信demo(附源码)
前段时间,有几个研究ESFramework的朋友对我说,ESFramework有点庞大,对于他们目前的项目来说有点“杀鸡用牛刀”的意思,因为他们的项目不需要文件传送.不需要P2P.不存在好友关系.也不 ...
- DevExpress - 使用 GaugeControl 标尺组件制作抽奖程序 附源码
前不久,公司举办了15周年庆,其中添加了一个抽奖环节,要从在读学员中随机抽取幸运学员,当然,这个任务就分到了我这里. 最后的效果如下,启动有个欢迎页面,数据是来自Excel的,点击开始则上面的学号及姓 ...
- 编写轻量ajax组件03-实现(附源码)
前言 通过前两篇的介绍,我们知道要执行页面对象的方法,核心就是反射,是从请求获取参数并执行指定方法的过程.实际上这和asp.net mvc框架的核心思想很类似,它会解析url,从中获取controll ...
随机推荐
- js数据结构与算法——二叉树
function BinaryTree(){ var Node = function(key){ this.key = key; //值 this.left = null; //左箭头 this.ri ...
- Qt-c++桌面编程报错:qt.qpa.plugin: Could not find the Qt platform plugin "windows" in "",已解决
语言:c++ 编译库:Qt GUI,qt5.12.1 软件类型:Qt application,qt桌面软件 运行平台:window 10 ?按照[https://www.devbean.net/201 ...
- 如何配置adb环境变量
如何配置adb环境变量? 1.我的电脑---控制面板---高级系统设置 2.点击[高级系统设置],弹出系统属性的弹框, 3.点击[环境变量],弹出环境变量弹框,新建一个系统变量,命名为Android ...
- C# 定时任务
工作中需要做个每天定时发邮件的功能,了解之后知道java里有做定时任务比较容易的方法,就是Quartz,在C#里叫Quartz.Net. 在写代码之前需要引用几个dll文件,分别是C5.dll.Com ...
- Python之MySQL基础
一.存储引擎 1.1 什么是存储引擎 MySQL中的数据通过不同的技术存储再文件或者内存中,每种技术有不同的存储机制,索引技巧,锁定水平,并且提供不同的能力,而实现这些技术的我们就称之为存储引擎 1 ...
- Build 2019 彩蛋
N久没写过博客了… 最近在玩 APEX 但是手残党表示打到15级了,至今杀敌 4 人… 当快递员是越来越顺手了… 今年巨硬的 Build 大会会在 5 月 6-8 号召开 新发布的 Hololens ...
- Trie for string LeetCode
Trie build and search class TrieNode { public: TrieNode * next[]; bool is_word; TrieNode(bool b = fa ...
- zabbix-tomcat监控
安装tomcat 1安装jdk # yum install lrzsz -y #tar xvf jdk # ln -sv /usr/local/src/jdk1..0_79/ /usr/local/j ...
- kafka+zookeeper集群
参考: kafka中文文档 快速搭建kafka+zookeeper高可用集群 kafka+zookeeper集群搭建 kafka+zookeeper集群部署 kafka集群部署 kafk ...
- 推荐学习git
龙恩博客http://www.cnblogs.com/tugenhua0707/p/4050072.html#!comments git命令大全https://www.jqhtml.com/8235. ...