React 应用设计之道 - curry 化妙用
使用 React 开发应用,给予了前端工程师无限“组合拼装”快感。但在此基础上,组件如何划分,数据如何流转等应用设计都决定了代码层面的美感和强健性。
同时,在 React 世界里提到 curry 化,也许很多开发者会第一时间反应出 React-redux 库的 connect 方法。然而,如果仅仅机械化地停留于此,而没有更多灵活地应用,是非常可惜的。
这篇文章以一个真实场景为基础,从细节出发,分析 curry 化如何化简为繁,更优雅地实现需求。
场景介绍
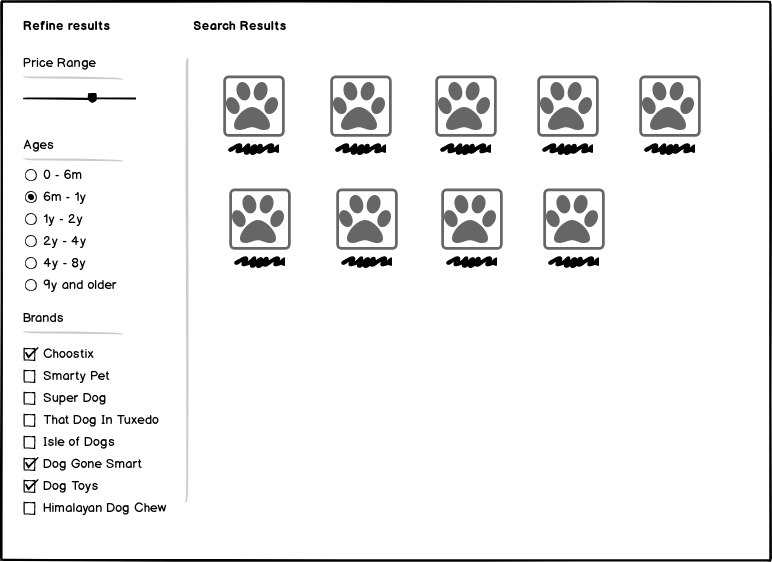
需求场景为一个卖食品的电商网站,左侧部分为商品筛选栏目,用户可以根据:价格区间、商品年限、商品品牌进行过滤。右侧展现对应产品。如下图:
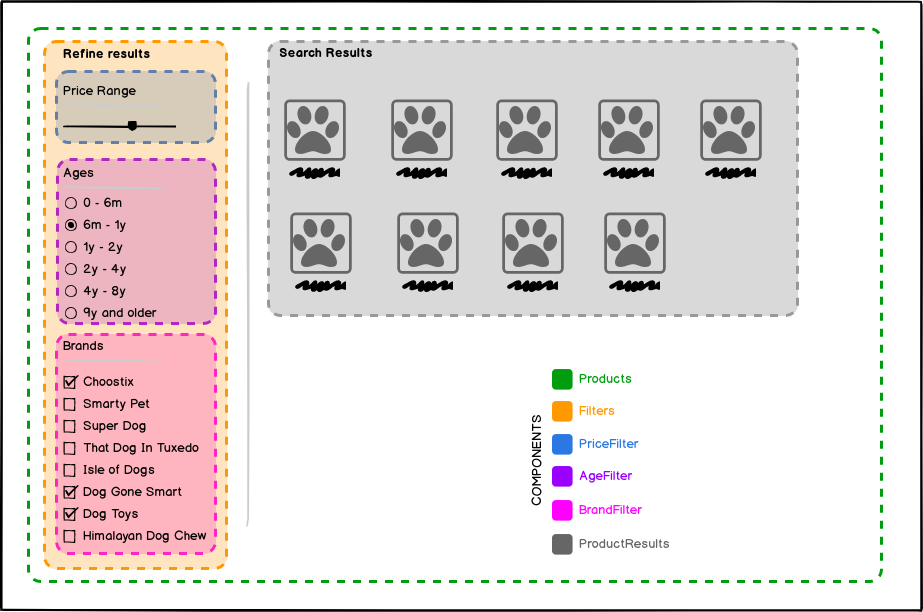
作为 React 开发者,我们知道 React 是组件化的,第一步将考虑根据 UE 图,进行组件拆分。这个过程比较简单直观,我们对拆分结果用下图表示:
对应代码为:
<Products>

    <Filters>

        <PriceFilter/>

        <AgeFilter/>

        <BrandFilter/>

    </Filters>

    <ProductResults/>

</Products>
初级实现
React 是基于数据状态的,紧接着第二步就要考虑应用状态。商品展现结果数据我们暂时不需要关心。这里主要考虑应用最重要的状态,即过滤条件信息。
我们使用命名为 filterSelections 的 JavaScript 对象表示过滤条件信息,如下:
filterSelections = {

  price: ...,

  ages: ...,

  brands: ...,

}
此数据需要在 Products 组件中进行维护。因为 Products 组件的子组件 Filters 和 ProductResults 都将依赖这项数据状态。
Filters 组件通过 prop 接收 filterSelections 状态,并拆解传递给它的三项筛选子组件:
class Filters extends React.Component {

  render() {

    return (

      <div>

        <PriceFilter price={this.props.filterSelections.price} />

        <AgeFilter ages={this.props.filterSelections.ages} />

        <BrandFilter brands={this.props.filterSelections.brands} />

      </div>

    );

  };

}
同样地,ProductResults 组件也通过 prop 接收 filterSelections 状态,进行相应产品的展示。
对于 Filters 组件,它一定不仅仅是接收 filterSelections 数据而已,同样也需要对此项数据进行更新。为此,我们在 Products 组件中设计相应的 handler 函数,对过滤信息进行更新,命名为 updateFilters,并将此处理函数作为 prop 下发给 Filters 组件:
class Products extends React.Component {

  constructor(props) {

    super(props);

    this.state = {

      filterSelections: {

        price: someInitialValue,

        ages: someInitialValue,

        brands: someInitialValue,

      }

    }

  }

  updateFilters = (newSelections) => {

    this.setState({

      filterSelections: newSelections

    })

  };

  render() {

    return(

      <div>

        <Filters

          filterSelections={this.state.filterSelections}

          selectionsChanged={this.updateFilters}

        />

        <Products filterSelections={this.state.filterSelections} />

      </div>

    );

  }

}
注意这里我们对 this 绑定方式。有兴趣的读者可以参考我的另一篇文章:从 React 绑定 this,看 JS 语言发展和框架设计。
作为 Filters 组件,同样也要对处理函数进行进一步拆分和分发:
class Filters extends React.Component {

  updatePriceFilter = (newValue) => {

    this.props.selectionsChanged({

      ...this.props.filterSelections,

      price: newValue

    })

  };

  updateAgeFilter = (newValue) => {

    this.props.selectionsChanged({

      ...this.props.filterSelections,

      ages: newValue

    })

  };

  updateBrandFilter = (newValue) => {

    this.props.selectionsChanged({

      ...this.props.filterSelections,

      brands: newValue

    })

  };

  render() {

    return (

      <div>

        <PriceFilter

          price={this.props.filterSelections.price}

          priceChanged={this.updatePriceFilter}

        />

        <AgeFilter

          ages={this.props.filterSelections.ages}

          agesChanged={this.updateAgeFilter}

        />

        <BrandFilter

          brands={this.props.filterSelections.brands}

          brandsChanged={this.updateBrandFilter}

        />

      </div>

    );

  };

}
我们根据 selectionsChanged 函数,通过传递不同类型参数,设计出 updatePriceFilter、updateAgeFilter、updateBrandFilter 三个方法,分别传递给 PriceFilter、AgeFilter、BrandFilter 三个组件。
这样的做法非常直接,然而运行良好。但是在 Filters 组件中,多了很多函数,且这些函数看上去做着相同的逻辑。如果将来又多出了一个或多个过滤条件,那么同样也要多出同等数量的“双胞胎”函数。这显然不够优雅。
currying 是什么
在分析更加优雅的解决方案之前,我们先简要了解一下 curry 化是什么。curry 化事实上是一种变形,它将一个函数 f 变形为 f',f' 的参数接收原本函数 f 的参数,同时返回一个新的函数 f'',f'' 接收剩余的参数并返回函数 f 的计算结果。
这么描述无疑是抽象的,我们还是通过代码来理解。这是一个简单的求和函数:
add = (x, y) => x + y;
curried 之后:
curriedAdd = (x) => {

  return (y) => {

    return x + y;

  }

}
所以,当执行 curriedAdd(1)(2) 之后,得到结果 3,curriedAdd(x) 函数有一个名字叫 partial application,curriedAdd 函数只需要原本 add(X, y) 函数的一部分参数。
Currying a regular function let’s us perform partial application on it.
curry 化应用
再回到之前的场景,我们设计 curry 化函数:updateSelections,
updateSelections = (selectionType) => {

  return (newValue) => {

    this.props.selectionsChanged({

      ...this.props.filterSelections,

      [selectionType]: newValue,

    });

  }

};
进一步可以简化为:
updateSelections = (selectionType) => (newValue) => {

   this.props.selectionsChanged({

      ...this.props.filterSelections,

      [selectionType]: newValue,

   })

};
对于 updateSelections 的偏应用(即上面提到的 partial application):
updateSelections('ages');

updateSelections('brands');

updateSelections('price');
相信大家已经理解了这么做的好处。这样一来,我们的 Filters 组件完整为:
class Filters extends React.Component {

  updateSelections = (selectionType) => {

    return (newValue) => {

      this.props.selectionsChanged({

        ...this.props.selections,

        [selectionType]: newValue,  // new ES6 Syntax!! :)

      });

    }

  };

  render() {

    return (

      <div>

        <PriceFilter

          price={this.props.selections.price}

          priceChanged={this.updateSelections('price')}

        />

        <AgeFilter

          ages={this.props.selections.ages}

          agesChanged={this.updateSelections('ages')}

        />

        <BrandFilter

          brands={this.props.selections.brands}

          brandsChanged={this.updateSelections('brands')}

        />

      </div>

    );

  };

}
当然,currying 并不是解决上述问题的唯一方案。我们再来了解一种方法,进行对比消化,updateSelections 函数 uncurried 版本:
updateSelections = (selectionType, newValue) => {

  this.props.updateFilters({

    ...this.props.filterSelections,

    [selectionType]: newValue,

  });

}
这样的设计使得每一个 Filter 组件:PriceFilter、AgeFilter、BrandFilter 都要调用 updateSelections 函数本身,并且要求组件本身感知 filterSelections 的属性名,以进行相应属性的更新。这就是一种耦合,完整实现:
class Filters extends React.Component {

      updateSelections = (selectionType, newValue) => {

        this.props.selectionsChanged({

          ...this.props.filterSelections,

          [selectionType]: newValue,

        });

      };

      render() {

        return (

          <>

            <PriceFilter

              price={this.props.selections.price}

              priceChanged={(value) => this.updateSelections('price', value)}

            />

            <AgeFilter

              ages={this.props.selections.ages}

              agesChanged={(value) => this.updateSelections('ages', value)}

            />

            <BrandFilter

              brands={this.props.selections.brands}

              brandsChanged={(value) => this.updateSelections('brands', value)}

            />

          </>

        );

      };

    }
其实我认为,在这种场景下,关于两种方案的选择,可以根据开发者的偏好来决定。
总结
这篇文章内容较为基础,但从细节入手,展现了 React 开发编写和函数式理念相结合的魅力。文章译自这里,部分内容有所改动。
广告时间:
如果你对前端发展,尤其对 React 技术栈感兴趣:我的新书中,也许有你想看到的内容。关注作者 Lucas HC,新书出版将会有送书活动。
Happy Coding!
PS: 作者 Github仓库 和 知乎问答链接 欢迎各种形式交流!
我的其他几篇关于React技术栈的文章:
从setState promise化的探讨 体会React团队设计思想
从setState promise化的探讨 体会React团队设计思想
React 应用设计之道 - curry 化妙用的更多相关文章
- 《工作型PPT设计之道》培训心得
参加包翔老师的“工作型PPT设计之道>培训,颇多心得,后来为部门新员工和同组同事做了转化培训,将心得整理成一份PPT讲义,效果颇佳.现将主要心得整理于此.因时间仓促,24条心得有拼凑之嫌,有待今 ...
- React的设计哲学 - 简单之美
React最初来自Facebook内部的广告系统项目,项目实施过程中前端开发遇到了巨大挑战,代码变得越来越臃肿且混乱不堪,难以维护.于是痛定思痛,他们决定抛开很多所谓的“最佳实践”,重新思考前端界面的 ...
- 函数Curry化
之前写过一个函数Curry化的小文章 那会儿对Curry化的理解不够深,平时遇到的需要Curry化的例子也比较少,今天,重新整理这个问题 函数Curry化,其实就是将一个参数非常多的函数,在大多数参数 ...
- HT图形组件设计之道(四)
在<HT图形组件设计之道(二)>我们展示了HT在2D图形矢量的数据绑定功能,这种机制不仅可用于2D图形,HT的通用组件甚至3D引擎都具备这种数据绑定机制,此篇我们将构建一个3D飞机模型,展 ...
- ♫【模式】Curry化
/** * 当发现正在调用同一个函数,并且传递的参数绝大多数都是相同的, * 那么该函数可能是用于Curry化的一个很好的候选参数 */ ;(function() { function add(x, ...
- React组件设计
React组件设计 组件分类 展示组件和容器组件 展示组件 容器组件 关注事物的展示 关注事物如何工作 可能包含展示和容器组件,并且一般会有DOM标签和css样式 可能包含展示和容器组件,并且不会有D ...
- Curry化函数
<script> function fn(){ var i, rult = 0, len = arguments.length; for (i=0;i<len ;i++ ) { ru ...
- React组件设计(转)
React组件设计 组件分类 展示组件和容器组件 展示组件 容器组件 关注事物的展示 关注事物如何工作 可能包含展示和容器组件,并且一般会有DOM标签和css样式 可能包含展示和容器组件,并且不会有D ...
- scala学习手记25 - Curry化
curry翻译为中文就是咖喱.意为使用curry可以让代码更有味道. scala里的curry化可以把函数从接收多个参数转换成接收多个参数列表.也就是说我们要编写的函数不是只有一个参数列表,这个参数列 ...
随机推荐
- ES6 暂时性死区
在ES6中,声明变量新增了两个关键字:let命令和const命令 如果在区块中存在let或者const命令时,任何变量都必须在声明之前使用,无论是区块外部的全局变量或者是区块内部的变量: /* 区块外 ...
- cat输出多行内容到文件
输出格式是: cat > f1.sh <<end ...... end ----------------- == cat < f1.sh ## 同一行中的顺序可以改变 .... ...
- 阶段3 1.Mybatis_11.Mybatis的缓存_4 mybatis一对多实现延迟加载
改成单表查询 首先配置的是select.他需要配置的值是accountDao中的方法,查询所有的账户,但是必须有条件.根据用户的id column配置的是id.因为要用user表的id去关联查询 Ac ...
- python调用Java方法传入HashMap ArrayList
1.Java代码: package com; import java.util.ArrayList; import java.util.Arrays; import java.util.HashMap ...
- python字符串-方法
一.1. upper()作用:将字符串中字符转换为大写 In [17]: spam Out[17]: 'hello,world' In [18]: print(spam.upper()) HELLO, ...
- 分享一个linux系统中循环遍历两个数组内容,并输出数组中的不同内容的shell脚本
cat diffarray.sh #!/bin/bash arry_list1=(1 2 3 4 5 6 7 8 9) arry_list2=(3 5 8) declare -a diff_list ...
- [19/06/03-星期一] HTML基础_C/S与B/S的区别&标题标签(h1-h6)、段落标签(p)
一.C/S与B/S的区别 C/S(Client/Server):客户端/服务器 1)一般使用的软件都是C/S架构,比如QQ.360.office365: 2)C表示客户端,用户通过客户端来使用软件:S ...
- JSP技术学习总结
1.JSP的执行过程 首先用户向服务器发出请求,服务器在接收请求后去寻找响应的jsp页面,然后服务器将jsp页面翻译成.java文件,然后进行编译得到.class字节码文件,服务器执行class文件将 ...
- 《剑指offer》面试题22 栈的压入、弹出序列 Java版
(输入两个整数序列,第一个序列是一串数字的压入顺序,判断第二个序列是否是该栈数字的弹出顺序.) 我的方法:压入序列是给定的,每一次弹出操作形成一个弹出序列的值,我们从前往后遍历弹出序列,每一次访问弹出 ...
- c++多线程并发学习笔记(2)
等待一个时间或其他条件 在一个线程等待完成任务时,会有很多选择: 1. 它可以持续的检查共享数据标志(用于做保护工作的互斥量),直到另一个线程完成工作时对这个标志进行重设.缺点:资源浪费,开销大 2. ...


