一、基础项目构建,引入web模块,完成一个简单的RESTful API
一、Spring Boot的主要优点:
- 为所有Spring开发者更快的入门
- 开箱即用,提供各种默认配置来简化项目配置
- 内嵌式容器简化Web项目
- 没有冗余代码生成和XML配置的要求
二、使用maven构建项目
1.访问官网:http://start.spring.io/ 选择基本的构建工具。
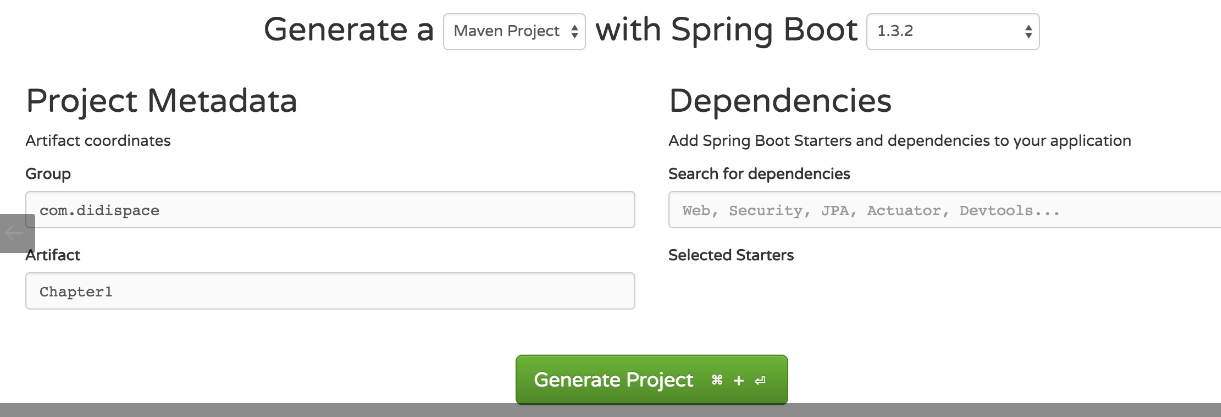
2.点击Generate Project下载项目压缩包。
3.解压项目包,并用ecplise以Maven项目导入
- 菜单中选择
File–>New–>Project from Existing Sources... - 选择解压后的项目文件夹,点击
OK - 点击
Import project from external model并选择Maven,点击Next到底为止。 - 若你的环境有多个版本的JDK,注意到选择
Java SDK的时候请选择Java 7以上的版本
三、项目结构解析
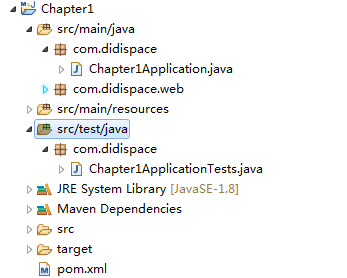
通过上面步骤完成了基础项目的创建,Spring Boot的基础结构共三个文件(具体路径根据用户生成项目时填写的Group所有差异):
src/main/java下的程序入口:Chapter1Applicationsrc/main/resources下的配置文件:application.propertiessrc/test/下的测试入口:Chapter1ApplicationTests
- package com.didispace;
- import org.springframework.boot.SpringApplication;
- import org.springframework.boot.autoconfigure.SpringBootApplication;
- import org.springframework.boot.builder.SpringApplicationBuilder;
- import org.springframework.boot.context.web.SpringBootServletInitializer;
- @SpringBootApplication
- public class Chapter1Application extends SpringBootServletInitializer{
- public static void main(String[] args) {
- SpringApplication.run(Chapter1Application.class, args);
- }
- @Override//为了打包springboot项目
- protected SpringApplicationBuilder configure(SpringApplicationBuilder builder) {
- return builder.sources(this.getClass());
- }
- }
Chapter1Application
- server.port=8080
application.properties
- package com.didispace;
- import com.didispace.web.HelloController;
- import org.junit.Before;
- import org.junit.Ignore;
- import org.junit.Test;
- import org.junit.runner.RunWith;
- import org.springframework.boot.test.SpringApplicationConfiguration;
- import org.springframework.http.MediaType;
- import org.springframework.mock.web.MockServletContext;
- import org.springframework.test.context.junit4.SpringJUnit4ClassRunner;
- import org.springframework.test.context.web.WebAppConfiguration;
- import org.springframework.test.web.servlet.MockMvc;
- import org.springframework.test.web.servlet.request.MockMvcRequestBuilders;
- import org.springframework.test.web.servlet.setup.MockMvcBuilders;
- import static org.hamcrest.Matchers.equalTo;
- import static org.springframework.test.web.servlet.result.MockMvcResultMatchers.content;
- import static org.springframework.test.web.servlet.result.MockMvcResultMatchers.status;
- @RunWith(SpringJUnit4ClassRunner.class)
- @SpringApplicationConfiguration(classes = MockServletContext.class)
- @WebAppConfiguration
- public class Chapter1ApplicationTests {
- private MockMvc mvc;
- @Before
- public void setUp() throws Exception {
- mvc = MockMvcBuilders.standaloneSetup(new HelloController()).build();
- }
- @Test
- public void getHello() throws Exception {
- mvc.perform(MockMvcRequestBuilders.get("/hello").accept(MediaType.APPLICATION_JSON))
- .andExpect(status().isOk())
- .andExpect(content().string(equalTo("Hello World")));
- }
- }
Chapter1ApplicationTests
生成的Chapter1Application和Chapter1ApplicationTests类都可以直接运行来启动当前创建的项目,由于目前该项目未配合任何数据访问或Web模块,程序会在加载完Spring之后结束运行。
四、引入web模块
当前的pom.xml内容如下,仅引入了两个模块:
spring-boot-starter:核心模块,包括自动配置支持、日志和YAMLspring-boot-starter-test:测试模块,包括JUnit、Hamcrest、Mockito
- <?xml version="1.0" encoding="UTF-8"?>
- <project xmlns="http://maven.apache.org/POM/4.0.0" xmlns:xsi="http://www.w3.org/2001/XMLSchema-instance"
- xsi:schemaLocation="http://maven.apache.org/POM/4.0.0 http://maven.apache.org/xsd/maven-4.0.0.xsd">
- <modelVersion>4.0.0</modelVersion>
- <groupId>com.didispace</groupId>
- <artifactId>Chapter1</artifactId>
- <version>1.0.0</version>
- <packaging>jar</packaging>
- <name>Chapter1</name>
- <description>The first Spring Boot project</description>
- <parent>
- <groupId>org.springframework.boot</groupId>
- <artifactId>spring-boot-starter-parent</artifactId>
- <version>1.3.2.RELEASE</version>
- <relativePath/> <!-- lookup parent from repository -->
- </parent>
- <properties>
- <project.build.sourceEncoding>UTF-8</project.build.sourceEncoding>
- <java.version>1.8</java.version>
- </properties>
- <dependencies>
- <dependency>
- <groupId>org.springframework.boot</groupId>
- <artifactId>spring-boot-starter</artifactId>
- </dependency>
- <dependency>
- <groupId>org.springframework.boot</groupId>
- <artifactId>spring-boot-starter-test</artifactId>
- <scope>test</scope>
- </dependency>
- <dependency>
- <groupId>org.springframework.boot</groupId>
- <artifactId>spring-boot-starter-web</artifactId>
- </dependency>
- </dependencies>
- <build>
- <defaultGoal>compile</defaultGoal>
- <sourceDirectory>src</sourceDirectory>
- <finalName>springboot-package</finalName>
- <plugins>
- <plugin>
- <groupId>org.springframework.boot</groupId>
- <artifactId>spring-boot-maven-plugin</artifactId>
- <configuration>
- <mainClass>com.didispace.Chapter1Application</mainClass>
- <skipTests>true</skipTests>
- </configuration>
- <executions>
- <execution>
- <goals>
- <goal>repackage</goal>
- </goals>
- </execution>
- </executions>
- </plugin>
- </plugins>
- </build>
- </project>
pom.xml
五、编写服务
- package com.didispace.web;
- import org.springframework.web.bind.annotation.RequestMapping;
- import org.springframework.web.bind.annotation.RestController;
- @RestController
- public class HelloController {
- @RequestMapping("/hello")
- public String index() {
- return "Hello World";
- }
- }
HelloController
启动主程序,打开浏览器访问http://localhost:8080/hello,可以看到页面输出Hello World
六、编写单元测试用例
- package com.didispace;
- import com.didispace.web.HelloController;
- import org.junit.Before;
- import org.junit.Ignore;
- import org.junit.Test;
- import org.junit.runner.RunWith;
- import org.springframework.boot.test.SpringApplicationConfiguration;
- import org.springframework.http.MediaType;
- import org.springframework.mock.web.MockServletContext;
- import org.springframework.test.context.junit4.SpringJUnit4ClassRunner;
- import org.springframework.test.context.web.WebAppConfiguration;
- import org.springframework.test.web.servlet.MockMvc;
- import org.springframework.test.web.servlet.request.MockMvcRequestBuilders;
- import org.springframework.test.web.servlet.setup.MockMvcBuilders;
- import static org.hamcrest.Matchers.equalTo;
- import static org.springframework.test.web.servlet.result.MockMvcResultMatchers.content;
- import static org.springframework.test.web.servlet.result.MockMvcResultMatchers.status;
- @RunWith(SpringJUnit4ClassRunner.class)
- @SpringApplicationConfiguration(classes = MockServletContext.class)
- @WebAppConfiguration
- public class Chapter1ApplicationTests {
- private MockMvc mvc;
- @Before
- public void setUp() throws Exception {
- mvc = MockMvcBuilders.standaloneSetup(new HelloController()).build();
- }
- @Test
- public void getHello() throws Exception {
- mvc.perform(MockMvcRequestBuilders.get("/hello").accept(MediaType.APPLICATION_JSON))
- .andExpect(status().isOk())
- .andExpect(content().string(equalTo("Hello World")));
- }
- }
Chapter1ApplicationTests
一、基础项目构建,引入web模块,完成一个简单的RESTful API的更多相关文章
- 基础项目构建,引入web模块,完成一个简单的RESTful API 转载来自翟永超
简介 在您第一次接触和学习Spring框架的时候,是否因为其繁杂的配置而退却了?在你第n次使用Spring框架的时候,是否觉得一堆反复粘贴的配置有一些厌烦?那么您就不妨来试试使用Spring Boot ...
- Node学习(二) --使用http和fs模块实现一个简单的服务器
1.创建一个www目录,存储静态文件1.html.1.jpg. * html文件内容如下: 12345678910111213 <html lang="en">< ...
- 从SpringBoot到SpringCloudAlibaba简明教程(一):初识SpringBoot及其基础项目构建
前言 Spring框架的大名想必大家早已如雷贯耳,我们来看一下springboot诞生的初衷,以及它在springframe的基础上解决了哪些痛点. 很久以前,J2EE还是java企业级应用的标准规范 ...
- nodejs基础 用http模块 搭建一个简单的web服务器 响应JSON、html
前端在开发中,大多会想浏览器获取json数据,下面来用nodejs中的http模块搭建一个返回json数据的服务器 var http = require("http"); var ...
- SpringBoot2.x入门:引入web模块
前提 这篇文章是<SpringBoot2.x入门>专辑的第3篇文章,使用的SpringBoot版本为2.3.1.RELEASE,JDK版本为1.8. 主要介绍SpringBoot的web模 ...
- springboot2.0入门(二)-- 基础项目构建+插件的使用
一.idea中新建第一个HelloWorld项目 点击next: 下一步 在这里可以选择我们需要依赖的第三方软件类库,包括spring-boot-web,mysql驱动,mybatis等.我们这里暂时 ...
- SpringBoot2.x入门教程:引入jdbc模块与JdbcTemplate简单使用
这是公众号<Throwable文摘>发布的第23篇原创文章,收录于专辑<SpringBoot2.x入门>. 前提 这篇文章是<SpringBoot2.x入门>专辑的 ...
- vue-cli安装以及创建一个简单的项目(二)(vuex使用、发行一个简单的app)
1.vuex的使用 vuex是vue的状态管理中心,vuex来保存我们需要管理的状态值,值一旦被修改,所有引用该值的地方就会自动更新,常用于: 1.多个视图依赖同一状态(l例:菜单导航) 2.来自不同 ...
- 使用springboot实现一个简单的restful crud——01、项目简介以及创建项目
前言 之前一段时间学习了一些springboot的一些基础使用方法和敲了一些例子,是时候写一个简单的crud来将之前学的东西做一个整合了 -- 一个员工列表的增删改查. 使用 restful api ...
随机推荐
- go语言从例子开始之Example28.非阻塞通道操作
常规的通过通道发送和接收数据是阻塞的.然而,我们可以使用带一个 default 子句的 select 来实现非阻塞 的发送.接收,甚至是非阻塞的多路 select. Example: package ...
- JavaScript值传递和引用传递
1、数据类型:boolean,null,undefined,String,Number,指向包含的数据,进行“值传递”: 2.非数据类型:Array,Function,Object,指向了一个内存地址 ...
- oracle exp不生成dumpfile,预估出实际导出文件的大小。
目的:在不创建dumpfile前预估出需要的导出文件大小. 适用于export 实验步骤如下:OS: Linux test20 2.6.18-238.el5 #1 SMP Sun Dec ...
- C++中表示字符串长度
string的size(), length() 和 char[]的strlen()都是不包括‘\0'的,他们都是“外貌协会”的,只停留在表面.而sizeof则是从内存角度来反映,它是包括’\0‘的.注 ...
- Es学习第四课, 倒排索引
大家知道,ES的发明者初衷是想做一个搜索引擎给自己老婆用来搜菜谱,所以ES的核心工作就是做搜索,下面我们就开始讲关于搜索方面的知识点. DOC的概念我们第一课就讲过,它是ES存储数据的最小单元,我们再 ...
- 密码加密与微服务鉴权JWT
博客学习目标 1.用户注册时候,对数据库中用户的密码进行加密存储(使用 SpringSecurity). 2.使用 JWT 鉴权认证. 一.BCrypt 密码加密 1.常见的加密方式 任何应用考虑到安 ...
- Halo(五)
ApplicationPreparedEvent 监听事件 Event published once the application context has been refreshed but be ...
- 【LeetCode 30】串联所有单词的子串
题目链接 [题解] 开个字典树记录下所有的单词. 然后注意题目的已知条件 每个单词的长度都是一样的. 这就说明不会出现某个字符串是另外一个字符串的前缀的情况(除非相同). 所以可以贪心地匹配(遇到什么 ...
- Drbd+Heatbeat实现NFS共享文件存储高可用
一.Drbd与Heartbeat简介 1.1 Drbd简介: Drbd是由内核模块和相关脚本而构成,用以构建高可用性的集群.其实现方式是通过网络来镜像整个设备.它允许用户在远程机器上建立一个本地块 ...
- 【Flutter学习】基本组件之上下刷新列表(一)
一,概述 RefreshIndicator是Flutter基于Material设计语言内置的控件,集合了下拉手势.加载指示器和刷新操作一体,可玩性比FutureBuilder差了一大截,不过大家也用过 ...