开发react 应用最好用的脚手架 create-react-app
安装
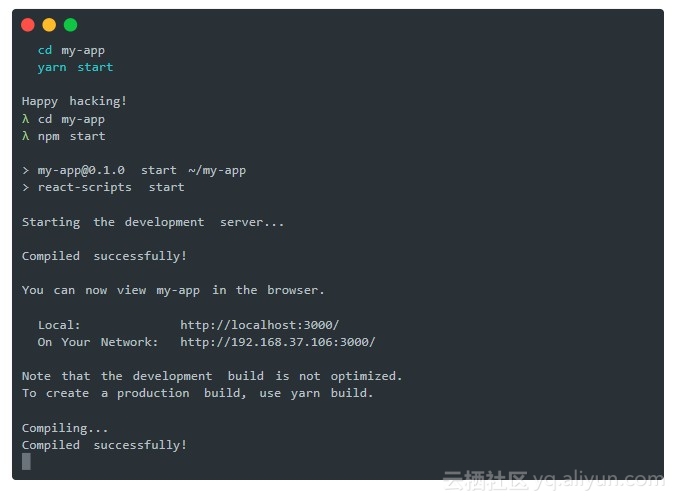
npx create-react-app my-app

cd my-app

npm start

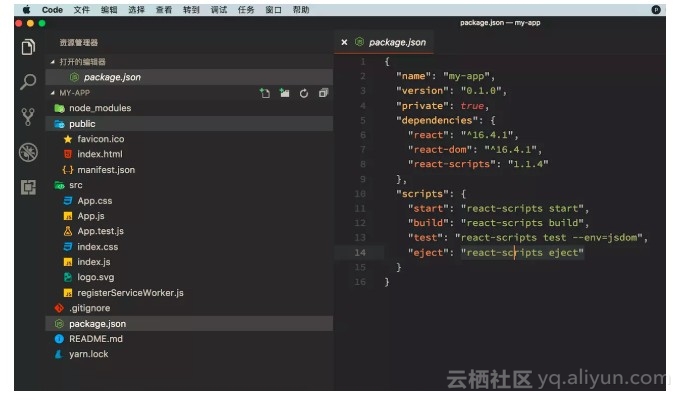
配置
这样的”零配置”没法满足我们的需求,我们需要自定义,需要加一些 loader,plugin 等。
react 团队当然也提供了这样的途径
yarn eject

    Removes this tool and copies build dependencies, configuration files

    and scripts into the app directory. If you do this, you can’t go back!
执行 yarn eject (这是一个不可逆操作)
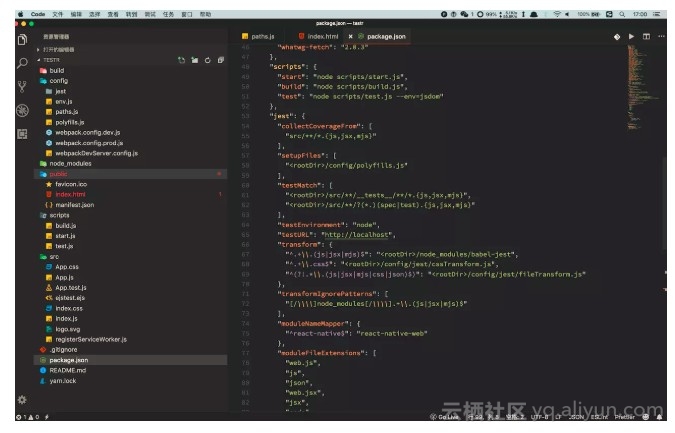
这个命令将部分配置文件释放出来,目录结构就变成下面这样子了

这时候就能够对 webpack.config 进行配置了,不过有的同学也会发现,package.json script 中并没有发现 webpack -c config.js 类似的命令,也没有看到.eslintrc、.babelrc 等配置文件。
不过 package.json->script 中能看到 这三条命令
"start": "node scripts/start.js",

"build": "node scripts/build.js",

"test": "node scripts/test.js --env=jsdom"
打开用户开发环境的 start.js 看看
片段:
// We attempt to use the default port but if it is busy, we offer the user to

// run on a different port. `choosePort()` Promise resolves to the next free port.

choosePort(HOST, DEFAULT_PORT)

  .then(port => {

    if (port == null) {

      // We have not found a port.

      return;

    }

    const protocol = process.env.HTTPS === 'true' ? 'https' : 'http';

    const appName = require(paths.appPackageJson).name;

    const urls = prepareUrls(protocol, HOST, port);

    // Create a webpack compiler that is configured with custom messages.

    const compiler = createCompiler(webpack, config, appName, urls, useYarn);

    // Load proxy config

    const proxySetting = require(paths.appPackageJson).proxy;

    const proxyConfig = prepareProxy(proxySetting, paths.appPublic);

    // Serve webpack assets generated by the compiler over a web sever.

    const serverConfig = createDevServerConfig(proxyConfig, urls.lanUrlForConfig);

    const devServer = new WebpackDevServer(compiler, serverConfig);

    // Launch WebpackDevServer.

    devServer.listen(port, HOST, err => {

      if (err) {

        return console.log(err);

      }

      if (isInteractive) {

        clearConsole();

      }

      console.log(chalk.cyan('Starting the development server...\n'));

      openBrowser(urls.localUrlForBrowser);

    });

    ['SIGINT', 'SIGTERM'].forEach(function(sig) {

      process.on(sig, function() {

        devServer.close();

        process.exit();

      });

    });

  })

  .catch(err => {

    if (err && err.message) {

      console.log(err.message);

    }

    process.exit(1);

  });
在 start.js 中通过代码来启动 webpack 以及 DevServer
eslint 和 babel 的配置 写在了 package.json 里
"babel": {

  "presets": [

    "react-app"

  ]

},

"eslintConfig": {

  "extends": "react-app"

},
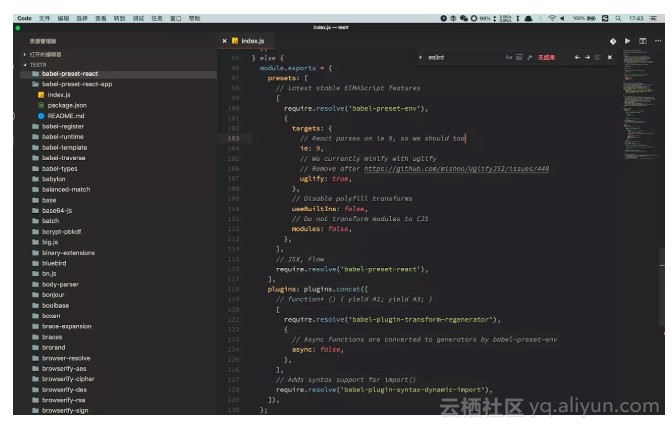
能中 dependencies 中找到对应的两个库 babel-preset-react-app和eslint-config-react-app
查看babel-preset-react-app源码,就能看到具体的 babel 配置了(eslint-config-react-app 同理),对这一块不熟悉的同学可以看看怎样组合 presets plugin 和 polyfill 的( ps:经常看到网上很多人贴出来的配置 会打包一大堆不需要的 polyfill )

开发react 应用最好用的脚手架 create-react-app的更多相关文章
- React(一)使用脚手架创建React项目
1.安装脚手架 现在使用较多的就是这三种脚手架工具: react-boilerplate react-redux-starter-kit create-react-app 我使用的是第三种,faceb ...
- 如何扩展 Create React App 的 Webpack 配置
如何扩展 Create React App 的 Webpack 配置 原文地址https://zhaozhiming.github.io/blog/2018/01/08/create-react-a ...
- 在 .NET Core 5 中集成 Create React app
翻译自 Camilo Reyes 2021年2月22日的文章 <Integrate Create React app with .NET Core 5> [1] Camilo Reyes ...
- 【每天学一点-04】使用脚手架搭建 React+TypeScript+umi.js+Antd 项目
一.使用脚手架搭建项目框架 1.首先使用脚手架搭建React项目(React+TypeScript+Umi.js) 在控制台输入命令:yarn create @umijs/umi-app 2.引入An ...
- React笔记:快速构建脚手架(1)
1. Create React APP React官方提供的脚手架工程Create React App:https://github.com/facebook/create-react-app Cre ...
- tap news:week5 0.0 create react app
参考https://blog.csdn.net/qtfying/article/details/78665664 先创建文件夹 安装create react app 这个脚手架(facebook官方提 ...
- 利用 Create React Native App 快速创建 React Native 应用
本文介绍的 Create-React-Native-App 是非常 Awesome 的工具,而其背后的 Expo 整个平台也让笔者感觉非常的不错.笔者目前公司是采用 APICloud 进行移动应用开发 ...
- 深入 Create React App 核心概念
本文差点难产而死.因为总结的过程中,多次怀疑本文是对官方文档的直接翻译和简单诺列:同时官方文档很全面,全范围的介绍无疑加深了写作的心智负担.但在最终的梳理中,发现走出了一条与众不同的路,于是坚持分享出 ...
- 使用create react app教程
This project was bootstrapped with Create React App. Below you will find some information on how to ...
- React前端有钱途吗?《React+Redux前端开发实战》学起来
再不学React就真的跟不上大前端的形式了,目前几乎所有前端的招聘条件都是精通React者优先,看看拉勾网的React薪资,都是15K-20K,这个暑假,必须动起来了. 如果你熟悉JavaScript ...
随机推荐
- Spring-quartz定时系统多任务配置
<!-- 启动触发器的配置开始 --> <bean name="startQuertz" lazy-init="false" autowire ...
- python-字符串的处理
s1 = '###12314##231###' print(s1.split('#')) #split,从左往右遇见# 就拆分一次['', '', '', '12314', '', '231', '' ...
- Flutter-AppBar
1.1 简介 AppBar “应用栏” 应用栏由工具栏组成,或者是工具栏和其他 widget 组合形成,例如 TabBar和FlexibleSpaceBar; 应用栏通常用于 Scaffold.app ...
- find命令查找目录
find <path> -type d -name "dir_name" -type d是查找目录的参数,如果是查找其他的: -type b: Block specia ...
- html中 的method=post和method=get的区别
1. get是从服务器上获取数据,post是向服务器传送数据. 2. get是把参数数据队列加到提交表单的ACTION属性所指的URL中,值和表单内各个字段一一对应,在URL中可以看到.post是通过 ...
- 推荐Html Table和Markown互转的网站Table Convert Online
网站名称:https://tableconvert.com/ 进入网站可以看到可以Table 转为Markdown.JSON.XML.SQL 多种格式 Table(4×5)定义Table的行数和列数: ...
- vfs的super block
super block这个数据结构,乃至super block在磁盘上的位置,是哪里的规定? 没规定,1k偏移只是ext文件系统.但是像fat,它们第0扇区后就是保留扇区,但linux一样要识别它们. ...
- CSD编码----数字信号处理--006
有符号数(Signed Digit Number , SD) SD编码 1.有三重值 {0,1,-1} 2.应用在不用进位的加法器或乘法器中能够降低复杂性 因为通常可以通过非零元素的数来估计乘法的工作 ...
- intellijidea查看git窗口
version control null
- linux设备驱动第三篇:写一个简单的字符设备驱动
在linux设备驱动第一篇:设备驱动程序简介中简单介绍了字符驱动,本篇简单介绍如何写一个简单的字符设备驱动.本篇借鉴LDD中的源码,实现一个与硬件设备无关的字符设备驱动,仅仅操作从内核中分 ...
