SpringBoot笔记(7)
一、单元测试
1、JUnit5简介
Spring Boot 2.2.0 版本开始引入 JUnit 5 作为单元测试默认库
作为最新版本的JUnit框架,JUnit5与之前版本的Junit框架有很大的不同。由三个不同子项目的几个不同模块组成。
JUnit 5 = JUnit Platform + JUnit Jupiter + JUnit Vintage
JUnit Platform: Junit Platform是在JVM上启动测试框架的基础,不仅支持Junit自制的测试引擎,其他测试引擎也都可以接入。
JUnit Jupiter: JUnit Jupiter提供了JUnit5的新的编程模型,是JUnit5新特性的核心。内部 包含了一个测试引擎,用于在Junit Platform上运行。
JUnit Vintage: 由于JUint已经发展多年,为了照顾老的项目,JUnit Vintage提供了兼容JUnit4.x,Junit3.x的测试引擎。
注意:
SpringBoot 2.4 以上版本移除了默认对 Vintage 的依赖。如果需要兼容junit4需要自行引入(不能使用junit4的功能 @Test)
<dependency>

    <groupId>org.junit.vintage</groupId>

    <artifactId>junit-vintage-engine</artifactId>

    <scope>test</scope>

    <exclusions>

        <exclusion>

            <groupId>org.hamcrest</groupId>

            <artifactId>hamcrest-core</artifactId>

        </exclusion>

    </exclusions>

</dependency>
2、使用
<dependency>

  <groupId>org.springframework.boot</groupId>

  <artifactId>spring-boot-starter-test</artifactId>

  <scope>test</scope>

</dependency>
现在版本:
@SpringBootTest

class Boot05WebAdminApplicationTests {

    @Test

    void contextLoads() {

    }

}
SpringBoot整合Junit以后。
- 编写测试方法:@Test标注(注意需要使用junit5版本的注解)
- Junit类具有Spring的功能,@Autowired、比如 @Transactional 标注测试方法,测试完成后自动回滚
3、常用注解
JUnit5的注解与JUnit4的注解有所变化
https://junit.org/junit5/docs/current/user-guide/#writing-tests-annotations
- @Test :表示方法是测试方法。但是与JUnit4的@Test不同,他的职责非常单一不能声明任何属性,拓展的测试将会由Jupiter提供额外测试
- @ParameterizedTest :表示方法是参数化测试,下方会有详细介绍
- @RepeatedTest :表示方法可重复执行,下方会有详细介绍
- @DisplayName :为测试类或者测试方法设置展示名称
- @BeforeEach :表示在每个单元测试之前执行
- @AfterEach :表示在每个单元测试之后执行
- @BeforeAll :表示在所有单元测试之前执行
- @AfterAll :表示在所有单元测试之后执行
- @Tag :表示单元测试类别,类似于JUnit4中的@Categories
- @Disabled :表示测试类或测试方法不执行,类似于JUnit4中的@Ignore
- @Timeout :表示测试方法运行如果超过了指定时间将会返回错误
- @ExtendWith :为测试类或测试方法提供扩展类引用
4、断言
断言(assertions)是测试方法中的核心部分,用来对测试需要满足的条件进行验证。这些断言方法都是 org.junit.jupiter.api.Assertions 的静态方法。JUnit 5 内置的断言可以分成如下几个类别:
检查业务逻辑返回的数据是否合理。
所有的测试运行结束以后,会有一个详细的测试报告;
1、简单断言
用来对单个值进行简单的验证。如:
| 方法 | 说明 |
|---|---|
| assertEquals | 判断两个对象或两个原始类型是否相等 |
| assertNotEquals | 判断两个对象或两个原始类型是否不相等 |
| assertSame | 判断两个对象引用是否指向同一个对象 |
| assertNotSame | 判断两个对象引用是否指向不同的对象 |
| assertTrue | 判断给定的布尔值是否为 true |
| assertFalse | 判断给定的布尔值是否为 false |
| assertNull | 判断给定的对象引用是否为 null |
| assertNotNull | 判断给定的对象引用是否不为 null |
@Test

@DisplayName("simple assertion")

public void simple() {

     assertEquals(3, 1 + 2, "simple math");

     assertNotEquals(3, 1 + 1);

     assertNotSame(new Object(), new Object());

     Object obj = new Object();

     assertSame(obj, obj);

     assertFalse(1 > 2);

     assertTrue(1 < 2);

     assertNull(null);

     assertNotNull(new Object());

}
2、数组断言
通过 assertArrayEquals 方法来判断两个对象或原始类型的数组是否相等
@Test

@DisplayName("array assertion")

public void array() {

 assertArrayEquals(new int[]{1, 2}, new int[] {1, 2});

}
3、组合断言
assertAll 方法接受多个 org.junit.jupiter.api.Executable 函数式接口的实例作为要验证的断言,可以通过 lambda 表达式很容易的提供这些断言
@Test

@DisplayName("assert all")

public void all() {

 assertAll("Math",

    () -> assertEquals(2, 1 + 1),

    () -> assertTrue(1 > 0)

 );

}
4、异常断言
在JUnit4时期,想要测试方法的异常情况时,需要用@Rule注解的ExpectedException变量还是比较麻烦的。而JUnit5提供了一种新的断言方式Assertions.assertThrows() ,配合函数式编程就可以进行使用。
@Test

@DisplayName("异常测试")

public void exceptionTest() {

    ArithmeticException exception = Assertions.assertThrows(

           //扔出断言异常

            ArithmeticException.class, () -> System.out.println(1 % 0));

}
5、超时断言
Junit5还提供了Assertions.assertTimeout() 为测试方法设置了超时时间
@Test

@DisplayName("超时测试")

public void timeoutTest() {

    //如果测试方法时间超过1s将会异常

    Assertions.assertTimeout(Duration.ofMillis(1000), () -> Thread.sleep(500));

}
6、快速失败
通过 fail 方法直接使得测试失败
@Test

@DisplayName("fail")

public void shouldFail() {

 fail("This should fail");

}
5、前置条件(assumptions)
JUnit 5 中的前置条件(assumptions【假设】)类似于断言,不同之处在于不满足的断言会使得测试方法失败,而不满足的前置条件只会使得测试方法的执行终止。前置条件可以看成是测试方法执行的前提,当该前提不满足时,就没有继续执行的必要。
@DisplayName("前置条件")

public class AssumptionsTest {

 private final String environment = "DEV";

 @Test

 @DisplayName("simple")

 public void simpleAssume() {

    assumeTrue(Objects.equals(this.environment, "DEV"));

    assumeFalse(() -> Objects.equals(this.environment, "PROD"));

 }

 @Test

 @DisplayName("assume then do")

 public void assumeThenDo() {

    assumingThat(

       Objects.equals(this.environment, "DEV"),

       () -> System.out.println("In DEV")

    );

 }

}
assumeTrue 和 assumFalse 确保给定的条件为 true 或 false,不满足条件会使得测试执行终止。assumingThat 的参数是表示条件的布尔值和对应的 Executable 接口的实现对象。只有条件满足时,Executable 对象才会被执行;当条件不满足时,测试执行并不会终止。
6、嵌套测试
JUnit 5 可以通过 Java 中的内部类和@Nested 注解实现嵌套测试,从而可以更好的把相关的测试方法组织在一起。在内部类中可以使用@BeforeEach 和@AfterEach 注解,而且嵌套的层次没有限制。
@DisplayName("A stack")

class TestingAStackDemo {

    Stack<Object> stack;

    @Test

    @DisplayName("is instantiated with new Stack()")

    void isInstantiatedWithNew() {

        new Stack<>();

    }

    @Nested

    @DisplayName("when new")

    class WhenNew {

        @BeforeEach

        void createNewStack() {

            stack = new Stack<>();

        }

        @Test

        @DisplayName("is empty")

        void isEmpty() {

            assertTrue(stack.isEmpty());

        }

        @Test

        @DisplayName("throws EmptyStackException when popped")

        void throwsExceptionWhenPopped() {

            assertThrows(EmptyStackException.class, stack::pop);

        }

        @Test

        @DisplayName("throws EmptyStackException when peeked")

        void throwsExceptionWhenPeeked() {

            assertThrows(EmptyStackException.class, stack::peek);

        }

        @Nested

        @DisplayName("after pushing an element")

        class AfterPushing {

            String anElement = "an element";

            @BeforeEach

            void pushAnElement() {

                stack.push(anElement);

            }

            @Test

            @DisplayName("it is no longer empty")

            void isNotEmpty() {

                assertFalse(stack.isEmpty());

            }

            @Test

            @DisplayName("returns the element when popped and is empty")

            void returnElementWhenPopped() {

                assertEquals(anElement, stack.pop());

                assertTrue(stack.isEmpty());

            }

            @Test

            @DisplayName("returns the element when peeked but remains not empty")

            void returnElementWhenPeeked() {

                assertEquals(anElement, stack.peek());

                assertFalse(stack.isEmpty());

            }

        }

    }

}
二、Profile环境切换
1、Profile功能
为了方便多环境适配,springboot简化了profile功能。
1、application-profile功能
默认配置文件 application.yaml;任何时候都会加载
指定环境配置文件 application-{env}.yaml
激活指定环境
- 配置文件激活:spring.profiles.active=。。。
- 命令行激活:java -jar xxx.jar --spring.profiles.active=prod --person.name=haha
- 修改配置文件的任意值,命令行优先
默认配置与环境配置同时生效
同名配置项,profile配置优先
2、@Profile条件装配功能
@Configuration(proxyBeanMethods = false)

@Profile("production")

public class ProductionConfiguration {

    // ...

}
3、profile分组
spring.profiles.group.production[0]=proddb

spring.profiles.group.production[1]=prodmq

使用:--spring.profiles.active=production  激活
三、外部化配置
1、配置源
- Default properties (specified by setting
SpringApplication.setDefaultProperties). @PropertySourceannotations on your@Configurationclasses. Please note that such property sources are not added to theEnvironmentuntil the application context is being refreshed. This is too late to configure certain properties such aslogging.*andspring.main.*which are read before refresh begins.- Config data (such as
application.propertiesfiles) - A
RandomValuePropertySourcethat has properties only inrandom.*. - OS environment variables.
- Java System properties (
System.getProperties()). - JNDI attributes from
java:comp/env. ServletContextinit parameters.ServletConfiginit parameters.- Properties from
SPRING_APPLICATION_JSON(inline JSON embedded in an environment variable or system property). - Command line arguments.
propertiesattribute on your tests. Available on@SpringBootTestand the test annotations for testing a particular slice of your application.@TestPropertySourceannotations on your tests.- Devtools global settings properties in the
$HOME/.config/spring-bootdirectory when devtools is active.
2、外部配置源(常用)
常用:Java属性文件、YAML文件、环境变量、命令行参数;
3、配置文件查找位置
(1) classpath 根路径
(2) classpath 根路径下config目录
(3) jar包当前目录
(4) jar包当前目录的config目录
(5) /config子目录的直接子目录
4、配置文件加载顺序:
- 当前jar包内部的application.properties和application.yml
- 当前jar包内部的application-{profile}.properties 和 application-{profile}.yml
- 引用的外部jar包的application.properties和application.yml
- 引用的外部jar包的application-{profile}.properties 和 application-{profile}.yml
5、覆盖规则
指定环境优先,外部优先,后面的可以覆盖前面的同名配置项
四、自定义starter
1、starter启动原理
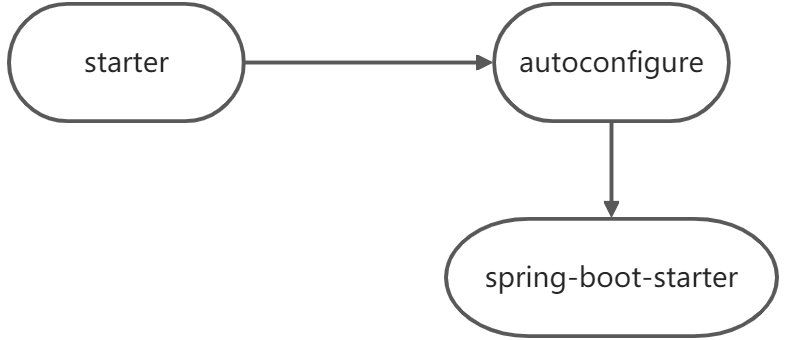
- starter-pom引入 autoconfigurer 包

autoconfigure包中配置使用 META-INF/spring.factories 中 EnableAutoConfiguration 的值,使得项目启动加载指定的自动配置类
编写自动配置类 xxxAutoConfiguration -> xxxxProperties
- @Configuration
- @Conditional
- @EnableConfigurationProperties
- @Bean
- ......
引入starter --- xxxAutoConfiguration --- 容器中放入组件 ---- 绑定xxxProperties ---- 配置项
2、自定义starter
atguigu-hello-spring-boot-starter(启动器)
atguigu-hello-spring-boot-starter-autoconfigure(自动配置包)
五、SpringBoot启动原理
Spring原理【Spring注解】、SpringMVC原理、自动配置原理、SpringBoot原理
1、SpringBoot启动过程
创建 SpringApplication
- 保存一些信息。
- 判定当前应用的类型。ClassUtils。Servlet
- bootstrappers****:初始启动引导器(List):去spring.factories文件中找 org.springframework.boot.Bootstrapper
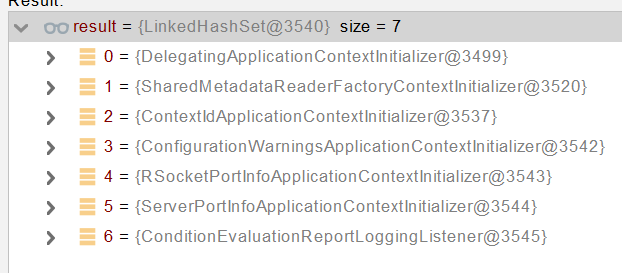
- 找 ApplicationContextInitializer;去spring.factories****找 ApplicationContextInitializer
- List<ApplicationContextInitializer<?>> initializers
- 找 ApplicationListener ;应用监听器。去spring.factories****找 ApplicationListener
- List<ApplicationListener<?>> listeners
运行 SpringApplication
- StopWatch
- 记录应用的启动时间
- 创建引导上下文(Context环境)****createBootstrapContext()
- 获取到所有之前的 bootstrappers 挨个执行 intitialize() 来完成对引导启动器上下文环境设置
- 让当前应用进入headless模式。java.awt.headless
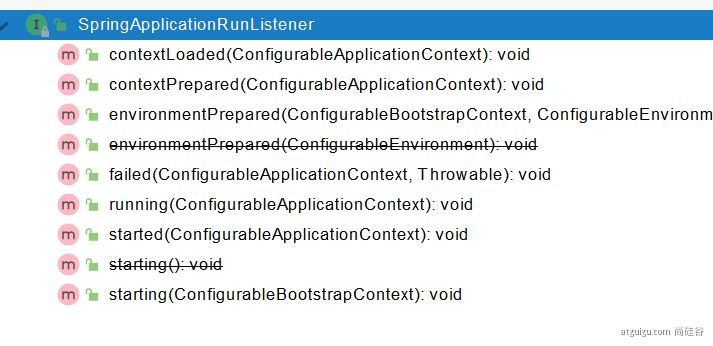
- 获取所有 RunListener****(运行监听器)【为了方便所有Listener进行事件感知】
- getSpringFactoriesInstances 去spring.factories****找 SpringApplicationRunListener.
- 遍历 SpringApplicationRunListener 调用 starting 方法;
- 相当于通知所有感兴趣系统正在启动过程的人,项目正在 starting。
- 保存命令行参数;ApplicationArguments
- 准备环境 prepareEnvironment();
- 返回或者创建基础环境信息对象。StandardServletEnvironment
- 配置环境信息对象。
- 读取所有的配置源的配置属性值。
- 绑定环境信息
- 监听器调用 listener.environmentPrepared();通知所有的监听器当前环境准备完成
- 创建IOC容器(createApplicationContext())
- 根据项目类型(Servlet)创建容器,
- 当前会创建 AnnotationConfigServletWebServerApplicationContext
- 准备ApplicationContext IOC容器的基本信息 prepareContext()
- 保存环境信息
- IOC容器的后置处理流程。
- 应用初始化器;applyInitializers;
- 遍历所有的 ApplicationContextInitializer 。调用 initialize.。来对ioc容器进行初始化扩展功能
- 遍历所有的 listener 调用 contextPrepared。EventPublishRunListenr;通知所有的监听器contextPrepared
- 所有的监听器 调用 contextLoaded。通知所有的监听器 contextLoaded;
- 刷新IOC容器。refreshContext
- 创建容器中的所有组件(Spring注解)
- 容器刷新完成后工作?afterRefresh
- 所有监听 器 调用 listeners.started(context); 通知所有的监听器 started
- 调用所有runners;callRunners()
- 获取容器中的 ApplicationRunner
- 获取容器中的 CommandLineRunner
- 合并所有runner并且按照@Order进行排序
- 遍历所有的runner。调用 run 方法
- 如果以上有异常,
- 调用Listener 的 failed
- 调用所有监听器的 running 方法 listeners.running(context); 通知所有的监听器 running
- running如果有问题。继续通知 failed 。****调用所有 Listener 的 failed;****通知所有的监听器 failed
public interface Bootstrapper {

    /**

     * Initialize the given {@link BootstrapRegistry} with any required registrations.

     * @param registry the registry to initialize

     */

    void intitialize(BootstrapRegistry registry);

}


@FunctionalInterface

public interface ApplicationRunner {

    /**

     * Callback used to run the bean.

     * @param args incoming application arguments

     * @throws Exception on error

     */

    void run(ApplicationArguments args) throws Exception;

}

@FunctionalInterface

public interface CommandLineRunner {

    /**

     * Callback used to run the bean.

     * @param args incoming main method arguments

     * @throws Exception on error

     */

    void run(String... args) throws Exception;

}
SpringBoot笔记(7)的更多相关文章
- SpringBoot笔记十六:ElasticSearch
目录 ElasticSearch官方文档 ElasticSearch安装 ElasticSearch简介 ElasticSearch操作数据,RESTful风格 存储 检查是否存在 删除 查询 更新 ...
- SpringBoot笔记一
1 开始 1.1 spring介绍 Spring Boot使开发独立的,产品级别的基于Spring的应用变得非常简单,你只需"just run". 我们为Spring平台及第三方库 ...
- 【SpringBoot笔记】SpringBoot整合Druid数据连接池
废话少说,按SpringBoot的老套路来. [step1]:添加依赖 <!-- 数据库连接池 --> <dependency> <groupId>com.alib ...
- SpringBoot笔记十七:热部署
目录 什么是热部署 Devtools热部署 什么是热部署 热部署,就是在应用正在运行的时候升级软件,却不需要重新启动应用. 举个例子,王者荣耀的更新有时候就是热部署,热更新,就是他提示你更新,更新40 ...
- SpringBoot笔记十四:消息队列
目录 什么是消息队列 消息队列的作用 异步通信 应用解耦 流量削峰 RabbitMQ RabbitMQ流程简介 RabbitMQ的三种模式 安装RabbitMQ RabbitMQ交换器路由和队列的创建 ...
- SpringBoot笔记十三:引入webjar资源和国际化处理
目录 什么是webjar 怎么使用webjar 国际化 新建国际化配置文件 配置配置文件 使用配置文件 我们先来看一个html,带有css的,我们就以这个为准来讲解. 资源可以去我网盘下载 链接:ht ...
- springboot笔记1(转载于puresmile)
构建微服务:Spring boot 入门篇 什么是spring boot Spring Boot是由Pivotal团队提供的全新框架,其设计目的是用来简化新Spring应用的初始搭建以及开发过程.该框 ...
- SpringBoot笔记
官网: http://springboot.fun/ 收集到一个比较全的: https://blog.csdn.net/xiaoyu411502/article/details/52474037 Id ...
- springboot笔记05——profile多环境配置切换
前言 一个应用程序从开发到上线,往往需要经历几个阶段,例如开发.测试.上线.每个阶段所用到的环境的配置可能都是不一样的,Springboot 应用可以很方便地在各个环境中对配置进行切换.所以,今天主要 ...
- springboot笔记09——使用aop
什么是AOP? aop(Aspect Oriented Programming)面向切面编程,是OOP(Object-Oriented Programing,面向对象编程)的补充和完善.OOP引入封装 ...
随机推荐
- 自动化测试(1)selenium+python+chrome 连接测试
环境准备: python版本:3.8.4 开发工具:pycharm 使用chrome和对应的webdriver http://npm.taobao.org/mirrors/chromedriver/ ...
- Adaptive AUTOSAR 学习笔记 10 - 执行管理
本系列学习笔记基于 AUTOSAR Adaptive Platform 官方文档 R20-11 版本 AUTOSAR_EXP_PlatformDesign.pdf 缩写 EM:Execution Ma ...
- DNS的原理和解析过程
DNS的解析原理和过程: 在Internet上域名和IP是对应的,DNS解析有两种:一种是正向解析,另外一种是反向解析. 正向解析:正向解析就是将域名转换成对应的 IP地址的过程,它应用于在浏览器地址 ...
- python中的常用内建属性与内建函数
常用专有属性常用专有属性 说明 触发方式 __init__ 构造初始化函数 创建实例后,赋值时使用,在__new__后 __new__ 生成实例所需属性 创建实例时 __class__ 实例所在的类 ...
- 构建前端第3篇之---使用scss
张艳涛 写于2021-1-20 主要解决俩个问题: 在单个vue文件中 <style rel="stylesheet/scss" lang="scss"& ...
- xss.haozi靶机
X00 <script>alert(1)</script> X01 </textarea><script>alert(1)</script> ...
- 关于C语言中对数字的扩展和缩短
关于对数字的扩展:如果需要在不改变他的类型的情况下去扩展一个数字 有符号数字: 如果最高位为0---向左按位复制0 如果最高位为1---向左按位复制1 无符号数字:向左按位复制0即可 对于数字的缩短: ...
- 破解加速乐-java
记录一哈自己遇到的简单站点的破解 Talk is cheap,show you the code! import com.google.gson.Gson; import com.google.gso ...
- RHCE_DAY06
iptables防火墙 ----匹配及停止 nerfilter/iptables:工作在主机或网络的边缘,对于进出本主机或网络的报文根据事先定义好的检查规则作匹配检测,对于能够被规则所匹配到的报文做出 ...
- Linux守护进程及Systemd
当我们启动一个前台任务后,命令行窗口退出,应用也就一起退出,无法访问了.怎么才能让它变成系统的守护进程(daemon),成为一种服务(service),一直在那里运行呢? 守护进程 前台任务和后台任务 ...
