springBoot2.0 配置 mybatis+mybatisPlus+redis
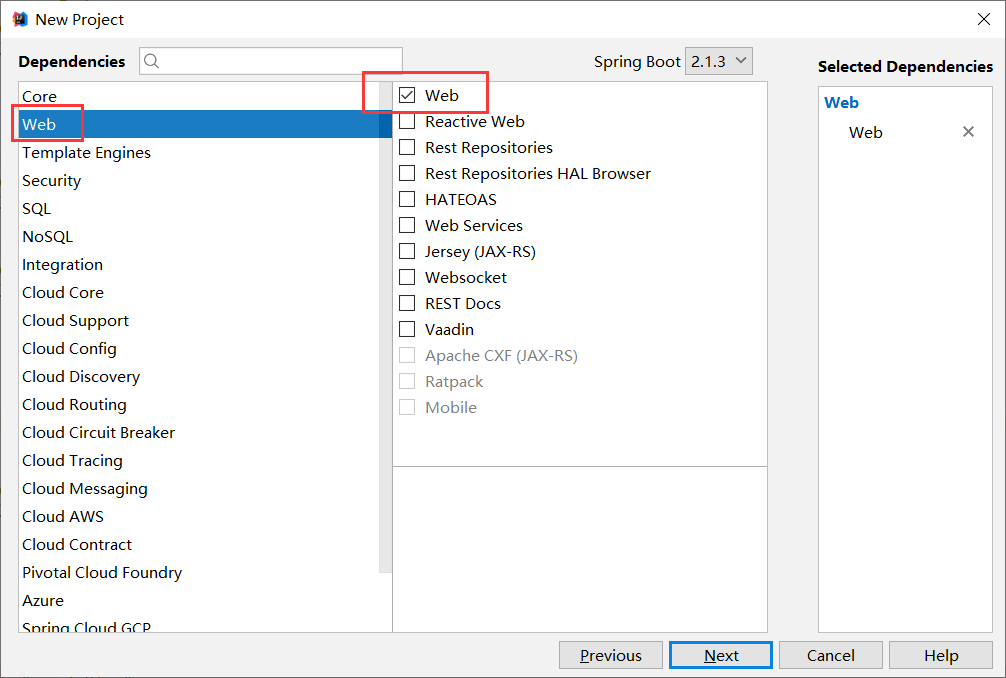
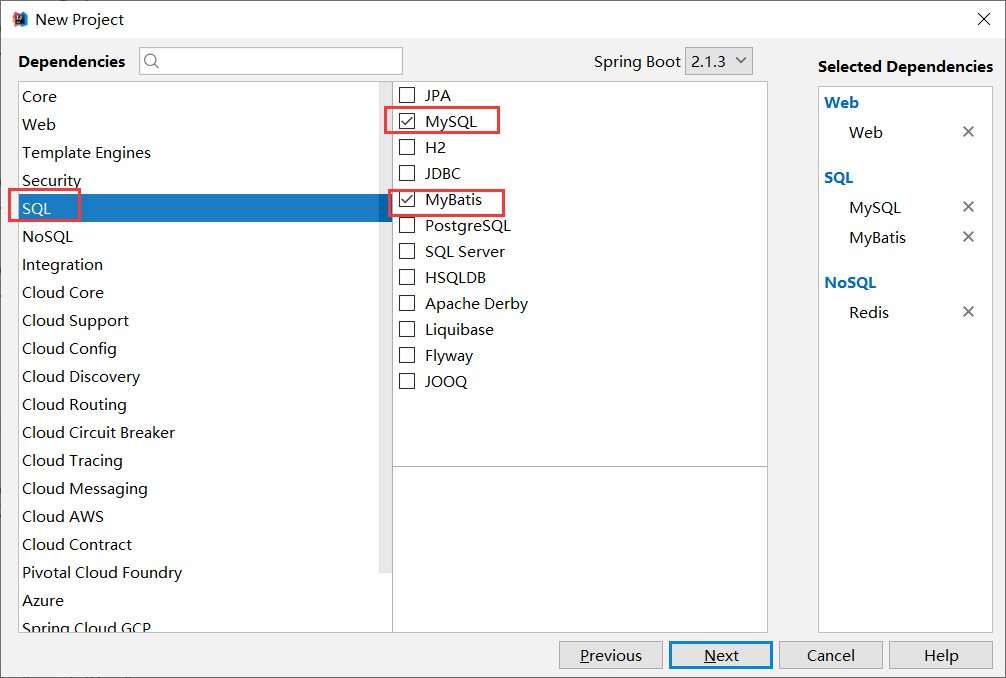
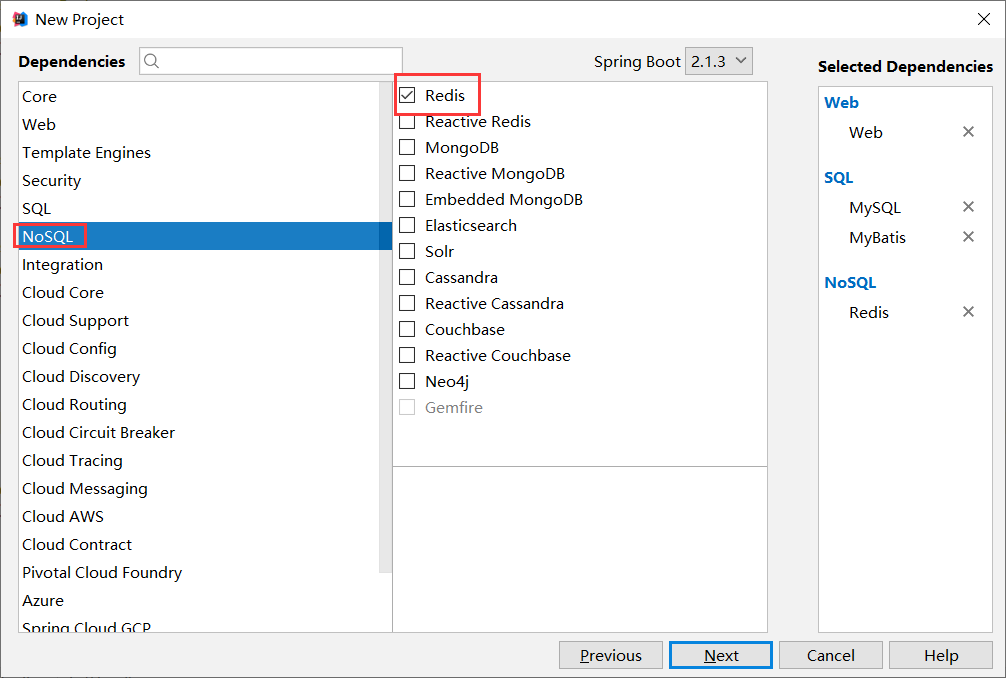
一.Idea新建springBoot项目
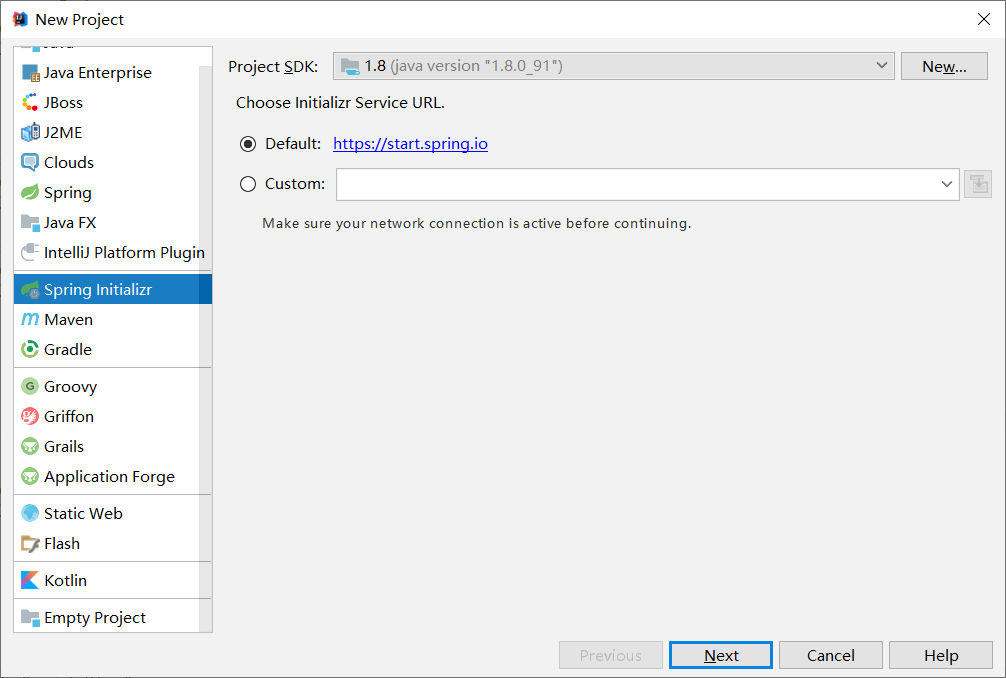

next到完成,然后修改使用自己的maven

等待下载包
二.pom.xml文件
<?xml version="1.0" encoding="UTF-8"?>
<project xmlns="http://maven.apache.org/POM/4.0.0" xmlns:xsi="http://www.w3.org/2001/XMLSchema-instance"
xsi:schemaLocation="http://maven.apache.org/POM/4.0.0 http://maven.apache.org/xsd/maven-4.0.0.xsd">
<modelVersion>4.0.0</modelVersion>
<parent>
<groupId>org.springframework.boot</groupId>
<artifactId>spring-boot-starter-parent</artifactId>
<version>2.1.3.RELEASE</version>
<relativePath/> <!-- lookup parent from repository -->
</parent>
<groupId>com.example</groupId>
<artifactId>demo2</artifactId>
<version>0.0.1-SNAPSHOT</version>
<name>demo2</name>
<description>Demo project for Spring Boot</description> <properties>
<java.version>1.8</java.version>
</properties> <!-- 配置环境变量 -->
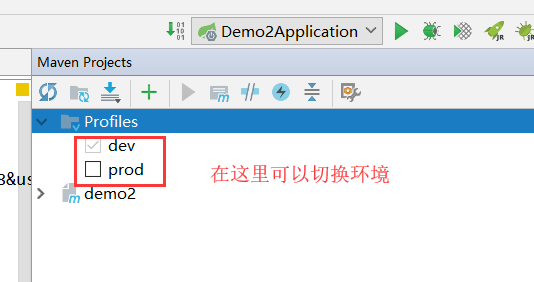
<profiles>
<profile>
<id>dev</id>
<properties>
<profiles.active>dev</profiles.active>
</properties>
<!-- 默认环境 -->
<activation>
<activeByDefault>true</activeByDefault>
</activation>
</profile>
<profile>
<id>prod</id>
<properties>
<profiles.active>prod</profiles.active>
</properties>
</profile>
</profiles> <dependencies>
<dependency>
<groupId>org.springframework.boot</groupId>
<artifactId>spring-boot-starter-data-redis</artifactId>
</dependency>
<dependency>
<groupId>org.springframework.boot</groupId>
<artifactId>spring-boot-starter-web</artifactId>
</dependency>
<dependency>
<groupId>org.mybatis.spring.boot</groupId>
<artifactId>mybatis-spring-boot-starter</artifactId>
<version>2.0.0</version>
</dependency> <dependency>
<groupId>mysql</groupId>
<artifactId>mysql-connector-java</artifactId>
<scope>runtime</scope>
</dependency>
<dependency>
<groupId>org.springframework.boot</groupId>
<artifactId>spring-boot-starter-test</artifactId>
<scope>test</scope>
</dependency> <!-- 阿里数据源 -->
<dependency>
<groupId>com.alibaba</groupId>
<artifactId>druid-spring-boot-starter</artifactId>
<version>1.1.10</version>
</dependency> <!-- lombok -->
<dependency>
<groupId>org.projectlombok</groupId>
<artifactId>lombok</artifactId>
<optional>true</optional>
</dependency> <!-- mybatisPlus -->
<dependency>
<groupId>com.baomidou</groupId>
<artifactId>mybatis-plus-boot-starter</artifactId>
<version>3.0.7.1</version>
</dependency> <!-- mybatis -->
<dependency>
<groupId>org.mybatis.spring.boot</groupId>
<artifactId>mybatis-spring-boot-starter</artifactId>
<version>1.3.2</version>
</dependency>
</dependencies> <build>
<plugins>
<plugin>
<groupId>org.springframework.boot</groupId>
<artifactId>spring-boot-maven-plugin</artifactId>
</plugin>
</plugins>
</build> </project>
三.application配置文件
application.properties 修改为 application.yml


新增application-dev.yml测试环境文件和application-prod.yml生成环境文件
application.yml配置
#默认配置文件

spring:

  profiles:

    active: @profiles.active@

#tomcat

server:

  port: 8080

  servlet:

    context-path: /demo2

#mybatis

mybatis-plus:

  configuration:

    map-underscore-to-camel-case: true

    jdbc-type-for-null: null

    auto-mapping-behavior: full

  mapper-locations: classpath*:mapping/*.xml

  type-aliases-package: com.sssr.assets.entity

#日志

logging:

  level:

    com.example.demo2.dao: debug

    org:

      springframework:

        boot:

          autoconfigure: ERROR

#日志文件输出路径

#  file:

#    assets.log
application-dev.yml配置
spring:

  datasource:

    druid:

      driver-class-name: com.mysql.cj.jdbc.Driver

      url: jdbc:mysql://localhost:3306/assets?characterEncoding=utf8&useSSL=false&serverTimezone=UTC&allowPublicKeyRetrieval=true

      username: root

      password: 123456

      stat-view-servlet:

        url-pattern: /druid/*

        reset-enable: true

        login-username: druid

        login-password: druid

      web-stat-filter:

        url-pattern: /*

        exclusions: "*.js,*.gif,*.jpg,*.bmp,*.png,*.css,*.ico,/druid/*"

  #redis

  redis:

    database: 0

    host: localhost

    port: 6379

    timeout: 3000

    password:

jedis:

      #    链接池

      pool:

#       最大连接数(负值表示没有限制)

        max-active: 8

#       最大阻塞等待时间(负值表示没有限制)

        max-wait: 1

#       最大空闲链接

        max-idle: 8

#       最小空闲链接

        min-idle: 0
四.entity,dao,controller,service,config,mapping包

User.java 实体类
package com.example.demo2.entity;

import lombok.Getter;

import lombok.Setter;

import java.io.Serializable;

/**

 * @author sssr

 * @version 1.0

 * @Description:

 * @date 2019/2/16

 */

@Getter

@Setter

public class User implements Serializable {

    private Long id;

    private String username;

    private String password;

}
UserDao.java
package com.example.demo2.dao;

import com.baomidou.mybatisplus.core.mapper.BaseMapper;

import com.example.demo2.entity.User;

import org.springframework.stereotype.Repository;

import java.util.List;

/**

 * @author sssr

 * @version 1.0

 * @Description:

 * @date 2019/2/16

 */

@Repository

public interface UserDao extends BaseMapper<User> {

    /**

     * 用户列表

     * @return

     */

    List<User> getList();

}
UserDao.xml
<?xml version="1.0" encoding="UTF-8" ?>

<!DOCTYPE mapper PUBLIC "-//mybatis.org//DTD Mapper 3.0//EN" "http://mybatis.org/dtd/mybatis-3-mapper.dtd" >

<mapper namespace="com.example.demo2.dao.UserDao">

    <resultMap id="userMap" type="com.example.demo2.entity.User">

    </resultMap>

    <select id="getList" resultMap="userMap">

      SELECT u.* FROM user u

    </select>

</mapper>
UserService.java
package com.example.demo2.service;

import com.baomidou.mybatisplus.extension.service.IService;

import com.example.demo2.entity.User;

import java.util.List;

/**

 * @author sssr

 * @version 1.0

 * @Description:

 * @date 2019/2/16

 */

public interface UserService extends IService<User> {

    List<User> getList();
}
UserServiceImpl.java
package com.example.demo2.service.impl;

import com.baomidou.mybatisplus.extension.service.impl.ServiceImpl;

import com.example.demo2.dao.UserDao;

import com.example.demo2.entity.User;

import com.example.demo2.service.UserService;

import org.springframework.beans.factory.annotation.Autowired;

import org.springframework.cache.annotation.Cacheable;

import org.springframework.stereotype.Service;

import java.util.List;

/**

 * @author sssr

 * @version 1.0

 * @Description:

 * @date 2019/2/16

 */

@Service

public class UserServiceImpl extends ServiceImpl<UserDao, User> implements UserService {

    @Autowired

    private UserDao userDao;

    /** (non-Javadoc)

     * @value:   在redis中 保存缓存在以user命名的集合中

     * @key  :   user集合中的关键字,注意字符串要以单引号括住  '',变量前缀加#号,如#userId

     */

    @Override

    @Cacheable(value="user",key="'userList'")

    public List<User> getList() {

        return userDao.getList();

    }

}
UserController.java
package com.example.demo2.controller; import com.example.demo2.entity.User;
import com.example.demo2.service.UserService;
import org.springframework.beans.factory.annotation.Autowired;
import org.springframework.web.bind.annotation.GetMapping;
import org.springframework.web.bind.annotation.RequestMapping;
import org.springframework.web.bind.annotation.RestController; import java.util.List; /**
* @author sssr
* @version 1.0
* @Description:
* @date 2019/2/16
*/
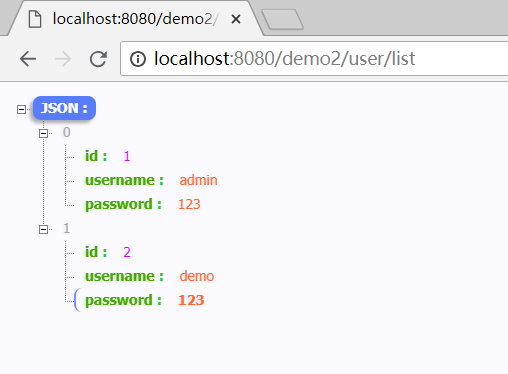
@RestController
@RequestMapping("/user")
public class UserController {
@Autowired
private UserService userService; @GetMapping("/list")
public List<User> getUserList(){
return userService.getList();
}
}
RedisConfig.java
package com.example.demo2.config;

import com.fasterxml.jackson.annotation.JsonAutoDetect;

import com.fasterxml.jackson.annotation.PropertyAccessor;

import com.fasterxml.jackson.databind.ObjectMapper;

import org.springframework.cache.CacheManager;

import org.springframework.cache.annotation.CachingConfigurerSupport;

import org.springframework.cache.annotation.EnableCaching;

import org.springframework.context.annotation.Bean;

import org.springframework.context.annotation.Configuration;

import org.springframework.data.redis.cache.RedisCacheConfiguration;

import org.springframework.data.redis.cache.RedisCacheManager;

import org.springframework.data.redis.cache.RedisCacheWriter;

import org.springframework.data.redis.connection.RedisConnectionFactory;

import org.springframework.data.redis.core.RedisTemplate;

import org.springframework.data.redis.core.StringRedisTemplate;

import org.springframework.data.redis.serializer.Jackson2JsonRedisSerializer;

import java.time.Duration;

/**

 * @author sssr

 * @version 1.0

 * @Description:

 * @date 2019/1/17

 */

@Configuration

@EnableCaching

public class RedisConfig extends CachingConfigurerSupport {

    //缓存管理器

    @Bean

    public CacheManager cacheManager(RedisConnectionFactory redisConnectionFactory) {

        RedisCacheConfiguration redisCacheConfiguration = RedisCacheConfiguration.defaultCacheConfig()

                .entryTtl(Duration.ofHours(1)); // 设置缓存有效期一小时

        return RedisCacheManager

                .builder(RedisCacheWriter.nonLockingRedisCacheWriter(redisConnectionFactory))

                .cacheDefaults(redisCacheConfiguration).build();

    }

    @Bean

    public RedisTemplate<String, String> redisTemplate(RedisConnectionFactory factory){

        StringRedisTemplate template = new StringRedisTemplate(factory);

        setSerializer(template);//设置序列化工具

        template.afterPropertiesSet();

        return template;

    }

    private void setSerializer(StringRedisTemplate template){

        @SuppressWarnings({ "rawtypes", "unchecked" })

        Jackson2JsonRedisSerializer jackson2JsonRedisSerializer = new Jackson2JsonRedisSerializer(Object.class);

        ObjectMapper om = new ObjectMapper();

        om.setVisibility(PropertyAccessor.ALL, JsonAutoDetect.Visibility.ANY);

        om.enableDefaultTyping(ObjectMapper.DefaultTyping.NON_FINAL);

        jackson2JsonRedisSerializer.setObjectMapper(om);

        template.setValueSerializer(jackson2JsonRedisSerializer);

    }

}
Demo2Application.java
package com.sssr.assets;

import org.mybatis.spring.annotation.MapperScan;

import org.springframework.boot.SpringApplication;

import org.springframework.boot.autoconfigure.SpringBootApplication;

import org.springframework.cache.annotation.EnableCaching;

import org.springframework.scheduling.annotation.EnableScheduling;

/**

 * @author sssr

 * 配置redis缓存,允许缓存

 *@EnableScheduling

 *@EnableCaching

 */

@SpringBootApplication

@EnableScheduling

@EnableCaching

@MapperScan({"com.example.demo2.dao","com.baomidou.mybatisplus.samples.quickstart.mapper"})

public class AssetsApplication {

   public static void main(String[] args) {

      SpringApplication.run(AssetsApplication.class, args);

   }

}
最终结构

五.运行测试

springBoot2.0 配置 mybatis+mybatisPlus+redis的更多相关文章
- springBoot2.0 配置shiro实现权限管理
一.前言 基于上一篇springBoot2.0 配置 mybatis+mybatisPlus+redis 这一篇加入shiro实现权限管理 二.shiro介绍 2.1 功能特点 Shiro 包含 10 ...
- Spring Boot 鉴权之—— springboot2.0.4+mybatis 整合的完整用例
自上一篇文章的基础上,Spring Boot 鉴权之—— JWT 鉴权我做了一波springboot2.0.4+mybatis 的整合. 参考文章: Spring Boot+Spring Securi ...
- springboot2.0配置连接池(hikari、druid)
springboot2.0配置连接池(hikari.druid) 原文链接:https://www.cnblogs.com/blog5277/p/10660689.html 原文作者:博客园--曲高终 ...
- springBoot2.0 配置@ControllerAdvice 捕获异常统一处理
一.前言 基于上一篇 springBoot2.0 配置shiro实现权限管理 这一篇配置 异常统一处理 二.新建文件夹:common,param 三.返回结果集对象 1.ResultData.java ...
- [转帖]springboot2.0配置连接池(hikari、druid)
springboot2.0配置连接池(hikari.druid) 原文链接:https://www.cnblogs.com/blog5277/p/10660689.html 原文作者:博客园--曲高终 ...
- SpringBoot2.0应用(五):SpringBoot2.0整合MyBatis
如何整合MyBatis 1.pom依赖 <dependency> <groupId>org.mybatis.spring.boot</groupId> <ar ...
- SpringBoot2.0(一) mybatis
使用mybatis springboot使用mybatis主要依赖 mybatis-spring-boot-starter 来实现.其提供了2中解决方案,一种是使用注解:另一种是简化后的传统的xml方 ...
- SpringBoot2.0整合mybatis、shiro、redis实现基于数据库权限管理系统
转自https://blog.csdn.net/poorcoder_/article/details/71374002 本文主要介绍使用SpringBoot与shiro实现基于数据库的细粒度动态权限管 ...
- IntelliJ IDEA 2017版 spring-boot2.0.4+mybatis+Redis处理高并发,穿透问题
一.当采用reddis缓存的时候,如果同时,一万次访问,那么就会有10000次访问数据库所以就会对数据库造成巨大压力,这时候,就要用到线程 1.方法体上加锁(优点,防护住了并发锁,缺点降低了内存效率) ...
随机推荐
- Eclipse_debug异常_Source not found
一.现象 在eclipse中,打了断点之后运行代码,出现debug异常:Source not found,如下图 原因 找不到源码. 解决方案 添加源码即可 1.Edit Source Lookup ...
- 通知消息与ON_NOTIFY
1.通知消息一般是由子控件发出,由父窗口响应,因此响应函数的位置在父窗口内. 2.通知消息发送给父窗口的是通知码,即WM_NOTIFY消息(但为了区分方便不同的消息有不同的名称,但都是以WM_NOTI ...
- codeforces 615E Hexagons (二分+找规律)
E. Hexagons time limit per test 1 second memory limit per test 256 megabytes input standard input ou ...
- JavaWEB - 静态include指令、动态Include指令
(一)使用静态include指令 <%@ page language="java" contentType="text/html; charset=gb2312&q ...
- Git远程克隆仓库出现Permission denied (publickey)
$ git clone git@github.com:DavidWanderer/test1.git Cloning into 'test1'... Warning: Permanently adde ...
- JS性能之setTimeout与clearTimeout
测试环境: chrome浏览器 结论: 1 一个页面用setTimeout越多,该页面消耗的内存就会越多,几乎成正比. 2 在'startCount(1000000);-->100万'情况下,不 ...
- ECMAScript基本函数、概念区分总结
1.使用Number()和parseInt() parseFloat()转换区别. 详见<JavaScript高级程序设计>P30 Number()可以针对任何类型. parseInt() ...
- linux 下查看某个进程中线程运行在哪个CPU上
运行程序,使用命令top查看指定的进程的PID: 然后使用命令: top -H -p PID 按f键,并使用上下切换,利用空格键选中nTH,P: 按esc键,P所在的列就是线程运行的CPU号:
- POJ2528(离散化+线段树区间更新)
Mayor's posters Time Limit:1000MS Memory Limit:65536KB 64bit IO Format:%I64d & %I64u De ...
- 彻底删除kafka下面的topic
如果只是用kafka-topics.sh的delete命令删除topic,会有两种情况: 如果当前topic没有使用过即没有传输过信息:可以彻底删除 如果当前topic有使用过即有过传输过信息:并没有 ...