Ubuntu下的MySQL安装
<1>安装mysql-server
sudo apt-get update

sudo apt-get install mysql-server mysql-client
<2>如何判断mysql是否安装成功
sudo service mysql restart
<3>让apache支持mysql
sudo apt-get install libapache2-mod-auth-mysql
16.04使用下面命令
sudo apt-get install libmysqlclient-dev
<3>登录mysql
mysql -u root -p
<4>配置文件my.cnf修改成功后就可以重启数据库(修改方法在下面),重启数据库之前需要先重新载入apparmor配置文件,使用下面命令重新载入:
sudo /etc/init.d/apparmor restart
重新启动数据库
sudo /etc/init.d/mysql start
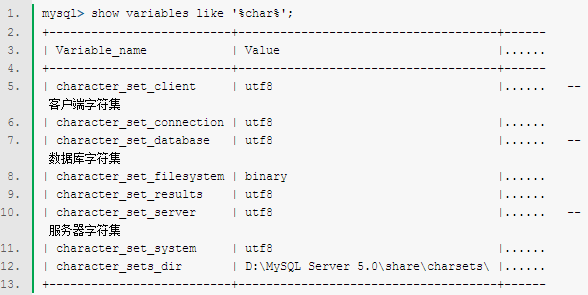
<5>查看数据库的编码
一、查看MySQL数据库服务器和数据库MySQL字符集。
SHOW VARIABLES LIKE 'character_set_%';
如果需要修改的话
set character_set_client=utf8;
二、查看MySQL数据表(table)的MySQL字符集,spring_user是数据库的名字,t_user是表名
mysql> show table status from spring_user like '%t_user%';
或者
mysql> show create table t_user;
修改方法:
alter table t_user convert to character set utf8;
三、查看MySQL数据列(column)的MySQL字符集,t_user是表名
mysql> show full columns from t_user;
<6>sudo gedit /etc/my.cnf
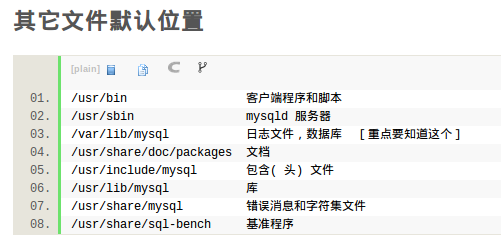
因为ubuntu下mySQL默认的数据库的路径是在/var/lib/mysql,所以要修改这个路径的话,参考
http://www.2cto.com/database/201501/373939.html
注意修改的时候/mysql要加上
修改的my.cnf文件,修改完切记一定要重启电脑才能生效!!重启电脑!!重启电脑!!
#

# The MySQL database server configuration file.

#

# You can copy this to one of:

# - "/etc/mysql/my.cnf" to set global options,

# - "~/.my.cnf" to set user-specific options.

#

# One can use all long options that the program supports.

# Run program with --help to get a list of available options and with

# --print-defaults to see which it would actually understand and use.

#

# For explanations see

# http://dev.mysql.com/doc/mysql/en/server-system-variables.html

# This will be passed to all mysql clients

# It has been reported that passwords should be enclosed with ticks/quotes

# escpecially if they contain "#" chars...

# Remember to edit /etc/mysql/debian.cnf when changing the socket location.

[client]

port		= 3306

socket		= /var/run/mysqld/mysqld.sock

default-character-set=utf8

# Here is entries for some specific programs

# The following values assume you have at least 32M ram

# This was formally known as [safe_mysqld]. Both versions are currently parsed.

[mysqld_safe]

default-character-set=utf8

character_set_server = utf8

socket		= /var/run/mysqld/mysqld.sock

nice		= 0

[mysqld]

#

# * Basic Settings

#

user		= mysql

pid-file	= /var/run/mysqld/mysqld.pid

socket		= /var/run/mysqld/mysqld.sock

character_set_server=utf8

init_connect='SET NAMES utf8'

port		= 3306

basedir		= /usr

datadir		= /home/common/software/database/mysql

tmpdir		= /tmp

lc-messages-dir	= /usr/share/mysql

skip-external-locking

#

# Instead of skip-networking the default is now to listen only on

# localhost which is more compatible and is not less secure.

bind-address		= 127.0.0.1

#

# * Fine Tuning

#

key_buffer		= 16M

max_allowed_packet	= 16M

thread_stack		= 192K

thread_cache_size       = 8

# This replaces the startup script and checks MyISAM tables if needed

# the first time they are touched

myisam-recover         = BACKUP

#max_connections        = 100

#table_cache            = 64

#thread_concurrency     = 10

#

# * Query Cache Configuration

#

query_cache_limit	= 1M

query_cache_size        = 16M

#

# * Logging and Replication

#

# Both location gets rotated by the cronjob.

# Be aware that this log type is a performance killer.

# As of 5.1 you can enable the log at runtime!

#general_log_file        = /var/log/mysql/mysql.log

#general_log             = 1

#

# Error log - should be very few entries.

#

log_error = /var/log/mysql/error.log

#

# Here you can see queries with especially long duration

#log_slow_queries	= /var/log/mysql/mysql-slow.log

#long_query_time = 2

#log-queries-not-using-indexes

#

# The following can be used as easy to replay backup logs or for replication.

# note: if you are setting up a replication slave, see README.Debian about

#       other settings you may need to change.

#server-id		= 1

#log_bin			= /var/log/mysql/mysql-bin.log

expire_logs_days	= 10

max_binlog_size         = 100M

#binlog_do_db		= include_database_name

#binlog_ignore_db	= include_database_name

#

# * InnoDB

#

# InnoDB is enabled by default with a 10MB datafile in /var/lib/mysql/.

# Read the manual for more InnoDB related options. There are many!

#

# * Security Features

#

# Read the manual, too, if you want chroot!

# chroot = /var/lib/mysql/

#

# For generating SSL certificates I recommend the OpenSSL GUI "tinyca".

#

# ssl-ca=/etc/mysql/cacert.pem

# ssl-cert=/etc/mysql/server-cert.pem

# ssl-key=/etc/mysql/server-key.pem

[mysqldump]

quick

quote-names

max_allowed_packet	= 16M

[mysql]

default-character-set=utf8

#no-auto-rehash	# faster start of mysql but no tab completition

[isamchk]

key_buffer		= 16M

#

# * IMPORTANT: Additional settings that can override those from this file!

#   The files must end with '.cnf', otherwise they'll be ignored.

#

!includedir /etc/mysql/conf.d/
Ubuntu下Eclipse部署MySQL JDBC驱动
参考http://www.linuxidc.com/Linux/2011-10/44355.htm中的上半部分
Linux下自动启动MySQL

一、查看MySQL数据库服务器和数据库MySQL字符集。
命令:
mysql> show variables like '%char%'; |

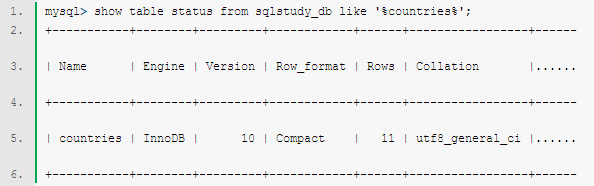
二、查看MySQL数据表(table)的MySQL字符集。
命令:
mysql> show table status from sqlstudy_db like '%countries%'; |

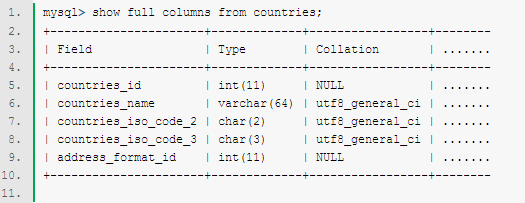
三、查看MySQL数据列(column)的MySQL字符集。
命令:
mysql> show full columns from countries; |

四、修改MySQL的密码
首先用root登录MySQL,然后执行
UPDATE user SET password=PASSWORD('123456') WHERE user='root';

FLUSH PRIVILEGES;
或者
SET PASSWORD FOR 'root'@'localhost' = PASSWORD('newpass');
如果要安装5.6版本的mysql
sudo add-apt-repository 'deb http://archive.ubuntu.com/ubuntu trusty universe'

sudo apt-get update

sudo apt install mysql-server-5.6 mysql-client-5.6
如果卸载5.7再安装的时候遇到
/var/cache/apt/archives/mysql-server-5.6_5.6.16-1~exp1_amd64.deb E: Sub-process /usr/bin/dpkg returned an error code (1)
sudo apt-get remove --purge mysql-server mysql-client mysql-common

sudo apt-get autoremove

sudo apt-get autoclean
先确保 mysql service是启动的,没启动会报找不到mysqld.sock
service mysql status

service mysql start
Ubuntu下的MySQL安装的更多相关文章
- ubuntu下root和安装mysql
sudo password创建新的root密码: 1.用当前登录用户打开终端,在终端输入命令 sudo passwd,输入当前用户的密码然后回车 2.会提示输入新密码,输入完成后回车(http://w ...
- Ubuntu下Apache的安装
Ubuntu下可快速安装LAMP server(Apache+MySQL+PHP5),参见<Ubuntu下快速安装LAMP server>一文. 也可以手动安装Apache.本文介绍如何手 ...
- ubuntu下修改mysql默认字符编码出现的Job failed to start解决办法
ubuntu下修改mysql默认字符编码出现的Job failed to start解决办法 前几天卸掉了用了好多年的Windows,安装了Ubuntu12.04,就开始各种搭环境.今天装好了MySQ ...
- Ubuntu下git的安装与使用
Ubuntu下git的安装与使用 Ubuntu下git的安装与使用与Windows下的大致相同,只不过个人感觉在Ubuntu下使用git更方便. 首先,确认你的系统是否已安装git,可以通过git指令 ...
- Ubuntu下Speedtest的安装
要安装Speedtest,需要先安装apache,参见<Ubuntu下Apache的安装>一文:*(再安装LAMP server,参见<Ubuntu下快速安装LAMP server& ...
- ubuntu下的openfire安装、配置、运行
openfire服务器 Openfire 采用Java开发,开源的实时协作(RTC)服务器基于XMPP(Jabber)协议.您可以使用它轻易的构建高效率的即时通信服务器.Op ...
- ubuntu下boost编译安装
ubuntu下boost编译安装 boost 安装 1.依赖安装 apt-get install mpi-default-dev libicu-dev python-dev python3-dev l ...
- 2010-01-20 12:09 ubuntu下minicom的安装及使用
转http://hi.baidu.com/npugtawqdnbgqrq/item/106f805409b42813db163527 ubuntu下minicom的安装及使用 安装: sudo apt ...
- ubuntu 下redis的安装简介
Linux公社:https://www.linuxidc.com/topicnews.aspx?page=2&tid=2 简单介绍下ubuntu下redis的安装方式: 第一种: 1:进入re ...
随机推荐
- 2-3 Linux文件管理命令详解
1. 复制文件 cp: copy 格式 SRCFILE DEST 一个文件到一个文件 多个文件到一个目录 注,cd 后面什么都不加,是进入用户的家目录 如果目标文件不存在,则先创建文 ...
- Linux可插拔认证模块(PAM)的配置文件、工作原理与流程
PAM的配置文件: 我们注意到,配置文件也放在了在应用接口层中,他与PAM API配合使用,从而达到了在应用中灵活插入所需鉴别模块的目的.他的作用主要是为应用选定具体的鉴别模块,模块间的组合以及规定模 ...
- SVN 提交失败: permission denied - txn-current-lock
执行以下命令即可 sudo chown -R www-data:subversion myproject sudo chmod -R g+rws myproject
- maven archetype生成自定义项目原型(模板)
maven archetype可以将一个项目做成项目原型,之后只需要以此原型来创建项目,那么初始创建的项目便具有原型项目中的一切配置和代码.通俗讲就是一个项目模板. eclipse中那些快速生成mav ...
- Python 数据类型及其用法
本文总结一下Python中用到的各种数据类型,以及如何使用可以使得我们的代码变得简洁. 基本结构 我们首先要看的是几乎任何语言都具有的数据类型,包括字符串.整型.浮点型以及布尔类型.这些基本数据类型组 ...
- noip2010提高组3题题解 by rLq
本题地址http://www.luogu.org/problem/show?pid=1525 关押罪犯 题目描述 S 城现有两座监狱,一共关押着N 名罪犯,编号分别为1~N.他们之间的关系自然也极不和 ...
- 一维码:EAN-13码的识别
1.一维码简述: 一维条码是一种能用于信息编码和信息自动识别的标准符号,是由一组宽度不同的黑白符号按一定规则交替排列编码组成的图形符号,用于表示一定的信息. 码制指条码符号的类型,不同的类型有不同的编 ...
- 深入浅出SQL笔记1–数据和表
1.数据库的概念及组成 数据库是保存表和其他相关SQL结构的容器. 数据库是由各种各样的表构成的,一个数据库里面的表总是存在相互联系的关系. 数据库内的信息组成了表,表示由行和列构成的,行是一组能够描 ...
- 转: 深入理解Linux修改hostname
from: http://www.cnblogs.com/kerrycode/p/3595724.html 写的相当详细!!! 深入理解Linux修改hostname 2014-03-12 10:17 ...
- intel和AMD CPU性能对比(2016年CPU天梯图)组装电脑必读!
http://www.365pcbuy.com/article-411.html 特别提示:此文已经于2016年10月12日更新!内容变动较大,请细细品鉴! 如何为客户推荐高性价比机型是我站的重要工作 ...