Tensorflow深度学习之十二:基础图像处理之二
Tensorflow深度学习之十二:基础图像处理之二
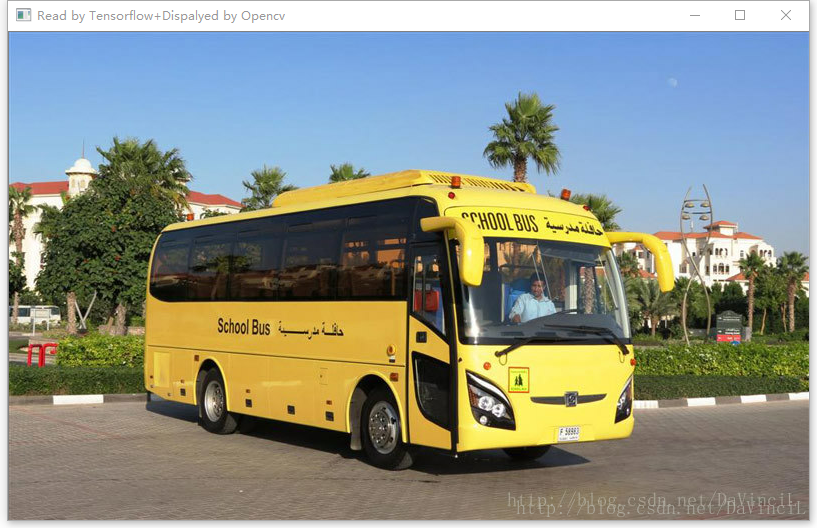
首先放出原始图像:

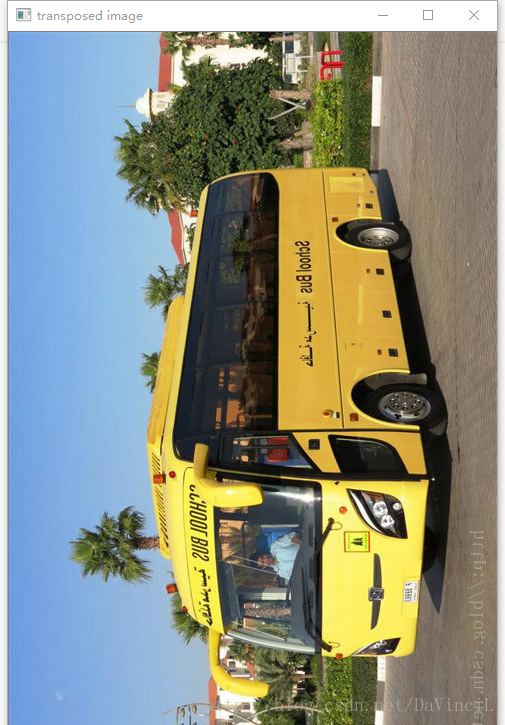
1、图像的翻转
import tensorflow as tf

import cv2

# 这里定义一个tensorflow读取的图片格式转换为opencv读取的图片格式的函数

# 请注意:

# 在tensorflow中,一个像素点的颜色顺序是R,G,B。

# 在opencv中,一个像素点的颜色顺序是B,G,R。

# 因此,我们循环遍历每一个像素点,将第0位的颜色和第2位的颜色数值换一下即可。

# 第一个参数name:将要显示的窗口名称。

# 第二个参数image:储存图片信息的一个tensor。

def cv2Show(name="", image=None):

    # 获取矩阵信息

    np = image.eval()

    # 获取行数列数

    row, col = len(np),len(np[1])

    # 两重循环遍历

    for i in range(row):

        for j in range(col):

            # 交换数值

            tmp = np[i][j][0]

            np[i][j][0] = np[i][j][2]

            np[i][j][2] = tmp

    # 显示图片

    cv2.imshow(name,np)

    pass

# tensorflow会话

with tf.Session() as sess:

    # 以二进制的方式读取图片。

    image_raw_data = tf.gfile.FastGFile("bus.jpg", "rb").read()

    # 按照jpeg的格式解码图片。

    image_data = tf.image.decode_jpeg(image_raw_data)

    # 显示原图片。

    cv2Show("Read by Tensorflow+Dispalyed by Opencv",image_data)

    # 上下翻转图像

    up_and_down = tf.image.flip_up_down(image_data)

    cv2Show("up and down",up_and_down)

    # 左右翻转图像

    left_and_right = tf.image.flip_left_right(image_data)

    cv2Show("left and right", left_and_right)

    # 沿对角线翻转图像

    transposed = tf.image.transpose_image(image_data)

    cv2Show("transposed image", transposed)

    # 以一定概率上下翻转图像

    random_up_and_down = tf.image.random_flip_up_down(image_data)

    cv2Show("random up and down", random_up_and_down)

    # 以一定概率左右翻转图像

    random_left_and_right = tf.image.random_flip_left_right(image_data)

    cv2Show("random left and right", random_left_and_right)

cv2.waitKey()- 1
- 2
- 3
- 4
- 5
- 6
- 7
- 8
- 9
- 10
- 11
- 12
- 13
- 14
- 15
- 16
- 17
- 18
- 19
- 20
- 21
- 22
- 23
- 24
- 25
- 26
- 27
- 28
- 29
- 30
- 31
- 32
- 33
- 34
- 35
- 36
- 37
- 38
- 39
- 40
- 41
- 42
- 43
- 44
- 45
- 46
- 47
- 48
- 49
- 50
- 51
- 52
- 53
- 54
- 55
- 56
- 57
- 58
- 59
- 60
程序运行结果如下:
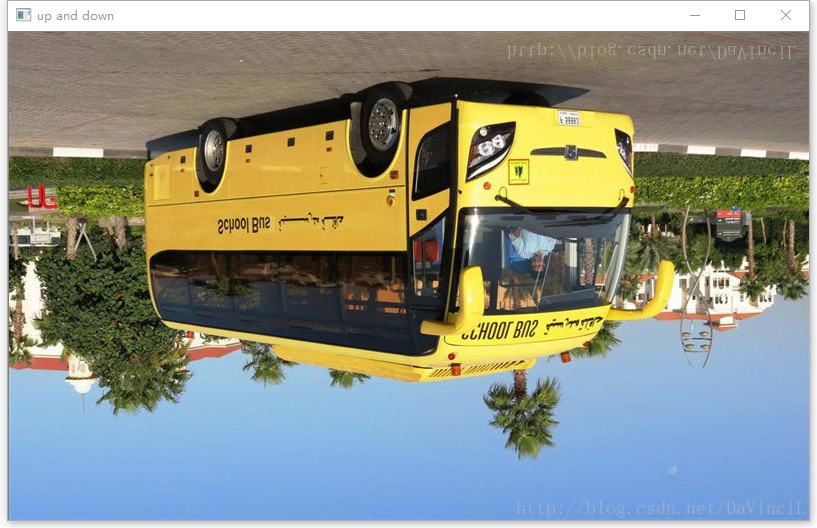

注:由于个人的显示器限制,这里只截取了部分的对角线翻转的图像。
注:可以看到这里按照一定的概率翻转,只有上下进行了翻转,而左右并没有翻转。


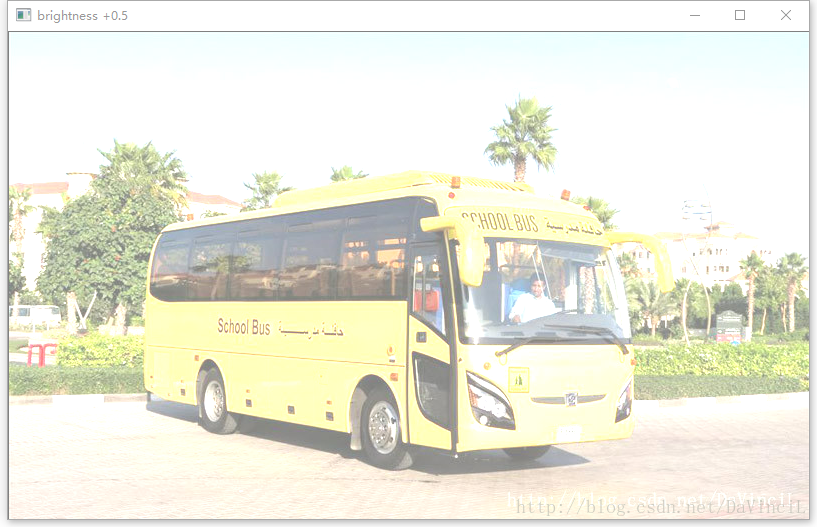
2、图像的亮度调整
import tensorflow as tf

import cv2

# 这里定义一个tensorflow读取的图片格式转换为opencv读取的图片格式的函数

# 请注意:

# 在tensorflow中,一个像素点的颜色顺序是R,G,B。

# 在opencv中,一个像素点的颜色顺序是B,G,R。

# 因此,我们循环遍历每一个像素点,将第0位的颜色和第2位的颜色数值换一下即可。

# 第一个参数name:将要显示的窗口名称。

# 第二个参数image:储存图片信息的一个tensor。

def cv2Show(name="", image=None):

    # 获取矩阵信息

    np = image.eval()

    # 获取行数列数

    row, col = len(np),len(np[1])

    # 两重循环遍历

    for i in range(row):

        for j in range(col):

            # 交换数值

            tmp = np[i][j][0]

            np[i][j][0] = np[i][j][2]

            np[i][j][2] = tmp

    # 显示图片

    cv2.imshow(name,np)

    pass

# tensorflow会话

with tf.Session() as sess:

    # 以二进制的方式读取图片。

    image_raw_data = tf.gfile.FastGFile("bus.jpg", "rb").read()

    # 按照jpeg的格式解码图片。

    image_data = tf.image.decode_jpeg(image_raw_data)

    # 显示原图片。

    cv2Show("Read by Tensorflow+Dispalyed by Opencv",image_data)

    # 将图片的亮度-0.5

    adjusted1 = tf.image.adjust_brightness(image_data, -0.5)

    cv2Show("brightness -0.5", adjusted1)

    # 将图片的亮度+0.5

    adjusted2 = tf.image.adjust_brightness(image_data, 0.5)

    cv2Show("brightness +0.5",adjusted2)

    # 随机调整图像的亮度:

    # random_brightness(image, max_delta, seed=None)

    # image:待调整的图像

    # max_delta:在[-max_delte,max_delte)的范围随机调整图像的亮度

    # seed:随机数种子

    adjusted3 = tf.image.random_brightness(image_data, 0.3)

    cv2Show("random brightness", adjusted3)

cv2.waitKey()- 1
- 2
- 3
- 4
- 5
- 6
- 7
- 8
- 9
- 10
- 11
- 12
- 13
- 14
- 15
- 16
- 17
- 18
- 19
- 20
- 21
- 22
- 23
- 24
- 25
- 26
- 27
- 28
- 29
- 30
- 31
- 32
- 33
- 34
- 35
- 36
- 37
- 38
- 39
- 40
- 41
- 42
- 43
- 44
- 45
- 46
- 47
- 48
- 49
- 50
- 51
- 52
- 53
- 54
- 55
- 56
程序运行如下:


3、调整图像的对比度
import tensorflow as tf
import cv2
# 这里定义一个tensorflow读取的图片格式转换为opencv读取的图片格式的函数
# 请注意:
# 在tensorflow中,一个像素点的颜色顺序是R,G,B。
# 在opencv中,一个像素点的颜色顺序是B,G,R。
# 因此,我们循环遍历每一个像素点,将第0位的颜色和第2位的颜色数值换一下即可。
# 第一个参数name:将要显示的窗口名称。
# 第二个参数image:储存图片信息的一个tensor。
def cv2Show(name="", image=None):
# 获取矩阵信息
np = image.eval()
# 获取行数列数
row, col = len(np),len(np[1])
# 两重循环遍历
for i in range(row):
for j in range(col):
# 交换数值
tmp = np[i][j][0]
np[i][j][0] = np[i][j][2]
np[i][j][2] = tmp
# 显示图片
cv2.imshow(name,np)
pass
# tensorflow会话
with tf.Session() as sess:
# 以二进制的方式读取图片。
image_raw_data = tf.gfile.FastGFile("bus.jpg", "rb").read()
# 按照jpeg的格式解码图片。
image_data = tf.image.decode_jpeg(image_raw_data)
# 显示原图片。
cv2Show("Read by Tensorflow+Dispalyed by Opencv",image_data)
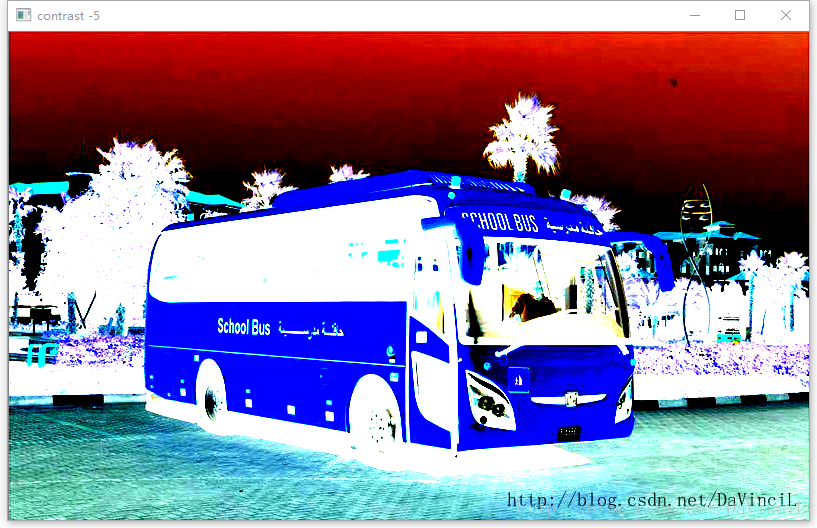
# 将图片的对比度-5
adjusted1 = tf.image.adjust_contrast(image_data, -5)
cv2Show("contrast -5", adjusted1)
# 将图片的对比度+5
adjusted2 = tf.image.adjust_contrast(image_data, 5)
cv2Show("contrast +5",adjusted2)
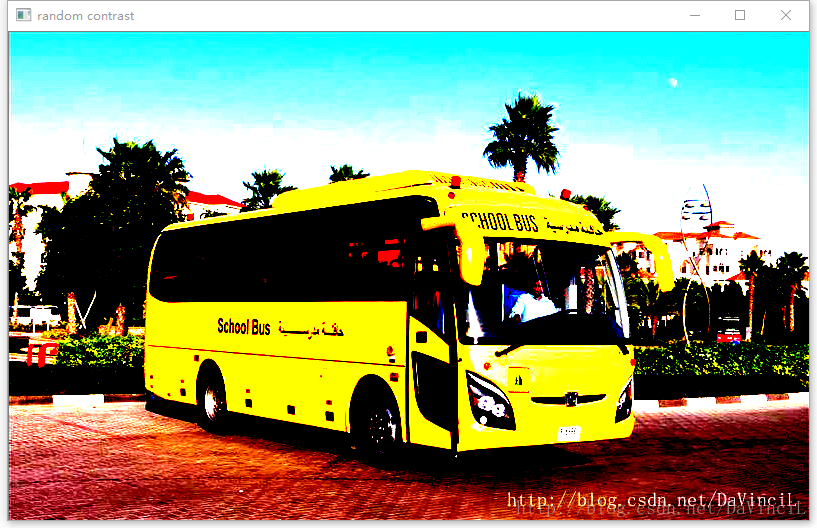
# 随机调整图像的对比度:
# random_contrast(image, lower, upper, seed=None)
# image:待调整的图像
# lower,upper:在[lower,upper]的范围随机调整图像的对比度。lower非负。
# seed:随机数种子
adjusted3 = tf.image.random_contrast(image_data, 1, 9)
cv2Show("random contrast", adjusted3)
cv2.waitKey()- 1
- 2
- 3
- 4
- 5
- 6
- 7
- 8
- 9
- 10
- 11
- 12
- 13
- 14
- 15
- 16
- 17
- 18
- 19
- 20
- 21
- 22
- 23
- 24
- 25
- 26
- 27
- 28
- 29
- 30
- 31
- 32
- 33
- 34
- 35
- 36
- 37
- 38
- 39
- 40
- 41
- 42
- 43
- 44
- 45
- 46
- 47
- 48
- 49
- 50
- 51
- 52
- 53
- 54
- 55
- 56
程序运行如下:


4、调整图像的色相
import tensorflow as tf
import cv2
# 这里定义一个tensorflow读取的图片格式转换为opencv读取的图片格式的函数
# 请注意:
# 在tensorflow中,一个像素点的颜色顺序是R,G,B。
# 在opencv中,一个像素点的颜色顺序是B,G,R。
# 因此,我们循环遍历每一个像素点,将第0位的颜色和第2位的颜色数值换一下即可。
# 第一个参数name:将要显示的窗口名称。
# 第二个参数image:储存图片信息的一个tensor。
def cv2Show(name="", image=None):
# 获取矩阵信息
np = image.eval()
# 获取行数列数
row, col = len(np),len(np[1])
# 两重循环遍历
for i in range(row):
for j in range(col):
# 交换数值
tmp = np[i][j][0]
np[i][j][0] = np[i][j][2]
np[i][j][2] = tmp
# 显示图片
cv2.imshow(name,np)
pass
# tensorflow会话
with tf.Session() as sess:
# 以二进制的方式读取图片。
image_raw_data = tf.gfile.FastGFile("bus.jpg", "rb").read()
# 按照jpeg的格式解码图片。
image_data = tf.image.decode_jpeg(image_raw_data)
# 显示原图片。
cv2Show("Read by Tensorflow+Dispalyed by Opencv",image_data)
# adjust_hue(image, delta, name=None)
# delte的范围:[-1,1]
# 将图片的色相+0.1
adjusted1 = tf.image.adjust_hue(image_data, 0.1)
cv2Show("hue +0.1", adjusted1)
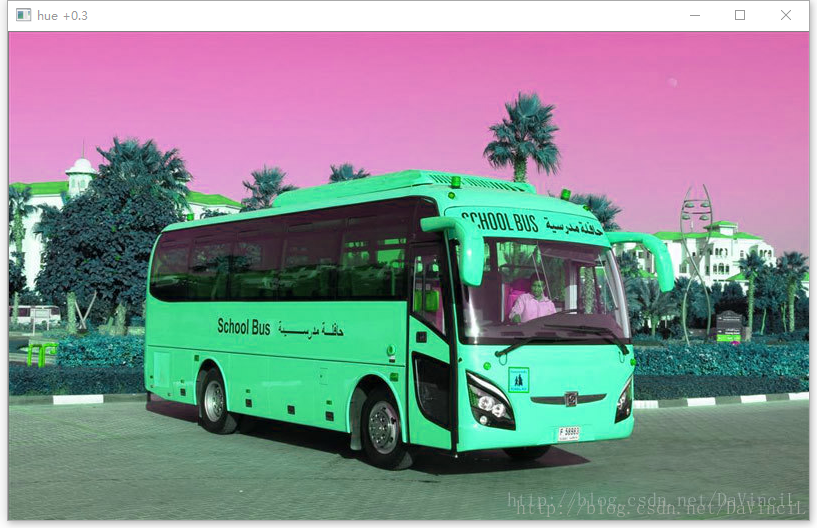
# 将图片的色相+0.3
adjusted2 = tf.image.adjust_hue(image_data, 0.3)
cv2Show("hue +0.3", adjusted2)
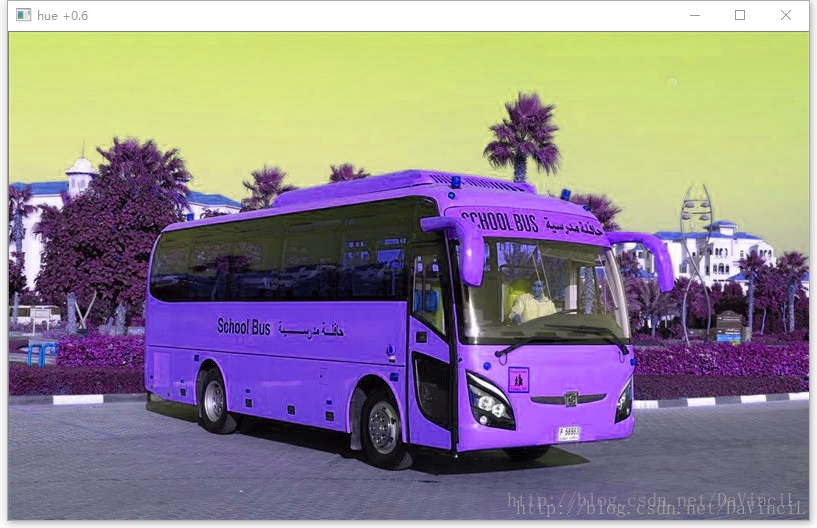
# 将图片的色相+0.6
adjusted3 = tf.image.adjust_hue(image_data, 0.6)
cv2Show("hue +0.6", adjusted3)
# 将图片的色相+0.9
adjusted4 = tf.image.adjust_hue(image_data, 0.9)
cv2Show("hue +0.9", adjusted4)
# 随机调整图像的色相:
# random_hue(image, max_delta, seed=None)
# image:待调整的图像
# max_delta:在[-max_delta,max_delta]的范围随机调整图像的色相。max_delta的范围[0,0.5]。
# seed:随机数种子
adjusted5 = tf.image.random_hue(image_data,0.4)
cv2Show("random hue", adjusted5)
cv2.waitKey()- 1
- 2
- 3
- 4
- 5
- 6
- 7
- 8
- 9
- 10
- 11
- 12
- 13
- 14
- 15
- 16
- 17
- 18
- 19
- 20
- 21
- 22
- 23
- 24
- 25
- 26
- 27
- 28
- 29
- 30
- 31
- 32
- 33
- 34
- 35
- 36
- 37
- 38
- 39
- 40
- 41
- 42
- 43
- 44
- 45
- 46
- 47
- 48
- 49
- 50
- 51
- 52
- 53
- 54
- 55
- 56
- 57
- 58
- 59
- 60
- 61
- 62
- 63
- 64
- 65
- 66
程序运行结果如下:


5、调整图像的饱和度
import tensorflow as tf

import cv2

# 这里定义一个tensorflow读取的图片格式转换为opencv读取的图片格式的函数

# 请注意:

# 在tensorflow中,一个像素点的颜色顺序是R,G,B。

# 在opencv中,一个像素点的颜色顺序是B,G,R。

# 因此,我们循环遍历每一个像素点,将第0位的颜色和第2位的颜色数值换一下即可。

# 第一个参数name:将要显示的窗口名称。

# 第二个参数image:储存图片信息的一个tensor。

def cv2Show(name="", image=None):

    # 获取矩阵信息

    np = image.eval()

    # 获取行数列数

    row, col = len(np),len(np[1])

    # 两重循环遍历

    for i in range(row):

        for j in range(col):

            # 交换数值

            tmp = np[i][j][0]

            np[i][j][0] = np[i][j][2]

            np[i][j][2] = tmp

    # 显示图片

    cv2.imshow(name,np)

    pass

# tensorflow会话

with tf.Session() as sess:

    # 以二进制的方式读取图片。

    image_raw_data = tf.gfile.FastGFile("bus.jpg", "rb").read()

    # 按照jpeg的格式解码图片。

    image_data = tf.image.decode_jpeg(image_raw_data)

    # 显示原图片。

    cv2Show("Read by Tensorflow+Dispalyed by Opencv",image_data)

    # 将图片的饱和度-5

    adjusted1 = tf.image.adjust_saturation(image_data, -5)

    cv2Show("saturation -5", adjusted1)

    # 将图片的饱和度+5

    adjusted2 = tf.image.adjust_saturation(image_data, 5)

    cv2Show("saturation +5", adjusted2)

    # 随机调整图像的饱和度:

    # random_saturation(image, lower, upper, seed=None)

    # image:待调整的图像

    # lower,upper:在[lower,upper]的范围随机调整图像的饱和度。lower非负。

    # seed:随机数种子

    adjusted3 = tf.image.random_saturation(image_data, 1, 9)

    cv2Show("random saturation", adjusted3)

cv2.waitKey()- 1
- 2
- 3
- 4
- 5
- 6
- 7
- 8
- 9
- 10
- 11
- 12
- 13
- 14
- 15
- 16
- 17
- 18
- 19
- 20
- 21
- 22
- 23
- 24
- 25
- 26
- 27
- 28
- 29
- 30
- 31
- 32
- 33
- 34
- 35
- 36
- 37
- 38
- 39
- 40
- 41
- 42
- 43
- 44
- 45
- 46
- 47
- 48
- 49
- 50
- 51
- 52
- 53
- 54
- 55
- 56
程序运行结果如下:


6、图像的标准化
import tensorflow as tf

import cv2

# 这里定义一个tensorflow读取的图片格式转换为opencv读取的图片格式的函数

# 请注意:

# 在tensorflow中,一个像素点的颜色顺序是R,G,B。

# 在opencv中,一个像素点的颜色顺序是B,G,R。

# 因此,我们循环遍历每一个像素点,将第0位的颜色和第2位的颜色数值换一下即可。

# 第一个参数name:将要显示的窗口名称。

# 第二个参数image:储存图片信息的一个tensor。

def cv2Show(name="", image=None):

    # 获取矩阵信息

    np = image.eval()

    # 获取行数列数

    row, col = len(np),len(np[1])

    # 两重循环遍历

    for i in range(row):

        for j in range(col):

            # 交换数值

            tmp = np[i][j][0]

            np[i][j][0] = np[i][j][2]

            np[i][j][2] = tmp

    # 显示图片

    cv2.imshow(name,np)

    pass

# tensorflow会话

with tf.Session() as sess:

    # 以二进制的方式读取图片。

    image_raw_data = tf.gfile.FastGFile("bus.jpg", "rb").read()

    # 按照jpeg的格式解码图片。

    image_data = tf.image.decode_jpeg(image_raw_data)

    # 显示原图片。

    cv2Show("Read by Tensorflow+Dispalyed by Opencv",image_data)

    # 将代表一张图像的三维矩阵中的数字均值变成0,方差变为1。

    adjusted = tf.image.per_image_standardization(image_data)

    cv2Show("image_standardization", adjusted)

cv2.waitKey()- 1
- 2
- 3
- 4
- 5
- 6
- 7
- 8
- 9
- 10
- 11
- 12
- 13
- 14
- 15
- 16
- 17
- 18
- 19
- 20
- 21
- 22
- 23
- 24
- 25
- 26
- 27
- 28
- 29
- 30
- 31
- 32
- 33
- 34
- 35
- 36
- 37
- 38
- 39
- 40
- 41
- 42
- 43
- 44
程序运行结果如下:


Tensorflow深度学习之十二:基础图像处理之二的更多相关文章
- TensorFlow深度学习基础与应用实战高清视频教程
TensorFlow深度学习基础与应用实战高清视频教程,适合Python C++ C#视觉应用开发者,基于TensorFlow深度学习框架,讲解TensorFlow基础.图像分类.目标检测训练与测试以 ...
- 没有博士学位,照样玩转TensorFlow深度学习
教程 | 没有博士学位,照样玩转TensorFlow深度学习 机器之心2017-01-24 12:32:22 程序设计 谷歌 操作系统 阅读(362)评论(0) 选自Codelabs 机器之心编译 参 ...
- TensorFlow 深度学习中文第二版·翻译完成
原文:Deep Learning with TensorFlow Second Edition 协议:CC BY-NC-SA 4.0 不要担心自己的形象,只关心如何实现目标.--<原则>, ...
- (转) TensorFlow深度学习,一篇文章就够了
TensorFlow深度学习,一篇文章就够了 2016/09/22 · IT技术 · TensorFlow, 深度学习 分享到:6 原文出处: 我爱计算机 (@tobe迪豪 ) 作者: 陈迪 ...
- (转)深度学习word2vec笔记之基础篇
深度学习word2vec笔记之基础篇 声明: 1)该博文是多位博主以及多位文档资料的主人所无私奉献的论文资料整理的.具体引用的资料请看参考文献.具体的版本声明也参考原文献 2)本文仅供学术交流,非商用 ...
- 深度学习word2vec笔记之基础篇
作者为falao_beiliu. 作者:杨超链接:http://www.zhihu.com/question/21661274/answer/19331979来源:知乎著作权归作者所有.商业转载请联系 ...
- TensorFlow深度学习,一篇文章就够了
http://blog.jobbole.com/105602/ 作者: 陈迪豪,就职小米科技,深度学习工程师,TensorFlow代码提交者. TensorFlow深度学习框架 Google不仅是大数 ...
- 问题集录--TensorFlow深度学习
TensorFlow深度学习框架 Google不仅是大数据和云计算的领导者,在机器学习和深度学习上也有很好的实践和积累,在2015年年底开源了内部使用的深度学习框架TensorFlow. 与Caffe ...
- 学习参考《TensorFlow深度学习》高清中文版PDF+英文版PDF+源代码
我们知道,TensorFlow是比较流行的深度学习框架,除了看手册文档外,推荐大家看看<Tensorflow深度学习>,共分5方面内容:基础知识.关键模块.算法模型.内核揭秘.生态发展.前 ...
随机推荐
- mysql事务四种隔离级别
事务的基本要素:原子性,一致性,隔离性,持久性. 事务并发问题:脏读,不可重复读,幻读. mysql隔离级别:read-uncommitted,read-committed,repeatable-re ...
- Android中Drawable知识总结
本文是学习<Android开发艺术探索>中Drawable章节之后的一个总结. 一.常见的Drawable种类介绍 Drawable类 xml标签 描述 BitmapDrawable 表示 ...
- Objc的底层并发API(转)
本文由webfrogs译自objc.io,原文作者Daniel Eggert. 小引 本篇英文原文所发布的站点objc.io是一个专门为iOS和OS X开发者提供的深入讨论技术的平台,文章含金量很 ...
- DevExpress右键菜单使用 z
添加BarManager和popupMenu组建: 设置popupMenu组件的Manager属性: 右键点击popupMenu主键,点击Customize选项添加菜单: 然后便可添加到鼠标事件 ...
- sshpass结合ssh和scp可以自动完成密码登录,无需手动输入密码
使用方法: 1.sshpass -p 123456 ssh admin@1.1.1.1 "touch file" 远程创建文件file 2.sshpass -p 123456 s ...
- 纯CSS3美化radio和checkbox
如题,主要通过CSS3来实现将radio和checkbox美化的效果.可是兼容性并非非常好,PC端仅仅支持chrome浏览器(IE和Firefox測试不行,其它没有很多其它測试).然后微信端和QQ端訪 ...
- [剑指Offer]2.变态跳台阶
题目 一仅仅青蛙一次能够跳上1级台阶,也能够跳上2级--它也能够跳上n级. 求该青蛙跳上一个n级的台阶总共同拥有多少种跳法. 思路 用Fib(n)表示青蛙跳上n阶台阶的跳法数,设定Fib(0) = 1 ...
- sql语句 MySQL
1.操作数据库 (1)创建数据库 CREATE DATABASE [IF NOT EXISTS] db_name [create_specification [, create_specifica ...
- sh_Spring整合Hibernate
分别介绍了Sping和Hibernate,以下是将它们整合到一块去了. 一.Hibernate内容 1.创建PO类. package cn.tgb.domain; //User实体 public ...
- 宜信开源|分布式任务调度平台SIA-TASK的架构设计与运行流程
一.分布式任务调度的背景 无论是互联网应用或者企业级应用,都充斥着大量的批处理任务.我们常常需要一些任务调度系统来帮助解决问题.随着微服务化架构的逐步演进,单体架构逐渐演变为分布式.微服务架构.在此背 ...